DVP5 User Guide (English)
Page 20
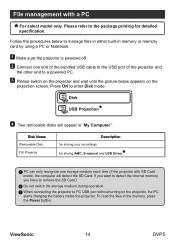
... the projector, the PC starts charging the battery inside , the computer will appear in "My Computer". for storing AMC, E-manual and USB Driver PC can only recognize one end of the bundled USB cable to the USB port of the projector and the other end to manage files... 1 Make sure the projector is powered off. 2 Connect one storage medium each time (If the projector with a PC For select model only. ViewSonic 14 DVP5 Disk USB Projection 4 Two removable disks will detect the SD Card. Disk Name Removable Disk DV Projector Description for detailed specification. If you want to...
... the projector, the PC starts charging the battery inside , the computer will appear in "My Computer". for storing AMC, E-manual and USB Driver PC can only recognize one end of the bundled USB cable to the USB port of the projector and the other end to manage files... 1 Make sure the projector is powered off. 2 Connect one storage medium each time (If the projector with a PC For select model only. ViewSonic 14 DVP5 Disk USB Projection 4 Two removable disks will detect the SD Card. Disk Name Removable Disk DV Projector Description for detailed specification. If you want to...

DVP5 User Guide (English)
Page 25
Installing Driver 1 Make sure the projector is powered off. 2 Connect one end of the bundled USB cable to the USB port of the projector and the other end to continue. ViewSonic 19 DVP5 Disk USB Projection 4 Two removable disks will appear in "My Computer". Please double-click the disk named DV Projector -> USB driver folder -> Setup.exe program. 5 Click Next to a powered PC. 3 Please switch on the projector and wait until the picture below appears on the projection screen. Press OK to enter Disk mode.
Installing Driver 1 Make sure the projector is powered off. 2 Connect one end of the bundled USB cable to the USB port of the projector and the other end to continue. ViewSonic 19 DVP5 Disk USB Projection 4 Two removable disks will appear in "My Computer". Please double-click the disk named DV Projector -> USB driver folder -> Setup.exe program. 5 Click Next to a powered PC. 3 Please switch on the projector and wait until the picture below appears on the projection screen. Press OK to enter Disk mode.
DVP5 User Guide (English)
Page 26
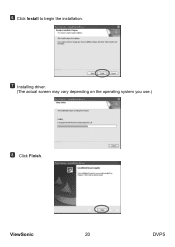
ViewSonic 20 DVP5 6 Click Install to begin the installation. 7 Installing driver. (The actual screen may vary depending on the operating system you use.) 8 Click Finish.
ViewSonic 20 DVP5 6 Click Install to begin the installation. 7 Installing driver. (The actual screen may vary depending on the operating system you use.) 8 Click Finish.
DVP5 User Guide (English)
Page 28
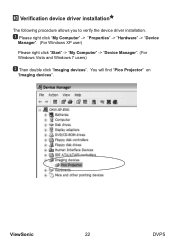
ViewSonic 22 DVP5 You will find "Pico Projector" on "Imaging devices". Verification device driver installation The following procedure allows you to verify the device driver installation. 1 Please right click "My Computer" -> "Properties" -> "Hardware" -> "Device Manager". (For Windows XP user) Please right click "Start" -> "My Computer" -> "Device Manager". (For Windows Vista and Windows 7 users) 2 Then double click "Imaging devices".
ViewSonic 22 DVP5 You will find "Pico Projector" on "Imaging devices". Verification device driver installation The following procedure allows you to verify the device driver installation. 1 Please right click "My Computer" -> "Properties" -> "Hardware" -> "Device Manager". (For Windows XP user) Please right click "Start" -> "My Computer" -> "Device Manager". (For Windows Vista and Windows 7 users) 2 Then double click "Imaging devices".

