Datasheet
Page 1
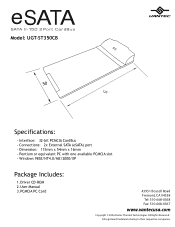
eSATA S ATA I I - 15 0 2 P o r t C a r d B u s Model: UGT-ST350CB 50 120 Specifications: - Connections: 2x External SATA (eSATA) port - Interface: 32-bit PCMCIA CardBus - All registered trademarks belog to their respective companies. Dimension: 115mm x 54mm x 16mm - Windows 98SE/NT4.0/ME/2000/XP Package Includes: 1.Driver CD-ROM 2.User Manual 3.PCMCIA PC Card 43951 Boscell Road Fremont, CA 94538 Tel: 510-668-0368 Fax: 510-668-0367 www.vantecusa.com Copyright...
eSATA S ATA I I - 15 0 2 P o r t C a r d B u s Model: UGT-ST350CB 50 120 Specifications: - Connections: 2x External SATA (eSATA) port - Interface: 32-bit PCMCIA CardBus - All registered trademarks belog to their respective companies. Dimension: 115mm x 54mm x 16mm - Windows 98SE/NT4.0/ME/2000/XP Package Includes: 1.Driver CD-ROM 2.User Manual 3.PCMCIA PC Card 43951 Boscell Road Fremont, CA 94538 Tel: 510-668-0368 Fax: 510-668-0367 www.vantecusa.com Copyright...
Flyer
Page 1
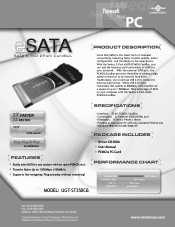
... Driver CD-ROM User Manual PCMCIA PC Card PERFORMANCE CHART SERIAL ATA FIREWIRE 800 USB 2.0 FIREWIRE 1500 Mbps 800 Mbps 480 Mbps 400 Mbps Take advantage of SATA on your notebook. SPECIFICATIONS 3X FASTER USB 2.0 Firewire 2X FASTER Firewire 800 Easily HOT-SWAP SATA devices Easy Plug N' Play Installation FEATURES Easily add eSATA to 1500Mbps (150MB/s). MODEL: UGT-ST350CB - Traditionally, one available PCMCIA slot - eSATA...
... Driver CD-ROM User Manual PCMCIA PC Card PERFORMANCE CHART SERIAL ATA FIREWIRE 800 USB 2.0 FIREWIRE 1500 Mbps 800 Mbps 480 Mbps 400 Mbps Take advantage of SATA on your notebook. SPECIFICATIONS 3X FASTER USB 2.0 Firewire 2X FASTER Firewire 800 Easily HOT-SWAP SATA devices Easy Plug N' Play Installation FEATURES Easily add eSATA to 1500Mbps (150MB/s). MODEL: UGT-ST350CB - Traditionally, one available PCMCIA slot - eSATA...
User Guide
Page 2
Package Contents: SATA/eSATA PCI Host Controller (UGT-ST300): • Driver CD-ROM • User Manual • PCI Card SATA/eSATA PCI-Express Host Controller (UGT-ST400): • Driver CD-ROM • User Manual • PCI-Express Card 2-Port eSATA PCMCIA CardBus (UGT-ST350CB): • Driver CD-ROM • User Manual • PCMCIA PC Card TRADEMARKS MS-DOS, Microsoft, Windows 95/98/NT/2000/ME/XP are the property of Microsoft Corporation. Apple, Macintosh and Mac are trademarks of Apple Computer. *All other third-party brands and names are trademarks of their respective owners.
Package Contents: SATA/eSATA PCI Host Controller (UGT-ST300): • Driver CD-ROM • User Manual • PCI Card SATA/eSATA PCI-Express Host Controller (UGT-ST400): • Driver CD-ROM • User Manual • PCI-Express Card 2-Port eSATA PCMCIA CardBus (UGT-ST350CB): • Driver CD-ROM • User Manual • PCMCIA PC Card TRADEMARKS MS-DOS, Microsoft, Windows 95/98/NT/2000/ME/XP are the property of Microsoft Corporation. Apple, Macintosh and Mac are trademarks of Apple Computer. *All other third-party brands and names are trademarks of their respective owners.
User Guide
Page 3
Introduction ...pg. 2 2. Specifications/Features pg. 3 3. Hardware Installation pg. 6 5.2. Installation SATA/eSATA PCI & PCI-E Host Controller (UGT-ST300/400) 5.1. Driver Installation pg. 10 SATA/eSATA PCI Host Controller / 2-Port eSATA PCMCIA CardBus 5.5. Contact ...pg. 13 Table of Contents: 1. Parts Layout ...pg. 5 5. System Requirements pg. 4 4. Warranty ...pg. 13 7. Driver Installation pg. 7 2-Port eSATA PCMCIA CardBus (UGT-ST350CB) 5.3. Hardware Installation pg. 9 5.4. Table of Contents 1 Connecting Drives pg. 12 6.
Introduction ...pg. 2 2. Specifications/Features pg. 3 3. Hardware Installation pg. 6 5.2. Installation SATA/eSATA PCI & PCI-E Host Controller (UGT-ST300/400) 5.1. Driver Installation pg. 10 SATA/eSATA PCI Host Controller / 2-Port eSATA PCMCIA CardBus 5.5. Contact ...pg. 13 Table of Contents: 1. Parts Layout ...pg. 5 5. System Requirements pg. 4 4. Warranty ...pg. 13 7. Driver Installation pg. 7 2-Port eSATA PCMCIA CardBus (UGT-ST350CB) 5.3. Hardware Installation pg. 9 5.4. Table of Contents 1 Connecting Drives pg. 12 6.
User Guide
Page 4
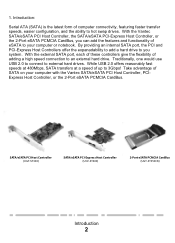
... functionality of adding a high speed connection to hot swap drives. SATA/eSATA PCI Host Controller (UGT-ST300) SATA/eSATA PCI-Express Host Controller (UGT-ST400) 2-Port eSATA PCMCIA CardBus (UGT-ST350CB) Introduction 2 With the external SATA port, each of these controllers give the flexibility of eSATA to external hard drives. Traditionally, one would use USB 2.0 to connect to your computer with the Vantec SATA/eSATA PCI Host Controller, PCIExpress Host Controller, or the 2-Port eSATA PCMCIA CardBus.
... functionality of adding a high speed connection to hot swap drives. SATA/eSATA PCI Host Controller (UGT-ST300) SATA/eSATA PCI-Express Host Controller (UGT-ST400) 2-Port eSATA PCMCIA CardBus (UGT-ST350CB) Introduction 2 With the external SATA port, each of these controllers give the flexibility of eSATA to external hard drives. Traditionally, one would use USB 2.0 to connect to your computer with the Vantec SATA/eSATA PCI Host Controller, PCIExpress Host Controller, or the 2-Port eSATA PCMCIA CardBus.
User Guide
Page 5
... mounting plate) Features: • Easily add SATA/eSATA to any system with an open PCI-Express slot. • Transfer Rates Up to 3000Mbps (300MB/s). • Supports Native Command Queueing (NCQ) • Supports Hot-swapping: Plug and play without rebooting! • LED drive activity header for each port. 2-Port eSATA PCMCIA CardBus (UGT-CB350): Specifications: • Interface: 32-bit PCMCIA CardBus • Connections: 2x External...
... mounting plate) Features: • Easily add SATA/eSATA to any system with an open PCI-Express slot. • Transfer Rates Up to 3000Mbps (300MB/s). • Supports Native Command Queueing (NCQ) • Supports Hot-swapping: Plug and play without rebooting! • LED drive activity header for each port. 2-Port eSATA PCMCIA CardBus (UGT-CB350): Specifications: • Interface: 32-bit PCMCIA CardBus • Connections: 2x External...
User Guide
Page 8
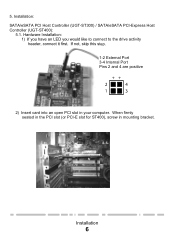
If not, skip this step. 1-2 External Port 3-4 Internal Port Pins 2 and 4 are positive 2) Insert card into an open PCI slot in mounting bracket. Installation 6 Installation: SATA/eSATA PCI Host Controller (UGT-ST300) / SATA/eSATA PCI-Express Host Controller (UGT-ST400): 5.1. 5. When firmly seated in the PCI slot (or PCI-E slot for ST400), screw in your computer. Hardware Installation: 1) If you have an LED you would like to connect to the drive activity header, connect it first.
If not, skip this step. 1-2 External Port 3-4 Internal Port Pins 2 and 4 are positive 2) Insert card into an open PCI slot in mounting bracket. Installation 6 Installation: SATA/eSATA PCI Host Controller (UGT-ST300) / SATA/eSATA PCI-Express Host Controller (UGT-ST400): 5.1. 5. When firmly seated in the PCI slot (or PCI-E slot for ST400), screw in your computer. Hardware Installation: 1) If you have an LED you would like to connect to the drive activity header, connect it first.
User Guide
Page 9
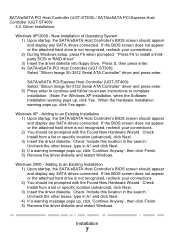
... Wizard. Check Install from a list or specific location (advanced), click Next. 3) Insert the driver diskette. SATA/eSATA PCI Host Controller (UGT-ST300) / SATA/eSATA PCI-Express Host Controller (UGT-ST400): 5.2. When the Hardware Installation warning pops up , click Yes. New Installation of Operating System 1) Upon startup, the SATA/eSATA Host Controller's BIOS screen should appear and display any SATA drives connected. Driver Installation: Windows XP/2000 - SATA/eSATA PCI-Express Host Controller (UGT-ST400): Select...
... Wizard. Check Install from a list or specific location (advanced), click Next. 3) Insert the driver diskette. SATA/eSATA PCI Host Controller (UGT-ST300) / SATA/eSATA PCI-Express Host Controller (UGT-ST400): 5.2. When the Hardware Installation warning pops up , click Yes. New Installation of Operating System 1) Upon startup, the SATA/eSATA Host Controller's BIOS screen should appear and display any SATA drives connected. Driver Installation: Windows XP/2000 - SATA/eSATA PCI-Express Host Controller (UGT-ST400): Select...
User Guide
Page 10
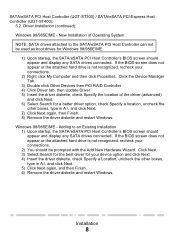
... Driver tab, then Update Driver. 5) Insert the driver diskette, check Specify the location of Operating System NOTE: SATA drives attached to an Existing installation 1) Upon startup, the SATA/eSATA PCI Host Controller's BIOS screen should appear and display any SATA drives connected. Windows 98/98SE/ME - SATA/eSATA PCI Host Controller (UGT-ST300) / SATA/eSATA PCI-Express Host Controller (UGT-ST400): 5.2. Driver Installation (continued): Windows 98/98SE/ME - Click Next. 3) Select Search...
... Driver tab, then Update Driver. 5) Insert the driver diskette, check Specify the location of Operating System NOTE: SATA drives attached to an Existing installation 1) Upon startup, the SATA/eSATA PCI Host Controller's BIOS screen should appear and display any SATA drives connected. Windows 98/98SE/ME - SATA/eSATA PCI Host Controller (UGT-ST300) / SATA/eSATA PCI-Express Host Controller (UGT-ST400): 5.2. Driver Installation (continued): Windows 98/98SE/ME - Click Next. 3) Select Search...
User Guide
Page 12
... Manager should be prompted with the Found New Hardware Wizard. Select the driver tab and click Update Driver. 2) Select Install for the best driver in these locations, check Search removable media (floppy, CD-ROM...), click Next. 6) If a warning message pops up , click 'Continue Anyway', then click Finish. 6) If you are prompted to reboot the system, click Yes. 2-Port eSATA PCMCIA CardBus (UGT-ST350CB): 5.4.
... Manager should be prompted with the Found New Hardware Wizard. Select the driver tab and click Update Driver. 2) Select Install for the best driver in these locations, check Search removable media (floppy, CD-ROM...), click Next. 6) If a warning message pops up , click 'Continue Anyway', then click Finish. 6) If you are prompted to reboot the system, click Yes. 2-Port eSATA PCMCIA CardBus (UGT-ST350CB): 5.4.
User Guide
Page 13
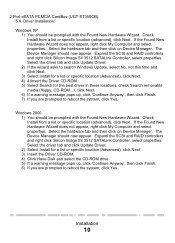
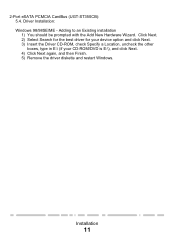
Click Next. 2) Select Search for the best driver for your device option and click Next. 3) Insert the Driver CD-ROM, check Specify a Location, uncheck the other boxes, type in E:\ (if your CD-ROM/DVD is E:\), and click Next. 4) Click Next again, and then Finish. 5) Remove the driver diskette and restart Windows. Adding to an Existing installation 1) You should be prompted with the Add New Hardware Wizard. Installation 11 Driver Installation: Windows 98/98SE/ME - 2-Port eSATA PCMCIA CardBus (UGT-ST350CB): 5.4.
Click Next. 2) Select Search for the best driver for your device option and click Next. 3) Insert the Driver CD-ROM, check Specify a Location, uncheck the other boxes, type in E:\ (if your CD-ROM/DVD is E:\), and click Next. 4) Click Next again, and then Finish. 5) Remove the driver diskette and restart Windows. Adding to an Existing installation 1) You should be prompted with the Add New Hardware Wizard. Installation 11 Driver Installation: Windows 98/98SE/ME - 2-Port eSATA PCMCIA CardBus (UGT-ST350CB): 5.4.
User Guide
Page 14
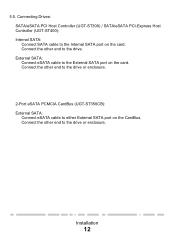
External SATA: Connect eSATA cable to the drive or enclosure. 5.5. Connect the other end to the drive. Connect the other end to the drive or enclosure. 2-Port eSATA PCMCIA CardBus (UGT-ST350CB): External SATA: Connect eSATA cable to the Internal SATA port on the card. Connect the other end to the External SATA port on the CardBus. Connecting Drives: SATA/eSATA PCI Host Controller (UGT-ST300) / SATA/eSATA PCI-Express Host Controller (UGT-ST400): Internal SATA: Connect SATA cable to either External SATA port on the card. Installation 12
External SATA: Connect eSATA cable to the drive or enclosure. 5.5. Connect the other end to the drive. Connect the other end to the drive or enclosure. 2-Port eSATA PCMCIA CardBus (UGT-ST350CB): External SATA: Connect eSATA cable to the Internal SATA port on the card. Connect the other end to the External SATA port on the CardBus. Connecting Drives: SATA/eSATA PCI Host Controller (UGT-ST300) / SATA/eSATA PCI-Express Host Controller (UGT-ST400): Internal SATA: Connect SATA cable to either External SATA port on the card. Installation 12
User Guide
Page 15
... received all parts. Contact: Vantec Thermal Technologies 43951 Boscell Rd. 9. If your unit should become defective within that time frame, please go to http://www.vantecusa.com for any parts are missing or if there are not covered under this warranty. Also, check for information on how to make sure you purchased the unit immediately and ask for a replacement...
... received all parts. Contact: Vantec Thermal Technologies 43951 Boscell Rd. 9. If your unit should become defective within that time frame, please go to http://www.vantecusa.com for any parts are missing or if there are not covered under this warranty. Also, check for information on how to make sure you purchased the unit immediately and ask for a replacement...
