Datasheet
Page 1
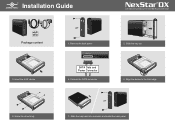
Remove the back panel SATA Port SATA Data and Power Connector 4. Installation Guide Package content 3. Slide the tray out 5. Slide the tray back into enclosure and install the back panel Insert the 5.25" device 1. Connect the SATA connector 2. Screw the drive firmly 7. Align the device to the front edge 6.
Remove the back panel SATA Port SATA Data and Power Connector 4. Installation Guide Package content 3. Slide the tray out 5. Slide the tray back into enclosure and install the back panel Insert the 5.25" device 1. Connect the SATA connector 2. Screw the drive firmly 7. Align the device to the front edge 6.

Datasheet
Page 2
Connect USB cable 10. Ready to change without written permission is subject to use Information in this document is strictly forbidden. The computer will ....i0caElxDterirvneaEl Innctelorsfaucree 12. Printed in any manner whatsoever without notice. All Right Reserved. Reproduction of these materials in China Printed on the power 11. Model: NST-536S3-BK Copyright © 2016 Vantec Thermal Technologies. All Registered Trademarks Belong To Their Respective Companies. 8 Power Cable 9 USB 3.0 Cable 10 PowerSwitch 8. Connect power cable 9. Turn on Recycled Paper.
Connect USB cable 10. Ready to change without written permission is subject to use Information in this document is strictly forbidden. The computer will ....i0caElxDterirvneaEl Innctelorsfaucree 12. Printed in any manner whatsoever without notice. All Right Reserved. Reproduction of these materials in China Printed on the power 11. Model: NST-536S3-BK Copyright © 2016 Vantec Thermal Technologies. All Registered Trademarks Belong To Their Respective Companies. 8 Power Cable 9 USB 3.0 Cable 10 PowerSwitch 8. Connect power cable 9. Turn on Recycled Paper.
