English Owners Manual
Page 4
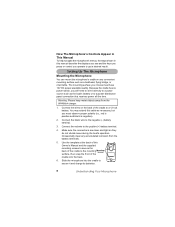
... 7 About This Manual 7 How The Microphone's Controls Appear in This Manual 8 Setting Up the Microphone 8 Mounting the Microphone 8 Installing the Battery 9 Charging the Batteries 10 A Look at the Microphone 11 A Look at the Display 13 Basic Operation 14 Turning the Microphone On and Off 14 Setting the Base.../Microphone ID 14 Adjusting the Volume and Squelch 14 Checking the Battery Level 14 Using Triple Watch 15 Tuning Weather Channels 15 Using Weather Alert Mode 15 Using Channel Step 15 Using Channel Scan ...
... 7 About This Manual 7 How The Microphone's Controls Appear in This Manual 8 Setting Up the Microphone 8 Mounting the Microphone 8 Installing the Battery 9 Charging the Batteries 10 A Look at the Microphone 11 A Look at the Display 13 Basic Operation 14 Turning the Microphone On and Off 14 Setting the Base.../Microphone ID 14 Adjusting the Volume and Squelch 14 Checking the Battery Level 14 Using Triple Watch 15 Tuning Weather Channels 15 Using Weather Alert Mode 15 Using Channel Step 15 Using Channel Scan ...
English Owners Manual
Page 6
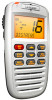
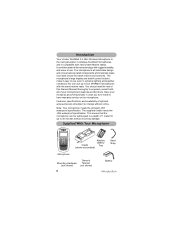
... to a depth of 1 meter for harsh marine environments. This means that the microphone can use . Introduction Introduction Your Uniden WHAMx4 2.4 GHz Wireless Microphone is the next generation in wireless handheld microphones, and is compatible with rugged durability and ease of use ...have warranty service on the microphone. Features, specifications, and availability of -the-art technology with new Uniden Marine radios. Supplied With Your Microphone Alkaline Battery Cradle Tray (shown assembled) Hand Strap Microphone Owner's Mounting Hardware Manual (not shown) (not shown...
... to a depth of 1 meter for harsh marine environments. This means that the microphone can use . Introduction Introduction Your Uniden WHAMx4 2.4 GHz Wireless Microphone is the next generation in wireless handheld microphones, and is compatible with rugged durability and ease of use ...have warranty service on the microphone. Features, specifications, and availability of -the-art technology with new Uniden Marine radios. Supplied With Your Microphone Alkaline Battery Cradle Tray (shown assembled) Hand Strap Microphone Owner's Mounting Hardware Manual (not shown) (not shown...
English Owners Manual
Page 7
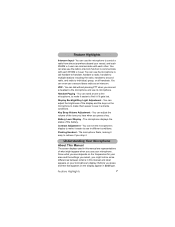
.... You can send a tone to the microphone, to make it easier to find it if it . Contrast Adjustment - Feature Highlights 7 Battery Level Display - You can adjust the brightness of the battery. Floating Handset - You can set the microphone's display to make them easier to see in different conditions. The microphone displays the...
.... You can send a tone to the microphone, to make it easier to find it if it . Contrast Adjustment - Feature Highlights 7 Battery Level Display - You can adjust the brightness of the battery. Floating Handset - You can set the microphone's display to make them easier to see in different conditions. The microphone displays the...
English Owners Manual
Page 8
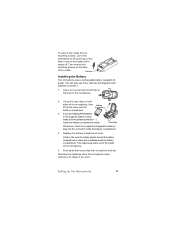
...battery terminals. 5. Slide the microphone into the cradle to a power distribution panel connection that receives power all the time. Because the cradle has no power switch, you will need to wire it directly to a power source such as the boat's battery... or to secure it and charge its batteries. 8 Understanding Your Microphone Connect the black wire to the positive (+) battery ...nearby. Connect the red wire to the negative (-) battery terminal. 3. The mounting surface you choose must observe...battery. Connect the wires on any accumulated corrosion from the...
...battery terminals. 5. Slide the microphone into the cradle to a power distribution panel connection that receives power all the time. Because the cradle has no power switch, you will need to wire it directly to a power source such as the boat's battery... or to secure it and charge its batteries. 8 Understanding Your Microphone Connect the black wire to the positive (+) battery ...nearby. Connect the red wire to the negative (-) battery terminal. 3. The mounting surface you choose must observe...battery. Connect the wires on any accumulated corrosion from the...
English Owners Manual
Page 9
... lift up the case clips on the cradle until it . 1. Setting Up the Microphone 9 Push down both sides of the microphone. 2. Lift Here Installing the Battery Your microphone uses a rechargeable battery (supplied) for power. Recharge the batteries when the microphone stops working or its range is clean and completely seals the...
... lift up the case clips on the cradle until it . 1. Setting Up the Microphone 9 Push down both sides of the microphone. 2. Lift Here Installing the Battery Your microphone uses a rechargeable battery (supplied) for power. Recharge the batteries when the microphone stops working or its range is clean and completely seals the...
English Owners Manual
Page 10
...for 14 hours to bring them to a full charge. Your microphone has been designed to be essentially impervious to fully recharge. Discharged batteries take measures to install a noise suppression kit. However, in some installations it may be necessary to take about 14 hours to ignition... noise and alternator noise. Before you use rechargeable batteries, you must charge them for more information. 10 Setting Up the Microphone WARNING! Engine Noise Suppression Interference from the noise generated by...
...for 14 hours to bring them to a full charge. Your microphone has been designed to be essentially impervious to fully recharge. Discharged batteries take measures to install a noise suppression kit. However, in some installations it may be necessary to take about 14 hours to ignition... noise and alternator noise. Before you use rechargeable batteries, you must charge them for more information. 10 Setting Up the Microphone WARNING! Engine Noise Suppression Interference from the noise generated by...
English Owners Manual
Page 12
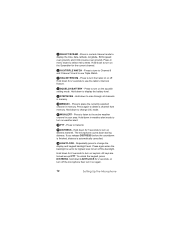
... to turn on or off. Press to turn the hailer on distress transmit. Hold down for 2 seconds to use the radio's intercom feature. 8 SQUELCH/BATTERY - Repeatedly press to display the time, date, latitude, longitude, SOG (speed over ground), and COG (course over ground). To unlock the keypad, press...use Triple Watch. 7 HAIL/INTERCOM - If you release DISTRESS before the countdown is finished, distress is set to its highest level to display the battery level. 9 STEP/SCAN - Hold down to turn it on the Scrambler for 2 seconds, or turn off the backlight. Press to turn on ...
... to turn on or off. Press to turn the hailer on distress transmit. Hold down for 2 seconds to use the radio's intercom feature. 8 SQUELCH/BATTERY - Repeatedly press to display the time, date, latitude, longitude, SOG (speed over ground), and COG (course over ground). To unlock the keypad, press...use Triple Watch. 7 HAIL/INTERCOM - If you release DISTRESS before the countdown is finished, distress is set to its highest level to display the battery level. 9 STEP/SCAN - Hold down to turn it on the Scrambler for 2 seconds, or turn off the backlight. Press to turn on ...
English Owners Manual
Page 14
... your radio's base ID so the microphone and radio can communicate with each other. Then press SELECT/SCRAM. To adjust the squelch, briefly press SQUELCH/BATTERY, then repeatedly press to turn up the volume or to turn it down. Briefly press PTT, 16/9/TRIPLE WATCH, or DISTRESS to turn off volume... radio is turned on, the channel that appears on both the radio's and microphone's display. 1. If you set (BASE ID or HANDSET ID). Checking the Battery Level Hold down . Repeatedly press or to select the ID you want (00-99 for BASE ID or 1-4 for about 2 seconds. Adjusting the Volume and...
... your radio's base ID so the microphone and radio can communicate with each other. Then press SELECT/SCRAM. To adjust the squelch, briefly press SQUELCH/BATTERY, then repeatedly press to turn up the volume or to turn it down. Briefly press PTT, 16/9/TRIPLE WATCH, or DISTRESS to turn off volume... radio is turned on, the channel that appears on both the radio's and microphone's display. 1. If you set (BASE ID or HANDSET ID). Checking the Battery Level Hold down . Repeatedly press or to select the ID you want (00-99 for BASE ID or 1-4 for about 2 seconds. Adjusting the Volume and...


