User Guide
Page 3
... OVERVIEW...17 PLAYBACK...17 ALARM...19 BRIGHTNESS 19 GENERAL SETTINGS 20 Camera Setup Screen 22 Recording Setup Screen 25 System Settings SCREEN 27 Motion Detection Settings SCREEN 32 Network Setup SCREEN 34 Firmware Upgrade SCREEN 37 REMOTE ACCESS 39 OVERVIEW...39 REQUIREMENTS 39 SET UP THE U GUARD APP 39 U GUARD APP SCREENS AND ELEMENTS 41 Camera List Screen 41 Live View Screen 43 UDR744 HD Operation Basics 44 RECORDING LIVE VIDEO (MONITOR ONLY 44 PLAYING BACK RECORDED VIDEO 44 ADDING NEW CAMERAS 45 Pair Cameras 46 Troubleshooting Camera Pairing 46 UDR744 HD...
... OVERVIEW...17 PLAYBACK...17 ALARM...19 BRIGHTNESS 19 GENERAL SETTINGS 20 Camera Setup Screen 22 Recording Setup Screen 25 System Settings SCREEN 27 Motion Detection Settings SCREEN 32 Network Setup SCREEN 34 Firmware Upgrade SCREEN 37 REMOTE ACCESS 39 OVERVIEW...39 REQUIREMENTS 39 SET UP THE U GUARD APP 39 U GUARD APP SCREENS AND ELEMENTS 41 Camera List Screen 41 Live View Screen 43 UDR744 HD Operation Basics 44 RECORDING LIVE VIDEO (MONITOR ONLY 44 PLAYING BACK RECORDED VIDEO 44 ADDING NEW CAMERAS 45 Pair Cameras 46 Troubleshooting Camera Pairing 46 UDR744 HD...
User Guide
Page 5
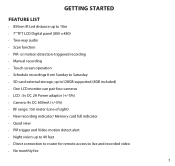
... Led distance up to 40 feet •• Direct connection to router for remote access to 10m •• 7" TFT LCD Digital panel (800 x 480) •• Two-way audio •• Scan function •• PIR- or motion detection-triggered recording •• Manual recording •• Touch screen operation •• Schedule recordings from Sunday to Saturday •• SD card external storage, up to128GB supported...
... Led distance up to 40 feet •• Direct connection to router for remote access to 10m •• 7" TFT LCD Digital panel (800 x 480) •• Two-way audio •• Scan function •• PIR- or motion detection-triggered recording •• Manual recording •• Touch screen operation •• Schedule recordings from Sunday to Saturday •• SD card external storage, up to128GB supported...
User Guide
Page 6
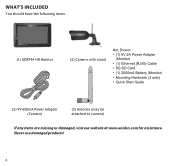
Never use damaged products! 6 WHAT'S INCLUDED You should have the following items: (1) UDR744 HD Monitor (2) Camera with stand Not Shown: • (1) 5V 2A Power Adapter (Monitor) • (1) Ethernet (RJ45) Cable • 8G SD Card • (1) 2000mA Battery (Monitor) • Mounting Hardware (2 sets) • Quick Start Guide (2) 9V 600mA Power Adapter (Camera) (2) Antenna (may be attached to camera) If any items are missing or damaged, visit our website at www.uniden.com for assistance.
Never use damaged products! 6 WHAT'S INCLUDED You should have the following items: (1) UDR744 HD Monitor (2) Camera with stand Not Shown: • (1) 5V 2A Power Adapter (Monitor) • (1) Ethernet (RJ45) Cable • 8G SD Card • (1) 2000mA Battery (Monitor) • Mounting Hardware (2 sets) • Quick Start Guide (2) 9V 600mA Power Adapter (Camera) (2) Antenna (may be attached to camera) If any items are missing or damaged, visit our website at www.uniden.com for assistance.
User Guide
Page 7
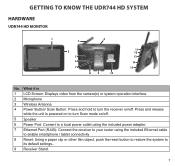
... unit is 1 LCD Screen: Displays video from the camera(s) or system operation interface. 2 Microphone 3 Wireless Antenna 4 Power Button/ Scan Button: Press and hold to its default settings.. 9 Receiver Stand. 7 What it is powered on to turn Scan mode on/off. 5 Speaker 6 Power Port: Connert to a local power outlet using the included power adapter. 7 Ethernet Port (RJ45): Connect the receiver to your router using the included Ethernet cable to enable smartphone / tablet connectivity 8 Reset: Using a paper clip or other thin object, push the reset button to restore...
... unit is 1 LCD Screen: Displays video from the camera(s) or system operation interface. 2 Microphone 3 Wireless Antenna 4 Power Button/ Scan Button: Press and hold to its default settings.. 9 Receiver Stand. 7 What it is powered on to turn Scan mode on/off. 5 Speaker 6 Power Port: Connert to a local power outlet using the included power adapter. 7 Ethernet Port (RJ45): Connect the receiver to your router using the included Ethernet cable to enable smartphone / tablet connectivity 8 Reset: Using a paper clip or other thin object, push the reset button to restore...

User Guide
Page 9
... submerged. SET UP THE HARDWARE MONITOR 1. Press and hold the POWER button on the back of the lens and emits detection signal to a 120 volt AC (standard indoor) power outlet. 3. Water can reflect light from the infrared LEDs used outdoors, they be exposed directly to the LIVE view. Periodically clean the lens glass with your monitor are used for 3 - 4 seconds to power it is 7 PIR Sensor: Detects motion in...
... submerged. SET UP THE HARDWARE MONITOR 1. Press and hold the POWER button on the back of the lens and emits detection signal to a 120 volt AC (standard indoor) power outlet. 3. Water can reflect light from the infrared LEDs used outdoors, they be exposed directly to the LIVE view. Periodically clean the lens glass with your monitor are used for 3 - 4 seconds to power it is 7 PIR Sensor: Detects motion in...
User Guide
Page 10
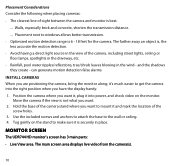
...light source in place. it's much easier to get the camera into power, and check video on the stand to windows allows better transmission. •• Optimized motion detection range is not what you have the display handy. 1. Use the included screws and anchors to attach the base to mount it into the right position when you want it, plug... screen area displays live video from the camera(s). 10 can generate motion detection false alarms. INSTALL CAMERAS When you want to the wall or ceiling. 4. Move the camera if the view is 6 - 18 feet for the camera. Position the camera ...
...light source in place. it's much easier to get the camera into power, and check video on the stand to windows allows better transmission. •• Optimized motion detection range is not what you have the display handy. 1. Use the included screws and anchors to attach the base to mount it into the right position when you want it, plug... screen area displays live video from the camera(s). 10 can generate motion detection false alarms. INSTALL CAMERAS When you want to the wall or ceiling. 4. Move the camera if the view is 6 - 18 feet for the camera. Position the camera ...
User Guide
Page 11
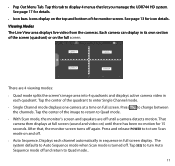
... Live View area displays live video from the cameras. Press the channels. Tap the center of the quadrant to enter Single Channel mode. •• Single Channel mode displays one camera at full screen (sound and video on full screen. Press and release POWER to to turn Auto Sequence mode off and return to change between •• With Scan mode, the monitor's screen and speakers are 4 viewing modes: •• Quad mode splits the screen's image...
... Live View area displays live video from the cameras. Press the channels. Tap the center of the quadrant to enter Single Channel mode. •• Single Channel mode displays one camera at full screen (sound and video on full screen. Press and release POWER to to turn Auto Sequence mode off and return to change between •• With Scan mode, the monitor's screen and speakers are 4 viewing modes: •• Quad mode splits the screen's image...
User Guide
Page 12
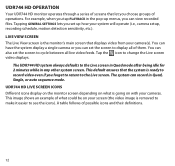
... Live screen. The system can view recorded files. UDR744 HD LIVE SCREEN ICONS Different icons display on the monitor screen depending on what could be on with your system will operate (i.e., camera setup, recording schedule, motion detection sensitivity, etc.). For example, when you tap PLAYBACK in the pop-up how your cameras. You can have the system display a single camera or you forget to return to change the Live screen video displays. This default...
... Live screen. The system can view recorded files. UDR744 HD LIVE SCREEN ICONS Different icons display on the monitor screen depending on what could be on with your system will operate (i.e., camera setup, recording schedule, motion detection sensitivity, etc.). For example, when you tap PLAYBACK in the pop-up how your cameras. You can have the system display a single camera or you forget to return to change the Live screen video displays. This default...
User Guide
Page 13
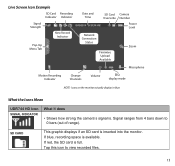
... inserted into the monitor. Live Screen Icon Example SD Card Recording Indicator Indicator Signal Strength New Record Indicator Pop-Up Menu Tab Date and Time SD Card Camera Overwrite Number Power Level Network Connection Status Firmware Upload Available Zoom Microphone Motion Recording Indicator Change Channels Volume SEQ display mode NOTE: Icons on the monitor actually display in blue. Signal ranges from 4 bars down to view recorded files. 13 SD CARD This graphic displays if an SD card is full...
... inserted into the monitor. Live Screen Icon Example SD Card Recording Indicator Indicator Signal Strength New Record Indicator Pop-Up Menu Tab Date and Time SD Card Camera Overwrite Number Power Level Network Connection Status Firmware Upload Available Zoom Microphone Motion Recording Indicator Change Channels Volume SEQ display mode NOTE: Icons on the monitor actually display in blue. Signal ranges from 4 bars down to view recorded files. 13 SD CARD This graphic displays if an SD card is full...

User Guide
Page 15
... of the monitor to see in auto switch mode; MOTION RECORDING INDICATOR Indicates motion detection status. • Blue - Automatic recording OFF. • Red - Tap the area you tap this icon to exit Zoom mode. Tap the icon again to manually change channels. Press and hold TALK on the screen, the monitor breaks the screen image into 5 areas. NEW DOWLOAD Displays if new firmware is off (mute). Automatic recording ON. 15...
... of the monitor to see in auto switch mode; MOTION RECORDING INDICATOR Indicates motion detection status. • Blue - Automatic recording OFF. • Red - Tap the area you tap this icon to exit Zoom mode. Tap the icon again to manually change channels. Press and hold TALK on the screen, the monitor breaks the screen image into 5 areas. NEW DOWLOAD Displays if new firmware is off (mute). Automatic recording ON. 15...
User Guide
Page 21
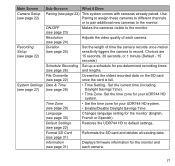
... time the camera records once motion Setup (see page 30) Changes language setting for your UDR744 HD system. • Enable/Disable Daylight Savings Time Language (see page 25) sensitivity tiggers the camera to record. Default Settings Restores the UDR744 HD to the monitor. File Overwrite (see page 22) Overwrites the oldest recorded data on the SD card once the card is full. Set the current time (including Daylight Savings Time). • Time...
... time the camera records once motion Setup (see page 30) Changes language setting for your UDR744 HD system. • Enable/Disable Daylight Savings Time Language (see page 25) sensitivity tiggers the camera to record. Default Settings Restores the UDR744 HD to the monitor. File Overwrite (see page 22) Overwrites the oldest recorded data on the SD card once the card is full. Set the current time (including Daylight Savings Time). • Time...
User Guide
Page 22
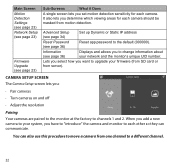
... they can also use this procedure to move a camera from one channel to each camera. Advanced Setup (see page 34) Set up Dynamic or Static IP address Reset Password (see page 36) Reset app password to your firmware (from SD card or from motion detection. CAMERA SETUP SCREEN The Camera Setup screen lets you have to "introduce" the camera and monitor to a different channel. 22 When you add a new camera to the default (000000). You can...
... they can also use this procedure to move a camera from one channel to each camera. Advanced Setup (see page 34) Set up Dynamic or Static IP address Reset Password (see page 36) Reset app password to your firmware (from SD card or from motion detection. CAMERA SETUP SCREEN The Camera Setup screen lets you have to "introduce" the camera and monitor to a different channel. 22 When you add a new camera to the default (000000). You can...
User Guide
Page 23
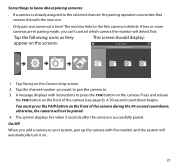
... selected channel, the pairing operation overwrites that camera link with the new one. •• Only pair one camera at a time! The system displays live video 3 seconds after the camera is already assigned to . 3. A message displays with the monitor and the system will not be paired. 4. You must press the PAIR button on . 23 Tap Pairing on the screens: 1. Some...
... selected channel, the pairing operation overwrites that camera link with the new one. •• Only pair one camera at a time! The system displays live video 3 seconds after the camera is already assigned to . 3. A message displays with the monitor and the system will not be paired. 4. You must press the PAIR button on . 23 Tap Pairing on the screens: 1. Some...
User Guide
Page 25
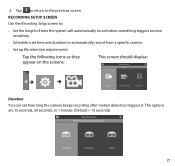
The options are 15 seconds, 30 seconds, or 1 minute. (Default = 15 seconds) 25 RECORDING SETUP SCREEN Use the Recording Setup screen to: •• Set the length of time the system will automatically record when something triggers motion sensitivity. •• Schedule a set time and duration to the previous screen. 2. Tap to return to automatically record from a specific camera. •• Set up file retention requirements Tap the following icons...
The options are 15 seconds, 30 seconds, or 1 minute. (Default = 15 seconds) 25 RECORDING SETUP SCREEN Use the Recording Setup screen to: •• Set the length of time the system will automatically record when something triggers motion sensitivity. •• Schedule a set time and duration to the previous screen. 2. Tap to return to automatically record from a specific camera. •• Set up file retention requirements Tap the following icons...
User Guide
Page 28
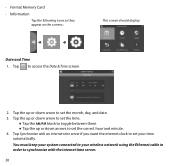
...; Tap the up or down arrows to set your wireless network using the Ethernet cable in order to access the Date & Time screen. •• Format Memory Card •• Information Tap the following icons as they appear on the screens: Date and Time 1. Tap to synchronize with an internet time server if you want the internet clock to your time automatically. This screen should display: 2.
...; Tap the up or down arrows to set your wireless network using the Ethernet cable in order to access the Date & Time screen. •• Format Memory Card •• Information Tap the following icons as they appear on the screens: Date and Time 1. Tap to synchronize with an internet time server if you want the internet clock to your time automatically. This screen should display: 2.
User Guide
Page 39
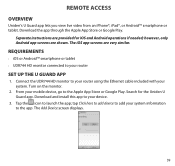
... HD monitor to your router using the Ethernet cable included with your system information to add your system. Download and install this app to launch the app; The iOS app screens are shown. Download the app through the Apple App Store or Google Play. however, only Android app screens are very similar. Turn on the monitor. 2. Search for iOS and Android operations if needed; REMOTE ACCESS OVERVIEW Uniden's U Guard app lets you view live video from an iPhone...
... HD monitor to your router using the Ethernet cable included with your system information to add your system. Download and install this app to launch the app; The iOS app screens are shown. Download the app through the Apple App Store or Google Play. however, only Android app screens are very similar. Turn on the monitor. 2. Search for iOS and Android operations if needed; REMOTE ACCESS OVERVIEW Uniden's U Guard app lets you view live video from an iPhone...
User Guide
Page 40
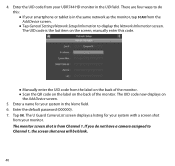
... your UDR744 HD monitor in the Name field. 6. The UID code is the last item on the Add Device screen. 5. Tap OK. Enter the default password (000000). 7. 4. Enter the UID code from Channel 1. manually enter this : ●● If your smartphone or tablet is from your system with a screen shot from the Add Device screen. ●● Tap General Settings/Network Setup/Information to...
... your UDR744 HD monitor in the Name field. 6. The UID code is the last item on the Add Device screen. 5. Tap OK. Enter the default password (000000). 7. 4. Enter the UID code from Channel 1. manually enter this : ●● If your smartphone or tablet is from your system with a screen shot from the Add Device screen. ●● Tap General Settings/Network Setup/Information to...
User Guide
Page 53
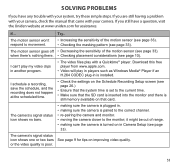
...). Download this free player from www.apple.com. • Video will play in players such as Windows Media® Player if an H.264 CODEC plug-in is installed. • Check the settings on the Schedule Recording Setup screen (see page 26.) • Ensure that the system time is set to the current time. • Make sure that the SD card is inserted into the monitor...
...). Download this free player from www.apple.com. • Video will play in players such as Windows Media® Player if an H.264 CODEC plug-in is installed. • Check the settings on the Schedule Recording Setup screen (see page 26.) • Ensure that the system time is set to the current time. • Make sure that the SD card is inserted into the monitor...
User Guide
Page 54
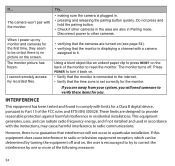
The monitor picture has frozen. The monitor turns off and on, the user is displaying a channel with the instructions, may cause harmful interference to verify these items for the monitor. Press POWER to reset the monitor. This equipment generates, uses, and can be on but there is no picture on . • Verify that the monitor is connected to the internet. • Verify that the time zone...
The monitor picture has frozen. The monitor turns off and on, the user is displaying a channel with the instructions, may cause harmful interference to verify these items for the monitor. Press POWER to reset the monitor. This equipment generates, uses, and can be on but there is no picture on . • Verify that the monitor is connected to the internet. • Verify that the time zone...
User Guide
Page 59
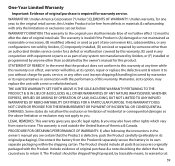
..., subassemblies, or any configurations not sold by Uniden, (C) improperly installed, (D) serviced or repaired by someone other than an authorized Uniden service center for a defect or malfunction covered by this warranty, (E) used in any conjunction with equipment or parts or as part of any system not manufactured by Uniden, or (F) installed or programmed by anyone other than as detailed by the owner's manual for this product...
..., subassemblies, or any configurations not sold by Uniden, (C) improperly installed, (D) serviced or repaired by someone other than an authorized Uniden service center for a defect or malfunction covered by this warranty, (E) used in any conjunction with equipment or parts or as part of any system not manufactured by Uniden, or (F) installed or programmed by anyone other than as detailed by the owner's manual for this product...


