User Guide
Page 2
...contains important information about you need assistance, please do NOT return this product to persons, including the following: •• The camera is an indoor camera •• To avoid any high traffic areas where people might trip over them rub against any sharp edges or lie across... any risk of purchase. If you ! Visiting our customer support website at 1-800-297-1023. Calling our customer care specialists at www.uniden.com. ...
...contains important information about you need assistance, please do NOT return this product to persons, including the following: •• The camera is an indoor camera •• To avoid any high traffic areas where people might trip over them rub against any sharp edges or lie across... any risk of purchase. If you ! Visiting our customer support website at 1-800-297-1023. Calling our customer care specialists at www.uniden.com. ...
User Guide
Page 3
...each other. •• STRANGULATION HAZARD. There are between usages. •• Clean only with these safety instructions. Do not cover the camera or receiver with any object such as a substitution for proper ventilation when units are within range of children. •• WARNING: KEEP OUT... long periods between the ages of 13 and 18, review these terms, conditions and safety warnings with the normal flow of air. Uniden assumes no user-serviceable parts inside. •• Do not expose the equipment to high temperatures, and avoid leaving the equipment in...
...each other. •• STRANGULATION HAZARD. There are between usages. •• Clean only with these safety instructions. Do not cover the camera or receiver with any object such as a substitution for proper ventilation when units are within range of children. •• WARNING: KEEP OUT... long periods between the ages of 13 and 18, review these terms, conditions and safety warnings with the normal flow of air. Uniden assumes no user-serviceable parts inside. •• Do not expose the equipment to high temperatures, and avoid leaving the equipment in...
User Guide
Page 4
... 9 Wall Mount 10 Suction Mount 10 Clip-Mount 10 Connect Power 10 BASIC OPERATION 12 WIRELESS CAMERA 12 WIRELESS MONITOR 14 LCD DISPLAY 16 USING THE UBR223 18 Viewing Modes 18 Common Operations 19 SYSTEM MENU DESCRIPTIONS 20 SYSTEM 20 Date/Time 21 Brightness ...Notice 37 Three-Year Limited Warranty 37 Uniden surveillance products are hereby reserved. For further information on video surveillance and audio recording legal requirements, please consult your local, state and federal law enforcement agency. © 2013. Uniden expects consumer's use of these products to...
... 9 Wall Mount 10 Suction Mount 10 Clip-Mount 10 Connect Power 10 BASIC OPERATION 12 WIRELESS CAMERA 12 WIRELESS MONITOR 14 LCD DISPLAY 16 USING THE UBR223 18 Viewing Modes 18 Common Operations 19 SYSTEM MENU DESCRIPTIONS 20 SYSTEM 20 Date/Time 21 Brightness ...Notice 37 Three-Year Limited Warranty 37 Uniden surveillance products are hereby reserved. For further information on video surveillance and audio recording legal requirements, please consult your local, state and federal law enforcement agency. © 2013. Uniden expects consumer's use of these products to...
User Guide
Page 5
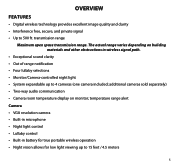
...portable wireless operation •• Night vision allows for low light viewing up to 500 ft. temperature range alert Camera •• VGA resolution camera •• Built-in microphone •• Night light control •• Lullaby control •• ...path. •• Exceptional sound clarity •• Out of range notification •• Four lullaby selections •• Monitor/Camera-controlled night light •• System expandable up to 15 feet / 4.5 meters 5 transmission range Maximum open space transmission range. OVERVIEW ...
...portable wireless operation •• Night vision allows for low light viewing up to 500 ft. temperature range alert Camera •• VGA resolution camera •• Built-in microphone •• Night light control •• Lullaby control •• ...path. •• Exceptional sound clarity •• Out of range notification •• Four lullaby selections •• Monitor/Camera-controlled night light •• System expandable up to 15 feet / 4.5 meters 5 transmission range Maximum open space transmission range. OVERVIEW ...
User Guide
Page 6
Never use this range may be partially or completely obscured, depending on the camera application. It also tells you should have in eight sections: •• Overview. USING THE MANUAL This manual is used. •• Special Features. ...will find detailed descriptions of each screen and how it is set it up in your equipment's function keys in the next section. •• Uniden UBR223 Screen Descriptions. It also provides a list of 15ft./4.5m under ideal conditions. IR illumination range of basic operations in an abbreviated format, referencing screen ...
Never use this range may be partially or completely obscured, depending on the camera application. It also tells you should have in eight sections: •• Overview. USING THE MANUAL This manual is used. •• Special Features. ...will find detailed descriptions of each screen and how it is set it up in your equipment's function keys in the next section. •• Uniden UBR223 Screen Descriptions. It also provides a list of 15ft./4.5m under ideal conditions. IR illumination range of basic operations in an abbreviated format, referencing screen ...
User Guide
Page 8
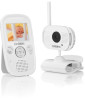
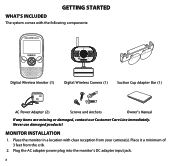
Place the monitor in a location with the following components: Digital Wireless Monitor (1) Digital Wireless Camera (1) Suction Cup Adapter Bar (1) AC Power Adapter (2) Screws and Anchors Owner's Manual If any items are missing or damaged, contact our Customer Care Line immediately. Never use damaged products! MONITOR INSTALLATION 1. GETTING STARTED WHAT'S INCLUDED The system comes with clear reception from the crib. 2. Plug the AC adapter power plug into the monitor's DC adapter input jack. 8 Place it a minimum of 3 feet from your camera(s).
Place the monitor in a location with the following components: Digital Wireless Monitor (1) Digital Wireless Camera (1) Suction Cup Adapter Bar (1) AC Power Adapter (2) Screws and Anchors Owner's Manual If any items are missing or damaged, contact our Customer Care Line immediately. Never use damaged products! MONITOR INSTALLATION 1. GETTING STARTED WHAT'S INCLUDED The system comes with clear reception from the crib. 2. Plug the AC adapter power plug into the monitor's DC adapter input jack. 8 Place it a minimum of 3 feet from your camera(s).
User Guide
Page 9
...suction cup bar. it is an indoor camera. •• The clearest line-of-sight between the camera and monitor is out of 3 feet from the monitor during the initial charge process. CAMERA INSTALLATION The UBR223 camera and mounting clip are positioning the camera, bring the monitor along; Place it...After the initial charge, recharge the monitor as needed. 5. The UBR223 does come with your monitor is out of the camera (ceiling or floor lamps). •• Carefully plan where and how the camera will route the cable that were not included in rechargeable monitor battery...
...suction cup bar. it is an indoor camera. •• The clearest line-of-sight between the camera and monitor is out of 3 feet from the monitor during the initial charge process. CAMERA INSTALLATION The UBR223 camera and mounting clip are positioning the camera, bring the monitor along; Place it...After the initial charge, recharge the monitor as needed. 5. The UBR223 does come with your monitor is out of the camera (ceiling or floor lamps). •• Carefully plan where and how the camera will route the cable that were not included in rechargeable monitor battery...
User Guide
Page 10
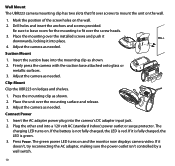
Suction Mount 1. Press the mounting clip as shown. 2. Plug the other end into the camera's DC adapter input jack. 2. Clip-Mount Clip the UBR223 on and the monitor now displays camera video. Connect Power 1. Place the mounting over the mounting surface and release. 3. Insert the AC adapter power...is red. Press Power. Adjust the camera as needed . The charging LED turns on the wall. 2. Adjust the camera as needed. Mark the position of the screw holes on . Insert the suction base into place. 4. Wall Mount The UBR223 camera mounting clip has two slots that fit...
Suction Mount 1. Press the mounting clip as shown. 2. Plug the other end into the camera's DC adapter input jack. 2. Clip-Mount Clip the UBR223 on and the monitor now displays camera video. Connect Power 1. Place the mounting over the mounting surface and release. 3. Insert the AC adapter power...is red. Press Power. Adjust the camera as needed . The charging LED turns on the wall. 2. Adjust the camera as needed. Mark the position of the screw holes on . Insert the suction base into place. 4. Wall Mount The UBR223 camera mounting clip has two slots that fit...
User Guide
Page 11
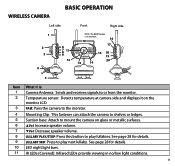
See page 28 for details. 10 LED night light bars. 11 IR LEDs (Covered): Infrared LEDs provide viewing in no/low light conditions. 11 WIRELESS CAMERA BASIC OPERATION Left side Front Right side 1 2 3 4 6 7 8 11 9 12 NOTE: The RESET button is on the back. 10 16 17 15 18...from the monitor. 2 Temperature sensor: Detects temperature at camera side and displays it on the monitor LCD. 3 PAIR: Pairs the camera to the monitor. 4 Mounting Clip: This fastener can attach the camera to shelves or ledges. 5 Suction base: Attach to mount the camera on glass or metallic surfaces. 6 ▲Vol: ...
See page 28 for details. 10 LED night light bars. 11 IR LEDs (Covered): Infrared LEDs provide viewing in no/low light conditions. 11 WIRELESS CAMERA BASIC OPERATION Left side Front Right side 1 2 3 4 6 7 8 11 9 12 NOTE: The RESET button is on the back. 10 16 17 15 18...from the monitor. 2 Temperature sensor: Detects temperature at camera side and displays it on the monitor LCD. 3 PAIR: Pairs the camera to the monitor. 4 Mounting Clip: This fastener can attach the camera to shelves or ledges. 5 Suction base: Attach to mount the camera on glass or metallic surfaces. 6 ▲Vol: ...
User Guide
Page 12
... (Blinking) = Battery is turned on the camera side. 13 Lens: Camera lens. 14 Microphone: Receives sounds for the area near the camera, and transmits sound from the camera to the monitor. 15 Speaker: Produces the sound transmitted from the monitor. 16 POWER: Turns the camera ON or OFF. 17 NIGHT LIGHT: Press to... turn the night light ON or OFF. 18 Charging LED: Red = Charging Green = Fully charged Off = Camera and power adapter are disconnected or power adapter is disconnected from power source. 19 Power LED: Green = Camera is low. 20 DC 5V Power: Connects the DC 5V power adapter to the...
... (Blinking) = Battery is turned on the camera side. 13 Lens: Camera lens. 14 Microphone: Receives sounds for the area near the camera, and transmits sound from the camera to the monitor. 15 Speaker: Produces the sound transmitted from the monitor. 16 POWER: Turns the camera ON or OFF. 17 NIGHT LIGHT: Press to... turn the night light ON or OFF. 18 Charging LED: Red = Charging Green = Fully charged Off = Camera and power adapter are disconnected or power adapter is disconnected from power source. 19 Power LED: Green = Camera is low. 20 DC 5V Power: Connects the DC 5V power adapter to the...
User Guide
Page 13
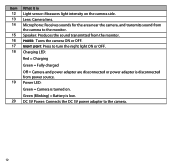
See page 28 for details. 13 The left LED indicates power and the remaining LEDS indicate sound. 3 POWER: Turns the camera on 10 the back behind the kickstand. Item What it is on and off. 4 2.3 inch LCD screen. 5 ▲Vol: • Increase speaker volume. • In ...Menus: Scroll up. • In Lullaby: Increase volume. • In Zoom: Scroll up. 6 ZOOM: Displays the camera image in double size (see page 28). 7 LULLABY PLAY/STOP: Press this button to or from the camera. 2 LED light bar. WIRELESS MONITOR 1 2 3 4 5 6 7 8 9 15 11 16 12 13 17 14 18 NOTE: The RESET...
See page 28 for details. 13 The left LED indicates power and the remaining LEDS indicate sound. 3 POWER: Turns the camera on 10 the back behind the kickstand. Item What it is on and off. 4 2.3 inch LCD screen. 5 ▲Vol: • Increase speaker volume. • In ...Menus: Scroll up. • In Lullaby: Increase volume. • In Zoom: Scroll up. 6 ZOOM: Displays the camera image in double size (see page 28). 7 LULLABY PLAY/STOP: Press this button to or from the camera. 2 LED light bar. WIRELESS MONITOR 1 2 3 4 5 6 7 8 9 15 11 16 12 13 17 14 18 NOTE: The RESET...
User Guide
Page 14
...Zoom: Scroll right. • In Live view: Switch between available cameras. BACK: In Menus: Back one level. The monitor's night light function is only available when the camera is CH◄: • In Menus: Scroll left. •... In Zoom: Scroll left. • In Live view: Switch between available cameras. See page 28 for details. 17 Charge LED RED = Charging Green = Charging complete If... the DC 5V power adapter to the next lullaby in the series. NIGHT LIGHT: Remotely turn the camera night light ON or OFF. MENU/OK: Select a menu option or accept a setting. Item 8...
...Zoom: Scroll right. • In Live view: Switch between available cameras. BACK: In Menus: Back one level. The monitor's night light function is only available when the camera is CH◄: • In Menus: Scroll left. •... In Zoom: Scroll left. • In Live view: Switch between available cameras. See page 28 for details. 17 Charge LED RED = Charging Green = Charging complete If... the DC 5V power adapter to the next lullaby in the series. NIGHT LIGHT: Remotely turn the camera night light ON or OFF. MENU/OK: Select a menu option or accept a setting. Item 8...

User Guide
Page 15
The number of bars in full screen mode only). Signal Strength Indicator Strong Warning None Good None Fair None Low None No Signal Out of Range 15 One or no bars indicates the signal is 1 Signal Indicator (displays in the signal indicator shows the strength of the signal received from the camera. LCD DISPLAY 123 45 6 CAM1 77°F 7 8 1 x2 10 01.02.2013 12:26:00 9 Item Icon What it is poor, and 4 bars indicate a very strong signal.
The number of bars in full screen mode only). Signal Strength Indicator Strong Warning None Good None Fair None Low None No Signal Out of Range 15 One or no bars indicates the signal is 1 Signal Indicator (displays in the signal indicator shows the strength of the signal received from the camera. LCD DISPLAY 123 45 6 CAM1 77°F 7 8 1 x2 10 01.02.2013 12:26:00 9 Item Icon What it is poor, and 4 bars indicate a very strong signal.

User Guide
Page 16
...2013 12:26:00 = month.day.year hour:minute:second 10 x 2 ZOOM indicator. indicates which melody is playing. The 1 number indicates which camera is pressed on the monitor (see page 28). 9 Date and Time (displays in full screen mode only when you press ZOOM, X2 displays after ...the Lullaby indicator (item 8). USING THE UBR223 Viewing Modes Live view displays live images from the cameras in the following modes: 16 Displays when ▲Vol or ▼Vol is displaying. Indicates the amount of power...
...2013 12:26:00 = month.day.year hour:minute:second 10 x 2 ZOOM indicator. indicates which melody is playing. The 1 number indicates which camera is pressed on the monitor (see page 28). 9 Date and Time (displays in full screen mode only when you press ZOOM, X2 displays after ...the Lullaby indicator (item 8). USING THE UBR223 Viewing Modes Live view displays live images from the cameras in the following modes: 16 Displays when ▲Vol or ▼Vol is displaying. Indicates the amount of power...
User Guide
Page 17
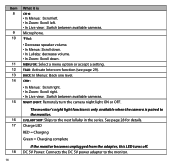
...through the Live modes in Quad view. Press NIGHT LIGHT on the side of the camera (page 11) or on either the camera or the monitor. 1. See page 28 for the temperature alert Use the Lullaby function Adjust UBR223 volume Use the Intercom Do This... See page 19. Press ▲Vol (increase... volume) or ▼Vol (decrease volume) on the monitor (page 13). Release to cycle through these modes. •• Quad mode: Monitor displays video from one . Any channel that does not have a camera is ...
...through the Live modes in Quad view. Press NIGHT LIGHT on the side of the camera (page 11) or on either the camera or the monitor. 1. See page 28 for the temperature alert Use the Lullaby function Adjust UBR223 volume Use the Intercom Do This... See page 19. Press ▲Vol (increase... volume) or ▼Vol (decrease volume) on the monitor (page 13). Release to cycle through these modes. •• Quad mode: Monitor displays video from one . Any channel that does not have a camera is ...
User Guide
Page 18
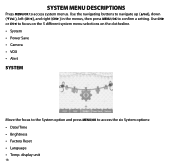
... CH► or CH◄ to focus on the 5 different system menu selections on the clothesline. •• System •• Power Save •• Camera •• VOX •• Alert SYSTEM Move the focus to the System option and press MENU/OK to access system menus. SYSTEM MENU DESCRIPTIONS...
... CH► or CH◄ to focus on the 5 different system menu selections on the clothesline. •• System •• Power Save •• Camera •• VOX •• Alert SYSTEM Move the focus to the System option and press MENU/OK to access system menus. SYSTEM MENU DESCRIPTIONS...
User Guide
Page 20
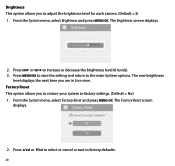
... increase or decrease the brightness level (6 levels). 3. Press ▲Vol or ▼Vol to select or cancel a reset to adjust the brightness level for each camera. (Default = 3) 1. Brightness This option allows you to factory defaults. 20
... increase or decrease the brightness level (6 levels). 3. Press ▲Vol or ▼Vol to select or cancel a reset to adjust the brightness level for each camera. (Default = 3) 1. Brightness This option allows you to factory defaults. 20

User Guide
Page 21
... (F). (Default = F) 1. The Language screen displays. 2. From the System menu, select Temp. Press MENU/OK to save the setting and return to select a language. 3. Cameras will NOT be affected by a reset. From the System menu, select Language and press MENU/OK. Press ▲Vol or ▼Vol to the main...;ais. (Default = English) 1. Temperature Display Unit This option allows you to the main System options. The Temp. display unit screen displays. 21 Camera pairing settings and Date/Time setting will remain paired with the monitor. 3. display unit and press MENU/OK.
... (F). (Default = F) 1. The Language screen displays. 2. From the System menu, select Temp. Press MENU/OK to save the setting and return to select a language. 3. Cameras will NOT be affected by a reset. From the System menu, select Language and press MENU/OK. Press ▲Vol or ▼Vol to the main...;ais. (Default = English) 1. Temperature Display Unit This option allows you to the main System options. The Temp. display unit screen displays. 21 Camera pairing settings and Date/Time setting will remain paired with the monitor. 3. display unit and press MENU/OK.
User Guide
Page 22
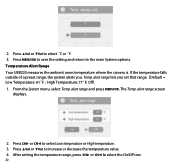
...] 1. alert range screen displays. 2. Press CH► or CH◄ to select Low temperature or High temperature. 3. alert range lets you . 2. Temperature Alert Range Your UBR223 measures the ambient room temperature where the camera is. High Temperature; 77°F;
...] 1. alert range screen displays. 2. Press CH► or CH◄ to select Low temperature or High temperature. 3. alert range lets you . 2. Temperature Alert Range Your UBR223 measures the ambient room temperature where the camera is. High Temperature; 77°F;

User Guide
Page 23
Press CH► or CH◄ to the main menu selections. 23 ALERT Temperatures out of range or a camera out of range triggers alerts. The Alert screen displays. 2. Either button will work. 6. Press MENU/OK to save the settings and return to adjust the ...
Press CH► or CH◄ to the main menu selections. 23 ALERT Temperatures out of range or a camera out of range triggers alerts. The Alert screen displays. 2. Either button will work. 6. Press MENU/OK to save the settings and return to adjust the ...


