User Guide
Page 2
... specialists are installing this product for others, you ! Calling our customer care specialists at www.uniden.com. 3. when running power cords, avoid letting them rub against any sharp edges or lie across any high traffic areas where people might trip over them. •• Do not use the plug to liquids, or the monitor/ camera has been...
... specialists are installing this product for others, you ! Calling our customer care specialists at www.uniden.com. 3. when running power cords, avoid letting them rub against any sharp edges or lie across any high traffic areas where people might trip over them. •• Do not use the plug to liquids, or the monitor/ camera has been...
User Guide
Page 3
.... •• WARNING: KEEP OUT OF THE REACH OF CHILDREN. Uniden assumes no user-serviceable parts inside. •• Do not expose the equipment to your parent or guardian understand these warnings and the assembly instructions could result in serious injury or death. This product is not intended ... flow of the equipment. Do not cover the camera or receiver with a dry cloth. Do not place it in a drawer or in direct sunlight for use by improper handling or failure to heavy pressure. •• Remove the power adapter during long periods between the ages of each other...
.... •• WARNING: KEEP OUT OF THE REACH OF CHILDREN. Uniden assumes no user-serviceable parts inside. •• Do not expose the equipment to your parent or guardian understand these warnings and the assembly instructions could result in serious injury or death. This product is not intended ... flow of the equipment. Do not cover the camera or receiver with a dry cloth. Do not place it in a drawer or in direct sunlight for use by improper handling or failure to heavy pressure. •• Remove the power adapter during long periods between the ages of each other...
User Guide
Page 4
...-Mount 10 Connect Power 10 BASIC OPERATION 12 WIRELESS CAMERA 12 WIRELESS MONITOR 14 LCD DISPLAY 16 USING THE UBR223 18 Viewing Modes 18 Common Operations 19 SYSTEM MENU DESCRIPTIONS 20 SYSTEM 20 Date/Time 21 Brightness 22 Factory Reset 22 Language 23 Temperature Display Unit 23 Temperature Alert Range 24 ALERT 25 VOX 26 CAMERA 27 Pair 27 On/Off 28 POWER SAVE 29 SPECIAL FEATURES 31 ZOOM 31 NIGHT LIGHT 31 LULLABIES 31 USING...
...-Mount 10 Connect Power 10 BASIC OPERATION 12 WIRELESS CAMERA 12 WIRELESS MONITOR 14 LCD DISPLAY 16 USING THE UBR223 18 Viewing Modes 18 Common Operations 19 SYSTEM MENU DESCRIPTIONS 20 SYSTEM 20 Date/Time 21 Brightness 22 Factory Reset 22 Language 23 Temperature Display Unit 23 Temperature Alert Range 24 ALERT 25 VOX 26 CAMERA 27 Pair 27 On/Off 28 POWER SAVE 29 SPECIAL FEATURES 31 ZOOM 31 NIGHT LIGHT 31 LULLABIES 31 USING...
User Guide
Page 6
... temperature display •• Remote night light control •• Remote lullaby control If any items are missing or damaged, contact our Customer Care Line immediately. It also provides a list of 15ft./4.5m under ideal conditions. Never use this range may be partially or completely obscured, depending on the camera application. Here you how to set up . •• Basic Operations...
... temperature display •• Remote night light control •• Remote lullaby control If any items are missing or damaged, contact our Customer Care Line immediately. It also provides a list of 15ft./4.5m under ideal conditions. Never use this range may be partially or completely obscured, depending on the camera application. Here you how to set up . •• Basic Operations...
User Guide
Page 8
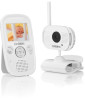
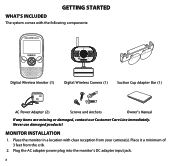
Place the monitor in a location with the following components: Digital Wireless Monitor (1) Digital Wireless Camera (1) Suction Cup Adapter Bar (1) AC Power Adapter (2) Screws and Anchors Owner's Manual If any items are missing or damaged, contact our Customer Care Line immediately. Plug the AC adapter power plug into the monitor's DC adapter input jack. 8 MONITOR INSTALLATION 1. GETTING STARTED WHAT'S INCLUDED The system comes with clear reception from the crib. 2. Never use damaged products! Place it a minimum of 3 feet from your camera(s).
Place the monitor in a location with the following components: Digital Wireless Monitor (1) Digital Wireless Camera (1) Suction Cup Adapter Bar (1) AC Power Adapter (2) Screws and Anchors Owner's Manual If any items are missing or damaged, contact our Customer Care Line immediately. Plug the AC adapter power plug into the monitor's DC adapter input jack. 8 MONITOR INSTALLATION 1. GETTING STARTED WHAT'S INCLUDED The system comes with clear reception from the crib. 2. Never use damaged products! Place it a minimum of 3 feet from your camera(s).
User Guide
Page 9
Press and hold POWER to turn on or off , or unsuccessfully paired to first time use so the built-in the original box, you have the display handy. Place it installed, you can mount the camera on the monitor before you turn the unit on the camera, . CAMERA INSTALLATION The UBR223 camera and mounting clip are positioning the camera, bring the monitor along; It also displays when the monitor is out of 3 feet...
Press and hold POWER to turn on or off , or unsuccessfully paired to first time use so the built-in the original box, you have the display handy. Place it installed, you can mount the camera on the monitor before you turn the unit on the camera, . CAMERA INSTALLATION The UBR223 camera and mounting clip are positioning the camera, bring the monitor along; It also displays when the monitor is out of 3 feet...
User Guide
Page 10
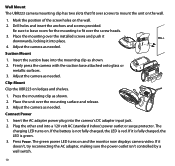
... the power outlet isn't controlled by a wall switch. 10 Insert the AC adapter power plug into a 120 volt AC (standard indoor) power outlet or surge protector. If it is fully charged, the LED is red. Wall Mount The UBR223 camera mounting clip has two slots that fit over screws to fit over the screw heads. 3. The charging LED turns on and the monitor now displays camera video. The green power LED turns on...
... the power outlet isn't controlled by a wall switch. 10 Insert the AC adapter power plug into a 120 volt AC (standard indoor) power outlet or surge protector. If it is fully charged, the LED is red. Wall Mount The UBR223 camera mounting clip has two slots that fit over screws to fit over the screw heads. 3. The charging LED turns on and the monitor now displays camera video. The green power LED turns on...
User Guide
Page 11
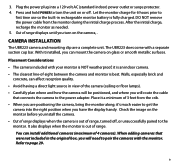
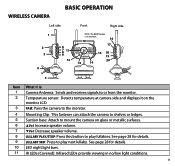
... the monitor. 4 Mounting Clip: This fastener can attach the camera to shelves or ledges. 5 Suction base: Attach to mount the camera on glass or metallic surfaces. 6 ▲Vol: Increase speaker volume. 7 ▼Vol: Decrease speaker volume. 8 LULLABY PLAY/STOP: Press this button to play lullabies. See page 28 for details. 10 LED night light bars. 11 IR LEDs (Covered): Infrared LEDs provide viewing...
... the monitor. 4 Mounting Clip: This fastener can attach the camera to shelves or ledges. 5 Suction base: Attach to mount the camera on glass or metallic surfaces. 6 ▲Vol: Increase speaker volume. 7 ▼Vol: Decrease speaker volume. 8 LULLABY PLAY/STOP: Press this button to play lullabies. See page 28 for details. 10 LED night light bars. 11 IR LEDs (Covered): Infrared LEDs provide viewing...
User Guide
Page 13
... & receives signals to remotely play lullabies. The left LED indicates power and the remaining LEDS indicate sound. 3 POWER: Turns the camera on 10 the back behind the kickstand. Item What it is on and off. 4 2.3 inch LCD screen. 5 ▲Vol: • Increase speaker volume. • In Menus: Scroll up. • In Lullaby: Increase volume. • In Zoom: Scroll up. 6 ZOOM: Displays the camera image in...
... & receives signals to remotely play lullabies. The left LED indicates power and the remaining LEDS indicate sound. 3 POWER: Turns the camera on 10 the back behind the kickstand. Item What it is on and off. 4 2.3 inch LCD screen. 5 ▲Vol: • Increase speaker volume. • In Menus: Scroll up. • In Lullaby: Increase volume. • In Zoom: Scroll up. 6 ZOOM: Displays the camera image in...
User Guide
Page 14
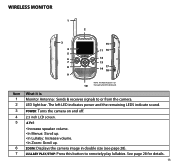
... adapter, this LED turns off. 18 DC 5V Power: Connects the DC 5V power adapter to the next lullaby in the series. TALK: Activate Intercom function (see page 29). The monitor's night light function is only available when the camera is CH◄: • In Menus: Scroll left. • In Zoom: Scroll left. • In Live view: Switch between available cameras. NIGHT LIGHT: Remotely turn the camera night light ON or OFF. MENU/OK: Select a menu...
... adapter, this LED turns off. 18 DC 5V Power: Connects the DC 5V power adapter to the next lullaby in the series. TALK: Activate Intercom function (see page 29). The monitor's night light function is only available when the camera is CH◄: • In Menus: Scroll left. • In Zoom: Scroll left. • In Live view: Switch between available cameras. NIGHT LIGHT: Remotely turn the camera night light ON or OFF. MENU/OK: Select a menu...

User Guide
Page 16
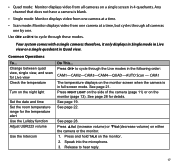
... screen mode only when a lullaby is pressed on the camera side. 4 Night light indicator (displays in full screen mode only). Displays when ▲Vol or ▼Vol is playing. Item Icon What it is charging. 7 Volume indicator. Displays in the following order: CH► : CAM1-CAM2-CAM3-CAM4-QUAD-AUTO SCAN - USING THE UBR223 Viewing Modes Live view displays live images from the cameras in full screen mode only when you press ZOOM, X2 displays...
... screen mode only when a lullaby is pressed on the camera side. 4 Night light indicator (displays in full screen mode only). Displays when ▲Vol or ▼Vol is playing. Item Icon What it is charging. 7 Volume indicator. Displays in the following order: CH► : CAM1-CAM2-CAM3-CAM4-QUAD-AUTO SCAN - USING THE UBR223 Viewing Modes Live view displays live images from the cameras in full screen mode only when you press ZOOM, X2 displays...
User Guide
Page 17
...-QUAD-AUTO Scan - Common Operations To... See page 22. Release to cycle through the Live modes in Quad view. See page 28 for the temperature alert Use the Lullaby function Adjust UBR223 volume Use the Intercom Do This... See page 28. CAM1 The temperature displays on the monitor screen when the camera is blank. •• Single mode: Monitor displays video from one camera at a time. •• Scan mode: Monitor displays video...
...-QUAD-AUTO Scan - Common Operations To... See page 22. Release to cycle through the Live modes in Quad view. See page 28 for the temperature alert Use the Lullaby function Adjust UBR223 volume Use the Intercom Do This... See page 28. CAM1 The temperature displays on the monitor screen when the camera is blank. •• Single mode: Monitor displays video from one camera at a time. •• Scan mode: Monitor displays video...
User Guide
Page 18
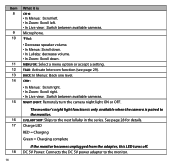
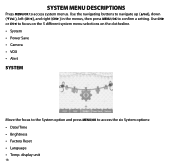
...; Factory Reset •• Language •• Temp. display unit 18 Use CH► or CH◄ to focus on the 5 different system menu selections on the clothesline. •• System •• Power Save •• Camera •• VOX •• Alert SYSTEM Move the focus to the System option and press MENU/OK to access system menus. Use the navigating buttons...
...; Factory Reset •• Language •• Temp. display unit 18 Use CH► or CH◄ to focus on the 5 different system menu selections on the clothesline. •• System •• Power Save •• Camera •• VOX •• Alert SYSTEM Move the focus to the System option and press MENU/OK to access system menus. Use the navigating buttons...
User Guide
Page 20
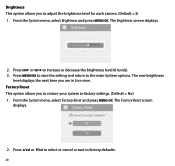
.... Brightness This option allows you to the main System options. Press MENU/OK to save the setting and return to adjust the brightness level for each camera. (Default = 3) 1. The Factory Reset screen displays. 2. From the System menu, select Brightness and press MENU/OK. The new brightness level displays the next time you to restore your system to factory settings. (Default = No) 1. Factory Reset This option allows you are in Live view.
.... Brightness This option allows you to the main System options. Press MENU/OK to save the setting and return to adjust the brightness level for each camera. (Default = 3) 1. The Factory Reset screen displays. 2. From the System menu, select Brightness and press MENU/OK. The new brightness level displays the next time you to restore your system to factory settings. (Default = No) 1. Factory Reset This option allows you are in Live view.
User Guide
Page 27
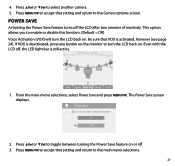
..., press any button on the monitor to enable or disable this function. (Default = Off) Voice Activation (VOX) will turn the LCD back on. Press ▲Vol or ▼Vol to select another camera. 5. Press ▲Vol or ▼Vol to toggle between turning the Power Save feature on . 4. Be sure that setting and return to the main menu selections. 27...
..., press any button on the monitor to enable or disable this function. (Default = Off) Voice Activation (VOX) will turn the LCD back on. Press ▲Vol or ▼Vol to select another camera. 5. Press ▲Vol or ▼Vol to toggle between turning the Power Save feature on . 4. Be sure that setting and return to the main menu selections. 27...
User Guide
Page 28
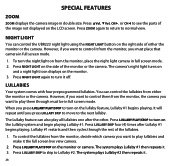
... skip to normal view. NIGHT LIGHT You can control the UBR223 night light using the NIGHT LIGHT button on the monitor. 3. The camera's night light turns on and a night light icon displays on the right side of the monitor or the camera. LULLABIES Your system comes with four preprogrammed lullabies. When you want to play them from the monitor, the camera you want to control it the full screen live view camera. 2. Press NIGHT LIGHT again to turn on the Lullaby...
... skip to normal view. NIGHT LIGHT You can control the UBR223 night light using the NIGHT LIGHT button on the monitor. 3. The camera's night light turns on and a night light icon displays on the right side of the monitor or the camera. LULLABIES Your system comes with four preprogrammed lullabies. When you want to play them from the monitor, the camera you want to control it the full screen live view camera. 2. Press NIGHT LIGHT again to turn on the Lullaby...
User Guide
Page 29
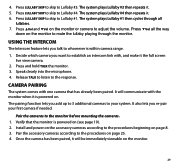
... cameras to Lullaby #4. The system plays Lullaby #3 then repeats it. 5. Press LULLABY SKIP to skip to the monitor before mounting the cameras. 1. Speak clearly into the microphone. 4. Press LULLABY SKIP to skip to mute the lullaby playing through all the way down on the monitor. 29 CAMERA PAIRING The system comes with the monitor when it the full screen live view camera...
... cameras to Lullaby #4. The system plays Lullaby #3 then repeats it. 5. Press LULLABY SKIP to skip to the monitor before mounting the cameras. 1. Speak clearly into the microphone. 4. Press LULLABY SKIP to skip to mute the lullaby playing through all the way down on the monitor. 29 CAMERA PAIRING The system comes with the monitor when it the full screen live view camera...
User Guide
Page 31
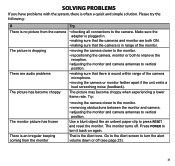
... Try • checking all connections to vertical position. The monitor turns off (see page 23). 31 That is dropping There are both to improve the reception. • adjusting the monitor and camera antennas to turn it back on again. Use a blunt object like an unbent paper clip to turn the alert volume down or off . Press POWER to press RESET and reset the monitor.
... Try • checking all connections to vertical position. The monitor turns off (see page 23). 31 That is dropping There are both to improve the reception. • adjusting the monitor and camera antennas to turn it back on again. Use a blunt object like an unbent paper clip to turn the alert volume down or off . Press POWER to press RESET and reset the monitor.
User Guide
Page 33
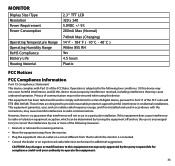
... your authority to provide reasonable protection against harmful interference in a particular installation. If this device. MONITOR Display Size/Type Resolution Power Requirement Power Consumption Operating Temperature Range Operating Humidity Range RoHS Compliance Battery Life Housing Material 2.3" TFT LCD 320 x 240 5.0VDC +/-5% 260mA Max (...turning the equipment off and on a circuit different from that to which can radiate radio frequency energy, and if not installed and used in accordance with the instructions, may not be determined by the party responsible for a Class B digital...
... your authority to provide reasonable protection against harmful interference in a particular installation. If this device. MONITOR Display Size/Type Resolution Power Requirement Power Consumption Operating Temperature Range Operating Humidity Range RoHS Compliance Battery Life Housing Material 2.3" TFT LCD 320 x 240 5.0VDC +/-5% 260mA Max (...turning the equipment off and on a circuit different from that to which can radiate radio frequency energy, and if not installed and used in accordance with the instructions, may not be determined by the party responsible for a Class B digital...
User Guide
Page 34
... any configurations not sold by Uniden, (C) improperly installed, (D) serviced or repaired by someone other than an authorized Uniden service center for a defect or malfunction covered by this warranty, (E) used for three years, to the original retail owner, this Uniden Product to the original user shall terminate & be collocated or operating in conjunction with any system not manufactured by Uniden, or (F) installed or programmed by anyone...
... any configurations not sold by Uniden, (C) improperly installed, (D) serviced or repaired by someone other than an authorized Uniden service center for a defect or malfunction covered by this warranty, (E) used for three years, to the original retail owner, this Uniden Product to the original user shall terminate & be collocated or operating in conjunction with any system not manufactured by Uniden, or (F) installed or programmed by anyone...


