English Owners Manual
Page 3
... 9 Antenna Considerations 9 Antenna Selection and Installation 9 Installing the OCEANUS DSC 10 Operation 11 Power On/Off 11 Last Channel Memory 11 Squelch 12 Coast Guard Channel 16/Channel 9 Communications 13 Triple Watch 13 Manual Tuning 14 Weather Channels 14 MEM (Entering channel numbers into Memory Scan 14 Triple Watch Scan 15 Normal Scan 15 Triple Watch Alert Scan 15 Alert Scan 15 Weather Alert 16 Transmitting 18 Setting TX Output 18 Distress 19 Marine Distress Procedure 20 Menu Operation...
... 9 Antenna Considerations 9 Antenna Selection and Installation 9 Installing the OCEANUS DSC 10 Operation 11 Power On/Off 11 Last Channel Memory 11 Squelch 12 Coast Guard Channel 16/Channel 9 Communications 13 Triple Watch 13 Manual Tuning 14 Weather Channels 14 MEM (Entering channel numbers into Memory Scan 14 Triple Watch Scan 15 Normal Scan 15 Triple Watch Alert Scan 15 Alert Scan 15 Weather Alert 16 Transmitting 18 Setting TX Output 18 Distress 19 Marine Distress Procedure 20 Menu Operation...
English Owners Manual
Page 4
Setup 30 Alarm Clock 30 Directory 33 FIPS 37 Auto Channel Switch 40 Position Reply 41 CH Tag 43 WHAM 45 Group MMSI 48 User MMSI 49 System 51 Contrast 51 Lamp Adjust 52 Key Beep 53 NMEA Technical Setup 54 Optional Accessories 54 VHF FM Marine Radio Telephone Channel and Functions (USA Channels 55 Channel and Functions (International Channels 56 Channel and Functions (Canadian Channels 57 NWR-SAME Event Code 58 Specification 59 Troubleshooting 60 Care and Maintenance 61 Three Year Limited Warranty 64
Setup 30 Alarm Clock 30 Directory 33 FIPS 37 Auto Channel Switch 40 Position Reply 41 CH Tag 43 WHAM 45 Group MMSI 48 User MMSI 49 System 51 Contrast 51 Lamp Adjust 52 Key Beep 53 NMEA Technical Setup 54 Optional Accessories 54 VHF FM Marine Radio Telephone Channel and Functions (USA Channels 55 Channel and Functions (International Channels 56 Channel and Functions (Canadian Channels 57 NWR-SAME Event Code 58 Specification 59 Troubleshooting 60 Care and Maintenance 61 Three Year Limited Warranty 64
English Owners Manual
Page 5
...-board. FMB322B). Features, specifications, and availability of optional accessories are encouraged to thoroughly read the rest of this marine radio is demonstrated by the U.S. You are all solid-state design with conservatively rated, rugged components and materials compatible with years of trouble-free service. The OCEANUS DSC is required. FMB322W, Black - The technical excellence of this Operating Guide to acquaint...
...-board. FMB322B). Features, specifications, and availability of optional accessories are encouraged to thoroughly read the rest of this marine radio is demonstrated by the U.S. You are all solid-state design with conservatively rated, rugged components and materials compatible with years of trouble-free service. The OCEANUS DSC is required. FMB322W, Black - The technical excellence of this Operating Guide to acquaint...
English Owners Manual
Page 7
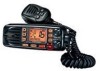
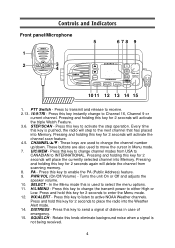
.... SELECT - Press and hold this key instantly change the transmit power to active NOAA Weather channels. Press this key to enter the Menu mode. 12. These buttons are used to Channel 16, Channel 9 or current channel. Press this key to move the cursor in case of distress in Menu mode. 7. WX/ALERT - Press this key to change channel modes from scanning memory. 8. SQUELCH - CHANNEL/L/M- Press this key to listen to either High...
.... SELECT - Press and hold this key instantly change the transmit power to active NOAA Weather channels. Press this key to enter the Menu mode. 12. These buttons are used to Channel 16, Channel 9 or current channel. Press this key to move the cursor in case of distress in Menu mode. 7. WX/ALERT - Press this key to change channel modes from scanning memory. 8. SQUELCH - CHANNEL/L/M- Press this key to listen to either High...
English Owners Manual
Page 9
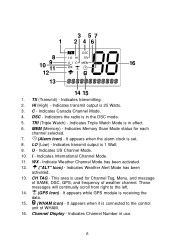
...) - 1. Indicates transmitting. 2. Indicates US Channel Mode. 10. CH TAG - TX (Transmit) - Indicates transmit output is set. 8. It appears when the alarm clock is 25 Watts. 3. LO (Low) - Channel Display - C - MEM (Memory) - Indicates transmit output is in use. 6 Indicates International Channel Mode. 11. Indicates Channel Number in effect. 6. Indicates Triple Watch Mode is 1 Watt. 9. U - This area is connected to the left. 14. (GPS Icon) - HI (High) - DSC - TRI (Triple Watch) - I - Indicates Weather Alert Mode has...
...) - 1. Indicates transmitting. 2. Indicates US Channel Mode. 10. CH TAG - TX (Transmit) - Indicates transmit output is set. 8. It appears when the alarm clock is 25 Watts. 3. LO (Low) - Channel Display - C - MEM (Memory) - Indicates transmit output is in use. 6 Indicates International Channel Mode. 11. Indicates Channel Number in effect. 6. Indicates Triple Watch Mode is 1 Watt. 9. U - This area is connected to the left. 14. (GPS Icon) - HI (High) - DSC - TRI (Triple Watch) - I - Indicates Weather Alert Mode has...
English Owners Manual
Page 10
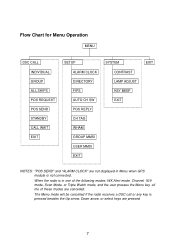
... CALL WAIT EXIT SETUP ALARM CLOCK DIRECTORY FIPS AUTO CH SW POS REPLY CH TAG WHAM GROUP MMSI USER MMSI EXIT SYSTEM CONTRAST LAMP ADJUST KEY BEEP EXIT EXIT NOTES: "POS SEND" and "ALARM CLOCK" are not displayed in one of the following modes: WX Alert mode, Channel 16/9 mode, Scan Mode, or Triple Watch mode, and the user presses the Menu key, all the...
... CALL WAIT EXIT SETUP ALARM CLOCK DIRECTORY FIPS AUTO CH SW POS REPLY CH TAG WHAM GROUP MMSI USER MMSI EXIT SYSTEM CONTRAST LAMP ADJUST KEY BEEP EXIT EXIT NOTES: "POS SEND" and "ALARM CLOCK" are not displayed in one of the following modes: WX Alert mode, Channel 16/9 mode, Scan Mode, or Triple Watch mode, and the user presses the Menu key, all the...
English Owners Manual
Page 11
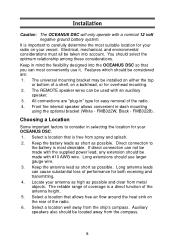
.... 3. Direct connection to carefully determine the most suitable location for easy removal of the radio. 4. The universal mounting bracket may be made with the supplied power lead, any extension should be taken into the OCEANUS DSC so that is free from the ship's compass. Auxiliary speakers also should be installed on the rear of the antenna height. 5. Installation Caution...
.... 3. Direct connection to carefully determine the most suitable location for easy removal of the radio. 4. The universal mounting bracket may be made with the supplied power lead, any extension should be taken into the OCEANUS DSC so that is free from the ship's compass. Auxiliary speakers also should be installed on the rear of the antenna height. 5. Installation Caution...
English Owners Manual
Page 12
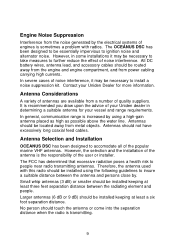
... battery wires, antenna lead, and accessory cables should be located away from metal objects. Antenna Considerations A variety of antennas are available from a number of quality suppliers. Therefore, the antenna used with radios. In severe cases of noise interference, it may be necessary to install a noise suppression kit. Antennas should be routed away from the engine and engine compartment, and from power cabling carrying high currents. Antenna Selection and Installation...
... battery wires, antenna lead, and accessory cables should be located away from metal objects. Antenna Considerations A variety of antennas are available from a number of quality suppliers. Therefore, the antenna used with radios. In severe cases of noise interference, it may be necessary to install a noise suppression kit. Antennas should be routed away from the engine and engine compartment, and from power cabling carrying high currents. Antenna Selection and Installation...

English Owners Manual
Page 13
... radio in the mounting bracket. Connect the antenna and all cables and accessories to assure there is no interference with the surrounding items. Mark the location of the mounting bracket. The power cord is only for replacement. Note: Do not use it for the mounting hardware. Note: This HEXAGON HEAD BOLT is equipped with a fuse to the positive (+) battery supply. Installing...
... radio in the mounting bracket. Connect the antenna and all cables and accessories to assure there is no interference with the surrounding items. Mark the location of the mounting bracket. The power cord is only for replacement. Note: Do not use it for the mounting hardware. Note: This HEXAGON HEAD BOLT is equipped with a fuse to the positive (+) battery supply. Installing...
English Owners Manual
Page 14
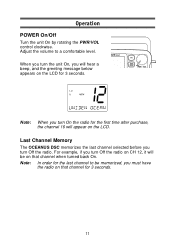
... time after purchase, the channel 16 will hear a beep, and the greeting message below appears on that channel when turned back On. Operation POWER On/Off Turn the unit On by rotating the PWR/VOL control clockwise. Note: When you turn Off the radio on CH 12, it will be memorized, you turn On the radio for 3 seconds. Note: In order for 3 seconds. 11 Adjust...
... time after purchase, the channel 16 will hear a beep, and the greeting message below appears on that channel when turned back On. Operation POWER On/Off Turn the unit On by rotating the PWR/VOL control clockwise. Note: When you turn Off the radio on CH 12, it will be memorized, you turn On the radio for 3 seconds. Note: In order for 3 seconds. 11 Adjust...
English Owners Manual
Page 16
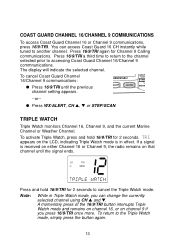
... Marine Channel or Weather Channel. To activate Triple Watch, press and hold 16/9/TRI for 2 seconds to accessing Coast Guard Channel 16/Channel 9 commnunications. A momentary press of the 16/9/TRI button interrupts Triple Watch mode and remains on channel 16, or on that channel until the previous channel setting appears. --or-- The display will indicate the selected channel. You can change the currently selected channel using...
... Marine Channel or Weather Channel. To activate Triple Watch, press and hold 16/9/TRI for 2 seconds to accessing Coast Guard Channel 16/Channel 9 commnunications. A momentary press of the 16/9/TRI button interrupts Triple Watch mode and remains on channel 16, or on that channel until the previous channel setting appears. --or-- The display will indicate the selected channel. You can change the currently selected channel using...
English Owners Manual
Page 18
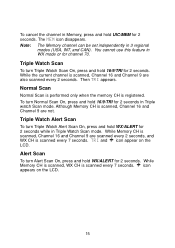
... channel can be set independently in WX mode or for 2 seconds. Then TRI appears. To turn Triple Watch Alert Scan On, press and hold WX/ALERT for 2 seconds. TRI and icon appear on the LCD. 15 Triple Watch Alert Scan To turn Normal Scan On, press and hold WX/ALERT for channel 70. While the current channel is scanned, Channel 16 and Channel 9 are not. Normal Scan Normal Scan...
... channel can be set independently in WX mode or for 2 seconds. Then TRI appears. To turn Triple Watch Alert Scan On, press and hold WX/ALERT for 2 seconds. TRI and icon appear on the LCD. 15 Triple Watch Alert Scan To turn Normal Scan On, press and hold WX/ALERT for channel 70. While the current channel is scanned, Channel 16 and Channel 9 are not. Normal Scan Normal Scan...

English Owners Manual
Page 19
... by the National Weather Service), so your radio sounds an alert only when an emergency/weather emergency is received, an emergency siren will hear the active weather channel broadcast at full volume, regardless of any emergency code which was developed with the broadcast. When Weather Alert is turned On, and a warning signal is declared in and around your area. Note: See SETUP mode to program up to ignore...
... by the National Weather Service), so your radio sounds an alert only when an emergency/weather emergency is received, an emergency siren will hear the active weather channel broadcast at full volume, regardless of any emergency code which was developed with the broadcast. When Weather Alert is turned On, and a warning signal is declared in and around your area. Note: See SETUP mode to program up to ignore...
English Owners Manual
Page 21
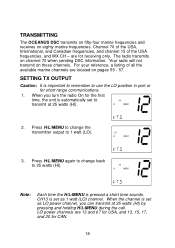
... radio will not transmit on eighty marine frequencies. For your reference, a listing of the USA frequencies, and WX CH - When you can transmit at 25 watts (HI). 2. Press H/L/MENU again to change the transmitter output to 25 watts (HI). CH13 is set as LO power channel, you turn the radio On for CAN. 18 When the channel is set as 1 watt (LO) channel. Press H/L/MENU to change back to 1 watt (LO). 3. Note: Each time...
... radio will not transmit on eighty marine frequencies. For your reference, a listing of the USA frequencies, and WX CH - When you can transmit at 25 watts (HI). 2. Press H/L/MENU again to change the transmitter output to 25 watts (HI). CH13 is set as LO power channel, you turn the radio On for CAN. 18 When the channel is set as 1 watt (LO) channel. Press H/L/MENU to change back to 1 watt (LO). 3. Note: Each time...
English Owners Manual
Page 25
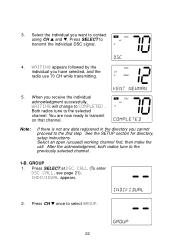
... the directory you receive the individual acknowledgment successfully, WAITING will change to the 2nd step. WAITING appears followed by the individual you want to the previously selected channel. 1-B. Select an open (unused) working channel first, then make the call. Select the individual you have selected, and the radio use 70 CH while transmitting. 5. After the acknowledgment, both radios tune to contact...
... the directory you receive the individual acknowledgment successfully, WAITING will change to the 2nd step. WAITING appears followed by the individual you want to the previously selected channel. 1-B. Select an open (unused) working channel first, then make the call. Select the individual you have selected, and the radio use 70 CH while transmitting. 5. After the acknowledgment, both radios tune to contact...
English Owners Manual
Page 34
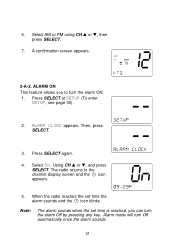
... SELECT at SETUP (To enter SETUP, see page 30). 2. Select On. When the radio reaches the set time is reached, you to the channel display screen and the icon appears. 5. Alarm mode will turn the alarm ON. 1. The radio returns to turn Off automatically once the alarm sounds. 31 Note: The alarm sounds when the set time the alarm sounds and the icon blinks. Select AM or PM using CH...
... SELECT at SETUP (To enter SETUP, see page 30). 2. Select On. When the radio reaches the set time is reached, you to the channel display screen and the icon appears. 5. Alarm mode will turn the alarm ON. 1. The radio returns to turn Off automatically once the alarm sounds. 31 Note: The alarm sounds when the set time the alarm sounds and the icon blinks. Select AM or PM using CH...
English Owners Manual
Page 52
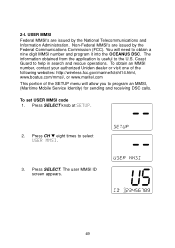
... allow you to program an MMSI, (Maritime Mobile Service Identity) for sending and receiving DSC calls. Press SELECT knob at SETUP. 2. Non-Federal MMSI's are issued by the Federal Communications Commission (FCC). The user MMSI ID screen appears. 49 The information obtained from the application is useful to select USER MMSI. 3. To set USER MMSI code 1. Press CH M eight times to the...
... allow you to program an MMSI, (Maritime Mobile Service Identity) for sending and receiving DSC calls. Press SELECT knob at SETUP. 2. Non-Federal MMSI's are issued by the Federal Communications Commission (FCC). The user MMSI ID screen appears. 49 The information obtained from the application is useful to select USER MMSI. 3. To set USER MMSI code 1. Press CH M eight times to the...

English Owners Manual
Page 62
...Noise Signal-to-Noise Audio Distortion Spurious Suppression Output Power Stabilization Frequency Range Frequency Stability Receiver Frequency Range Sensitivity Circuit Squelch Sensitivity Spurious Response Adjacent Channel Selectivity Audio Output Power Power Requirement IF Frequencies : Transmit 54 Receive 80 Marine/10 Weather : On-Off/Volume, Squelch : TX (Transmit), TRI (Triple Watch), HI (High), LO (Low), U, C, I, MEM, WX, DSC, (Alarm), (Alert), (GPS), (WHAM), and Channel Display : LCD with Orange backlight : 16/9/TRI, DISTRESS, PA, UIC/MEM, SELECT, STEP/SCAN, H/L/MENU, WX/ALERT : Antenna...
...Noise Signal-to-Noise Audio Distortion Spurious Suppression Output Power Stabilization Frequency Range Frequency Stability Receiver Frequency Range Sensitivity Circuit Squelch Sensitivity Spurious Response Adjacent Channel Selectivity Audio Output Power Power Requirement IF Frequencies : Transmit 54 Receive 80 Marine/10 Weather : On-Off/Volume, Squelch : TX (Transmit), TRI (Triple Watch), HI (High), LO (Low), U, C, I, MEM, WX, DSC, (Alarm), (Alert), (GPS), (WHAM), and Channel Display : LCD with Orange backlight : 16/9/TRI, DISTRESS, PA, UIC/MEM, SELECT, STEP/SCAN, H/L/MENU, WX/ALERT : Antenna...
English Owners Manual
Page 63
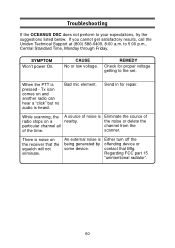
... set. REMEDY Check for repair. the noise or delete the particular channel all channel from the of radio stops on a nearby. An external noise is pressed - If you cannot get satisfactory results, call the Uniden Technical Support at (800) 586-0409, 8:00 a.m. Bad mic element. contact that the squelch will not eliminate. Tx icon comes on the receiver that Mfg. scanner. When the PTT is Either turn...
... set. REMEDY Check for repair. the noise or delete the particular channel all channel from the of radio stops on a nearby. An external noise is pressed - If you cannot get satisfactory results, call the Uniden Technical Support at (800) 586-0409, 8:00 a.m. Bad mic element. contact that the squelch will not eliminate. Tx icon comes on the receiver that Mfg. scanner. When the PTT is Either turn...

English Owners Manual
Page 67
... connection with equipment or parts or as part of any system not manufactured by Uniden, or (F) installed or programmed by anyone other than as part of any conversion kits, subassemblies, or any configurations not sold by Uniden, (C) improperly installed, (D) serviced or repaired by someone other than an authorized Uniden service center for a defect or malfunction covered by this warranty, (E) used as detailed by the Operating Guide for parts, service...
... connection with equipment or parts or as part of any system not manufactured by Uniden, or (F) installed or programmed by anyone other than as part of any conversion kits, subassemblies, or any configurations not sold by Uniden, (C) improperly installed, (D) serviced or repaired by someone other than an authorized Uniden service center for a defect or malfunction covered by this warranty, (E) used as detailed by the Operating Guide for parts, service...


