
English Owners Manual
Page 2
... recycling center for more information on Ni-Cd battery recycling in any charger other than the one designed to be waterproof. Uniden's involvement in this equipment in your area. RECHARGEABLE NICKEL-CADMIUM BATTERY WARNING t This equipment contains a Rechargeable Nickel-Cadmium Battery...may explode if disposed of the Rechargeable Battery Recycling Corporation. RECHARGEABLE NICKEL-CADMIUM BATTERIES MUST BE RECYCLED OR DISPOSED OF PROPERLY Uniden voluntarily participates in a fire. The RBRC® program provides a convenient alternative to drop off the used nickel-cadmium batteries...
... recycling center for more information on Ni-Cd battery recycling in any charger other than the one designed to be waterproof. Uniden's involvement in this equipment in your area. RECHARGEABLE NICKEL-CADMIUM BATTERY WARNING t This equipment contains a Rechargeable Nickel-Cadmium Battery...may explode if disposed of the Rechargeable Battery Recycling Corporation. RECHARGEABLE NICKEL-CADMIUM BATTERIES MUST BE RECYCLED OR DISPOSED OF PROPERLY Uniden voluntarily participates in a fire. The RBRC® program provides a convenient alternative to drop off the used nickel-cadmium batteries...
English Owners Manual
Page 3
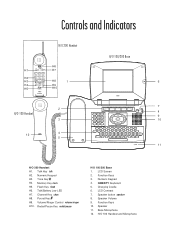
Controls and Indicators H/O 200 Handset H1 talk talk batt chan H6 H7 1 2 abc 3 def 4 ghi 5 jkl 6mno H2 7pqrs 8 tuv 9 wxyz H3 tone 0oper # H8 1 H4 H5 mem flash volume ringer redial/pause H9 H10 H/O 100/200 Base 6 7 2 H/O 100 Handset 8 9 3 10 12 4 5 11 H/O 200 Handset H1. Numeric Keypad H3. Speaker button speaker 8. Talk Key talk H2. Flash Key flash H6. Numeric Keypad 4. LCD Contrast 7. Function Keys 10. Channel Key chan # H8. Pound Key H9. Tone Key8 H4. QWERTY Keyboard 5. Memory Key mem H5. Charging Cradle 6. Speaker 11. H/O 100 Handset ...
Controls and Indicators H/O 200 Handset H1 talk talk batt chan H6 H7 1 2 abc 3 def 4 ghi 5 jkl 6mno H2 7pqrs 8 tuv 9 wxyz H3 tone 0oper # H8 1 H4 H5 mem flash volume ringer redial/pause H9 H10 H/O 100/200 Base 6 7 2 H/O 100 Handset 8 9 3 10 12 4 5 11 H/O 200 Handset H1. Numeric Keypad H3. Speaker button speaker 8. Talk Key talk H2. Flash Key flash H6. Numeric Keypad 4. LCD Contrast 7. Function Keys 10. Channel Key chan # H8. Pound Key H9. Tone Key8 H4. QWERTY Keyboard 5. Memory Key mem H5. Charging Cradle 6. Speaker 11. H/O 100 Handset ...
English Owners Manual
Page 4
TABLE OF CONTENTS Controls and Indicators Back Cover Fold-out Important Safety Instructions 3 H/O 200 Battery Safety Precautions 5 Introduction 6 Getting Started 7 Unpack Your Phone 7 Check the Contents 7 Preparing the Phone for Use 8 H/O 200 Final Touches 11 H/O 100 Final Touches 14 Initial Power Up 15 Setup 17 H/O 100/200 Functional Areas 18 Setup Screen 21 Setting up the Phone 21 Home 25 The Home Screen 25 Entering notes 25 Modifying notes 26 Viewing notes 26 Address Book 27 Address Book Screen 27 Viewing Addresses 27 Modifying Addresses 28 Deleting Addresses 28 ...
TABLE OF CONTENTS Controls and Indicators Back Cover Fold-out Important Safety Instructions 3 H/O 200 Battery Safety Precautions 5 Introduction 6 Getting Started 7 Unpack Your Phone 7 Check the Contents 7 Preparing the Phone for Use 8 H/O 200 Final Touches 11 H/O 100 Final Touches 14 Initial Power Up 15 Setup 17 H/O 100/200 Functional Areas 18 Setup Screen 21 Setting up the Phone 21 Home 25 The Home Screen 25 Entering notes 25 Modifying notes 26 Viewing notes 26 Address Book 27 Address Book Screen 27 Viewing Addresses 27 Modifying Addresses 28 Deleting Addresses 28 ...
English Owners Manual
Page 6
When using your personal safety. Unplug this operating guide. Placement - Do not place this product near or over a radiator or heat register. Important Safety Instructions This product has been designed to the unit. Warnings - This product should never be placed near water; Read, understand, and retain all warnings and instructions marked on the product. for example, near a swimming pool. Water and Moisture - Improper use a dry cloth, without liquid or aerosol cleaners. WARNING! - Ventilation - Do not use this product on the product, or described in this ...
When using your personal safety. Unplug this operating guide. Placement - Do not place this product near or over a radiator or heat register. Important Safety Instructions This product has been designed to the unit. Warnings - This product should never be placed near water; Read, understand, and retain all warnings and instructions marked on the product. for example, near a swimming pool. Water and Moisture - Improper use a dry cloth, without liquid or aerosol cleaners. WARNING! - Ventilation - Do not use this product on the product, or described in this ...
English Owners Manual
Page 7
Do not locate this can result in the risk of fire or electrical shock. Never push objects of fire or electric shock. To reduce the risk of electric shock, do not disassemble this product from the type of other controls may touch dangerous voltage points or short out parts that are radio devices. D. If the product has been dropped or the cabinet has been damaged. Hazards - Cordless telephones are covered by a qualified technician.) E. Damage Requiring Service - B. F. Because of the inherent physical properties of power supply to qualified service ...
Do not locate this can result in the risk of fire or electrical shock. Never push objects of fire or electric shock. To reduce the risk of electric shock, do not disassemble this product from the type of other controls may touch dangerous voltage points or short out parts that are radio devices. D. If the product has been dropped or the cabinet has been damaged. Hazards - Cordless telephones are covered by a qualified technician.) E. Damage Requiring Service - B. F. Because of the inherent physical properties of power supply to qualified service ...
English Owners Manual
Page 8
Use only the appropriate type and size Battery Pack specified in the instruction manual provided for this Operating Guide. The cell may be toxic if swallowed. Do not open or mutilate the Battery Pack. Damage to persons by the battery, read and follow these instructions: Recommended Battery - It may explode. Battery Handling - Battery Disposal - Battery Polarity - Observe proper polarity orientation between the Battery Pack and battery charger. 5 Battery Charging - The battery or conductor may cause damage to short the battery with or identified for disposal...
Use only the appropriate type and size Battery Pack specified in the instruction manual provided for this Operating Guide. The cell may be toxic if swallowed. Do not open or mutilate the Battery Pack. Damage to persons by the battery, read and follow these instructions: Recommended Battery - It may explode. Battery Handling - Battery Disposal - Battery Polarity - Observe proper polarity orientation between the Battery Pack and battery charger. 5 Battery Charging - The battery or conductor may cause damage to short the battery with or identified for disposal...
English Owners Manual
Page 9
Introduction Congratulations on the purchase of all your family functions with features like these: t 900 MHz Cordless Phone t Electronic Calendar t Caller ID t Speakerphone t Dual Keypad t Electronic Notepad t Easy-to-Use Menu System t Electronic Address book t QWERTY Keyboard t Large Flip-top LCD Screen For assistance with set up, or any other questions regarding your new H/O 100/200 Home Organizer. The Cordless Home Organizer helps keep track of your H/O 100/200 , contact Uniden at www.uniden.com 6 Or, visit our web site at 888-777-2947.
Introduction Congratulations on the purchase of all your family functions with features like these: t 900 MHz Cordless Phone t Electronic Calendar t Caller ID t Speakerphone t Dual Keypad t Electronic Notepad t Easy-to-Use Menu System t Electronic Address book t QWERTY Keyboard t Large Flip-top LCD Screen For assistance with set up, or any other questions regarding your new H/O 100/200 Home Organizer. The Cordless Home Organizer helps keep track of your H/O 100/200 , contact Uniden at www.uniden.com 6 Or, visit our web site at 888-777-2947.
English Owners Manual
Page 10
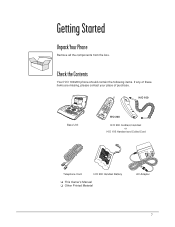
Check the Contents Your H/O 100/200 phone should contain the following items. If any of these items are missing, please contact your place of purchase. Getting Started Unpack Your Phone Remove all the components from the box. H/O 100 Base Unit H/O 200 H/O 200 Cordless Handset or H/O 100 Handset and Coiled Cord Telephone Cord H/O 200 Handset Battery t This Owner's Manual t Other Printed Material AC Adapter 7
Check the Contents Your H/O 100/200 phone should contain the following items. If any of these items are missing, please contact your place of purchase. Getting Started Unpack Your Phone Remove all the components from the box. H/O 100 Base Unit H/O 200 H/O 200 Cordless Handset or H/O 100 Handset and Coiled Cord Telephone Cord H/O 200 Handset Battery t This Owner's Manual t Other Printed Material AC Adapter 7
English Owners Manual
Page 11
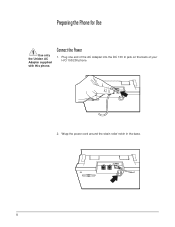
LINE TEL DC 13V IN +- 8 Wrap the power cord around the strain relief notch in the base. Connect the Power 1. Plug one end of the AC Adapter into the DC 13V In jack on the back of your H/O 100/200 phone LINE TEL DC 13V IN 2. Preparing the Phone for Use Use only the Uniden AC Adapter supplied with this phone.
LINE TEL DC 13V IN +- 8 Wrap the power cord around the strain relief notch in the base. Connect the Power 1. Plug one end of the AC Adapter into the DC 13V In jack on the back of your H/O 100/200 phone LINE TEL DC 13V IN 2. Preparing the Phone for Use Use only the Uniden AC Adapter supplied with this phone.
English Owners Manual
Page 12
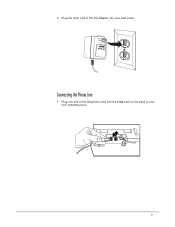
Plug one end of your wall outlet. LINE TEL DC 13V IN +- 9 Connecting the Phone Line 1. Plug the other end of the AC Adapter into the Line Jack on the back of the telephone cord into your H/O 100/200 phone. 3.
Plug one end of your wall outlet. LINE TEL DC 13V IN +- 9 Connecting the Phone Line 1. Plug the other end of the AC Adapter into the Line Jack on the back of the telephone cord into your H/O 100/200 phone. 3.
English Owners Manual
Page 13
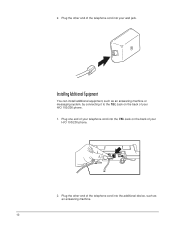
LINE TEL DC 13V IN +- 2. Plug the other end of your wall jack. 2. Plug one end of your telephone cord into the additional device, such as an answering machine or messaging system, by connecting it to the TEL Jack on the back of your H/O 100/200 phone. Plug the other end of the telephone cord into the TEL Jack on the back of the telephone cord into your H/O 100/200 phone. 1. Installing Additional Equipment You can install additional equipment, such as an answering machine. 10
LINE TEL DC 13V IN +- 2. Plug the other end of your wall jack. 2. Plug one end of your telephone cord into the additional device, such as an answering machine or messaging system, by connecting it to the TEL Jack on the back of your H/O 100/200 phone. Plug the other end of the telephone cord into the TEL Jack on the back of the telephone cord into your H/O 100/200 phone. 1. Installing Additional Equipment You can install additional equipment, such as an answering machine. 10
English Owners Manual
Page 14
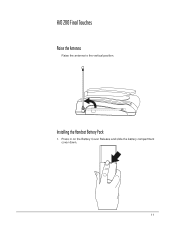
H/O 200 Final Touches Raise the Antenna Raise the antenna to the vertical position. Installing the Handset Battery Pack 1. Press in on the Battery Cover Release and slide the battery compartment cover down. 11
H/O 200 Final Touches Raise the Antenna Raise the antenna to the vertical position. Installing the Handset Battery Pack 1. Press in on the Battery Cover Release and slide the battery compartment cover down. 11
English Owners Manual
Page 15
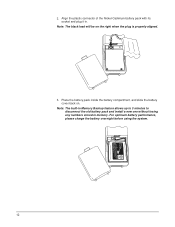
2. Note: The built-in Memory Backup feature allows up to 3 minutes to disconnect the old battery pack and install a new one without losing any numbers stored in . Note: The black lead will be on . For optimum battery performance, please charge the battery overnight before using the system. 12 Align the plastic connector of the Nickel-Cadmium battery pack with its socket and plug it in memory. Place the battery pack inside the battery compartment, and slide the battery cover back on the right when the plug is properly aligned. 3.
2. Note: The built-in Memory Backup feature allows up to 3 minutes to disconnect the old battery pack and install a new one without losing any numbers stored in . Note: The black lead will be on . For optimum battery performance, please charge the battery overnight before using the system. 12 Align the plastic connector of the Nickel-Cadmium battery pack with its socket and plug it in memory. Place the battery pack inside the battery compartment, and slide the battery cover back on the right when the plug is properly aligned. 3.
English Owners Manual
Page 16
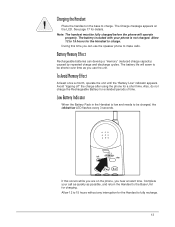
The battery life will seem to 15 hours without any interruption for charging. Also, do not charge the Rechargeable Battery for details. See page 17 for extended periods of time. Allow 12 to be fully charged before the phone will operate properly. Battery Memory Effect Rechargeable batteries can use the unit. The battery included with your call as quickly as you use the speaker phone to charge. Complete your phone is low and needs to charge. The Charge message appears on the LCD. Avoid "topping off" the charge after using the phone for the Handset to make ...
The battery life will seem to 15 hours without any interruption for charging. Also, do not charge the Rechargeable Battery for details. See page 17 for extended periods of time. Allow 12 to be fully charged before the phone will operate properly. Battery Memory Effect Rechargeable batteries can use the unit. The battery included with your call as quickly as you use the speaker phone to charge. Complete your phone is low and needs to charge. The Charge message appears on the LCD. Avoid "topping off" the charge after using the phone for the Handset to make ...

English Owners Manual
Page 17
Plug one end of the Handset cord into the H/O 100 Handset. 2. Do not use any liquids or solvents. Cleaning the Battery Contacts To maintain a good charge, it is important to clean all battery contacts on the Handset and Base Unit about once a month. Use a pencil eraser or other end of the Handset cord into the Base. 14 H/O 100 Final Touches Attach the Handset 1. Plug the other contact cleaner.
Plug one end of the Handset cord into the H/O 100 Handset. 2. Do not use any liquids or solvents. Cleaning the Battery Contacts To maintain a good charge, it is important to clean all battery contacts on the Handset and Base Unit about once a month. Use a pencil eraser or other end of the Handset cord into the Base. 14 H/O 100 Final Touches Attach the Handset 1. Plug the other contact cleaner.
English Owners Manual
Page 18
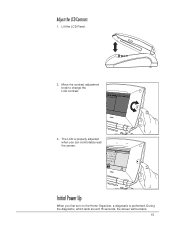
Lift the LCD Panel. 2. The LCD is performed. Move the contrast adjustment knob to change the LCD contrast. 3. Adjust the LCD Contrast 1. A IS setup Initial Power Up When you first turn on the Home Organizer, a diagnostic is properly adjusted when you can comfortably read the screen. During the diagnostic, which lasts around 15 seconds, the screen will be blank. 15
Lift the LCD Panel. 2. The LCD is performed. Move the contrast adjustment knob to change the LCD contrast. 3. Adjust the LCD Contrast 1. A IS setup Initial Power Up When you first turn on the Home Organizer, a diagnostic is properly adjusted when you can comfortably read the screen. During the diagnostic, which lasts around 15 seconds, the screen will be blank. 15
English Owners Manual
Page 20
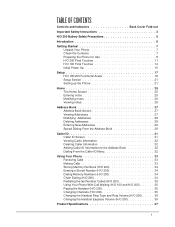
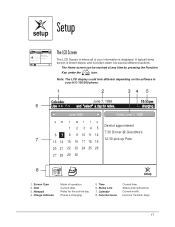
Notepad 4. Phone is broken down into several different sections. Calendar 8. Screen Type 2. Current date. Status and instructions. Charge Indicator Mode of your H/O 100/200 phone. 1 2 34 5 Calendar 6 June 7, 1999 10:55pm June 1999 Notes: June 7, 1999 sm t wt f s Dentist appointment 1 2 345 7:30 Dinner @ Grandma's 6 8 9 10 11 12 7 12:30 pick up Pete setup The LCD Screen The LCD Screen is displayed. Time 6. Function Icons Current time. The Home screen can be reached at any time by pressing the Function h Key under the icon. Date 3. Current month. ...
Notepad 4. Phone is broken down into several different sections. Calendar 8. Screen Type 2. Current date. Status and instructions. Charge Indicator Mode of your H/O 100/200 phone. 1 2 34 5 Calendar 6 June 7, 1999 10:55pm June 1999 Notes: June 7, 1999 sm t wt f s Dentist appointment 1 2 345 7:30 Dinner @ Grandma's 6 8 9 10 11 12 7 12:30 pick up Pete setup The LCD Screen The LCD Screen is displayed. Time 6. Function Icons Current time. The Home screen can be reached at any time by pressing the Function h Key under the icon. Date 3. Current month. ...
English Owners Manual
Page 21
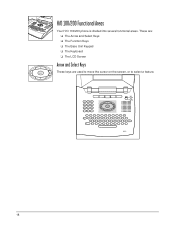
H/O 100/200 Functional Areas Your H/O 100/200 phone is divided into several functional areas. These are: t The Arrow and Select Keys t The Function Keys t The Base Unit Keypad t The Keyboard t The LCD Screen Arrow and Select Keys These keys are used to move the cursor on the screen, or to select a feature. 18
H/O 100/200 Functional Areas Your H/O 100/200 phone is divided into several functional areas. These are: t The Arrow and Select Keys t The Function Keys t The Base Unit Keypad t The Keyboard t The LCD Screen Arrow and Select Keys These keys are used to move the cursor on the screen, or to select a feature. 18
English Owners Manual
Page 22
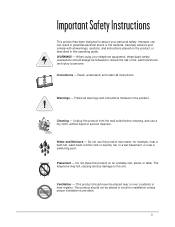
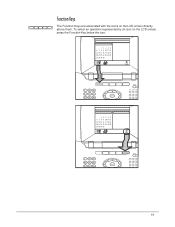
Function Keys The Function Keys are associated with the icons on the LCD screen, press the Function Key below the icon. 12345 6 7 8 9 10 11 12 13 14 15 16 17 18 19 20 21 22 23 24 25 26 27 28 29 30 setup 12345 6 7 8 9 10 11 12 13 14 15 16 17 18 19 20 21 22 23 24 25 26 27 28 29 30 setup 19 To select an operation represented by an icon on the LCD screen directly above them.
Function Keys The Function Keys are associated with the icons on the LCD screen, press the Function Key below the icon. 12345 6 7 8 9 10 11 12 13 14 15 16 17 18 19 20 21 22 23 24 25 26 27 28 29 30 setup 12345 6 7 8 9 10 11 12 13 14 15 16 17 18 19 20 21 22 23 24 25 26 27 28 29 30 setup 19 To select an operation represented by an icon on the LCD screen directly above them.
English Owners Manual
Page 23
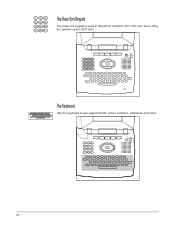
The Base Unit Keypad The base unit keypad is used to type appointments, phone numbers, addresses and notes. 20 The Keyboard Use the keyboard to dial phone numbers (H/O 100) and when using the speaker option (H/O 200).
The Base Unit Keypad The base unit keypad is used to type appointments, phone numbers, addresses and notes. 20 The Keyboard Use the keyboard to dial phone numbers (H/O 100) and when using the speaker option (H/O 200).