
English Owners Manual
Page 3
...channels, provides you to hang up by other equipment, the EXA7950 has Random Code™ digital security which automatically selects one of the Uniden EXA7950 cordless telephone and answering system. AutoStandby allows you with the ...best possible reception during all your purchase of over 65,000 digital security codes for reliability, long life, and outstanding performance. The UltraClear Plus™ true compander circuitry virtually eliminates background noise. INTRODUCTION TO YOUR NEW PHONE...
...channels, provides you to hang up by other equipment, the EXA7950 has Random Code™ digital security which automatically selects one of the Uniden EXA7950 cordless telephone and answering system. AutoStandby allows you with the ...best possible reception during all your purchase of over 65,000 digital security codes for reliability, long life, and outstanding performance. The UltraClear Plus™ true compander circuitry virtually eliminates background noise. INTRODUCTION TO YOUR NEW PHONE...

English Owners Manual
Page 4
to complete and mail the product registration form. INCLUDED IN YOUR PACKAGE Handset Base AC Adapter NOTE If any of these items are from your phone, please read this owner's manual thoroughly. TIP To get the most from 8:30 a.m. Central Time, Monday through Friday. Rechargeable Battery Telephone Cord Wall Mount Adapter ... Card 2 We can also be sure to 5:00 p.m. Also be reached on the web at (800) 554-3988. Hours are missing or damaged, contact the Uniden Parts Department at www...
to complete and mail the product registration form. INCLUDED IN YOUR PACKAGE Handset Base AC Adapter NOTE If any of these items are from your phone, please read this owner's manual thoroughly. TIP To get the most from 8:30 a.m. Central Time, Monday through Friday. Rechargeable Battery Telephone Cord Wall Mount Adapter ... Card 2 We can also be sure to 5:00 p.m. Also be reached on the web at (800) 554-3988. Hours are missing or damaged, contact the Uniden Parts Department at www...
English Owners Manual
Page 5
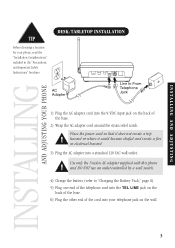
Use only the Uniden AC adapter supplied with this phone and DO NOT use an outlet controlled by a wall switch. 4) Charge the battery (refer to "Charging the Battery Pack," page 8). 5) Plug one end of the ... the "Installation Considerations" included in the "Precautions and Important Safety Instructions" brochure. Installing and Adjusting Your Phone DESK/TABLETOP INSTALLATION INSTALLING AND ADJUSTING YOUR PHONE INSTALLING AND ADJUSTING 1) Plug the AC adapter cord into the 9 VDC input jack on the back of the cord into a standard 120 VAC wall outlet. ...
Use only the Uniden AC adapter supplied with this phone and DO NOT use an outlet controlled by a wall switch. 4) Charge the battery (refer to "Charging the Battery Pack," page 8). 5) Plug one end of the ... the "Installation Considerations" included in the "Precautions and Important Safety Instructions" brochure. Installing and Adjusting Your Phone DESK/TABLETOP INSTALLATION INSTALLING AND ADJUSTING YOUR PHONE INSTALLING AND ADJUSTING 1) Plug the AC adapter cord into the 9 VDC input jack on the back of the cord into a standard 120 VAC wall outlet. ...
English Owners Manual
Page 6
... Place the power cord so that it does not create a trip hazard or where it around the strain relief notch. w Standard wall plate mounting This phone can be mounted on a desk or tabletop, and place the handset into the base as shown. HINT Before using your... phone, fully charge the NickelCadmium battery pack for 15-20 hours. 7) Set the base on any standard AT&T or GTE wall plate. 1) Slide the wall mount ...
... Place the power cord so that it does not create a trip hazard or where it around the strain relief notch. w Standard wall plate mounting This phone can be mounted on a desk or tabletop, and place the handset into the base as shown. HINT Before using your... phone, fully charge the NickelCadmium battery pack for 15-20 hours. 7) Set the base on any standard AT&T or GTE wall plate. 1) Slide the wall mount ...

English Owners Manual
Page 7
This will hold the handset in and down until the phone is at the bottom of the slot and rotate it back into the modular jack on the wall, charge the battery (refer to "Charging the ...
This will hold the handset in and down until the phone is at the bottom of the slot and rotate it back into the modular jack on the wall, charge the battery (refer to "Charging the ...

English Owners Manual
Page 8
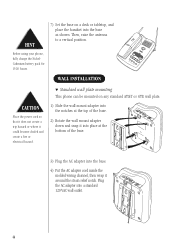
...the base. 4) Plug the AC adapter into the base. 6 Allow about 3/16 of an inch between the wall and screw heads for mounting the phone. 2) Slide the wall mount into the notches at the top of the base. 3) Rotate the wall mount adapter down and snap it into place ...such as this , consider the following: • Select a location away from electrical cables, pipes, or other items behind it, you are not mounting your phone directly to a wall plate with their appropriate anchoring device if necessary, 3-15/16 inches apart. Remember, you will need the appropriate anchoring devices in order...
...the base. 4) Plug the AC adapter into the base. 6 Allow about 3/16 of an inch between the wall and screw heads for mounting the phone. 2) Slide the wall mount into the notches at the top of the base. 3) Rotate the wall mount adapter down and snap it into place ...such as this , consider the following: • Select a location away from electrical cables, pipes, or other items behind it, you are not mounting your phone directly to a wall plate with their appropriate anchoring device if necessary, 3-15/16 inches apart. Remember, you will need the appropriate anchoring devices in order...
English Owners Manual
Page 9
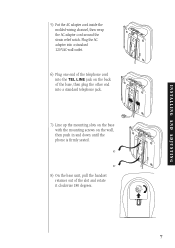
Plug the AC adapter into a standard 120 VAC wall outlet. 6) Plug one end of the telephone cord into the TEL LINE jack on the back of the base, then plug the other end into a standard telephone jack. 7) Line up the mounting slots on the base with the mounting screws on the wall, then push in and down until the phone is firmly seated. 8) On the base unit, pull the handset retainer out of the slot and rotate it clockwise 180 degrees. 7 INSTALLING AND ADJUSTING 5) Put the AC adapter cord inside the molded wiring channel, then wrap the AC adapter cord around the strain relief notch.
Plug the AC adapter into a standard 120 VAC wall outlet. 6) Plug one end of the telephone cord into the TEL LINE jack on the back of the base, then plug the other end into a standard telephone jack. 7) Line up the mounting slots on the base with the mounting screws on the wall, then push in and down until the phone is firmly seated. 8) On the base unit, pull the handset retainer out of the slot and rotate it clockwise 180 degrees. 7 INSTALLING AND ADJUSTING 5) Put the AC adapter cord inside the molded wiring channel, then wrap the AC adapter cord around the strain relief notch.

English Owners Manual
Page 10
... w Initial battery charging Before plugging the phone line into the handset 1 2 3) Replace the battery cover. 3 The plastic connectors will hold the handset in and that the lip of the retainer faces up and the oval is at the bottom of the retainer. Use only the Uniden battery pack (model BT-905). If...
... w Initial battery charging Before plugging the phone line into the handset 1 2 3) Replace the battery cover. 3 The plastic connectors will hold the handset in and that the lip of the retainer faces up and the oval is at the bottom of the retainer. Use only the Uniden battery pack (model BT-905). If...

English Owners Manual
Page 11
...base. PAGE To locate the handset (while it's off the base), press page on the handset and base about once a month with your phone. you may damage your conversation as quickly as possible and return the handset to the base for 60 seconds. Paging is canceled, when the handset...batt LED flashes every three seconds. INSTALLING AND ADJUSTING ! If the phone is in use liquids or solvents; If the phone is not in use, the talk/batt LED flashes every three seconds and the handset beeps. Use only the Uniden battery (BT-905) supplied with a pencil eraser or other contact cleaner...
...base. PAGE To locate the handset (while it's off the base), press page on the handset and base about once a month with your phone. you may damage your conversation as quickly as possible and return the handset to the base for 60 seconds. Paging is canceled, when the handset...batt LED flashes every three seconds. INSTALLING AND ADJUSTING ! If the phone is in use liquids or solvents; If the phone is not in use, the talk/batt LED flashes every three seconds and the handset beeps. Use only the Uniden battery (BT-905) supplied with a pencil eraser or other contact cleaner...

English Owners Manual
Page 12
...each with your system is in standby mode, pressing the volume key on , select the RINGER ON position. Check with two volume levels; TIP Most phone systems use tone dialing. high and low. w Base unit ringer on-off , select the RINGER OFF position. 10 Press volume to select Normal, ...High or Loud. When you 're not sure whether your local phone company if you hang up, the phone keeps the last volume setting selected. SETTING THE PULSE/TONE SWITCH Be sure the PULSE/TONE switch is tone or pulse. w ...
...each with your system is in standby mode, pressing the volume key on , select the RINGER ON position. Check with two volume levels; TIP Most phone systems use tone dialing. high and low. w Base unit ringer on-off , select the RINGER OFF position. 10 Press volume to select Normal, ...High or Loud. When you 're not sure whether your local phone company if you hang up, the phone keeps the last volume setting selected. SETTING THE PULSE/TONE SWITCH Be sure the PULSE/TONE switch is tone or pulse. w ...

English Owners Manual
Page 13
INSTALLING AND ADJUSTING AUTOMATIC DIGITAL CODE SECURITY To prevent other parties from making unauthorized calls on the base. Your phone's handset and base share this code, which is reset. 11 The status LED blinks to the EXA7950. w To reestablish communication between the handset and the base in the event of a power failure 1) Restore power to the base. 2) Place the handset on your phone line, a digital code was added to indicate that the digital security code is randomly set each time you place the handset in the charging cradle.
INSTALLING AND ADJUSTING AUTOMATIC DIGITAL CODE SECURITY To prevent other parties from making unauthorized calls on the base. Your phone's handset and base share this code, which is reset. 11 The status LED blinks to the EXA7950. w To reestablish communication between the handset and the base in the event of a power failure 1) Restore power to the base. 2) Place the handset on your phone line, a digital code was added to indicate that the digital security code is randomly set each time you place the handset in the charging cradle.

English Owners Manual
Page 14
... waiting call. Press talk, or return the handset to the original caller, press flash again. 12 Using Your New Phone MAKING AND RECEIVING CALLS Handset On Base Handset Off Base USING YOUR NEW PHONE To answer Pick up the handset. 2) Press talk. 3) Listen for the dial tone. 4) Dial the number. 1) Press talk...
... waiting call. Press talk, or return the handset to the original caller, press flash again. 12 Using Your New Phone MAKING AND RECEIVING CALLS Handset On Base Handset Off Base USING YOUR NEW PHONE To answer Pick up the handset. 2) Press talk. 3) Listen for the dial tone. 4) Dial the number. 1) Press talk...
English Owners Manual
Page 15
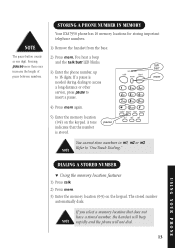
... a memory location that the number is needed during dialing to access a long distance or other service, press pause to "One-Touch Dialing." STORING A PHONE NUMBER IN MEMORY Your EXA7950 phone has 10 memory locations for storing important telephone numbers. 1) Remove the handset from the base. 2) Press mem. A tone indicates that does not have...
... a memory location that the number is needed during dialing to access a long distance or other service, press pause to "One-Touch Dialing." STORING A PHONE NUMBER IN MEMORY Your EXA7950 phone has 10 memory locations for storing important telephone numbers. 1) Remove the handset from the base. 2) Press mem. A tone indicates that does not have...
English Owners Manual
Page 16
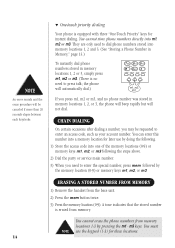
... procedure will be requested to enter an access code, such as your account number. the phone will not dial. You can enter this number into one of the memory locations (0-9) or...may be canceled if more than 20 seconds elapse between each keystroke. w One-touch priority dialing Your phone is no phone number was stored in memory locations 1, 2 or 3, simply press m1, m2 or m3. (There...Priority" keys for later use the keypad (1-3) for these locations. 14 They are only used to dial phone numbers stored into m1, m2 or m3. You must NOTE use by the memory location (0-9) or memory ...
... procedure will be requested to enter an access code, such as your account number. the phone will not dial. You can enter this number into one of the memory locations (0-9) or...may be canceled if more than 20 seconds elapse between each keystroke. w One-touch priority dialing Your phone is no phone number was stored in memory locations 1, 2 or 3, simply press m1, m2 or m3. (There...Priority" keys for later use the keypad (1-3) for these locations. 14 They are only used to dial phone numbers stored into m1, m2 or m3. You must NOTE use by the memory location (0-9) or memory ...

English Owners Manual
Page 17
... resumes. TONE If you begin to answer a call will terminate within 20 seconds. Then press speaker on the base. You can be up . USING YOUR PHONE 15 USING THE SPEAKERPHONE To use the speakerphone while making a call tone 0oper # redial pause chan volume has ended, the tone mode is set up...
... resumes. TONE If you begin to answer a call will terminate within 20 seconds. Then press speaker on the base. You can be up . USING YOUR PHONE 15 USING THE SPEAKERPHONE To use the speakerphone while making a call tone 0oper # redial pause chan volume has ended, the tone mode is set up...
English Owners Manual
Page 18
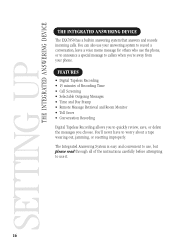
...INTEGRATED ANSWERING DEVICE Setting Up the Integrated Answering Device THE INTEGRATED ANSWERING DEVICE The EXA7950 has a built-in answering system that answers and records incoming calls. You can also use your phone. FEATURES • Digital Tapeless Recording • 15 minutes of the instructions carefully...delete the messages you 're away from your answering system to record a conversation, leave a voice memo message for others who use the phone, or to announce a special message to use , but please read through all of Recording Time • Call Screening • Selectable Outgoing...
...INTEGRATED ANSWERING DEVICE Setting Up the Integrated Answering Device THE INTEGRATED ANSWERING DEVICE The EXA7950 has a built-in answering system that answers and records incoming calls. You can also use your phone. FEATURES • Digital Tapeless Recording • 15 minutes of the instructions carefully...delete the messages you 're away from your answering system to record a conversation, leave a voice memo message for others who use the phone, or to announce a special message to use , but please read through all of Recording Time • Call Screening • Selectable Outgoing...

English Owners Manual
Page 27
... answering system from a remote location using your PIN code. NOTE A voice memo message is treated as a typical recorded message and will be heard by your phone. 1) During a conversation, press voice memo. RECORDING A CONVERSATION You can be added to stop or voice memo again. A beep that can record up to a 15 minute...
... answering system from a remote location using your PIN code. NOTE A voice memo message is treated as a typical recorded message and will be heard by your phone. 1) During a conversation, press voice memo. RECORDING A CONVERSATION You can be added to stop or voice memo again. A beep that can record up to a 15 minute...

English Owners Manual
Page 29
... and day stamp. Or, select another 15 seconds. , ANSWERING DEVICE USE , REMOTE ROOM MONITOR You can call your answering system from any touch-tone phone and monitor sounds in the room where your phone is installed. 1) Call your telephone number. 2) During the outgoing message playback, press # followed by your base is installed.
... and day stamp. Or, select another 15 seconds. , ANSWERING DEVICE USE , REMOTE ROOM MONITOR You can call your answering system from any touch-tone phone and monitor sounds in the room where your phone is installed. 1) Call your telephone number. 2) During the outgoing message playback, press # followed by your base is installed.
English Owners Manual
Page 30
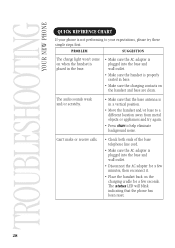
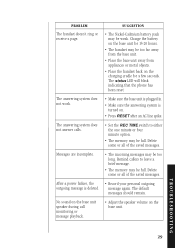
... QUICK REFERENCE CHART If your phone is not performing to your expectations, please try again. • Press chan to a different location away from metal objects or appliances and try these simple ... it. • Place the handset back on the handset and base are clean. The audio sounds weak and/or scratchy. • Make sure that the phone has been reset. 28
... QUICK REFERENCE CHART If your phone is not performing to your expectations, please try again. • Press chan to a different location away from metal objects or appliances and try these simple ... it. • Place the handset back on the handset and base are clean. The audio sounds weak and/or scratchy. • Make sure that the phone has been reset. 28
English Owners Manual
Page 31
.... No sound on the charging cradle for 15-20 hours. • The handset may be too long. The status LED will blink indicating that the phone has been reset. • Make sure the base unit is plugged in. • Make sure the answering system is deleted. SUGGESTION • The Nickel-Cadmium...
.... No sound on the charging cradle for 15-20 hours. • The handset may be too long. The status LED will blink indicating that the phone has been reset. • Make sure the base unit is plugged in. • Make sure the answering system is deleted. SUGGESTION • The Nickel-Cadmium...

