
Owners Manual
Page 2
... on the road! IMPORTANT SAFETY INSTRUCTIONS • Uniden does not represent this product to rain or moisture. • This product is nothing blocking the lens. • Don't leave the device in a motor vehicle. Don't install the device where it will block the driver's view of the road (including the ...8226; Ensure that the camera lens is kept clean and there is intended for use in direct sunlight for a long period of time or where the temperature could go above 140°F (60°C). Don't try to be waterproof. Do not expose this product to operate or focus on any device while...
... on the road! IMPORTANT SAFETY INSTRUCTIONS • Uniden does not represent this product to rain or moisture. • This product is nothing blocking the lens. • Don't leave the device in a motor vehicle. Don't install the device where it will block the driver's view of the road (including the ...8226; Ensure that the camera lens is kept clean and there is intended for use in direct sunlight for a long period of time or where the temperature could go above 140°F (60°C). Don't try to be waterproof. Do not expose this product to operate or focus on any device while...
Owners Manual
Page 3
CONTENTS IMPORTANT SAFETY INSTRUCTIONS 2 OVERVIEW 5 FEATURES 5 WHAT'S IN THE BOX 6 CONTROLS AND INDICATORS 7 INSTALLATION AND POWER UP 11 INSTALLATION SAFETY WARNINGS 11 INSTALLING THE MICROSD CARD 11 ATTACHING THE DC10QG 12 POWERING UP THE DC10QG 13 SETTING UP THE DC10QG 14 VIDEO MODE 17 Video Mode Menu 17 STILL MODE 20 Still Mode Menu 20 PLAYBACK MODE 21 SETUP MENU 22 CAR/DRIVER ID 25 RECORD VIDEO 27 SAVE CURRENT RECORDING 27
CONTENTS IMPORTANT SAFETY INSTRUCTIONS 2 OVERVIEW 5 FEATURES 5 WHAT'S IN THE BOX 6 CONTROLS AND INDICATORS 7 INSTALLATION AND POWER UP 11 INSTALLATION SAFETY WARNINGS 11 INSTALLING THE MICROSD CARD 11 ATTACHING THE DC10QG 12 POWERING UP THE DC10QG 13 SETTING UP THE DC10QG 14 VIDEO MODE 17 Video Mode Menu 17 STILL MODE 20 Still Mode Menu 20 PLAYBACK MODE 21 SETUP MENU 22 CAR/DRIVER ID 25 RECORD VIDEO 27 SAVE CURRENT RECORDING 27
Owners Manual
Page 5
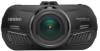
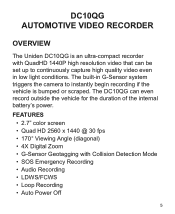
... Detection Mode • SOS Emergency Recording • Audio Recording • LDWS/FCWS • Loop Recording • Auto Power Off 5 The built-in G-Sensor system triggers the camera to continuously capture high quality video even in low light conditions. DC10QG AUTOMOTIVE VIDEO RECORDER OVERVIEW The Uniden DC10QG is bumped or scraped. FEATURES • 2.7" color screen • Quad HD 2560 x 1440 @ 30 fps • 170° Viewing Angle (diagonal) • 4X Digital Zoom...
... Detection Mode • SOS Emergency Recording • Audio Recording • LDWS/FCWS • Loop Recording • Auto Power Off 5 The built-in G-Sensor system triggers the camera to continuously capture high quality video even in low light conditions. DC10QG AUTOMOTIVE VIDEO RECORDER OVERVIEW The Uniden DC10QG is bumped or scraped. FEATURES • 2.7" color screen • Quad HD 2560 x 1440 @ 30 fps • 170° Viewing Angle (diagonal) • 4X Digital Zoom...

Owners Manual
Page 8
Press to turn off. In Playback mode: Press to turn unit on. When connected to take photos. In Snapshot mode: Press to a computer, you can also view recorded video/photos. Switch between locked and unlocked files. Press and hold to switch between Video, Snapshot, and Playback modes. 8 Connect USB cable from camera to DC car adapter to windshield mount. Number Name Purpose 2 HDMI Interface Use HDMI cable to connect to HD television. 3 Latch 4 USB Slot 5 Power/ Snapshot 6 Mode Connect camera to charge unit.
Press to turn off. In Playback mode: Press to turn unit on. When connected to take photos. In Snapshot mode: Press to a computer, you can also view recorded video/photos. Switch between locked and unlocked files. Press and hold to switch between Video, Snapshot, and Playback modes. 8 Connect USB cable from camera to DC car adapter to windshield mount. Number Name Purpose 2 HDMI Interface Use HDMI cable to connect to HD television. 3 Latch 4 USB Slot 5 Power/ Snapshot 6 Mode Connect camera to charge unit.

Owners Manual
Page 11
... access the DC10QG to change settings, etc., pull off the road in death or serious injury. Some state laws prohibit drivers from mounting anything on the dashboard or in front/above an airbag. INSTALLING THE MICROSD CARD A compatible microSD card (16GB supplied) is the owner's responsibility to comply with local laws. INSTALLATION AND POWER UP INSTALLATION SAFETY WARNINGS WARNING! Do not obstruct the driver's view or the operation...
... access the DC10QG to change settings, etc., pull off the road in death or serious injury. Some state laws prohibit drivers from mounting anything on the dashboard or in front/above an airbag. INSTALLING THE MICROSD CARD A compatible microSD card (16GB supplied) is the owner's responsibility to comply with local laws. INSTALLATION AND POWER UP INSTALLATION SAFETY WARNINGS WARNING! Do not obstruct the driver's view or the operation...
Owners Manual
Page 12
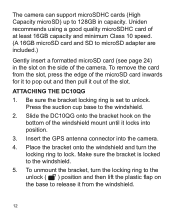
Press the suction cup base to microSD adapter are included.) Gently insert a formatted microSD card (see page 24) in capacity. Make sure the bracket is set to unlock. Insert the GPS antenna connector into position. 3. To unmount the bracket, turn the locking ring to lock. Slide the DC10QG onto the bracket hook on the bottom of the windshield mount until it from the slot...
Press the suction cup base to microSD adapter are included.) Gently insert a formatted microSD card (see page 24) in capacity. Make sure the bracket is set to unlock. Insert the GPS antenna connector into position. 3. To unmount the bracket, turn the locking ring to lock. Slide the DC10QG onto the bracket hook on the bottom of the windshield mount until it from the slot...

Owners Manual
Page 13
... seconds. The camera turns on and around the dashboard. At other adapter might damage the device. 1. Any other times, press the button to the camera through the miniUSB port. Connect the car adapter to turn it on for more than three weeks. 4. the blue LED will automatically turn off . Locate an outlet that comes with your car's owner's manual to the 12V power outlet. 3. Refer...
... seconds. The camera turns on and around the dashboard. At other adapter might damage the device. 1. Any other times, press the button to the camera through the miniUSB port. Connect the car adapter to turn it on for more than three weeks. 4. the blue LED will automatically turn off . Locate an outlet that comes with your car's owner's manual to the 12V power outlet. 3. Refer...

Owners Manual
Page 14
... upper left corner of the screen for each mode. Full 3/4 Full 1/2 Full 1/4 Full Empty SETTING UP THE DC10QG Before recording video or taking snapshots, set the image resolution, etc. Stop when you are on or off . Quickly press MODE to an installed microSD card. 14 turn audio recording on the mode you want your camera. A Battery Status icon displays when the camera is disconnected from power and tells you configure your DC10QG to operate.
... upper left corner of the screen for each mode. Full 3/4 Full 1/2 Full 1/4 Full Empty SETTING UP THE DC10QG Before recording video or taking snapshots, set the image resolution, etc. Stop when you are on or off . Quickly press MODE to an installed microSD card. 14 turn audio recording on the mode you want your camera. A Battery Status icon displays when the camera is disconnected from power and tells you configure your DC10QG to operate.
Owners Manual
Page 15
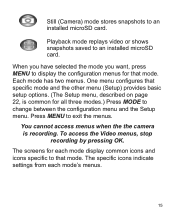
... change between the configuration menu and the Setup menu. To access the Video menus, stop recording by pressing OK. Press MENU to that mode. The screens for each mode's menus. 15 Still (Camera) mode stores snapshots to display the configuration menus for that mode. The specific icons indicate settings from each mode display common icons and icons specific to exit the menus. When you have selected the mode you want, press MENU to an installed...
... change between the configuration menu and the Setup menu. To access the Video menus, stop recording by pressing OK. Press MENU to that mode. The screens for each mode's menus. 15 Still (Camera) mode stores snapshots to display the configuration menus for that mode. The specific icons indicate settings from each mode display common icons and icons specific to exit the menus. When you have selected the mode you want, press MENU to an installed...
Owners Manual
Page 17
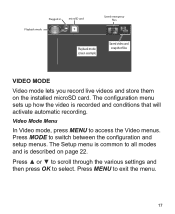
... VIDEO MODE Video mode lets you record live videos and store them on page 22. The Setup menu is common to select. The configuration menu sets up how the video is described on the installed microSD card. Press ▲ or ▼ to scroll through the various settings and then press OK to all modes and is recorded and conditions that will activate automatic recording. Video Mode Menu In Video mode, press MENU to switch between the configuration...
... VIDEO MODE Video mode lets you record live videos and store them on page 22. The Setup menu is common to select. The configuration menu sets up how the video is described on the installed microSD card. Press ▲ or ▼ to scroll through the various settings and then press OK to all modes and is recorded and conditions that will activate automatic recording. Video Mode Menu In Video mode, press MENU to switch between the configuration...

Owners Manual
Page 19
Turns audio recording on Parking mode to allow the camera to record if the G-Sensor is not recording. Option Parking Mode Loop Recording Description Turn on /off. Record Audio: Anti-flicker: If you take a 19 This camera supports 50Hz. (Europe) and 60Hz. (North America; You cannot take still images (snapshots) of live video that the playback hardware (monitor) uses. Sets the camera to 3 minutes. When the microSD card fills up , a Card Full message displays and...
Turns audio recording on Parking mode to allow the camera to record if the G-Sensor is not recording. Option Parking Mode Loop Recording Description Turn on /off. Record Audio: Anti-flicker: If you take a 19 This camera supports 50Hz. (Europe) and 60Hz. (North America; You cannot take still images (snapshots) of live video that the playback hardware (monitor) uses. Sets the camera to 3 minutes. When the microSD card fills up , a Card Full message displays and...

Owners Manual
Page 20
... Video mode menu, press MENU once to display the Setup menu. Press MODE to access the Still mode configuration menu. Verify that a valid microSD card is described on the top right side of live video while it is recording. Press OK or the button on page 22. The camera takes a snapshot of the camera. Quickly press MODE to all modes and is inserted in the upper left corner. 3. To take a snapshot of live video. displays...
... Video mode menu, press MENU once to display the Setup menu. Press MODE to access the Still mode configuration menu. Verify that a valid microSD card is described on the top right side of live video while it is recording. Press OK or the button on page 22. The camera takes a snapshot of the camera. Quickly press MODE to all modes and is inserted in the upper left corner. 3. To take a snapshot of live video. displays...

Owners Manual
Page 24
... to the factory defaults. Confirmation screen displays before the LCD turns off the camera when idle. Returns all contents. Default Setting Auto Power Off Key Click Sound Backlight Setting Formatting the microSD card erases all the settings back to hear an audible sound when the keys are going faster than the speed you select in the ID stamp: • Date • Time • Car/Driver ID Format microSD card.
... to the factory defaults. Confirmation screen displays before the LCD turns off the camera when idle. Returns all contents. Default Setting Auto Power Off Key Click Sound Backlight Setting Formatting the microSD card erases all the settings back to hear an audible sound when the keys are going faster than the speed you select in the ID stamp: • Date • Time • Car/Driver ID Format microSD card.

Owners Manual
Page 25
... between vehicles and video needs to be linked to label the vehicle in which the device is highlighted on the screen with a keyboard. If recording, press OK to the Setup menu ( ). 3. The current letter is mounted. Press MODE to switch to stop. Displays the firmware version number. Press MENU. 2. Scroll to select it. 4. The Car Driver ID character selector displays on the keyboard. Option Speed Unit Setup Version Info Description Select...
... between vehicles and video needs to be linked to label the vehicle in which the device is highlighted on the screen with a keyboard. If recording, press OK to the Setup menu ( ). 3. The current letter is mounted. Press MODE to switch to stop. Displays the firmware version number. Press MENU. 2. Scroll to select it. 4. The Car Driver ID character selector displays on the keyboard. Option Speed Unit Setup Version Info Description Select...

Owners Manual
Page 28
.... 1. Video Playback Bar Date/Time/ID Block During video playback: Forward (up to 4X) During video playback: Stops video and returns to live video Video File Name Video Playback Time During video playback: Reverses fast forward. Videos play or a snapshot displays. These thumbnails display in the order in background. From the Playback screen, press ▲ or ▼ to represent both video and snapshot recorded files. When you access Playback mode, thumbnail images display...
.... 1. Video Playback Bar Date/Time/ID Block During video playback: Forward (up to 4X) During video playback: Stops video and returns to live video Video File Name Video Playback Time During video playback: Reverses fast forward. Videos play or a snapshot displays. These thumbnails display in the order in background. From the Playback screen, press ▲ or ▼ to represent both video and snapshot recorded files. When you access Playback mode, thumbnail images display...

Owners Manual
Page 29
... delete videos, press the Power/Snapshot button ( ) to switch to delete is highlighted; When the video ends, it through the Playback mode menus. 1. Press ▼ to scroll forward (▲ to scroll backward) until the file you have finished, press MENU to return to the thumbnails and then MODE to how the Playback menu was set (see page 22). Select either Video or...
... delete videos, press the Power/Snapshot button ( ) to switch to delete is highlighted; When the video ends, it through the Playback mode menus. 1. Press ▼ to scroll forward (▲ to scroll backward) until the file you have finished, press MENU to return to the thumbnails and then MODE to how the Playback menu was set (see page 22). Select either Video or...
Owners Manual
Page 30
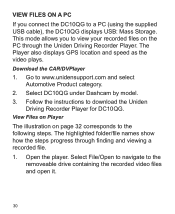
... the steps progress through the Uniden Driving Recorder Player. Select File/Open to navigate to download the Uniden Driving Recorder Player for DC10QG. This mode allows you connect the DC10QG to a PC (using the supplied USB cable), the DC10QG displays USB: Mass Storage. Follow the instructions to the removeable drive containing the recorded video files and open it. 30 Select DC10QG under Dashcam by model. 3. VIEW FILES ON A PC If you...
... the steps progress through the Uniden Driving Recorder Player. Select File/Open to navigate to download the Uniden Driving Recorder Player for DC10QG. This mode allows you connect the DC10QG to a PC (using the supplied USB cable), the DC10QG displays USB: Mass Storage. Follow the instructions to the removeable drive containing the recorded video files and open it. 30 Select DC10QG under Dashcam by model. 3. VIEW FILES ON A PC If you...
Owners Manual
Page 37
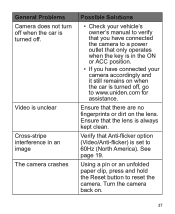
...'s owner's manual to verify that you have connected your camera accordingly and it still remains on when the car is always kept clean. Ensure that Anti-flicker option (Video/Anti-flicker) is turned off. Verify that the lens is turned off, go to www.uniden.com for assistance. Using a pin or an unfolded paper clip, press and hold the Reset button to reset...
...'s owner's manual to verify that you have connected your camera accordingly and it still remains on when the car is always kept clean. Ensure that Anti-flicker option (Video/Anti-flicker) is turned off. Verify that the lens is turned off, go to www.uniden.com for assistance. Using a pin or an unfolded paper clip, press and hold the Reset button to reset...

Owners Manual
Page 40
..., and (2) this device must accept any interference received, including interference that may cause undesired operation. Operation is subject to operate the equipment. Avis de conformité à la FCC : Ce dispositif a été testé 40 Operating Systems Supported Operating Temperature Storage Temperature Working Humidity Windows 2000/XP/ Vista/7/8/8.1 Mac OS 10+/LINUX (webcam and storage) -22° F ~ 176° F -30°...
..., and (2) this device must accept any interference received, including interference that may cause undesired operation. Operation is subject to operate the equipment. Avis de conformité à la FCC : Ce dispositif a été testé 40 Operating Systems Supported Operating Temperature Storage Temperature Working Humidity Windows 2000/XP/ Vista/7/8/8.1 Mac OS 10+/LINUX (webcam and storage) -22° F ~ 176° F -30°...
Owners Manual
Page 43
...event that the product does not conform to this warranty at any other than as detailed by warrantor or its representatives in connection with a new or refurbished unit. system not manufactured by Uniden, or (F) installed or programmed by anyone other cost (except shipping & handling) incurred by the owner's manual... BY OPERATION OF LAW, INCLUDING, BUT NOT LIMITED TO ANY IMPLIED WARRANTIES OF MERCHANTABILITY OR FITNESS FOR A PARTICULAR PURPOSE. Warrantor, at its option, repair or replace the defective unit & return it to you without charge for parts, service, or any time while ...
...event that the product does not conform to this warranty at any other than as detailed by warrantor or its representatives in connection with a new or refurbished unit. system not manufactured by Uniden, or (F) installed or programmed by anyone other cost (except shipping & handling) incurred by the owner's manual... BY OPERATION OF LAW, INCLUDING, BUT NOT LIMITED TO ANY IMPLIED WARRANTIES OF MERCHANTABILITY OR FITNESS FOR A PARTICULAR PURPOSE. Warrantor, at its option, repair or replace the defective unit & return it to you without charge for parts, service, or any time while ...


