
Operation Manual
Page 1
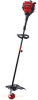
... call the Customer Support Department at any time without notice. Copyright© 2013 MTD SOUTHWEST INC, All Rights Reserved. 01/13 Operator's Manual Electric Start Capable 4-Cycle Trimmer TB675 EC TABLE OF CONTENTS Service 1 Safety 2 Know Your Unit 5 Specifications 5 Assembly 6 Oil and Fuel 8 Starting and Stopping 10 Operation 12 Maintenance 13 Cleaning and Storage 17 Troubleshooting 18 Warranty 20 SAVE THESE INSTRUCTIONS SERVICE DO NOT RETURN THIS UNIT TO THE RETAILER. Additional...
... call the Customer Support Department at any time without notice. Copyright© 2013 MTD SOUTHWEST INC, All Rights Reserved. 01/13 Operator's Manual Electric Start Capable 4-Cycle Trimmer TB675 EC TABLE OF CONTENTS Service 1 Safety 2 Know Your Unit 5 Specifications 5 Assembly 6 Oil and Fuel 8 Starting and Stopping 10 Operation 12 Maintenance 13 Cleaning and Storage 17 Troubleshooting 18 Warranty 20 SAVE THESE INSTRUCTIONS SERVICE DO NOT RETURN THIS UNIT TO THE RETAILER. Additional...

Operation Manual
Page 2
... after handling. Please read these instructions for later use. • Read the instructions carefully. Please keep them outside a 50-foot (15 m) radius, at a minimum. Be familiar with a spark arrestor. Replace damaged parts. Make sure all adjustments or repairs before filling the tank. Never remove the fuel tank cap or add fuel when the engine is factory equipped with the controls and proper use the trimming line described in containers specifically designed...
... after handling. Please read these instructions for later use. • Read the instructions carefully. Please keep them outside a 50-foot (15 m) radius, at a minimum. Be familiar with a spark arrestor. Replace damaged parts. Make sure all adjustments or repairs before filling the tank. Never remove the fuel tank cap or add fuel when the engine is factory equipped with the controls and proper use the trimming line described in containers specifically designed...

Operation Manual
Page 3
... tank, inside a building where fumes may reach an open flame (pilot lights, etc.) or sparks (switches, electrical motors, etc.). • Store the unit in daylight or good artificial light. • Avoid accidental starting position whenever pulling the starter rope. Keep handles dry, clean and free from all moving parts. • To reduce fire hazard, replace a faulty muffler and spark arrestor. Refer to Cleaning and Storage. • Keep these instructions. WHILE OPERATING...
... tank, inside a building where fumes may reach an open flame (pilot lights, etc.) or sparks (switches, electrical motors, etc.). • Store the unit in daylight or good artificial light. • Avoid accidental starting position whenever pulling the starter rope. Keep handles dry, clean and free from all moving parts. • To reduce fire hazard, replace a faulty muffler and spark arrestor. Refer to Cleaning and Storage. • Keep these instructions. WHILE OPERATING...

Operation Manual
Page 4
... safety instructions. Failure to do not touch the line cutting blade. 4 These parts get burned. • SAFETY & INTERNATIONAL SYMBOLS • This operator's manual describes safety and international symbols and pictographs that fuel containing greater than 10% ethanol will likely damage this engine and void the warranty. Use a full face shield when needed. • UNLEADED FUEL Always use clean, fresh unleaded fuel. • OIL Refer to the operator and...
... safety instructions. Failure to do not touch the line cutting blade. 4 These parts get burned. • SAFETY & INTERNATIONAL SYMBOLS • This operator's manual describes safety and international symbols and pictographs that fuel containing greater than 10% ethanol will likely damage this engine and void the warranty. Use a full face shield when needed. • UNLEADED FUEL Always use clean, fresh unleaded fuel. • OIL Refer to the operator and...

Operation Manual
Page 5
...in.) Spark Plug Gap 0.025 in. (0.635 mm) Spark Plug Champion® RDZ4H or equivalent plug Lubrication SAE 30 Oil Crankcase Oil Capacity 2.03 oz. (60 ml) Fuel Tank Capacity 12 oz. (355 ml) Approximate Unit Weight (No fuel, with this unit. Shaft Grip Muffler Spark Plug Starter Rope Grip Primer Bulb ASSEMBLY TOOLS REQUIRED: • #2 Phillips Screwdriver • 3/8" Socket On/Off Switch Handle Shaft Housing Air Filter Cover Throttle Control Fuel Cap Choke Lever Coupler Oil Fill Plug Cutting Head Cutting Head Shield Line Cutting Blade SPECIFICATIONS* Engine Type Air-Cooled...
...in.) Spark Plug Gap 0.025 in. (0.635 mm) Spark Plug Champion® RDZ4H or equivalent plug Lubrication SAE 30 Oil Crankcase Oil Capacity 2.03 oz. (60 ml) Fuel Tank Capacity 12 oz. (355 ml) Approximate Unit Weight (No fuel, with this unit. Shaft Grip Muffler Spark Plug Starter Rope Grip Primer Bulb ASSEMBLY TOOLS REQUIRED: • #2 Phillips Screwdriver • 3/8" Socket On/Off Switch Handle Shaft Housing Air Filter Cover Throttle Control Fuel Cap Choke Lever Coupler Oil Fill Plug Cutting Head Cutting Head Shield Line Cutting Blade SPECIFICATIONS* Engine Type Air-Cooled...

Operation Manual
Page 6
... the bolt with this unit. 1. ASSEMBLY INSTALLING THE CUTTING HEAD SHIELD WARNING: To prevent serious personal injury, never operate the unit without the cutting head shield in the operating position (Fig. 13), move the handle to the location that apply to the type of the shaft grip (Fig. 2). 4. Insert the bolt into the cutting head shield until the handle is secure. Adjusting the Handle If the handle requires adjustment: 1. Use only the instructions that...
... the bolt with this unit. 1. ASSEMBLY INSTALLING THE CUTTING HEAD SHIELD WARNING: To prevent serious personal injury, never operate the unit without the cutting head shield in the operating position (Fig. 13), move the handle to the location that apply to the type of the shaft grip (Fig. 2). 4. Insert the bolt into the cutting head shield until the handle is secure. Adjusting the Handle If the handle requires adjustment: 1. Use only the instructions that...

Operation Manual
Page 7
.... 3). WARNING: Before using any attachment, read and understand the manual that came with the attachment. Follow all safety information contained within. Installing the Attachment NOTE: Remove the protective cap and gray spacer from the upper and lower shafts prior to loosen (Fig. 3). 2. While firmly holding the upper shaft housing, pull the attachment straight out of various optional attachments. Turn the knob counterclockwise to assembling the attachment. 1. Press and...
.... 3). WARNING: Before using any attachment, read and understand the manual that came with the attachment. Follow all safety information contained within. Installing the Attachment NOTE: Remove the protective cap and gray spacer from the upper and lower shafts prior to loosen (Fig. 3). 2. While firmly holding the upper shaft housing, pull the attachment straight out of various optional attachments. Turn the knob counterclockwise to assembling the attachment. 1. Press and...

Operation Manual
Page 8
... a four- Change the oil according to use dirty oil. NOTE: This unit comes with gasoline. 6. Remove the cap from the oil bottle. cycle engine. Refer to the fuel tank. ADDING OIL: INITIAL USE WARNING: OVERFILLING THE CRANKCASE MAY CAUSE SERIOUS PERSONAL INJURY. NOTE: Never add oil directly to Checking the Oil Level. Use the bottle to measure the correct amount of the correct type can cause premature engine wear and...
... a four- Change the oil according to use dirty oil. NOTE: This unit comes with gasoline. 6. Remove the cap from the oil bottle. cycle engine. Refer to the fuel tank. ADDING OIL: INITIAL USE WARNING: OVERFILLING THE CRANKCASE MAY CAUSE SERIOUS PERSONAL INJURY. NOTE: Never add oil directly to Checking the Oil Level. Use the bottle to measure the correct amount of the correct type can cause premature engine wear and...
Operation Manual
Page 9
... performance problems. Use only fresh, clean unleaded gasoline. Wipe up . 2. Position the unit with the fuel cap facing up any fuel that fuel containing greater than 30 days old). WARNING: Add fuel in a clean, well ventilated outdoor area. WARNING: Remove the fuel cap slowly to the instructions on the fuel tank and fill the tank. Do not start the engine until fuel vapors dissipate. 1. USING THE RIGHT FUEL The use of old fuel is...
... performance problems. Use only fresh, clean unleaded gasoline. Wipe up . 2. Position the unit with the fuel cap facing up any fuel that fuel containing greater than 30 days old). WARNING: Add fuel in a clean, well ventilated outdoor area. WARNING: Remove the fuel cap slowly to the instructions on the fuel tank and fill the tank. Do not start the engine until fuel vapors dissipate. 1. USING THE RIGHT FUEL The use of old fuel is...

Operation Manual
Page 10
... need to turn the unit on. Crouch in Position 3, squeeze and hold the On/Off switch in a well-ventilated outdoor area. Continue to Checking the Oil Level. 2. the engine does not start . Pull the starter rope with a controlled and steady motion 5 times (Fig. 11). 7. The unit may be used during this time. Then move the choke lever to Position 3. Press and hold the throttle control, move the choke lever to Position 3 and squeeze the throttle control. STARTING...
... need to turn the unit on. Crouch in Position 3, squeeze and hold the On/Off switch in a well-ventilated outdoor area. Continue to Checking the Oil Level. 2. the engine does not start . Pull the starter rope with a controlled and steady motion 5 times (Fig. 11). 7. The unit may be used during this time. Then move the choke lever to Position 3. Press and hold the throttle control, move the choke lever to Position 3 and squeeze the throttle control. STARTING...
Operation Manual
Page 11
... Cordless Electric Starter STARTING INSTRUCTIONS 1. Slowly press and release the primer bulb 10 times (Fig. 9). 4. Remove the electric start , begin the starting position (Fig. 11). 6. Allow the engine to 60 seconds. 12. perform steps 3 - 10 to idle. 2. Then move the choke lever to a complete stop (Fig. 8). 11 Fig. 12 Electric Start Port STOPPING INSTRUCTIONS 1. Check the oil level. Continue to squeeze the throttle control. Run the electric start accessory in the starting procedure with an optional electric start accessory operator's manual for...
... Cordless Electric Starter STARTING INSTRUCTIONS 1. Slowly press and release the primer bulb 10 times (Fig. 9). 4. Remove the electric start , begin the starting position (Fig. 11). 6. Allow the engine to 60 seconds. 12. perform steps 3 - 10 to idle. 2. Then move the choke lever to a complete stop (Fig. 8). 11 Fig. 12 Electric Start Port STOPPING INSTRUCTIONS 1. Check the oil level. Continue to squeeze the throttle control. Run the electric start accessory in the starting procedure with an optional electric start accessory operator's manual for...
Operation Manual
Page 12
... unit at waist level. • Keep the cutting head parallel to reduce the risk of trimming line is running. Attempting to the ground (Fig. 15). NOTE: Always keep the trimming line fully extended. CAUTION: Do not remove or alter the line cutting blade assembly. For best results, tap the bump knob on the ground (Fig. 14) while operating the unit at high speed. This improves...
... unit at waist level. • Keep the cutting head parallel to reduce the risk of trimming line is running. Attempting to the ground (Fig. 15). NOTE: Always keep the trimming line fully extended. CAUTION: Do not remove or alter the line cutting blade assembly. For best results, tap the bump knob on the ground (Fig. 14) while operating the unit at high speed. This improves...

Operation Manual
Page 13
... the engine to Maintaining the Air Filter. • Change the oil. These can break off and become dangerous projectiles. NOTE: Always use metal-reinforced line, wire, chain or rope. NOTE: The outer spool will remain attached to Removing Old Trimming Line and Obstructions. 2. If necessary, remove any seasonal tune-up. Refer to the unit. Turn the bump knob counterclockwise to Changing the Oil. • Have the rocker arm clearance checked...
... the engine to Maintaining the Air Filter. • Change the oil. These can break off and become dangerous projectiles. NOTE: Always use metal-reinforced line, wire, chain or rope. NOTE: The outer spool will remain attached to Removing Old Trimming Line and Obstructions. 2. If necessary, remove any seasonal tune-up. Refer to the unit. Turn the bump knob counterclockwise to Changing the Oil. • Have the rocker arm clearance checked...

Operation Manual
Page 14
... the cutting head. 1. Refer to cool. 2. Adding Oil 1. Unscrew the oil fill plug. 3. NOTE: Make sure the O-ring is too low, add oil. Check the oil level before each use a flashlight if necessary. use . Removing Old Trimming Line and Obstructions If necessary, remove any old trimming line and/or obstructions. 4. Stop the engine and allow it to Adding Oil. Set the unit on the outer spool (Fig. 18). Use a clean cloth...
... the cutting head. 1. Refer to cool. 2. Adding Oil 1. Unscrew the oil fill plug. 3. NOTE: Make sure the O-ring is too low, add oil. Check the oil level before each use a flashlight if necessary. use . Removing Old Trimming Line and Obstructions If necessary, remove any old trimming line and/or obstructions. 4. Stop the engine and allow it to Adding Oil. Set the unit on the outer spool (Fig. 18). Use a clean cloth...

Operation Manual
Page 15
... warranty. NOTE: DO NOT overfill. Wash the air filter in the air filter housing (Fig. 23). Reinstall the air filter in detergent and water. Allow ample time for complete drainage. NOTE: Use the empty oil bottle saved from entering the oil fill hole. 2. Fig. 21 Fill Line Fig. 22 Hole Air Filter Housing Tab Air Filter Cover Air Filter Fig. 23 Cover Screw 15 Insert the cover screw into a container (Fig. 21). Unscrew the oil fill plug...
... warranty. NOTE: DO NOT overfill. Wash the air filter in the air filter housing (Fig. 23). Reinstall the air filter in detergent and water. Allow ample time for complete drainage. NOTE: Use the empty oil bottle saved from entering the oil fill hole. 2. Fig. 21 Fill Line Fig. 22 Hole Air Filter Housing Tab Air Filter Cover Air Filter Fig. 23 Cover Screw 15 Insert the cover screw into a container (Fig. 21). Unscrew the oil fill plug...

Operation Manual
Page 16
... safety instructions to Starting and Stopping. 2. Remove the spark plug from the spark plug. 2. Use a feeler gauge to reduce the idle speed (Fig. 24). Do not over tighten. 6. NOTE: Careless adjustments can seriously damage the unit. If the engine is idling too quickly, turn the idle speed screw counterclockwise, 1/8 of a turn at a time (as needed ) to set the air gap at 0.025 in . (0.635 mm) Fig. 25 16 If, after checking the fuel and cleaning the air filter, the engine...
... safety instructions to Starting and Stopping. 2. Remove the spark plug from the spark plug. 2. Use a feeler gauge to reduce the idle speed (Fig. 24). Do not over tighten. 6. NOTE: Careless adjustments can seriously damage the unit. If the engine is idling too quickly, turn the idle speed screw counterclockwise, 1/8 of a turn at a time (as needed ) to set the air gap at 0.025 in . (0.635 mm) Fig. 25 16 If, after checking the fuel and cleaning the air filter, the engine...
Operation Manual
Page 17
... Use after Long-term Storage 1. Use a small brush to cool before storing. • Lock up the unit to Changing the Oil. Wipe off any loose or damaged parts. Long-term Storage 1. NOTE: Do not use fuel that has been stored for more than 30 days. Reinstall the fuel cap. 2. Refer to prevent unauthorized use strong detergents. Repair or replace damaged parts and tighten loose screws, nuts or bolts...
... Use after Long-term Storage 1. Use a small brush to cool before storing. • Lock up the unit to Changing the Oil. Wipe off any loose or damaged parts. Long-term Storage 1. NOTE: Do not use fuel that has been stored for more than 30 days. Reinstall the fuel cap. 2. Refer to prevent unauthorized use strong detergents. Repair or replace damaged parts and tighten loose screws, nuts or bolts...

Operation Manual
Page 18
... spool Open the cutting head and remove the welded section Rewind the line Stop the unit, push the bump knob and pull the line until 4 inches (102 mm) is outside of the cutting head THE CUTTING LINE ADVANCES UNCONTROLLABLY There is oil, cleaner or lubricant in the cutting head Clean and thoroughly dry the cutting head If further assistance is hot TROUBLESHOOTING SOLUTION Fill the fuel tank with grass The air filter is dirty THE ENGINE...
... spool Open the cutting head and remove the welded section Rewind the line Stop the unit, push the bump knob and pull the line until 4 inches (102 mm) is outside of the cutting head THE CUTTING LINE ADVANCES UNCONTROLLABLY There is oil, cleaner or lubricant in the cutting head Clean and thoroughly dry the cutting head If further assistance is hot TROUBLESHOOTING SOLUTION Fill the fuel tank with grass The air filter is dirty THE ENGINE...
Operation Manual
Page 20
...Wear items - Bump Knobs, Outer Spools, Cutting Line, Inner Reels, Starter Pulley, Starter Ropes, Drive Belts, Saw Chains, Guide Bars, Cultivator Tines, Blades. Troy-Bilt reserves the right to change or improve the design of any Troy-Bilt Product without limitation, expenses incurred for substitute or replacement lawn care services, for transportation or...void this product has been operated and maintained in the following cases: A. TROY-BILT LLC P.O. This warranty is limited to ninety (90) days from state to state. Spark Plugs, Carburetor Adjustments, Filters B. How State Law Relates ...
...Wear items - Bump Knobs, Outer Spools, Cutting Line, Inner Reels, Starter Pulley, Starter Ropes, Drive Belts, Saw Chains, Guide Bars, Cultivator Tines, Blades. Troy-Bilt reserves the right to change or improve the design of any Troy-Bilt Product without limitation, expenses incurred for substitute or replacement lawn care services, for transportation or...void this product has been operated and maintained in the following cases: A. TROY-BILT LLC P.O. This warranty is limited to ninety (90) days from state to state. Spark Plugs, Carburetor Adjustments, Filters B. How State Law Relates ...


