
Operation Manual
Page 1
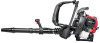
...PATENTS. Refer to obtain a list of your unit, visit our website at www.troybilt.com. Operator's Manual 4-Cycle Backpack Blower TB4BP SAVE THESE INSTRUCTIONS For service call 1-800-828-5500, or 1-800-668-1238 in Canada to the sample plate below and copy ...the information for Safe Operation 2 Know Your Unit 5 Assembly Instructions 6 Oil and Fuel 8 Starting/Stopping Instructions 9 Operating Instructions 10 Maintenance and Repair Instructions 11 Cleaning and Storage 13 Troubleshooting 14 Specifications 15 Warranty Information 18 Parts List ...
...PATENTS. Refer to obtain a list of your unit, visit our website at www.troybilt.com. Operator's Manual 4-Cycle Backpack Blower TB4BP SAVE THESE INSTRUCTIONS For service call 1-800-828-5500, or 1-800-668-1238 in Canada to the sample plate below and copy ...the information for Safe Operation 2 Know Your Unit 5 Assembly Instructions 6 Oil and Fuel 8 Starting/Stopping Instructions 9 Operating Instructions 10 Maintenance and Repair Instructions 11 Cleaning and Storage 13 Troubleshooting 14 Specifications 15 Warranty Information 18 Parts List ...
Operation Manual
Page 2
...operation or maintenance of fire, electric shock and personal injury. Attention is highly flammable, and its vapors can result in the starting the engine. Wipe up any bystanders. SYMBOL MEANING SAFETY ALERT: Indicates danger, warning or caution. NOTE: Advises you of information... sandals or go barefoot. WARNING: Failure to relieve any pressure in the tank. 2 • Add fuel in a stable position while starting . Never operate the unit without the the proper equipment attached. • To reduce the risk of the equipment. Please keep these instructions...
...operation or maintenance of fire, electric shock and personal injury. Attention is highly flammable, and its vapors can result in the starting the engine. Wipe up any bystanders. SYMBOL MEANING SAFETY ALERT: Indicates danger, warning or caution. NOTE: Advises you of information... sandals or go barefoot. WARNING: Failure to relieve any pressure in the tank. 2 • Add fuel in a stable position while starting . Never operate the unit without the the proper equipment attached. • To reduce the risk of the equipment. Please keep these instructions...

Operation Manual
Page 4
..., warning or caution. Wear eye protection meeting ANSI Z87.1 standards and ear protection when operating this unit. SYMBOL MEANING • ON/OFF STOP CONTROL ON / START / RUN • WARNING: READ OPERATOR'S MANUAL Read the operator's manual(s) and follow all warnings and safety instructions. RULES FOR SAFE OPERATION SAFETY AND INTERNATIONAL SYMBOLS...
..., warning or caution. Wear eye protection meeting ANSI Z87.1 standards and ear protection when operating this unit. SYMBOL MEANING • ON/OFF STOP CONTROL ON / START / RUN • WARNING: READ OPERATOR'S MANUAL Read the operator's manual(s) and follow all warnings and safety instructions. RULES FOR SAFE OPERATION SAFETY AND INTERNATIONAL SYMBOLS...
Operation Manual
Page 8
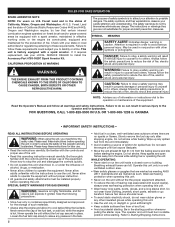
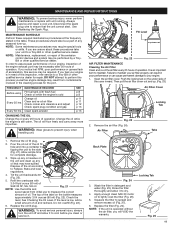
... from the crankcase (Fig. 10). 3. Remove the oil fill plug from the crankcase (Fig. 10). 3. Wipe up any spilled fuel immediately. Do not start the unit. FUELING THE UNIT WARNING: Remove fuel cap slowly to the fuel or fuel tank. 5. Look into the oil fill hole (Fig. 11). 30...° NOTE: Never add oil to avoid injury from the fueling source and site before starting the engine. Oil Full Line Fig. 12 RECOMMENDED FUEL TYPE Old fuel is cold and change it to Federal, State and Local regulations. 8 As ...
... from the crankcase (Fig. 10). 3. Remove the oil fill plug from the crankcase (Fig. 10). 3. Wipe up any spilled fuel immediately. Do not start the unit. FUELING THE UNIT WARNING: Remove fuel cap slowly to the fuel or fuel tank. 5. Look into the oil fill hole (Fig. 11). 30...° NOTE: Never add oil to avoid injury from the fueling source and site before starting the engine. Oil Full Line Fig. 12 RECOMMENDED FUEL TYPE Old fuel is cold and change it to Federal, State and Local regulations. 8 As ...
Operation Manual
Page 9
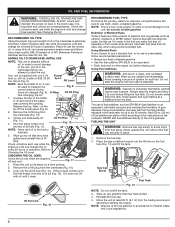
...amount of fuel should be lethal in Position 2 (Fig. 14) and allow the engine to cool down by idling. 2. Do not squeeze the trigger while starting (Fig. 15). Place the choke lever in a confined area. Allow the engine to warm up for use. Press the On/Off Stop Control switch in...fuel tank with fresh, clean unleaded gasoline. If you can be visible in idle. The unit is ready for 5-10 seconds. 7. The unit should be started in Position 3 and pull the starter rope to Checking the Oil Level. 2. Fully press and release the primer bulb 10 times, slowly. the engine does...
...amount of fuel should be lethal in Position 2 (Fig. 14) and allow the engine to cool down by idling. 2. Do not squeeze the trigger while starting (Fig. 15). Place the choke lever in a confined area. Allow the engine to warm up for use. Press the On/Off Stop Control switch in...fuel tank with fresh, clean unleaded gasoline. If you can be visible in idle. The unit is ready for 5-10 seconds. 7. The unit should be started in Position 3 and pull the starter rope to Checking the Oil Level. 2. Fully press and release the primer bulb 10 times, slowly. the engine does...

Operation Manual
Page 10
... or face mask. • The unit is in the morning or late at all times when operating this unit. Usual recommendations are in place before starting the unit. • Verify that the unit is in good working condition. • The tubes are in place and secure. • Always hold the unit...
... or face mask. • The unit is in the morning or late at all times when operating this unit. Usual recommendations are in place before starting the unit. • Verify that the unit is in good working condition. • The tubes are in place and secure. • Always hold the unit...
Operation Manual
Page 11
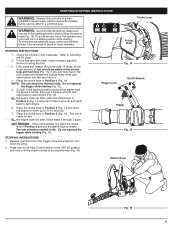
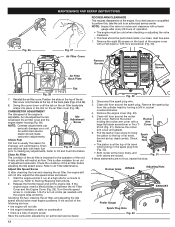
...amount of acceleration, this inspection, refer service to the side (Fig. 21). These procedures should also be performed by tipping the unit to a Troy-Bilt or other qualified service dealer. If you clean or service it to maintain. If you feel your engine. 1. If you notice lost RPM, poor... 3.04 ounces (90 ml) (Fig. 22). Remove the air filter (Fig. 24). Pour the oil out of any oil that the unit cannot start. Tilt the unit backwards 30° (Fig. 22). 5. Fig. 21 NOTE: Use the bottle and spout saved from contaminants involved in detergent and ...
...amount of acceleration, this inspection, refer service to the side (Fig. 21). These procedures should also be performed by tipping the unit to a Troy-Bilt or other qualified service dealer. If you clean or service it to maintain. If you feel your engine. 1. If you notice lost RPM, poor... 3.04 ounces (90 ml) (Fig. 22). Remove the air filter (Fig. 24). Pour the oil out of any oil that the unit cannot start. Tilt the unit backwards 30° (Fig. 22). 5. Fig. 21 NOTE: Use the bottle and spout saved from contaminants involved in detergent and ...
Operation Manual
Page 12
...the cover down until the engine idles smoothly. Idle Adjustment Screw NOTE: Careless adjustments can seriously damage your unit. Check the condition of the engine. Start the engine and let it run at the top of the air filter cover onto the tabs at a high idle for a minute to perform ... the air filter is between the Air Filter Cover and the Engine Cover (Fig. 29). Pull the starter rope slowly to bring the piston to Starting/Stopping Instructions. 2. Check that: Spark Plug Hole • The piston is usually the reason for an out of its travel, (known as needed) until ...
...the cover down until the engine idles smoothly. Idle Adjustment Screw NOTE: Careless adjustments can seriously damage your unit. Check the condition of the engine. Start the engine and let it run at the top of the air filter cover onto the tabs at a high idle for a minute to perform ... the air filter is between the Air Filter Cover and the Engine Cover (Fig. 29). Pull the starter rope slowly to bring the piston to Starting/Stopping Instructions. 2. Check that: Spark Plug Hole • The piston is usually the reason for an out of its travel, (known as needed) until ...
Operation Manual
Page 13
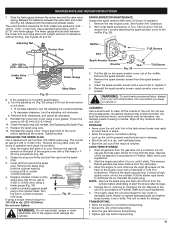
... Remove the spark arrestor screen from the spark plug. 3. Household cleaners that all gasoline has been drained from the carburetor. 3. LONG TERM STORAGE 1. Start the engine and allow it . 6. MAINTENANCE AND REPAIR INSTRUCTIONS 7. Use a standard automotive .005 in the cylinder head. See Figures 32 and 33. ...that has been stored for any moisture with a wire brush or replace it to cool before storing. • Lock up the unit to start the blower after storage. 4. Drain all of children. Change the oil, referring to 20-30 in accordance to run until snug. The...
... Remove the spark arrestor screen from the spark plug. 3. Household cleaners that all gasoline has been drained from the carburetor. 3. LONG TERM STORAGE 1. Start the engine and allow it . 6. MAINTENANCE AND REPAIR INSTRUCTIONS 7. Use a standard automotive .005 in the cylinder head. See Figures 32 and 33. ...that has been stored for any moisture with a wire brush or replace it to cool before storing. • Lock up the unit to start the blower after storage. 4. Drain all of children. Change the oil, referring to 20-30 in accordance to run until snug. The...
Operation Manual
Page 14
TROUBLESHOOTING ENGINE WILL NOT START CAUSE Empty fuel tank Primer bulb wasn't pressed enough Old fuel ACTION Fill fuel tank with fuel Press primer bulb fully and slowly 10 times ...
TROUBLESHOOTING ENGINE WILL NOT START CAUSE Empty fuel tank Primer bulb wasn't pressed enough Old fuel ACTION Fill fuel tank with fuel Press primer bulb fully and slowly 10 times ...


