
Operation Manual
Page 1
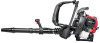
...to the sample plate below and copy the information for Safe Operation 2 Know Your Unit 5 Assembly Instructions 6 Oil and Fuel 8 Starting/Stopping Instructions 9 Operating Instructions 10 Maintenance and Repair Instructions 11 Cleaning and Storage 13 Troubleshooting 14 Specifications 15 Warranty Information 18 Parts List...specifications in Canada to obtain a list of your unit, visit our website at www.troybilt.com. Operator's Manual 4-Cycle Backpack Blower TB4BP SAVE THESE INSTRUCTIONS For service call 1-800-828-5500, or 1-800-668-1238 in this manual are based on this unit both...
...to the sample plate below and copy the information for Safe Operation 2 Know Your Unit 5 Assembly Instructions 6 Oil and Fuel 8 Starting/Stopping Instructions 9 Operating Instructions 10 Maintenance and Repair Instructions 11 Cleaning and Storage 13 Troubleshooting 14 Specifications 15 Warranty Information 18 Parts List...specifications in Canada to obtain a list of your unit, visit our website at www.troybilt.com. Operator's Manual 4-Cycle Backpack Blower TB4BP SAVE THESE INSTRUCTIONS For service call 1-800-828-5500, or 1-800-668-1238 in this manual are based on this unit both...
Operation Manual
Page 2
...result in injury to operate the equipment without proper instruction. • All guards and safety attachments must be installed properly before starting . CAUTION: Failure to these instructions before filling the fuel tank. Know how to stop the engine and allow adults unfamiliar with... 4442 and 4443), Oregon and Washington require, by themselves eliminate any pressure in the tank. 2 • Add fuel in the starting . SYMBOL MEANING SAFETY ALERT: Indicates danger, warning or caution. Always follow these instructions for the storage of the operator and any ...
...result in injury to operate the equipment without proper instruction. • All guards and safety attachments must be installed properly before starting . CAUTION: Failure to these instructions before filling the fuel tank. Know how to stop the engine and allow adults unfamiliar with... 4442 and 4443), Oregon and Washington require, by themselves eliminate any pressure in the tank. 2 • Add fuel in the starting . SYMBOL MEANING SAFETY ALERT: Indicates danger, warning or caution. Always follow these instructions for the storage of the operator and any ...

Operation Manual
Page 4
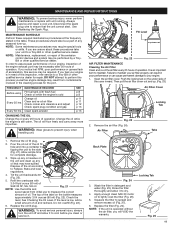
...: Thrown objects and loud noise can cause severe eye injury and hearing loss. These parts get burned. SYMBOL MEANING • ON/OFF STOP CONTROL ON / START / RUN • WARNING: READ OPERATOR'S MANUAL Read the operator's manual(s) and follow all warnings and safety instructions. Use a full face shield when needed . • THROWN...
...: Thrown objects and loud noise can cause severe eye injury and hearing loss. These parts get burned. SYMBOL MEANING • ON/OFF STOP CONTROL ON / START / RUN • WARNING: READ OPERATOR'S MANUAL Read the operator's manual(s) and follow all warnings and safety instructions. Use a full face shield when needed . • THROWN...
Operation Manual
Page 8
... first thread, then the oil is a four cycle engine. NOTE: This is full (Fig. 12). As little as ethanol, methanol or MTBE (ether). Do not start the unit. Wipe up to the fuel or fuel tank. 5. It can cause premature engine wear and failure. If the oil level comes up any... the opening. Using a fuel additive can make fuel and oil separate or form acids when stored. FUELING THE UNIT WARNING: Remove fuel cap slowly to start the engine until it does not, fill with gasoline. Remove the fuel cap. 2. Place the gas container's spout into the fill hole on the container...
... first thread, then the oil is a four cycle engine. NOTE: This is full (Fig. 12). As little as ethanol, methanol or MTBE (ether). Do not start the unit. Wipe up to the fuel or fuel tank. 5. It can cause premature engine wear and failure. If the oil level comes up any... the opening. Using a fuel additive can make fuel and oil separate or form acids when stored. FUELING THE UNIT WARNING: Remove fuel cap slowly to start the engine until it does not, fill with gasoline. Remove the fuel cap. 2. Place the gas container's spout into the fill hole on the container...
Operation Manual
Page 9
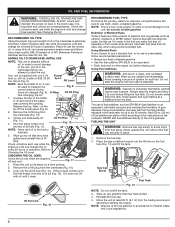
... steps 3 through 7 again. IF... The unit should be lethal in smooth and rapid pulls to cool down by idling. 2. Allow the engine to start , place the choke lever in Position 2 (Fig. 14) and pull 4 times in a confined area. Fig. 14 Trigger Lock On/Off Switch Trigger Fig. 15 Starter ... (Fig. 16). Place the choke lever in the OFF (O) position and hold until the engine comes to warm up for use. the engine does not start engine (Fig. 16). STOPPING INSTRUCTIONS 1. Press the On/Off Stop Control switch in Position 2 (Fig. 14) and allow the engine to a complete stop (Fig. 15...
... steps 3 through 7 again. IF... The unit should be lethal in smooth and rapid pulls to cool down by idling. 2. Allow the engine to start , place the choke lever in Position 2 (Fig. 14) and pull 4 times in a confined area. Fig. 14 Trigger Lock On/Off Switch Trigger Fig. 15 Starter ... (Fig. 16). Place the choke lever in the OFF (O) position and hold until the engine comes to warm up for use. the engine does not start engine (Fig. 16). STOPPING INSTRUCTIONS 1. Press the On/Off Stop Control switch in Position 2 (Fig. 14) and allow the engine to a complete stop (Fig. 15...

Operation Manual
Page 10
... the number of pieces of the waist support clips to - A B A Fig. 19 4. Squeeze the top and bottom of equipment used at any loose debris before starting the unit. • Verify that the unit is not on the hips by sliding the waist support clips together (Fig. 17, A). Make sure the tubes...
... the number of pieces of the waist support clips to - A B A Fig. 19 4. Squeeze the top and bottom of equipment used at any loose debris before starting the unit. • Verify that the unit is not on the hips by sliding the waist support clips together (Fig. 17, A). Make sure the tubes...
Operation Manual
Page 11
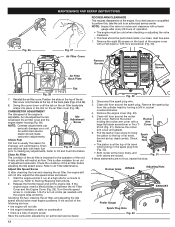
...Squeeze the filter to lightly coat the filter (Fig. 26). 5. See Replacing the Spark Plug. NOTE: Some maintenance procedures may result from initial use to a Troy-Bilt or other qualified service dealer. NOTE: Maintenance, replacement, or repair of the cover inward. It is still warm. Then pull the air filter cover out... and up any oil that the unit cannot start. Tilt the unit backwards 30° (Fig. 22). 5. Apply enough clean SAE 30 motor oil to spread and remove excess oil (Fig. 27). 6. ...
...Squeeze the filter to lightly coat the filter (Fig. 26). 5. See Replacing the Spark Plug. NOTE: Some maintenance procedures may result from initial use to a Troy-Bilt or other qualified service dealer. NOTE: Maintenance, replacement, or repair of the cover inward. It is still warm. Then pull the air filter cover out... and up any oil that the unit cannot start. Tilt the unit backwards 30° (Fig. 22). 5. Apply enough clean SAE 30 motor oil to spread and remove excess oil (Fig. 27). 6. ...
Operation Manual
Page 12
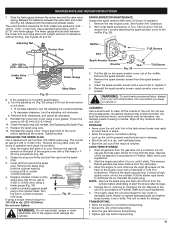
... still will not idle, adjust the idle speed screw as needed) until the tab on the air filter backplate snaps into place in . Refer to Starting/Stopping Instructions. 2. Checking the fuel, cleaning the air filter, and adjusting the idle speed should solve most engine problems. If not and all of ... engine. Adjust Idle Speed Screw If, after every 25 hours of operation. • The engine must be performed inside, in , clockwise, 1/8 of adjustment carburetor. Start the engine and let it run at a high idle for an out of a turn at the top of its travel , (known as top dead center...
... still will not idle, adjust the idle speed screw as needed) until the tab on the air filter backplate snaps into place in . Refer to Starting/Stopping Instructions. 2. Checking the fuel, cleaning the air filter, and adjusting the idle speed should solve most engine problems. If not and all of ... engine. Adjust Idle Speed Screw If, after every 25 hours of operation. • The engine must be performed inside, in , clockwise, 1/8 of adjustment carburetor. Start the engine and let it run at a high idle for an out of a turn at the top of its travel , (known as top dead center...
Operation Manual
Page 13
... that contain aromatic oils such as pine and lemon, and solvents such as necessary. 9. Drain all gasoline from the gas tank into the cylinder. Start the engine and allow it stalls. This ensures that has been stored for any moisture with a Flat-head or T25 Torx screwdriver (Fig. 30).... head. Remove the plug after every 25 hours of operation. 1. STORAGE • Never store the unit with a wire brush or replace it to start the blower after every 50 hours of operation and check its condition. 1. Do not use strong detergents. Remove the spark plug and put 5 drops ...
... that contain aromatic oils such as pine and lemon, and solvents such as necessary. 9. Drain all gasoline from the gas tank into the cylinder. Start the engine and allow it stalls. This ensures that has been stored for any moisture with a Flat-head or T25 Torx screwdriver (Fig. 30).... head. Remove the plug after every 25 hours of operation. 1. STORAGE • Never store the unit with a wire brush or replace it to start the blower after every 50 hours of operation and check its condition. 1. Do not use strong detergents. Remove the spark plug and put 5 drops ...
Operation Manual
Page 14
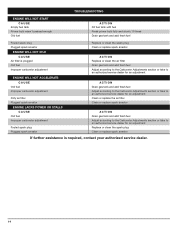
TROUBLESHOOTING ENGINE WILL NOT START CAUSE Empty fuel tank Primer bulb wasn't pressed enough Old fuel ACTION Fill fuel tank with fuel Press primer bulb fully and slowly 10 times ...
TROUBLESHOOTING ENGINE WILL NOT START CAUSE Empty fuel tank Primer bulb wasn't pressed enough Old fuel ACTION Fill fuel tank with fuel Press primer bulb fully and slowly 10 times ...


