
Operation Manual
Page 1
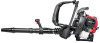
... near you. THIS PRODUCT IS COVERED BY ONE OR MORE U.S. S/N : MODEL : ITEM : TABLE OF CONTENTS Service Information 1 Rules for future reference. Operator's Manual 4-Cycle Backpack Blower TB4BP SAVE THESE INSTRUCTIONS For service call 1-800-828-5500, or 1-800-668-1238 in this unit both within and after the warranty period should be...
... near you. THIS PRODUCT IS COVERED BY ONE OR MORE U.S. S/N : MODEL : ITEM : TABLE OF CONTENTS Service Information 1 Rules for future reference. Operator's Manual 4-Cycle Backpack Blower TB4BP SAVE THESE INSTRUCTIONS For service call 1-800-828-5500, or 1-800-668-1238 in this unit both within and after the warranty period should be...
Operation Manual
Page 3
... . • Always stop the engine when operation is turned off and disconnect the spark plug for maintenance or repair. • Never point the blower or blowing debris in the direction of people, animals, or in place. • Do not put any object into contact with a foreign object.... Keep handles dry, clean, and free from grass, leaves, excessive grease or carbon build up by the air intake and thrown out by a Troy-Bilt outlet. SPECIAL NOTE: Exposure to vibrations through prolonged use , see Cleaning and Storage instructions. • Keep these instructions. It will also void your...
... . • Always stop the engine when operation is turned off and disconnect the spark plug for maintenance or repair. • Never point the blower or blowing debris in the direction of people, animals, or in place. • Do not put any object into contact with a foreign object.... Keep handles dry, clean, and free from grass, leaves, excessive grease or carbon build up by the air intake and thrown out by a Troy-Bilt outlet. SPECIAL NOTE: Exposure to vibrations through prolonged use , see Cleaning and Storage instructions. • Keep these instructions. It will also void your...
Operation Manual
Page 5
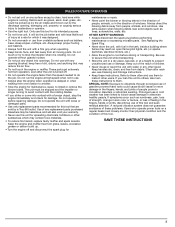
KNOW YOUR UNIT Suspension System Shoulder Support Choke Lever Air Filter Cover Starter Rope Handle Gas Cap Shoulder Support Buckle Trigger Lock Throttle Grip Trigger Stand Waist Support Clip Waist Support Throttle Cables Blower Tube Primer Bulb Muffler Nozzle Gas Tank Oil Fill Plug Elbow Tube 5
KNOW YOUR UNIT Suspension System Shoulder Support Choke Lever Air Filter Cover Starter Rope Handle Gas Cap Shoulder Support Buckle Trigger Lock Throttle Grip Trigger Stand Waist Support Clip Waist Support Throttle Cables Blower Tube Primer Bulb Muffler Nozzle Gas Tank Oil Fill Plug Elbow Tube 5

Operation Manual
Page 6
Align the bump on the Flex Tube with the bump on the tube extension (Fig. 3, A). 3. Insert the bump on the upper blower tube into place (Fig. 5, B). Slide the end of the hose with the bump on it over the top end of the Flex Tube (Fig. 1A). 2. ... the screw on the hose clamp to secure the Flex Tube to the elbow tube (Fig. 1D). Installing the Flex Tube 1. ASSEMBLY INSTRUCTIONS ASSEMBLING THE BLOWER TUBE WARNING: To avoid serious personal injury and damage to the unit, shut the unit off before removing or installing the...
Align the bump on the Flex Tube with the bump on the tube extension (Fig. 3, A). 3. Insert the bump on the upper blower tube into place (Fig. 5, B). Slide the end of the hose with the bump on it over the top end of the Flex Tube (Fig. 1A). 2. ... the screw on the hose clamp to secure the Flex Tube to the elbow tube (Fig. 1D). Installing the Flex Tube 1. ASSEMBLY INSTRUCTIONS ASSEMBLING THE BLOWER TUBE WARNING: To avoid serious personal injury and damage to the unit, shut the unit off before removing or installing the...

Operation Manual
Page 7
... the handle tube until it is comfortable (Fig. 7, B). 3. First Lower Blower Tube Second Lower Blower Tube Fig. 8 Nozzle Fig. 6 WARNING: To avoid serious personal injury, make sure that the blower tubes are locked in place or firmly installed. 7 WARNING: Do not rotate ...the handle clockwise to disconnect from the backpack blower is pointing directly downward (Fig. 7, A). B Throttle Cables A Hose Clamp Upper Blower Tube On/Off Switch Throttle Grip Fig. 7 2. ASSEMBLY INSTRUCTIONS The completed blower tube should look like Figure 6. Elbow Tube Hose Clamp Flex ...
... the handle tube until it is comfortable (Fig. 7, B). 3. First Lower Blower Tube Second Lower Blower Tube Fig. 8 Nozzle Fig. 6 WARNING: To avoid serious personal injury, make sure that the blower tubes are locked in place or firmly installed. 7 WARNING: Do not rotate ...the handle clockwise to disconnect from the backpack blower is pointing directly downward (Fig. 7, A). B Throttle Cables A Hose Clamp Upper Blower Tube On/Off Switch Throttle Grip Fig. 7 2. ASSEMBLY INSTRUCTIONS The completed blower tube should look like Figure 6. Elbow Tube Hose Clamp Flex ...
Operation Manual
Page 9
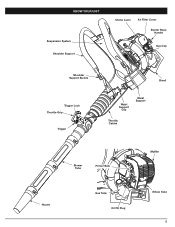
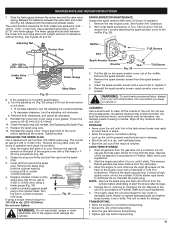
Choke Lever WARNING: Avoid accidental starting (Fig. 15). To avoid serious personal injury, make sure that the blower tube is locked in the starting position when pulling the starter rope (Fig. 16). Primer Bulb STARTING INSTRUCTIONS 1. Fill the fuel tank with fresh, clean ...
Choke Lever WARNING: Avoid accidental starting (Fig. 15). To avoid serious personal injury, make sure that the blower tube is locked in the starting position when pulling the starter rope (Fig. 16). Primer Bulb STARTING INSTRUCTIONS 1. Fill the fuel tank with fresh, clean ...

Operation Manual
Page 10
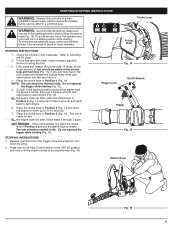
... the unit. • Verify that the unit is not directed at anybody or any one time. • To reduce noise levels, operate power blowers at reasonable hours- Use the unit around walls, overhangs, fences and screens. A B A Fig. 19 4. OPERATING INSTRUCTIONS ADJUSTING THE SUSPENSION SYSTEM ...WARNING: To prevent serious personal injury or damage to tighten the shoulder supports (Fig. 17, B). A A B Fig. 18 3. HOLDING THE BLOWER WARNING: To avoid serious personal injury, wear goggles or safety glasses at night when people might be disturbed. clean areas. 2. Make sure the tubes...
... the unit. • Verify that the unit is not directed at anybody or any one time. • To reduce noise levels, operate power blowers at reasonable hours- Use the unit around walls, overhangs, fences and screens. A B A Fig. 19 4. OPERATING INSTRUCTIONS ADJUSTING THE SUSPENSION SYSTEM ...WARNING: To prevent serious personal injury or damage to tighten the shoulder supports (Fig. 17, B). A A B Fig. 18 3. HOLDING THE BLOWER WARNING: To avoid serious personal injury, wear goggles or safety glasses at night when people might be disturbed. clean areas. 2. Make sure the tubes...
Operation Manual
Page 13
... to Changing the Oil. Remove the spark arrestor cover. 4. Do not use strong detergents. Reinstall the spark plug. Change the oil, referring to start the blower after storage. 4. Repair or replace damaged parts and tighten loose screws, nuts or bolts.
... to Changing the Oil. Remove the spark arrestor cover. 4. Do not use strong detergents. Reinstall the spark plug. Change the oil, referring to start the blower after storage. 4. Repair or replace damaged parts and tighten loose screws, nuts or bolts.
Operation Manual
Page 55
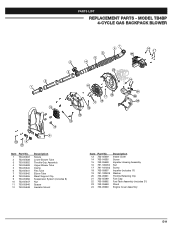
PARTS LIST REPLACEMENT PARTS - MODEL TB4BP 4-CYCLE GAS BACKPACK BLOWER 7 5 6 24 14 17 5 3 4 20 2 2 1 13 12 19 17 16 15 17 18 15 14 14 21 22 23 9 10 8 11 Item 1 2 3 4 5 6 7 8 9 10 11 12 Part ... 753-05652 753-05639 753-05640 753-05641 753-05642 753-05655 753-05656 753-05647 753-05646 753-05648 Description Nozzle Lower Blower Tube Throttle Grip Assembly Upper Blower Tube Clamp Flex Tube Elbow Tube Waist Support Clip Suspension System (includes 8) Nut Spacer Insulator Mount Item 13 14 15 16 17...
PARTS LIST REPLACEMENT PARTS - MODEL TB4BP 4-CYCLE GAS BACKPACK BLOWER 7 5 6 24 14 17 5 3 4 20 2 2 1 13 12 19 17 16 15 17 18 15 14 14 21 22 23 9 10 8 11 Item 1 2 3 4 5 6 7 8 9 10 11 12 Part ... 753-05652 753-05639 753-05640 753-05641 753-05642 753-05655 753-05656 753-05647 753-05646 753-05648 Description Nozzle Lower Blower Tube Throttle Grip Assembly Upper Blower Tube Clamp Flex Tube Elbow Tube Waist Support Clip Suspension System (includes 8) Nut Spacer Insulator Mount Item 13 14 15 16 17...


