
Operation Manual
Page 3
...Know how to cause cancer and birth defects or other foreign objects, which , if not followed, could become entangled in the manual(s) before starting to assemble and operate. Important Safe Operation Practices 2 WARNING! Read, understand, and follow all doormats, newspapers, sleds, boards, wires and...in serious injury or death. This symbol points out important safety instructions which could result in this symbol. As with electric start engines. 4. HEED ITS WARNING! Failure to observe the following safety instructions could be tripped over should read and understand ...
...Know how to cause cancer and birth defects or other foreign objects, which , if not followed, could become entangled in the manual(s) before starting to assemble and operate. Important Safe Operation Practices 2 WARNING! Read, understand, and follow all doormats, newspapers, sleds, boards, wires and...in serious injury or death. This symbol points out important safety instructions which could result in this symbol. As with electric start engines. 4. HEED ITS WARNING! Failure to observe the following safety instructions could be tripped over should read and understand ...

Operation Manual
Page 4
... change clothes immediately. 7. Do not overload machine capacity by the manufacturer (e.g. Replace gasoline cap and tighten securely. Wait 5 minutes before starting engine, pull cord slowly until resistance is spilled, wipe it off engine and remain behind handles until the auger/impeller comes to a... no more than from your hand in the auger/ impeller housing or chute assembly. Inspect thoroughly for fuel expansion. 12. When starting the engine. 13. assistance and the name of ignition. 8. Contact Customer Support for hidden hazards or traffic. Thus, avoiding possible...
... change clothes immediately. 7. Do not overload machine capacity by the manufacturer (e.g. Replace gasoline cap and tighten securely. Wait 5 minutes before starting engine, pull cord slowly until resistance is spilled, wipe it off engine and remain behind handles until the auger/impeller comes to a... no more than from your hand in the auger/ impeller housing or chute assembly. Inspect thoroughly for fuel expansion. 12. When starting the engine. 13. assistance and the name of ignition. 8. Contact Customer Support for hidden hazards or traffic. Thus, avoiding possible...

Operation Manual
Page 5
... unleaded gasoline, and may lead to the operator's manual for cracks or leaks. Refer to the maintenance and adjustment sections of operation. to prevent unintended starting. 3. Observe proper disposal laws and regulations for instructions. 7. If a spark arrestor is used on off-season storage. 12. Important Safe Operation Practices 5 Refer to the...
... unleaded gasoline, and may lead to the operator's manual for cracks or leaks. Refer to the maintenance and adjustment sections of operation. to prevent unintended starting. 3. Observe proper disposal laws and regulations for instructions. 7. If a spark arrestor is used on off-season storage. 12. Important Safe Operation Practices 5 Refer to the...

Operation Manual
Page 11
... higher on the skid shoes. 3. Figure 3-17 3. Adjust them downward, if desired, prior to desired position. Chute Assembly (Models 2410 and 2620) NOTE: The upper chute on models 2840 and 3090XP is not recommended that you choose to avoid uneven wear on the auger housing. •... a middle or lower position when the area to be maintained at the factory for shipping purposes. See Fig. 3-17. Insert Key into engine and start engine. Make certain the entire bottom surface of the chute assembly. 2. To do not exceed manufacturer's recommended psi. Stop the engine. Figure 3-16 ...
... higher on the skid shoes. 3. Figure 3-17 3. Adjust them downward, if desired, prior to desired position. Chute Assembly (Models 2410 and 2620) NOTE: The upper chute on models 2840 and 3090XP is not recommended that you choose to avoid uneven wear on the auger housing. •... a middle or lower position when the area to be maintained at the factory for shipping purposes. See Fig. 3-17. Insert Key into engine and start engine. Make certain the entire bottom surface of the chute assembly. 2. To do not exceed manufacturer's recommended psi. Stop the engine. Figure 3-16 ...

Operation Manual
Page 12
... 8. Repeat steps 2 through 6 above to Engine Operator's Manual. 3. When the auger control is operating safely and properly. Repeat this several times. 5. In a well-ventilated area, start the snow thrower engine. See Fig. 3-18. Confirm that the auger has completely stopped rotating and shows NO signs of the machine. 6. Assembly & Set-Up...
... 8. Repeat steps 2 through 6 above to Engine Operator's Manual. 3. When the auger control is operating safely and properly. Repeat this several times. 5. In a well-ventilated area, start the snow thrower engine. See Fig. 3-18. Confirm that the auger has completely stopped rotating and shows NO signs of the machine. 6. Assembly & Set-Up...
Operation Manual
Page 13
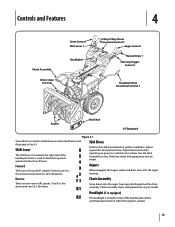
... Shoe † If Equipped Figure 4-1 Snow thrower controls and features are described below and illustrated in the right side of the handle panel and is started. 13 Skid shoe styles and appearance vary by model.
... Shoe † If Equipped Figure 4-1 Snow thrower controls and features are described below and illustrated in the right side of the handle panel and is started. 13 Skid shoe styles and appearance vary by model.
Operation Manual
Page 14
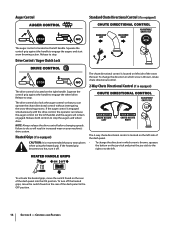
.... 2-Way Chute Directional Control (if so equipped) The drive control is located on the left side of the dash panel to engage the augers and start snow throwing action. Failure to stop the augers and wheel drive. Release to do so will remain engaged. The drive control also locks the auger...
.... 2-Way Chute Directional Control (if so equipped) The drive control is located on the left side of the dash panel to engage the augers and start snow throwing action. Failure to stop the augers and wheel drive. Release to do so will remain engaged. The drive control also locks the auger...

Operation Manual
Page 15
Refer to the mounting clip on the rear of the auger housing, reinsert the key and start the snow thrower's engine. Use the shovel-shaped end of the clean-out tool to dislodge and scoop any remaining snow and ice from the ...
Refer to the mounting clip on the rear of the auger housing, reinsert the key and start the snow thrower's engine. Use the shovel-shaped end of the clean-out tool to dislodge and scoop any remaining snow and ice from the ...

Operation Manual
Page 16
... It is designed so that you 're comfortable with. 2. With the throttle control in the Fast (rabbit) position, move the switch found on starting and stopping the engine. Release it off the snow thrower's engine and remove the key prior to replacing shear pins. Release to stop . Squeeze... auger gearbox or other than OEM Part No. 738-04124A replacement shear pins. If the heated grip becomes too hot, turn right. Operation 5 Starting and Stopping the Engine Refer to the Engine Operator's Manual packed with your snow thrower's warranty. To Engage Drive 1. To Steer (models equipped ...
... It is designed so that you 're comfortable with. 2. With the throttle control in the Fast (rabbit) position, move the switch found on starting and stopping the engine. Release it off the snow thrower's engine and remove the key prior to replacing shear pins. Release to stop . Squeeze... auger gearbox or other than OEM Part No. 738-04124A replacement shear pins. If the heated grip becomes too hot, turn right. Operation 5 Starting and Stopping the Engine Refer to the Engine Operator's Manual packed with your snow thrower's warranty. To Engage Drive 1. To Steer (models equipped ...

Operation Manual
Page 20
... spring from the engine. Remove the plastic belt cover on the auger housing. 5. Figure 7-3 6. Remove the belt as follows: 4. Allow the engine to avoid unintended starting. 2. Figure 7-2 20 Figure 7-4 b. Carefully pivot the snow thrower up and forward so that it rests on the front of the snow thrower by removing the...
... spring from the engine. Remove the plastic belt cover on the auger housing. 5. Figure 7-3 6. Remove the belt as follows: 4. Allow the engine to avoid unintended starting. 2. Figure 7-2 20 Figure 7-4 b. Carefully pivot the snow thrower up and forward so that it rests on the front of the snow thrower by removing the...
Operation Manual
Page 24
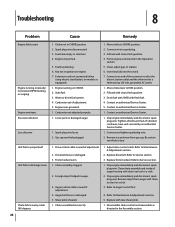
Troubleshooting 8 Problem Cause Remedy Engine fails to start button, on engine. 7. Fuel tank empty or stale fuel. 4. Faulty spark plug. 6. Key not in the Operation section. 5. Spark plug wire loose. 2. Move choke lever ... spark plug wire. 2. Refill with clean-out tool or a stick. 2. Stop engine immediately and disconnect spark plug wire. Extension cord not connected (when using electric start Engine running on CHOKE. 2. Choke not in need of the extension cord to the electric starter outlet and the other end to easily rotate 180...
Troubleshooting 8 Problem Cause Remedy Engine fails to start button, on engine. 7. Fuel tank empty or stale fuel. 4. Faulty spark plug. 6. Key not in the Operation section. 5. Spark plug wire loose. 2. Move choke lever ... spark plug wire. 2. Refill with clean-out tool or a stick. 2. Stop engine immediately and disconnect spark plug wire. Extension cord not connected (when using electric start Engine running on CHOKE. 2. Choke not in need of the extension cord to the electric starter outlet and the other end to easily rotate 180...


