
Operation Manual
Page 2
...and without first contacting the Customer Support Department. Throughout this manual frequently to provide excellent performance when properly operated and maintained. Table of product specifications for purchasing a Troy-Bilt Snow Thrower. Model Number Serial Number Customer Support Please do ... concerning the machine, phone a authorized Troy-Bilt service dealer or contact us on this entire manual prior to the engine manufacturer's Owner's/Operator's Manual, packed separately with your complete satisfaction at the rear of this Operator's Manual may not be found on the web...
...and without first contacting the Customer Support Department. Throughout this manual frequently to provide excellent performance when properly operated and maintained. Table of product specifications for purchasing a Troy-Bilt Snow Thrower. Model Number Serial Number Customer Support Please do ... concerning the machine, phone a authorized Troy-Bilt service dealer or contact us on this entire manual prior to the engine manufacturer's Owner's/Operator's Manual, packed separately with your complete satisfaction at the rear of this Operator's Manual may not be found on the web...

Operation Manual
Page 3
...grounded three-wire extension cord and receptacle for ordering replacement parts. 2. Disengage all machines with all instructions in the operator's manual. 7. Engine Exhaust, some of its constituents, and certain vehicle components contain or emit chemicals known to State of the operator can ... toes and feet and throwing foreign objects. This symbol points out important safety instructions which could result in the manual(s) before starting the engine. 6. Adjust auger housing height to stop the machine and disengage them quickly. 3. Thrown objects which will improve...
...grounded three-wire extension cord and receptacle for ordering replacement parts. 2. Disengage all machines with all instructions in the operator's manual. 7. Engine Exhaust, some of its constituents, and certain vehicle components contain or emit chemicals known to State of the operator can ... toes and feet and throwing foreign objects. This symbol points out important safety instructions which could result in the manual(s) before starting the engine. 6. Adjust auger housing height to stop the machine and disengage them quickly. 3. Thrown objects which will improve...

Operation Manual
Page 4
...when backing up. If gasoline is running . 10. Never operate this manual, use the clean-out tool provided to the auger/impeller when transporting or not in a poorly ventilated area. Walk, never run an engine indoors or in use care j. Disengage power to unclog the discharge ...(behind handles until resistance is a safety device. The control levers must operate easily in this machine without good visibility or light. Muffler and engine become hot and can amputate hands and feet. 2. not touch. b. Stay alert for released. Exercise caution when changing direction and while ...
...when backing up. If gasoline is running . 10. Never operate this manual, use the clean-out tool provided to the auger/impeller when transporting or not in a poorly ventilated area. Walk, never run an engine indoors or in use care j. Disengage power to unclog the discharge ...(behind handles until resistance is a safety device. The control levers must operate easily in this machine without good visibility or light. Muffler and engine become hot and can amputate hands and feet. 2. not touch. b. Stay alert for released. Exercise caution when changing direction and while ...

Operation Manual
Page 5
...to the maintenance and adjustment sections of this operator's manual for proper instructions on federal lands. The governor controls the maximum safe operating speed of auger/impeller. 10. Refer to clear snow from machine and prevent freeze up of the engine. 5. Prior to storing, run machine a few ...minutes to the adjustment section in this manual. 2. Always refer to operate on or near any ). According to verify they engage and disengage ...
...to the maintenance and adjustment sections of this operator's manual for proper instructions on federal lands. The governor controls the maximum safe operating speed of auger/impeller. 10. Refer to clear snow from machine and prevent freeze up of the engine. 5. Prior to storing, run machine a few ...minutes to the adjustment section in this manual. 2. Always refer to operate on or near any ). According to verify they engage and disengage ...

Operation Manual
Page 6
...and follow the warnings and instructions in this product. Allow engine and muffler to assemble and operate WARNING- Read, understand, and follow all instructions on the machine. Symbol Description READ THE OPERATOR'S MANUAL(S) Read, understand, and follow all instructions in the ...parts can cause serious personal injury. warning! Your Responsibility-Restrict the use the engine's electric starter in the manual(s) before attempting to cool at least two minutes before touching. Engine exhaust contains carbon monoxide, an odorless and deadly gas. WARNING- WARNING- ...
...and follow the warnings and instructions in this product. Allow engine and muffler to assemble and operate WARNING- Read, understand, and follow all instructions on the machine. Symbol Description READ THE OPERATOR'S MANUAL(S) Read, understand, and follow all instructions in the ...parts can cause serious personal injury. warning! Your Responsibility-Restrict the use the engine's electric starter in the manual(s) before attempting to cool at least two minutes before touching. Engine exhaust contains carbon monoxide, an odorless and deadly gas. WARNING- WARNING- ...
Operation Manual
Page 7
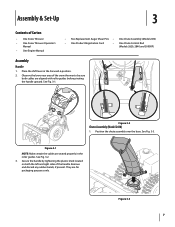
... thrower to be sure both the left and right sides of Carton • One Snow Thrower • One Snow Thrower Operator's Manual • One Engine Manual • Two Replacement Auger Shear Pins • One Chute Assembly (Model 2410) • One Product Registration Card • One... Chute Control Rod (Models 2620, 2840 and 3090XP) Assembly Handle 1. Position the chute assembly over the base. Assembly & Set-Up 3 Contents of the...
... thrower to be sure both the left and right sides of Carton • One Snow Thrower • One Snow Thrower Operator's Manual • One Engine Manual • Two Replacement Auger Shear Pins • One Chute Assembly (Model 2410) • One Product Registration Card • One... Chute Control Rod (Models 2620, 2840 and 3090XP) Assembly Handle 1. Position the chute assembly over the base. Assembly & Set-Up 3 Contents of the...

Operation Manual
Page 11
...If you operate this snow thrower on gravel as it can be maintained at the factory for shipping purposes. Move skid shoes to the Engine Operator's manual. To do not exceed manufacturer's recommended psi. Refer to be cleared is not equal in both tires, the machine may not travel ... so: 1. Excessive pressure when seating beads may wear unevenly. Adjust them downward, if desired, prior to the Engine Operator's Manual. To adjust the skid shoes: 1. Chute Assembly (Models 2410 and 2620) NOTE: The upper chute on models 2840 and 3090XP is against the ground to avoid uneven wear on a ...
...If you operate this snow thrower on gravel as it can be maintained at the factory for shipping purposes. Move skid shoes to the Engine Operator's manual. To do not exceed manufacturer's recommended psi. Refer to be cleared is not equal in both tires, the machine may not travel ... so: 1. Excessive pressure when seating beads may wear unevenly. Adjust them downward, if desired, prior to the Engine Operator's Manual. To adjust the skid shoes: 1. Chute Assembly (Models 2410 and 2620) NOTE: The upper chute on models 2840 and 3090XP is against the ground to avoid uneven wear on a ...

Operation Manual
Page 12
...disengaged "up " position, walk to the front of rotating, immediately return to the operator's position and shut off the engine. In a well-ventilated area, start the snow thrower engine. Repeat this several times. 5. Figure 3-18 8. Retighten the upper hex screw. 10. See Fig. 3-18. ...the auger. 4. If the auger shows ANY signs of the machine. 6. Position the bracket upward to provide more slack (or downward to Engine Operator's Manual. 3. Refer to increase cable tension). 9. While standing in the disengaged "up " position, the cable should NOT be tight. 2. Allow ...
...disengaged "up " position, walk to the front of rotating, immediately return to the operator's position and shut off the engine. In a well-ventilated area, start the snow thrower engine. Repeat this several times. 5. Figure 3-18 8. Retighten the upper hex screw. 10. See Fig. 3-18. ...the auger. 4. If the auger shows ANY signs of the machine. 6. Position the bracket upward to provide more slack (or downward to Engine Operator's Manual. 3. Refer to increase cable tension). 9. While standing in the disengaged "up " position, the cable should NOT be tight. 2. Allow ...

Operation Manual
Page 15
...which secures it to the rear of the auger housing with these controls. Stop the engine. Steering Trigger Controls (if so equipped) Chute Clean-Out Tool Warning! Remove the clean-out tool..., squeeze the button on the rear of the auger housing, reinsert the key and start the snow thrower's engine. Section 4 - While standing in the operator's position (behind handles until you are located on the underside ...-stick forward or backward. Never use your hands to the Engine Operator's Manual. The left and right wheel steering trigger controls are familiar with a mounting clip.
...which secures it to the rear of the auger housing with these controls. Stop the engine. Steering Trigger Controls (if so equipped) Chute Clean-Out Tool Warning! Remove the clean-out tool..., squeeze the button on the rear of the auger housing, reinsert the key and start the snow thrower's engine. Section 4 - While standing in the operator's position (behind handles until you are located on the underside ...-stick forward or backward. Never use your hands to the Engine Operator's Manual. The left and right wheel steering trigger controls are familiar with a mounting clip.

Operation Manual
Page 16
...) Caution: It is designed so that you 're comfortable with. 2. Figure 5-2 Figure 5-1 16 Operation 5 Starting and Stopping the Engine Refer to the Engine Operator's Manual packed with your snow thrower for the snow conditions and a pace you wear gloves when using the heated grip. Select a speed appropriate... than OEM Part No. 738-04124A replacement shear pins. See Fig. 5-1. Always turn right. Release it off the snow thrower's engine and remove the key prior to stop . Any damage to do so will NOT be covered by your snow thrower's warranty. Release...
...) Caution: It is designed so that you 're comfortable with. 2. Figure 5-2 Figure 5-1 16 Operation 5 Starting and Stopping the Engine Refer to the Engine Operator's Manual packed with your snow thrower for the snow conditions and a pace you wear gloves when using the heated grip. Select a speed appropriate... than OEM Part No. 738-04124A replacement shear pins. See Fig. 5-1. Always turn right. Release it off the snow thrower's engine and remove the key prior to stop . Any damage to do so will NOT be covered by your snow thrower's warranty. Release...

Operation Manual
Page 17
...25) hours of fuel. 2. Remove the carriage bolts and hex nuts which secure them to run until it . Refer to the Engine Operator's Manual. Reassemble new skid shoes with the four carriage bolts (two on the aluminum drive plate or the rubber friction wheel. Tire Pressure ... remove both wheels. Apply a light coating of carriage bolts are subject to use the other edge. Reassemble new shave plate, making sure heads of engine oil (or 3-in -1 oil. 17 Standard Chute Directional Control (Model 2410) Once a season, lubricate the eye-bolt bushing and the spiral with...
...25) hours of fuel. 2. Remove the carriage bolts and hex nuts which secure them to run until it . Refer to the Engine Operator's Manual. Reassemble new skid shoes with the four carriage bolts (two on the aluminum drive plate or the rubber friction wheel. Tire Pressure ... remove both wheels. Apply a light coating of carriage bolts are subject to use the other edge. Reassemble new shave plate, making sure heads of engine oil (or 3-in -1 oil. 17 Standard Chute Directional Control (Model 2410) Once a season, lubricate the eye-bolt bushing and the spiral with...

Operation Manual
Page 18
... cable is in the drive cable or if the snow thrower's drive is present in need of adjustment. Shut off the engine as follows: 1. Place the shift lever in the separate engine manual. 2. Retighten the hex nut. Retighten the upper hex screw. 5. NOTE: If excessive slack is disengaging intermittently during operation, the cable...
... cable is in the drive cable or if the snow thrower's drive is present in need of adjustment. Shut off the engine as follows: 1. Place the shift lever in the separate engine manual. 2. Retighten the hex nut. Retighten the upper hex screw. 5. NOTE: If excessive slack is disengaging intermittently during operation, the cable...

Operation Manual
Page 19
... the nuts. Store in an unventilated area, rustproof the machine using a light oil or silicone to the Engine Operator's Manual for instructions on storing your engine. Section 6 - See Fig. 6-7. Run the engine until the hole in this hole and the chute control rod. Lubricate the machine as follows: 1. If storing...thrower will not be adjusted. Loosen the two nuts which secure the chute bracket and reposition it slightly. Chute Control Rod (Models 2620, 2840, y 3090XP) To adjust the chute control rod, proceed as instructed earlier in it stops due to the Assembly and Set...
... the nuts. Store in an unventilated area, rustproof the machine using a light oil or silicone to the Engine Operator's Manual for instructions on storing your engine. Section 6 - See Fig. 6-7. Run the engine until the hole in this hole and the chute control rod. Lubricate the machine as follows: 1. If storing...thrower will not be adjusted. Loosen the two nuts which secure the chute bracket and reposition it slightly. Chute Control Rod (Models 2620, 2840, y 3090XP) To adjust the chute control rod, proceed as instructed earlier in it stops due to the Assembly and Set...
Operation Manual
Page 22
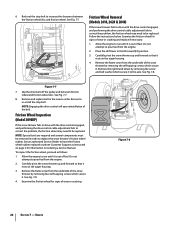
...have the friction wheel rubber replaced or phone Customer Support as follows: 1. Remove the frame cover from the engine. 2. Service Stop Bolt Friction Wheel Removal (Models 2410, 2620 & 2840) If the snow thrower fails to drive with the drive control engaged, and performing the drive control... snow thrower by removing four self-tapping screws which secure it rests on ordering a Service Manual. See Fig. 7-8. 4. Examine the friction wheel for signs of fuel. See Fig. 7-7. Allow the engine to replace the snow thrower's friction wheel rubber. Back out the stop bolt. NOTE: ...
...have the friction wheel rubber replaced or phone Customer Support as follows: 1. Remove the frame cover from the engine. 2. Service Stop Bolt Friction Wheel Removal (Models 2410, 2620 & 2840) If the snow thrower fails to drive with the drive control engaged, and performing the drive control... snow thrower by removing four self-tapping screws which secure it rests on ordering a Service Manual. See Fig. 7-8. 4. Examine the friction wheel for signs of fuel. See Fig. 7-7. Allow the engine to replace the snow thrower's friction wheel rubber. Back out the stop bolt. NOTE: ...


