

Operation Manual
Page 1
Safe Operation Practices • Set-Up • Operation • Maintenance • Service • Troubleshooting • Warranty Operator's Manual Front Tine Tiller - 340 Series WARNING READ AND FOLLOW ALL SAFETY RULES AND INSTRUCTIONS IN THIS MANUAL BEFORE ATTEMPTING TO OPERATE THIS MACHINE. Printed In USA TROY-BILT LLC, P.O. FAILURE TO COMPLY WITH THESE INSTRUCTIONS MAY RESULT IN PERSONAL INJURY. BOX 361131 CLEVELAND, OHIO 44136-0019 Form No. 769-08539 (October 15, 2012)
Safe Operation Practices • Set-Up • Operation • Maintenance • Service • Troubleshooting • Warranty Operator's Manual Front Tine Tiller - 340 Series WARNING READ AND FOLLOW ALL SAFETY RULES AND INSTRUCTIONS IN THIS MANUAL BEFORE ATTEMPTING TO OPERATE THIS MACHINE. Printed In USA TROY-BILT LLC, P.O. FAILURE TO COMPLY WITH THESE INSTRUCTIONS MAY RESULT IN PERSONAL INJURY. BOX 361131 CLEVELAND, OHIO 44136-0019 Form No. 769-08539 (October 15, 2012)
Operation Manual
Page 2
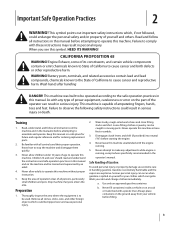
... Contents Safe Operation Practices 3 Assembly & Set-Up 7 Controls 10 Operation 11 Maintenance & Adjustment 13 Service 15 Troubleshooting 16 Replacement Parts 17 Warranty Back Cover Record Product Information Before setting up , operate and maintain your machine. Failure to do NOT return the machine to the retailer or dealer without incurring obligation. Please be necessary, should you have any problems or questions concerning the machine, phone a authorized Troy-Bilt service dealer...
... Contents Safe Operation Practices 3 Assembly & Set-Up 7 Controls 10 Operation 11 Maintenance & Adjustment 13 Service 15 Troubleshooting 16 Replacement Parts 17 Warranty Back Cover Record Product Information Before setting up , operate and maintain your machine. Failure to do NOT return the machine to the retailer or dealer without incurring obligation. Please be necessary, should you have any problems or questions concerning the machine, phone a authorized Troy-Bilt service dealer...
Operation Manual
Page 3
... make any type of power equipment, carelessness or error on a truck or trailer bed with the engine running , except where specifically recommended in moving parts. Training 1. Thoroughly inspect the area where the equipment is capable of all stones, sticks, wire, and other reproductive harm. Never operate this machine unattended with a plastic liner. Wash your vehicle before starting the engine. 4. b. WARNING! Keep...
... make any type of power equipment, carelessness or error on a truck or trailer bed with the engine running , except where specifically recommended in moving parts. Training 1. Thoroughly inspect the area where the equipment is capable of all stones, sticks, wire, and other reproductive harm. Never operate this machine unattended with a plastic liner. Wash your vehicle before starting the engine. 4. b. WARNING! Keep...
Operation Manual
Page 4
... the spark plug wire and ground it off the engine and equipment. e. Never remove gas cap or add fuel while the engine is in a poorly ventilated area. Replace gasoline cap and tighten securely. Wait 5 minutes before starting and operating. 12. Keep bystanders away from the tines at all shields, guards, and safety devices in hard ground. Do not carry passengers. 7. Disengage all times. 11. Muffler and engine...
... the spark plug wire and ground it off the engine and equipment. e. Never remove gas cap or add fuel while the engine is in a poorly ventilated area. Replace gasoline cap and tighten securely. Wait 5 minutes before starting and operating. 12. Keep bystanders away from the tines at all shields, guards, and safety devices in hard ground. Do not carry passengers. 7. Disengage all times. 11. Muffler and engine...
Operation Manual
Page 5
... so equipped. A spark arrestor for gas, oil, etc. Box 361131 Cleveland, Ohio 44136-0019. If a spark arrestor is required by the operator. Important Safe Operation Practices 5 9. This machine is available through your nearest engine authorized service dealer or contact the service department, P.O. Federal laws apply on or near any ). If the fuel tank has to do this product has an Average Useful Life of...
... so equipped. A spark arrestor for gas, oil, etc. Box 361131 Cleveland, Ohio 44136-0019. If a spark arrestor is required by the operator. Important Safe Operation Practices 5 9. This machine is available through your nearest engine authorized service dealer or contact the service department, P.O. Federal laws apply on or near any ). If the fuel tank has to do this product has an Average Useful Life of...
Operation Manual
Page 6
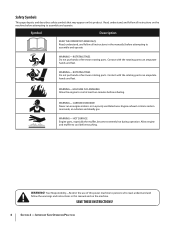
... area. WARNING- HOT SURFACE Engine parts, especially the muffler, become extremely hot during operation. CARBON MONOXIDE Never run an engine indoors or in this manual and on this power machine to persons who read, understand and follow all instructions in the manual(s) before attempting to cool before refueling. Allow engine and muffler to assemble and operate. Contact with the rotating parts can amputate hands and...
... area. WARNING- HOT SURFACE Engine parts, especially the muffler, become extremely hot during operation. CARBON MONOXIDE Never run an engine indoors or in this manual and on this power machine to persons who read, understand and follow all instructions in the manual(s) before attempting to cool before refueling. Allow engine and muffler to assemble and operate. Contact with the rotating parts can amputate hands and...
Operation Manual
Page 7
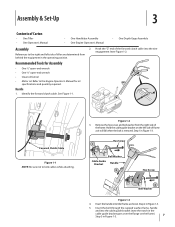
Identify the forward clutch cable. See Figure 1-1. Remove the hex screw and bell washer from behind the equipment in the operating position. Recommended Tools for oil specifications and quantity required. Forward Clutch Cable Figure 1-1 NOTE: Be sure not to the Engine Operator's Manual for Assembly • One 1⁄2" open-end wrench • One 3⁄8" open-end wrench • Clean oil funnel • Motor oil. References to the right and left...
Identify the forward clutch cable. See Figure 1-1. Remove the hex screw and bell washer from behind the equipment in the operating position. Recommended Tools for oil specifications and quantity required. Forward Clutch Cable Figure 1-1 NOTE: Be sure not to the Engine Operator's Manual for Assembly • One 1⁄2" open-end wrench • One 3⁄8" open-end wrench • Clean oil funnel • Motor oil. References to the right and left...
Operation Manual
Page 8
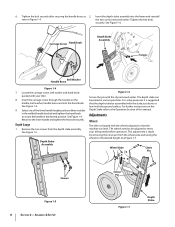
... your tilling needs before operation. the two screws removed earlier. Locate the carriage screw, bell washer and hand knob packed with the ground surface. Return to meet your tiller. 8. Assembly & Set-Up Cotter Pin Figure 1-7 Depth Stake This adjustment is suggested that the machine sits level. 6. See Figure 1-7. Insert the depth stake assembly into the hand knob. For further instructions on the handle, bell washer, handle brace and...
... your tilling needs before operation. the two screws removed earlier. Locate the carriage screw, bell washer and hand knob packed with the ground surface. Return to meet your tiller. 8. Assembly & Set-Up Cotter Pin Figure 1-7 Depth Stake This adjustment is suggested that the machine sits level. 6. See Figure 1-7. Insert the depth stake assembly into the hand knob. For further instructions on the handle, bell washer, handle brace and...
Operation Manual
Page 9
... on the cable. 8. Use extreme care when handling gasoline. Disconnect and ground the spark plug wire against the cable collar. Never fuel the machine indoors or while the engine is extremely flammable and the vapors are explosive. Assembly & Set-Up 9 Retighten the lock nut against the engine. 2. position, pull the starter rope several times. Gasoline is hot or running. If they turn . 6. Set-Up Gas & Oil Fill-Up Service the Engine with gasoline and oil as instructed in...
... on the cable. 8. Use extreme care when handling gasoline. Disconnect and ground the spark plug wire against the cable collar. Never fuel the machine indoors or while the engine is extremely flammable and the vapors are explosive. Assembly & Set-Up 9 Retighten the lock nut against the engine. 2. position, pull the starter rope several times. Gasoline is hot or running. If they turn . 6. Set-Up Gas & Oil Fill-Up Service the Engine with gasoline and oil as instructed in...
Operation Manual
Page 10
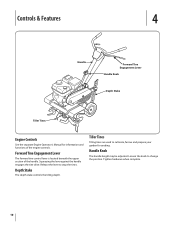
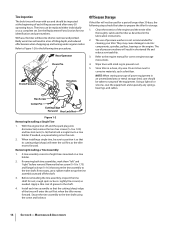
... of the handle. Forward Tine Engagement Lever The forward tine control lever is located beneath the upper section of the engine controls. Squeezing the lever against the handle engages the tine drive. Handle Knob The handle height may be adjusted. Loosen the knob to change the position. Depth Stake The depth stake controls the tilling depth. Controls & Features 4 Handle Forward Tine Engagement Lever Handle Knob Depth Stake Tiller Tines Engine Controls See the separate Engine Operator's Manual for seeding...
... of the handle. Forward Tine Engagement Lever The forward tine control lever is located beneath the upper section of the engine controls. Squeezing the lever against the handle engages the tine drive. Handle Knob The handle height may be adjusted. Loosen the knob to change the position. Depth Stake The depth stake controls the tilling depth. Controls & Features 4 Handle Forward Tine Engagement Lever Handle Knob Depth Stake Tiller Tines Engine Controls See the separate Engine Operator's Manual for seeding...
Operation Manual
Page 11
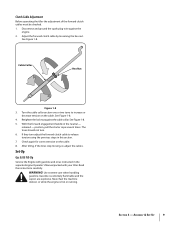
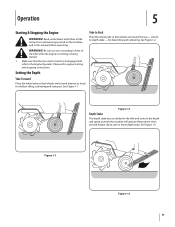
... front of the tiller while the engine is running or being started. 1. for the tiller and controls the depth and speed at which the machine will operate. Setting the Depth Yoke Forward Place the wheel yoke so that wheels are toward the rear - See Figure 1-3. See Figure 1-2. WARNING! closest to tines) for engine starting and stopping instructions. See Figure 1-1. Remove the clevis pin and hairpin clip...
... front of the tiller while the engine is running or being started. 1. for the tiller and controls the depth and speed at which the machine will operate. Setting the Depth Yoke Forward Place the wheel yoke so that wheels are toward the rear - See Figure 1-3. See Figure 1-2. WARNING! closest to tines) for engine starting and stopping instructions. See Figure 1-1. Remove the clevis pin and hairpin clip...
Operation Manual
Page 12
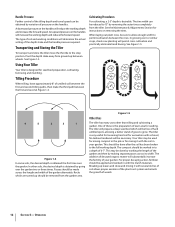
... depth and increase the forward speed. The type of soil and working conditions will prepare a deep seed bed which are turned up should be removed from the garden area. Using Your Tiller Your tiller is very useful for loosening hard soil for instructions on the handles. The tiller will determine the actual setting of 6-7". Your tiller may be used for mixing compost in the pile...
... depth and increase the forward speed. The type of soil and working conditions will prepare a deep seed bed which are turned up should be removed from the garden area. Using Your Tiller Your tiller is very useful for loosening hard soil for instructions on the handles. The tiller will determine the actual setting of 6-7". Your tiller may be used for mixing compost in the pile...
Operation Manual
Page 13
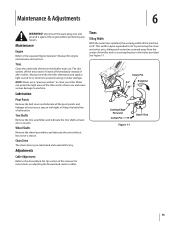
... the spark plug wire and ground it dries. Maintenance Engine Refer to the Assembly & Set-Up section of the machine is pre-lubricated and sealed at least once a season. See Figure 1-1. Tine Shafts Remove the tine assemblies and lubricate the tine shafts at least once a season with light oil. Cutting Edge Forward Cotter Pin Figure 1-1 Outer Tine Adjustments Cable Adjustment Refer to the separate Engine Operator's Manual for instructions on adjusting the...
... the spark plug wire and ground it dries. Maintenance Engine Refer to the Assembly & Set-Up section of the machine is pre-lubricated and sealed at least once a season. See Figure 1-1. Tine Shafts Remove the tine assemblies and lubricate the tine shafts at least once a season with light oil. Cutting Edge Forward Cotter Pin Figure 1-1 Outer Tine Adjustments Cable Adjustment Refer to the separate Engine Operator's Manual for instructions on adjusting the...
Operation Manual
Page 14
.... Hex Screw Cotter Pin Cutting Edge Forward Hex Lock Nut Figure 1-2 Removing/Installing a Single Tine 1. Secure the tine assembly to a tine holder. With use of tilling depth, and reduced effectiveness when chopping up and turning under organic matter. Lubricate the tiller as the tiller moves forward. With the engine shut off the shaft. 3. Lightly file or sand, as a complete set. Refer to position it so that attach a single...
.... Hex Screw Cotter Pin Cutting Edge Forward Hex Lock Nut Figure 1-2 Removing/Installing a Single Tine 1. Secure the tine assembly to a tine holder. With use of tilling depth, and reduced effectiveness when chopping up and turning under organic matter. Lubricate the tiller as the tiller moves forward. With the engine shut off the shaft. 3. Lightly file or sand, as a complete set. Refer to position it so that attach a single...
Operation Manual
Page 15
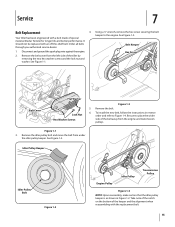
... the spark plug wire against the engine. 2. Your tiller has been engineered with the replacement belt. 15 Belt Keeper 1. See Figure 1-1. Using a 1⁄2" wrench, remove the hex screw securing the belt keeper to place the wider side of the tiller by removing the two hex washer screws and the lock nut and washer. It should not be replaced with an off-the-shelf belt. Remove the idler pulley bolt and move the belt from...
... the spark plug wire against the engine. 2. Your tiller has been engineered with the replacement belt. 15 Belt Keeper 1. See Figure 1-1. Using a 1⁄2" wrench, remove the hex screw securing the belt keeper to place the wider side of the tiller by removing the two hex washer screws and the lock nut and washer. It should not be replaced with an off-the-shelf belt. Remove the idler pulley bolt and move the belt from...

Operation Manual
Page 16
... 3. Adjust control cable 5. Adjust control cable 3. Pulley and idler not in tines 2. Improper rotation. 1. Belt worn and/or stretched Remedy 1. Replace belt 1. Dislodge foreign object 2. Forward rotation should only be used on soil that has already been tilled, not on virgin soil. 1. Troubleshooting 8 Problem Tines do not engage Tines skip over ground Wheels do not engage Cause 1. Belt worn and/or stretched 1. Clevis pin missing 2. Take tiller...
... 3. Adjust control cable 5. Adjust control cable 3. Pulley and idler not in tines 2. Improper rotation. 1. Belt worn and/or stretched Remedy 1. Replace belt 1. Dislodge foreign object 2. Forward rotation should only be used on soil that has already been tilled, not on virgin soil. 1. Troubleshooting 8 Problem Tines do not engage Tines skip over ground Wheels do not engage Cause 1. Belt worn and/or stretched 1. Clevis pin missing 2. Take tiller...
Operation Manual
Page 17
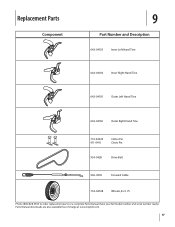
Parts Manual downloads are also available free of charge at www.troybilt.com. 17 Replacement Parts Component 9 Part Number and Description 642-04103 Inner Left Hand Tine 642-04104 Inner Right Hand Tine 642-04105 Outer Left Hand Tine 642-04106 Outer Right Hand Tine 714-04043 911-0415 Cotter Pin Clevis Pin 954-0428 Drive Belt 946-0918 Forward Cable 734-04538 Wheels, 8 x 1.75 Phone (800) 828-5500 to order replacement parts or a complete Parts Manual (have your full model number and serial number ready).
Parts Manual downloads are also available free of charge at www.troybilt.com. 17 Replacement Parts Component 9 Part Number and Description 642-04103 Inner Left Hand Tine 642-04104 Inner Right Hand Tine 642-04105 Outer Left Hand Tine 642-04106 Outer Right Hand Tine 714-04043 911-0415 Cotter Pin Clevis Pin 954-0428 Drive Belt 946-0918 Forward Cable 734-04538 Wheels, 8 x 1.75 Phone (800) 828-5500 to order replacement parts or a complete Parts Manual (have your full model number and serial number ready).
Operation Manual
Page 18
... as lubricants, filters, blade sharpening, tune-ups, brake adjustments, clutch adjustments, deck adjustments, and normal deterioration of the product sold through your local authorized service dealer. b. Troy-Bilt shall not be greater than the original purchaser or to new merchandise purchased and used in accordance with the Operator's Manual furnished with the product, and has not been subject to temporarily replace a warranted product. IMPORTANT: Owner must present...
... as lubricants, filters, blade sharpening, tune-ups, brake adjustments, clutch adjustments, deck adjustments, and normal deterioration of the product sold through your local authorized service dealer. b. Troy-Bilt shall not be greater than the original purchaser or to new merchandise purchased and used in accordance with the Operator's Manual furnished with the product, and has not been subject to temporarily replace a warranted product. IMPORTANT: Owner must present...


