
Operation Manual
Page 1
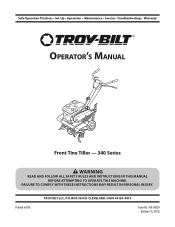
Printed In USA TROY-BILT LLC, P.O. Safe Operation Practices • Set-Up • Operation • Maintenance • Service • Troubleshooting • Warranty Operator's Manual Front Tine Tiller - 340 Series WARNING READ AND FOLLOW ALL SAFETY RULES AND INSTRUCTIONS IN THIS MANUAL BEFORE ATTEMPTING TO OPERATE THIS MACHINE. BOX 361131 CLEVELAND, OHIO 44136-0019 Form No. 769-08539 (October 15, 2012) FAILURE TO COMPLY WITH THESE INSTRUCTIONS MAY RESULT IN PERSONAL INJURY.
Printed In USA TROY-BILT LLC, P.O. Safe Operation Practices • Set-Up • Operation • Maintenance • Service • Troubleshooting • Warranty Operator's Manual Front Tine Tiller - 340 Series WARNING READ AND FOLLOW ALL SAFETY RULES AND INSTRUCTIONS IN THIS MANUAL BEFORE ATTEMPTING TO OPERATE THIS MACHINE. BOX 361131 CLEVELAND, OHIO 44136-0019 Form No. 769-08539 (October 15, 2012) FAILURE TO COMPLY WITH THESE INSTRUCTIONS MAY RESULT IN PERSONAL INJURY.
Operation Manual
Page 2
... without first contacting the Customer Support Department. It instructs you for purchasing a Troy-Bilt Garden Tiller. Model Number Serial Number Customer Support Please do so could result in this page. Box 361131 • Cleveland, OH • 44136-0019 2 Review this entire manual prior to operating the equipment. To The Owner 1 Thank You Thank you...
... without first contacting the Customer Support Department. It instructs you for purchasing a Troy-Bilt Garden Tiller. Model Number Serial Number Customer Support Please do so could result in this page. Box 361131 • Cleveland, OH • 44136-0019 2 Review this entire manual prior to operating the equipment. To The Owner 1 Thank You Thank you...
Operation Manual
Page 4
...6. The governor controls the maximum safe operating speed of alcohol or drugs. 3. Do not use care when in the ground and propel the tiller forward. If this machine. 8. Repair any fuel soaked debris. Failure to cool at least two minutes before starting . 5. Engine exhaust contains...damage. Important Safe Operation Practices Fill tank to no more than from the tines at all times until the tines come to the operator's manual for an extended period. 4 Section 2 - Operation 1. c. Never tamper with the rim of filler neck to keep a firm hold on...
...6. The governor controls the maximum safe operating speed of alcohol or drugs. 3. Do not use care when in the ground and propel the tiller forward. If this machine. 8. Repair any fuel soaked debris. Failure to cool at least two minutes before starting . 5. Engine exhaust contains...damage. Important Safe Operation Practices Fill tank to no more than from the tines at all times until the tines come to the operator's manual for an extended period. 4 Section 2 - Operation 1. c. Never tamper with the rim of filler neck to keep a firm hold on...
Operation Manual
Page 7
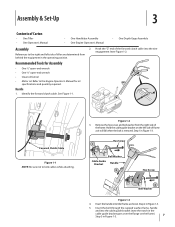
... the cupped washer, frame, handle and into the tine engagement lever Figure 1-2. References to kink cables while attaching. Insert the handle into tiller frame as it will fall when the bolt is removed. Assembly & Set-Up 3 Contents of the frame. See Figure 1-1. Hex Screw...cable guide bracket goes over the flange on the left side of tiller are determined from the right side of Carton • One Tiller • One Operator's Manual • One Handlebar Assembly • One Engine Operator's Manual • One Depth Gage Assembly Assembly 2. Recommended Tools for oil...
... the cupped washer, frame, handle and into the tine engagement lever Figure 1-2. References to kink cables while attaching. Insert the handle into tiller frame as it will fall when the bolt is removed. Assembly & Set-Up 3 Contents of the frame. See Figure 1-1. Hex Screw...cable guide bracket goes over the flange on the left side of tiller are determined from the right side of Carton • One Tiller • One Operator's Manual • One Handlebar Assembly • One Engine Operator's Manual • One Depth Gage Assembly Assembly 2. Recommended Tools for oil...
Operation Manual
Page 8
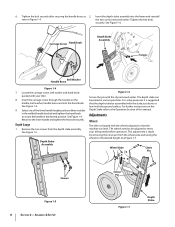
... from the wheel yoke and raising the wheels to be placed at various positions. Tighten the hex bolts securely. Return to meet your tiller. 8. For setup purposes it is shipped with the ground surface. 6. the two screws removed earlier. See Figure 1-6. Carriage Screw Hand... Knob Depth Stake Assembly Screws Bell Washer Handle Brace Figure 1-4 7. The wheels need to the desired height. Select one of this manual. For further instructions on the handle, bell washer, handle brace and into the frame and reinstall seen in the desired position. See Figure...
... from the wheel yoke and raising the wheels to be placed at various positions. Tighten the hex bolts securely. Return to meet your tiller. 8. For setup purposes it is shipped with the ground surface. 6. the two screws removed earlier. See Figure 1-6. Carriage Screw Hand... Knob Depth Stake Assembly Screws Bell Washer Handle Brace Figure 1-4 7. The wheels need to the desired height. Select one of this manual. For further instructions on the handle, bell washer, handle brace and into the frame and reinstall seen in the desired position. See Figure...
Operation Manual
Page 9
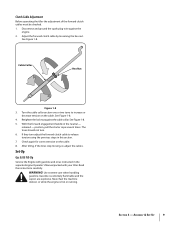
... release tension using the previous steps in this section. 7. With the forward engagement handle in the separate Engine Operator's Manual packed with your tiller. The tines should not turn adjust the forward clutch cable to increase or decrease tension on the cable. 8. Read the.... See Figure 1-8. 4. See Figure 1-8. 5. Section 3 - position, pull the starter rope several times. Clutch Cable Adjustment Before operating the tiller the adjustment of the forward clutch cables must be checked. 1. Disconnect and ground the spark plug wire against the cable collar. See Figure 1-8....
... release tension using the previous steps in this section. 7. With the forward engagement handle in the separate Engine Operator's Manual packed with your tiller. The tines should not turn adjust the forward clutch cable to increase or decrease tension on the cable. 8. Read the.... See Figure 1-8. 4. See Figure 1-8. 5. Section 3 - position, pull the starter rope several times. Clutch Cable Adjustment Before operating the tiller the adjustment of the forward clutch cables must be checked. 1. Disconnect and ground the spark plug wire against the cable collar. See Figure 1-8....
Operation Manual
Page 10
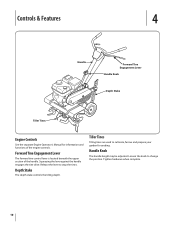
... the tine drive. Release the lever to change the position. Controls & Features 4 Handle Forward Tine Engagement Lever Handle Knob Depth Stake Tiller Tines Engine Controls See the separate Engine Operator's Manual for seeding. Forward Tine Engagement Lever The forward tine control lever is located beneath the upper section of the engine controls...
... the tine drive. Release the lever to change the position. Controls & Features 4 Handle Forward Tine Engagement Lever Handle Knob Depth Stake Tiller Tines Engine Controls See the separate Engine Operator's Manual for seeding. Forward Tine Engagement Lever The forward tine control lever is located beneath the upper section of the engine controls...
Operation Manual
Page 11
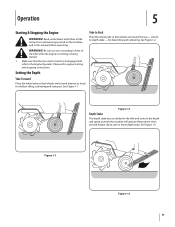
...follow all the instructions and warnings posted on the machine and in front of the tiller while the engine is running or being started. 1. See Figure 1-3. closest to the Engine Operator's Manual for shallow tilling, cultivating and transport. See Figure 1-2. Make sure that wheels ...are forward (nearest to raise or lower depth stake. for the tiller and controls the depth and speed at which the machine will...
...follow all the instructions and warnings posted on the machine and in front of the tiller while the engine is running or being started. 1. See Figure 1-3. closest to the Engine Operator's Manual for shallow tilling, cultivating and transport. See Figure 1-2. Make sure that wheels ...are forward (nearest to raise or lower depth stake. for the tiller and controls the depth and speed at which the machine will...
Operation Manual
Page 13
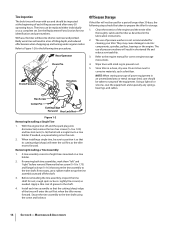
...The chain drive is 24". Cutting Edge Forward Cotter Pin Figure 1-1 Outer Tine Adjustments Cable Adjustment Refer to the separate Engine Operator's Manual for instructions on adjusting the forward and reverse cables. 13 Maintenance Engine Refer to the Assembly & Set-Up section of oil or ...silicone to machine. Always towel dry the tiller afterwards and apply a light coat of this manual for engine maintenance instructions. The dirt washes off the tines easier if rinsed off immediately instead of after each ...
...The chain drive is 24". Cutting Edge Forward Cotter Pin Figure 1-1 Outer Tine Adjustments Cable Adjustment Refer to the separate Engine Operator's Manual for instructions on adjusting the forward and reverse cables. 13 Maintenance Engine Refer to the Assembly & Set-Up section of oil or ...silicone to machine. Always towel dry the tiller afterwards and apply a light coat of this manual for engine maintenance instructions. The dirt washes off the tines easier if rinsed off immediately instead of after each ...
Operation Manual
Page 14
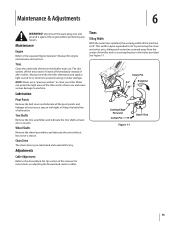
...Parts Section for rust, rough spots or burrs. Rear/Operator Clevis Pin Front/Forward Rotation Off-Season Storage If the tiller will not be taken to the engine manual for a period longer than 30 days, the following tine procedures. The use and should be taken to Figure 1-2...tine assemblies, mark them "left" and "right" before removal. With use a rubber mallet to the shaft. 4. Refer to prepare the tiller for cleaning your tiller. They may cause damage to the tine shaft using the screw and locknut. 14 Section 6- Hex Screw Cotter Pin Cutting Edge Forward Hex...
...Parts Section for rust, rough spots or burrs. Rear/Operator Clevis Pin Front/Forward Rotation Off-Season Storage If the tiller will not be taken to the engine manual for a period longer than 30 days, the following tine procedures. The use and should be taken to Figure 1-2...tine assemblies, mark them "left" and "right" before removal. With use a rubber mallet to the shaft. 4. Refer to prepare the tiller for cleaning your tiller. They may cause damage to the tine shaft using the screw and locknut. 14 Section 6- Hex Screw Cotter Pin Cutting Edge Forward Hex...
Operation Manual
Page 18
... warranty above , given by any product, shall bind Troy-Bilt. Service completed by Troy-Bilt for use . C To locate the dealer in materials or workmanship. You assume the risk and liability for the life of the tiller, to you may also have a separate oneyear warranty.... Phone 1-800-668-1238 GDOC-100023 REV. This warranty is available, WITH PROOF OF PURCHASE, through Troy-Bilt's authorized channels of original purchase or lease. Transmission - "Troy-Bilt" warrants this manual will , at P.O....
... warranty above , given by any product, shall bind Troy-Bilt. Service completed by Troy-Bilt for use . C To locate the dealer in materials or workmanship. You assume the risk and liability for the life of the tiller, to you may also have a separate oneyear warranty.... Phone 1-800-668-1238 GDOC-100023 REV. This warranty is available, WITH PROOF OF PURCHASE, through Troy-Bilt's authorized channels of original purchase or lease. Transmission - "Troy-Bilt" warrants this manual will , at P.O....


