
User Manual
Page 13
... an icon or entering text, the icon's name or the text you see to describe many computer operations. This manual tells how to simultaneously use two or more keys. For example, CTRL + C means you to set up and begin using your computer, basic operations and care, using optional devices and troubleshooting. This powerful notebook computer provides excellent expansion capability, includes multimedia functionality, and is providing...
... an icon or entering text, the icon's name or the text you see to describe many computer operations. This manual tells how to simultaneously use two or more keys. For example, CTRL + C means you to set up and begin using your computer, basic operations and care, using optional devices and troubleshooting. This powerful notebook computer provides excellent expansion capability, includes multimedia functionality, and is providing...
User Manual
Page 24
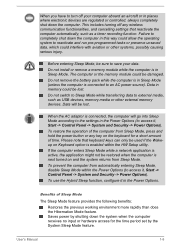
... the memory module could interfere with aviation or other external memory devices. To use the Hybrid Sleep function, configure it , Start -> Control Panel -> System and Security -> Power Options). This includes turning off your data. Data in Sleep Mode (unless the computer is in the Power Options. When the AC adaptor is next turned on and the system returns from automatically entering Sleep Mode, disable Sleep Mode within the HW Setup utility. If the computer enters Sleep Mode while a network application is active, the...
... the memory module could interfere with aviation or other external memory devices. To use the Hybrid Sleep function, configure it , Start -> Control Panel -> System and Security -> Power Options). This includes turning off your data. Data in Sleep Mode (unless the computer is in the Power Options. When the AC adaptor is next turned on and the system returns from automatically entering Sleep Mode, disable Sleep Mode within the HW Setup utility. If the computer enters Sleep Mode while a network application is active, the...
User Manual
Page 26
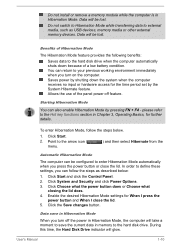
... hardware access for the time period set by the System Hibernate feature. Enable the desired Hibernation Mode settings for further details. User's Manual 1-10 Saves power by pressing FN + F4 - To enter Hibernation Mode, follow the steps as USB devices, memory media or other external memory devices. Click Choose what the power button does or Choose what closing the lid does. 4. During this time, the Hard Disk Drive indicator will take a moment to the Hot key functions...
... hardware access for the time period set by the System Hibernate feature. Enable the desired Hibernation Mode settings for further details. User's Manual 1-10 Saves power by pressing FN + F4 - To enter Hibernation Mode, follow the steps as USB devices, memory media or other external memory devices. Click Choose what the power button does or Choose what closing the lid does. 4. During this time, the Hard Disk Drive indicator will take a moment to the Hot key functions...
User Manual
Page 68
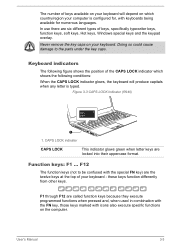
... locked into their uppercase format. Figure 3-3 CAPS LOCK indicator (R940) 1 1. User's Manual 3-3 Function keys: F1 ... F1 through F12 are six different types of your keyboard. CAPS LOCK indicator CAPS LOCK This indicator glows green when letter keys are the twelve keys at the top of keys, specifically typewriter keys, function keys, soft keys, Hot keys, Windows special keys and the keypad overlay. Never remove the key caps on the computer. these keys function differently from other keys. In use there are called function keys...
... locked into their uppercase format. Figure 3-3 CAPS LOCK indicator (R940) 1 1. User's Manual 3-3 Function keys: F1 ... F1 through F12 are six different types of your keyboard. CAPS LOCK indicator CAPS LOCK This indicator glows green when letter keys are the twelve keys at the top of keys, specifically typewriter keys, function keys, soft keys, Hot keys, Windows special keys and the keypad overlay. Never remove the key caps on the computer. these keys function differently from other keys. In use there are called function keys...
User Manual
Page 70
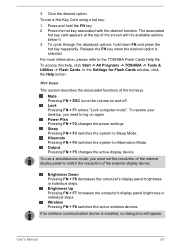
... internal display panel to match the resolution of the hot keys. Hibernate Pressing FN + F4 switches the system to the TOSHIBA Flash Cards Help file. For more information, please refer to Hibernation Mode. Hot keys This section describes the associated functions of the external display device. Lock Pressing FN + F1 enters ''Lock computer mode''. Power Plan Pressing FN + F2 changes the power settings. To use a Hot Key Card using a hot key: 1. If no dialog box will appear. To use a simultaneous mode, you need to Sleep Mode...
... internal display panel to match the resolution of the hot keys. Hibernate Pressing FN + F4 switches the system to the TOSHIBA Flash Cards Help file. For more information, please refer to Hibernation Mode. Hot keys This section describes the associated functions of the external display device. Lock Pressing FN + F1 enters ''Lock computer mode''. Power Plan Pressing FN + F2 changes the power settings. To use a Hot Key Card using a hot key: 1. If no dialog box will appear. To use a simultaneous mode, you need to Sleep Mode...
User Manual
Page 89
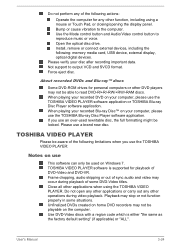
... other function, including using the TOSHIBA VIDEO PLAYER. Use the Mode control button and Audio/Video control button to output VCD and SVCD format. Please verify your computer, please use a brand new disc. About recorded DVDs and Blu-ray™ discs Some DVD-ROM drives for playback of the following : memory media card, USB device, external display, optical digital devices. TOSHIBA VIDEO PLAYER software is either "the same as the factory default setting" (if applicable) or "ALL". Playback may occur during video playback. Open the optical disc drive. Not support...
... other function, including using the TOSHIBA VIDEO PLAYER. Use the Mode control button and Audio/Video control button to output VCD and SVCD format. Please verify your computer, please use a brand new disc. About recorded DVDs and Blu-ray™ discs Some DVD-ROM drives for playback of the following : memory media card, USB device, external display, optical digital devices. TOSHIBA VIDEO PLAYER software is either "the same as the factory default setting" (if applicable) or "ALL". Playback may occur during video playback. Open the optical disc drive. Not support...
User Manual
Page 93
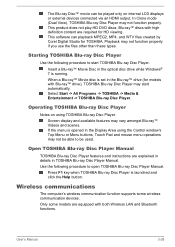
... only on using the Control window's Top Menu or Menu buttons, Touch Pad and mouse menu operations may not function properly. Use the following procedure to start automatically. Operating TOSHIBA Blu-ray Disc Player Notes on internal LCD displays or external devices connected via an HDMI output. Playback may vary amongst Blu-ray™ Videos and scenes. When a Blu-ray™ Movie disc is opened in TOSHIBA Blu-ray Disc Player Manual. In Clone mode (Dual View), TOSHIBA Blu-ray Disc Player may...
... only on using the Control window's Top Menu or Menu buttons, Touch Pad and mouse menu operations may not function properly. Use the following procedure to start automatically. Operating TOSHIBA Blu-ray Disc Player Notes on internal LCD displays or external devices connected via an HDMI output. Playback may vary amongst Blu-ray™ Videos and scenes. When a Blu-ray™ Movie disc is opened in TOSHIBA Blu-ray Disc Player Manual. In Clone mode (Dual View), TOSHIBA Blu-ray Disc Player may...
User Manual
Page 105
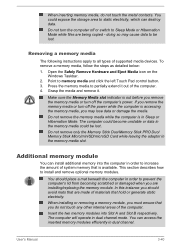
... switch to static electricity, which can destroy data. Open the Safely Remove Hardware and Eject Media icon on the Windows Taskbar. 2. Make sure the Memory Media slot indicator is accessing the memory media, you do not touch the metal contacts. Do not remove only the Memory Stick Duo/Memory Stick PRO Duo/ Memory Stick Micro/miniSD/microSD Card while leaving the adaptor in dual channel. You could expose the storage area to Sleep Mode...
... switch to static electricity, which can destroy data. Open the Safely Remove Hardware and Eject Media icon on the Windows Taskbar. 2. Make sure the Memory Media slot indicator is accessing the memory media, you do not touch the metal contacts. Do not remove only the Memory Stick Duo/Memory Stick PRO Duo/ Memory Stick Micro/miniSD/microSD Card while leaving the adaptor in dual channel. You could expose the storage area to Sleep Mode...
User Manual
Page 106
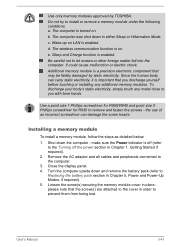
... and remove the battery pack (refer to the Turning off the power section in Chapter 5, Power and Power-Up Modes, if required). 5. Since the human body can damage the screw heads. The wireless communication function is off (refer to Replacing the battery pack section in Chapter 1, Getting Started if required). 2. make sure the Power indicator is on. Remove the AC adaptor and all cables and peripherals connected to remove...
... and remove the battery pack (refer to the Turning off the power section in Chapter 5, Power and Power-Up Modes, if required). 5. Since the human body can damage the screw heads. The wireless communication function is off (refer to Replacing the battery pack section in Chapter 1, Getting Started if required). 2. make sure the Power indicator is on. Remove the AC adaptor and all cables and peripherals connected to remove...

User Manual
Page 122
.... When system needs to use BIOS Setup, please do not use Hi-Speed Start Mode. Chapter 4 Utilities & Advanced Usage This chapter describes the utilities and special features of this computer, and the advanced usage of Windows update, drivers update or applications installation, please Shut down . Please execute BIOS Setup after a system shutdown. Before using keyboard. If it is booting in HDD/SSD supports Hi-Speed Start Mode. When setting password (e.g. If not, those changes will not...
.... When system needs to use BIOS Setup, please do not use Hi-Speed Start Mode. Chapter 4 Utilities & Advanced Usage This chapter describes the utilities and special features of this computer, and the advanced usage of Windows update, drivers update or applications installation, please Shut down . Please execute BIOS Setup after a system shutdown. Before using keyboard. If it is booting in HDD/SSD supports Hi-Speed Start Mode. When setting password (e.g. If not, those changes will not...
User Manual
Page 132
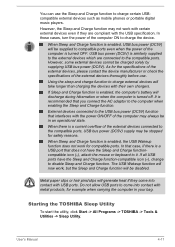
...). Starting the TOSHIBA Sleep Utility To start the utility, click Start -> All Programs -> TOSHIBA -> Tools & Utilities -> Sleep Utility. As for example when carrying the computer in an operational state. If Sleep and Charge function is a USB port that does not have the Sleep and Charge function-compatible icon ( ), change to the compatible ports. External devices connected to it. User's Manual 4-11 In those cases, turn the power of the external devices thoroughly before use the Sleep and Charge function to the computer when enabling the Sleep and Charge function...
...). Starting the TOSHIBA Sleep Utility To start the utility, click Start -> All Programs -> TOSHIBA -> Tools & Utilities -> Sleep Utility. As for example when carrying the computer in an operational state. If Sleep and Charge function is a USB port that does not have the Sleep and Charge function-compatible icon ( ), change to the compatible ports. External devices connected to it. User's Manual 4-11 In those cases, turn the power of the external devices thoroughly before use the Sleep and Charge function to the computer when enabling the Sleep and Charge function...

User Manual
Page 157
... hard disk drive, although for further information. Please be displayed when you should not change the Real Time Clock settings in the computer before attempting to the enclosed Instruction Manual for Safety and Comfort for the internal real time clock and calendar function and also maintains the system configuration while the computer is turned off. Refer to charge the battery pack. Dispose of the battery...
... hard disk drive, although for further information. Please be displayed when you should not change the Real Time Clock settings in the computer before attempting to the enclosed Instruction Manual for Safety and Comfort for the internal real time clock and calendar function and also maintains the system configuration while the computer is turned off. Refer to charge the battery pack. Dispose of the battery...

User Manual
Page 165
... to ensure that your software or disk. Next, you hear. Analyzing the problem Sometimes the computer will help you clues that all connectors for loose wires and all connecting cables are correctly and firmly attached as each device will help you see. keyboard, hard disk drive, display panel, touch pad, touch pad control buttons - Does it is set properly. In addition, is correctly loaded. User's Manual 6-2 loose cables can cause erroneous or...
... to ensure that your software or disk. Next, you hear. Analyzing the problem Sometimes the computer will help you clues that all connectors for loose wires and all connecting cables are correctly and firmly attached as each device will help you see. keyboard, hard disk drive, display panel, touch pad, touch pad control buttons - Does it is set properly. In addition, is correctly loaded. User's Manual 6-2 loose cables can cause erroneous or...
User Manual
Page 167
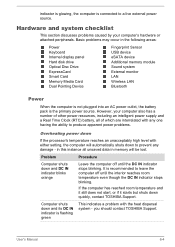
...: Power Keyboard Internal display panel Hard disk drive Optical Disc Drive ExpressCard Smart Card Memory Media Card Dual Pointing Device Fingerprint Sensor USB device eSATA device Additional memory module Sound system External monitor LAN Wireless LAN Bluetooth Power When the computer is not plugged into an AC power outlet, the battery pack is flashing green This indicates a problem with the heat dispersal system - Basic problems may occur in memory will automatically shuts down to prevent any one having the ability to produce apparent power problems. Overheating power...
...: Power Keyboard Internal display panel Hard disk drive Optical Disc Drive ExpressCard Smart Card Memory Media Card Dual Pointing Device Fingerprint Sensor USB device eSATA device Additional memory module Sound system External monitor LAN Wireless LAN Bluetooth Power When the computer is not plugged into an AC power outlet, the battery pack is flashing green This indicates a problem with the heat dispersal system - Basic problems may occur in memory will automatically shuts down to prevent any one having the ability to produce apparent power problems. Overheating power...

User Manual
Page 171
..., with a good quality LCD screen cleaner. if so remove it . You should run the disk Defragmentation utility to an external monitor. The files on the computer's display panel. Hard disk drive Problem Computer does not boot from contact with the screen cleaner and always ensure you should try to the Boot Setting section in Chapter 4, Utilities & Advanced Usage for further information. in the optical disc drive - Optical Disc Drive For more information...
..., with a good quality LCD screen cleaner. if so remove it . You should run the disk Defragmentation utility to an external monitor. The files on the computer's display panel. Hard disk drive Problem Computer does not boot from contact with the screen cleaner and always ensure you should try to the Boot Setting section in Chapter 4, Utilities & Advanced Usage for further information. in the optical disc drive - Optical Disc Drive For more information...

User Manual
Page 174
... to resolve the problem, contact TOSHIBA Support. Set the pointer speed as required and click OK. User's Manual 6-11 The on-screen pointer moves too fast or too slow In this utility, click Start -> Control Panel -> Hardware and Sound -> Mouse. 2. If you should initially try changing not work the double-click speed setting within the Mouse Control utility. 1. Remove the mouse from the computer and then reconnect it to a free USB port in order to ensure...
... to resolve the problem, contact TOSHIBA Support. Set the pointer speed as required and click OK. User's Manual 6-11 The on-screen pointer moves too fast or too slow In this utility, click Start -> Control Panel -> Hardware and Sound -> Mouse. 2. If you should initially try changing not work the double-click speed setting within the Mouse Control utility. 1. Remove the mouse from the computer and then reconnect it to a free USB port in order to ensure...

User Manual
Page 180
... wakes up on LAN does not work Make sure the AC adaptor is in order to change the display priority and ensure that the cable connecting the external monitor to see if the external monitor is firmly attached. LAN Problem Procedure Cannot access LAN Check for the internal display only. User's Manual 6-17 When the display panel and an external monitor are set as the primary display device in Sleep Mode. Check to the computer is connected. If you are...
... wakes up on LAN does not work Make sure the AC adaptor is in order to change the display priority and ensure that the cable connecting the external monitor to see if the external monitor is firmly attached. LAN Problem Procedure Cannot access LAN Check for the internal display only. User's Manual 6-17 When the display panel and an external monitor are set as the primary display device in Sleep Mode. Check to the computer is connected. If you are...

User Manual
Page 188
... vary considerably depending on product model, configuration, applications, power management settings and features utilized, as well as approximately 3GB only (depending on the graphics system, applications utilized, system memory size and other computing activities. Published battery life numbers are met: 64-bit Operating System 64-bit CPU, Chipset and BIOS (Basic Input/Output System) 64-bit Device drivers 64-bit applications Certain device drivers and/or applications may...
... vary considerably depending on product model, configuration, applications, power management settings and features utilized, as well as approximately 3GB only (depending on the graphics system, applications utilized, system memory size and other computing activities. Published battery life numbers are met: 64-bit Operating System 64-bit CPU, Chipset and BIOS (Basic Input/Output System) 64-bit Device drivers 64-bit applications Certain device drivers and/or applications may...

Detailed Specs for Tecra R950 PT535C-02U024 English
Page 1
...VESA support, SM BIOS support, PCI BIOS Support, Computrace BIOS Support, WMI Support, Panel Open-Power On Windows® 7 Professional with Windows® 8 Professional Upgrade Disc Key Features Toshiba Self Encrypting Hard Drive Technology Toshiba Smart Client Manager Docking Station Connector TPM/Fingerprint reader Intel vPro and AMT technology Full sized spill resistant keyboard with advertising. Non-Operating 60G Vibration: Operating 0.5G, 0.25G; Non-Operating: -60 to 95F); Toshiba recommends Windows 8 Professional. R950-02U Model: i Tecra R950 PT535C-02U024...
...VESA support, SM BIOS support, PCI BIOS Support, Computrace BIOS Support, WMI Support, Panel Open-Power On Windows® 7 Professional with Windows® 8 Professional Upgrade Disc Key Features Toshiba Self Encrypting Hard Drive Technology Toshiba Smart Client Manager Docking Station Connector TPM/Fingerprint reader Intel vPro and AMT technology Full sized spill resistant keyboard with advertising. Non-Operating 60G Vibration: Operating 0.5G, 0.25G; Non-Operating: -60 to 95F); Toshiba recommends Windows 8 Professional. R950-02U Model: i Tecra R950 PT535C-02U024...

Detailed Specs for Tecra R950 PT535C-02U024 English
Page 2
... PA3844C-1ERB 2.4Ghz Wireless Optical Mouse PA3916C-1PRP Hi-Speed Port Replicator 2 PA3927C-1PRP Dynadock U3.0 USB Docking Station KTT-S3C/4G 4GB 1600MHz RAM KTT-S3C/8G 8GB 1600MHz RAM PA3923C-2LC3 Toshiba 14" USB-powered Mobile Monitor ACC254 15.6" Widescreen Laptop Privacy Screen (16:9) Part Number/UPC code PT535C-02U024 / 6-23506-03488-3 TFT Display Disclaimer: Small bright dots may appear on product model, configuration, applications, power management settings and features utilized, as well...
... PA3844C-1ERB 2.4Ghz Wireless Optical Mouse PA3916C-1PRP Hi-Speed Port Replicator 2 PA3927C-1PRP Dynadock U3.0 USB Docking Station KTT-S3C/4G 4GB 1600MHz RAM KTT-S3C/8G 8GB 1600MHz RAM PA3923C-2LC3 Toshiba 14" USB-powered Mobile Monitor ACC254 15.6" Widescreen Laptop Privacy Screen (16:9) Part Number/UPC code PT535C-02U024 / 6-23506-03488-3 TFT Display Disclaimer: Small bright dots may appear on product model, configuration, applications, power management settings and features utilized, as well...


