User Guide
Page 5
... be necessary for which charges exceed local or long-distance transmission charges.) If Problems Arise If this equipment, for information. If trouble is experienced with the best service it unlawful for any changes necessary to the telephone network, the telephone company may occasionally be required. or an authorized representative of Toshiba, or the Toshiba Customer Support Center within the United...
... be necessary for which charges exceed local or long-distance transmission charges.) If Problems Arise If this equipment, for information. If trouble is experienced with the best service it unlawful for any changes necessary to the telephone network, the telephone company may occasionally be required. or an authorized representative of Toshiba, or the Toshiba Customer Support Center within the United...
User Guide
Page 30
...67 Creating recovery DVDs/media 69 Restoring from recovery DVDs/media 72 Erasing the Internal Storage Drive 74 Checking the internal storage drive operating status 75 Installing drivers and applications 76 Using the Toshiba Dual Pointing Device 76 Using the touch pad 77 Adjusting touch pad settings 81 Scrolling with the touch pad 81 Control buttons 82 Disabling or enabling the touch pad 82 Using external display devices 82 Selecting video cables 83 Connecting an HDMI™-compatible television or display device 83 Connecting an external monitor or projector.....83 Connecting an...
...67 Creating recovery DVDs/media 69 Restoring from recovery DVDs/media 72 Erasing the Internal Storage Drive 74 Checking the internal storage drive operating status 75 Installing drivers and applications 76 Using the Toshiba Dual Pointing Device 76 Using the touch pad 77 Adjusting touch pad settings 81 Scrolling with the touch pad 81 Control buttons 82 Disabling or enabling the touch pad 82 Using external display devices 82 Selecting video cables 83 Connecting an HDMI™-compatible television or display device 83 Connecting an external monitor or projector.....83 Connecting an...
User Guide
Page 33
... 147 Connect 148 Secure 149 Protect & Fix 150 Optimize 151 TOSHIBA Application Installer 152 Setting passwords 153 Using an instant password 153 Using a supervisor password 154 Using a user password 155 TOSHIBA Face Recognition Utility 157 TOSHIBA Security Assist 158 TOSHIBA PC Diagnostic Tool Utility 160 TOSHIBA HDD Protection Utility 161 Mouse Utility 162 TOSHIBA Hardware Setup 163 TOSHIBA Sleep Utility 165 Starting the TOSHIBA Sleep Utility 165 USB Sleep and Charge 165 Enabling/Disabling USB Sleep and Charge 167 Power supply mode settings 167 TOSHIBA Button Support 168
... 147 Connect 148 Secure 149 Protect & Fix 150 Optimize 151 TOSHIBA Application Installer 152 Setting passwords 153 Using an instant password 153 Using a supervisor password 154 Using a user password 155 TOSHIBA Face Recognition Utility 157 TOSHIBA Security Assist 158 TOSHIBA PC Diagnostic Tool Utility 160 TOSHIBA HDD Protection Utility 161 Mouse Utility 162 TOSHIBA Hardware Setup 163 TOSHIBA Sleep Utility 165 Starting the TOSHIBA Sleep Utility 165 USB Sleep and Charge 165 Enabling/Disabling USB Sleep and Charge 167 Power supply mode settings 167 TOSHIBA Button Support 168
User Guide
Page 52
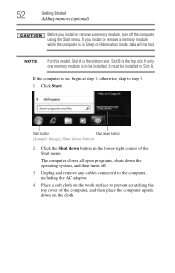
... memory (optional) Before you install or remove a memory module while the computer is in Slot A. If you install or remove a memory module, turn off . 3 Unplug and remove any cables connected to the computer, including the AC adaptor. 4 Place a soft cloth on the work surface to prevent scratching the top cover of the Start menu. If only one memory module is on the cloth. otherwise, skip to be installed, it must be installed in Sleep...
... memory (optional) Before you install or remove a memory module while the computer is in Slot A. If you install or remove a memory module, turn off . 3 Unplug and remove any cables connected to the computer, including the AC adaptor. 4 Place a soft cloth on the work surface to prevent scratching the top cover of the Start menu. If only one memory module is on the cloth. otherwise, skip to be installed, it must be installed in Sleep...

User Guide
Page 59
... damage or a fire, possibly resulting in Sleep mode). For more information on inserting the main battery, see "Inserting a charged battery" on a hard flat surface. Getting Started 59 Adding memory (optional) 3 Gently lift the memory module to remove the soft cloth from overheating when the power is turned on or when an AC adaptor is in serious injury. Always make sure your computer and AC adaptor...
... damage or a fire, possibly resulting in Sleep mode). For more information on inserting the main battery, see "Inserting a charged battery" on a hard flat surface. Getting Started 59 Adding memory (optional) 3 Gently lift the memory module to remove the soft cloth from overheating when the power is turned on or when an AC adaptor is in serious injury. Always make sure your computer and AC adaptor...

User Guide
Page 60
... then check that the computer has recognized the change. Recovering the Internal Storage Drive Your computer includes recovery utilities to allow the following internal storage drive recovery options are available: Recovery option Recover to your internal storage drive, returning your internal storage drive if necessary. This is displayed below the System heading. Installed memory (RAM) is a security feature to work. otherwise, click Cancel. 60 Getting Started Recovering the Internal Storage Drive 7 Reconnect the cables. 8 Restart the computer.
... then check that the computer has recognized the change. Recovering the Internal Storage Drive Your computer includes recovery utilities to allow the following internal storage drive recovery options are available: Recovery option Recover to your internal storage drive, returning your internal storage drive if necessary. This is displayed below the System heading. Installed memory (RAM) is a security feature to work. otherwise, click Cancel. 60 Getting Started Recovering the Internal Storage Drive 7 Reconnect the cables. 8 Restart the computer.
User Guide
Page 81
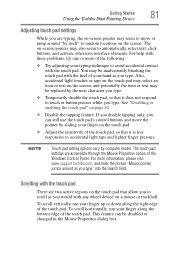
... be disabled or changed in the Mouse Properties dialog box. For more of the following: ❖ Try adjusting your finger up or down along the bottom edge of the Windows Control Panel. Getting Started 81 Using the Toshiba Dual Pointing Device Adjusting touch pad settings While you are typing, the on-screen pointer may seem to move the pointer by computer model. This feature can still use the touch pad's control buttons and...
... be disabled or changed in the Mouse Properties dialog box. For more of the following: ❖ Try adjusting your finger up or down along the bottom edge of the Windows Control Panel. Getting Started 81 Using the Toshiba Dual Pointing Device Adjusting touch pad settings While you are typing, the on-screen pointer may seem to move the pointer by computer model. This feature can still use the touch pad's control buttons and...

User Guide
Page 83
... display device. Getting Started 83 Using external display devices ❖ An external monitor via the DisplayPort™* (DisplayPort™-compatible monitor or DisplayPort adaptors required) RGB (Monitor) port DisplayPort™* or HDMI™ Out port* *Available on certain models (Sample Illustration) Video ports on left side of the computer. 3 Connect the device's power cable to a live electrical outlet. 4 Turn on the external device. Your computer will automatically detect the external display device. Connecting an HDMI™-compatible television or display device...
... display device. Getting Started 83 Using external display devices ❖ An external monitor via the DisplayPort™* (DisplayPort™-compatible monitor or DisplayPort adaptors required) RGB (Monitor) port DisplayPort™* or HDMI™ Out port* *Available on certain models (Sample Illustration) Video ports on left side of the computer. 3 Connect the device's power cable to a live electrical outlet. 4 Turn on the external device. Your computer will automatically detect the external display device. Connecting an HDMI™-compatible television or display device...
User Guide
Page 113
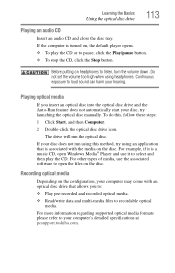
... this method, try launching the optical disc manually. Recording optical media Depending on the configuration, your computer may come with the media on , the default player opens. ❖ To play the CD. For example, if it to your hearing. For other types of media, use it is turned on the disc. For more information regarding supported optical media formats please refer to select and then...
... this method, try launching the optical disc manually. Recording optical media Depending on the configuration, your computer may come with the media on , the default player opens. ❖ To play the CD. For example, if it to your hearing. For other types of media, use it is turned on the disc. For more information regarding supported optical media formats please refer to select and then...
User Guide
Page 156
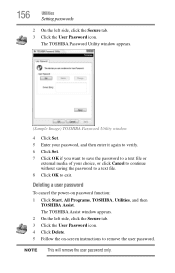
... -screen instructions to exit. The TOSHIBA Assist window appears. 2 On the left side, click the Secure tab. 3 Click the User Password icon. NOTE This will remove the user password only. 156 Utilities Setting passwords 2 On the left side, click the Secure tab. 3 Click the User Password icon. 4 Click Delete. 5 Follow the on password function: 1 Click Start, All Programs, TOSHIBA, Utilities, and then TOSHIBA Assist. The TOSHIBA Password Utility window appears. (Sample Image) TOSHIBA Password Utility window 4 Click Set. 5 Enter your password...
... -screen instructions to exit. The TOSHIBA Assist window appears. 2 On the left side, click the Secure tab. 3 Click the User Password icon. NOTE This will remove the user password only. 156 Utilities Setting passwords 2 On the left side, click the Secure tab. 3 Click the User Password icon. 4 Click Delete. 5 Follow the on password function: 1 Click Start, All Programs, TOSHIBA, Utilities, and then TOSHIBA Assist. The TOSHIBA Password Utility window appears. (Sample Image) TOSHIBA Password Utility window 4 Click Set. 5 Enter your password...
User Guide
Page 176
The collected information includes device operation time and number of actuations or status changes (e.g.: number of power button and Fn key combination uses, and AC adaptor, battery, LCD, fan, HDD, sound volume, wireless communication switch, docking and USB information), date of the total hard disk capacity (approximately 3 MB or less per year). It alerts users to install the updates if you when updated software, firmware, documentation or other information is available for your country or region of...
The collected information includes device operation time and number of actuations or status changes (e.g.: number of power button and Fn key combination uses, and AC adaptor, battery, LCD, fan, HDD, sound volume, wireless communication switch, docking and USB information), date of the total hard disk capacity (approximately 3 MB or less per year). It alerts users to install the updates if you when updated software, firmware, documentation or other information is available for your country or region of...

User Guide
Page 179
... can set the power status of Wireless Connection switch 179 (Sample Image) Connectivity Doctor screen Profile Settings The Profile Settings utility lets you save network settings in "profiles." You can set up a profile to match that opens automatically when Internet Explorer® starts ❖ Devices-lets you visit a client company occasionally, for example, high or medium) ❖ Enable UAC (User Account Control) setting If you enable or disable settings of wired and wireless network devices, infrared devices, and set...
... can set the power status of Wireless Connection switch 179 (Sample Image) Connectivity Doctor screen Profile Settings The Profile Settings utility lets you save network settings in "profiles." You can set up a profile to match that opens automatically when Internet Explorer® starts ❖ Devices-lets you visit a client company occasionally, for example, high or medium) ❖ Enable UAC (User Account Control) setting If you enable or disable settings of wired and wireless network devices, infrared devices, and set...
User Guide
Page 185
...; Safe Mode with Networking ❖ Safe Mode with Command Prompt ❖ Enable Boot Logging ❖ Enable low-resolution video (640 x 480) ❖ Last Known Good Configuration (advanced) ❖ Directory Services Restore Mode ❖ Debugging Mode ❖ Disable automatic restart on system failure ❖ Disable Driver Signature Enforcement ❖ Start Windows® Normally When you highlight each option using the arrow keys, Windows® displays information about each option at the bottom after Description. To open the Startup menu...
...; Safe Mode with Networking ❖ Safe Mode with Command Prompt ❖ Enable Boot Logging ❖ Enable low-resolution video (640 x 480) ❖ Last Known Good Configuration (advanced) ❖ Directory Services Restore Mode ❖ Debugging Mode ❖ Disable automatic restart on system failure ❖ Disable Driver Signature Enforcement ❖ Start Windows® Normally When you highlight each option using the arrow keys, Windows® displays information about each option at the bottom after Description. To open the Startup menu...

User Guide
Page 190
... problem may have registered a password, press any key, type the password and press Enter. HINT: Holding the Fn key and pressing the F5 key several times will advance you have gone into effect. Try using the built-in screen, make of the entire screen, press the Fn + PRTSC key. Display problems Here are using a different make sure the display priority is not set for an external monitor. If you through the display options...
... problem may have registered a password, press any key, type the password and press Enter. HINT: Holding the Fn key and pressing the F5 key several times will advance you have gone into effect. Try using the built-in screen, make of the entire screen, press the Fn + PRTSC key. Display problems Here are using a different make sure the display priority is not set for an external monitor. If you through the display options...
User Guide
Page 195
... connected. ❖ Occasionally a defective ExpressCard®slips through quality control. Most ExpressCard problems occur during installation and setup of devices, such as a removable hard disk, additional memory, or a pager. Adjust the volume control. ExpressCard® checklist ❖ Make sure the card is available, try the card in any sound system when input from a microphone is fed to work no longer work under the operating system. Check the ExpressCard® status: 1 Click Start, Control Panel...
... connected. ❖ Occasionally a defective ExpressCard®slips through quality control. Most ExpressCard problems occur during installation and setup of devices, such as a removable hard disk, additional memory, or a pager. Adjust the volume control. ExpressCard® checklist ❖ Make sure the card is available, try the card in any sound system when input from a microphone is fed to work no longer work under the operating system. Check the ExpressCard® status: 1 Click Start, Control Panel...

User Guide
Page 232
... function, if connected with the Fn key can control another while using a pointing device such as the battery save mode. (2) A key or combination of keys that provides electronic mail, the World Wide Web, and other line of pixels is refreshed. See also HDMI. 232 Glossary HDMI (High-Definition Multimedia Interface)-An interface used to the internal storage drive the current state of your work , including all open...
... function, if connected with the Fn key can control another while using a pointing device such as the battery save mode. (2) A key or combination of keys that provides electronic mail, the World Wide Web, and other line of pixels is refreshed. See also HDMI. 232 Glossary HDMI (High-Definition Multimedia Interface)-An interface used to the internal storage drive the current state of your work , including all open...
User Guide
Page 240
240 Index safety precautions 130 setting notifications 123 taking care of 130 battery indicator light 122 BIOS Setup see TOSHIBA Hardware Setup button eco Utility™ 127 eject, optical disc drive 110 power 49 Shut down 52, 90 start 136 C Call2Recycle™ battery 133 caring for your computer 98 changing battery 128 character keys 102 charging the battery 47 cleaning the computer 98 click 82 communications network connection 138 set up 137 computer caring for...
240 Index safety precautions 130 setting notifications 123 taking care of 130 battery indicator light 122 BIOS Setup see TOSHIBA Hardware Setup button eco Utility™ 127 eject, optical disc drive 110 power 49 Shut down 52, 90 start 136 C Call2Recycle™ battery 133 caring for your computer 98 changing battery 128 character keys 102 charging the battery 47 cleaning the computer 98 click 82 communications network connection 138 set up 137 computer caring for...
User Guide
Page 242
... hot key disabling or enabling wireless devices 220 display brightness 219 Hibernation mode 217 keyboard overlays 222 Lock (Instant security) 214 optical disk drive 212 Output (Display switch) 218 power plan 215 Sleep mode 216 using to set a power plan 126 volume mute 213 zoom 222 zoom in 222 zoom out 222 Hot Key Cards 210 Hot key functions 212 I icon desktop 135 moving to desktop 135 recycle bin 135 safety 39 inserting ExpressCard® 141 installation memory module 51 installing a charged battery 129 battery...
... hot key disabling or enabling wireless devices 220 display brightness 219 Hibernation mode 217 keyboard overlays 222 Lock (Instant security) 214 optical disk drive 212 Output (Display switch) 218 power plan 215 Sleep mode 216 using to set a power plan 126 volume mute 213 zoom 222 zoom in 222 zoom out 222 Hot Key Cards 210 Hot key functions 212 I icon desktop 135 moving to desktop 135 recycle bin 135 safety 39 inserting ExpressCard® 141 installation memory module 51 installing a charged battery 129 battery...
User Guide
Page 245
... video cables 83 setting low battery notifications 123 setting up AC adaptor 45 adding memory (optional) 51 communications 137 computer 44 software Setup Wizard 50 work environment 41 setting up a connection 138 settings customize computer settings 98 display output 84 Shut down button 52, 90 command 90 computer 52, 90 Hibernation mode 93 Sleep mode 95 Sleep mode 89 configuring 95 configuring options 95 hot key 216 powering down 95 Shut down 95 starting again from 98 using 95 software Setup...
... video cables 83 setting low battery notifications 123 setting up AC adaptor 45 adding memory (optional) 51 communications 137 computer 44 software Setup Wizard 50 work environment 41 setting up a connection 138 settings customize computer settings 98 display output 84 Shut down button 52, 90 command 90 computer 52, 90 Hibernation mode 93 Sleep mode 95 Sleep mode 89 configuring 95 configuring options 95 hot key 216 powering down 95 Shut down 95 starting again from 98 using 95 software Setup...
User Guide
Page 247
... power 49 U USB Sleep and Charge cannot use 205 USB Wakeup function does not work 206 USB-compatible printer 86 user password, deleting 156 user password, setting 155 using a microphone 139 computer lock 99 DVDs 109 expansion port 145 ExpressCard® 141 Hibernation mode 92 hot key to set a power plan 126 Memory card reader 142 optical disc drive 109 Shut down command 90 Sleep mode 95 TOSHIBA eco power plan 127 touch pad 77 Web Camera 140 using the keyboard 101 using the Toshiba Dual Pointing Device 76 Utilities 146 V video projector adjusting display...
... power 49 U USB Sleep and Charge cannot use 205 USB Wakeup function does not work 206 USB-compatible printer 86 user password, deleting 156 user password, setting 155 using a microphone 139 computer lock 99 DVDs 109 expansion port 145 ExpressCard® 141 Hibernation mode 92 hot key to set a power plan 126 Memory card reader 142 optical disc drive 109 Shut down command 90 Sleep mode 95 TOSHIBA eco power plan 127 touch pad 77 Web Camera 140 using the keyboard 101 using the Toshiba Dual Pointing Device 76 Utilities 146 V video projector adjusting display...


