
User Guide
Page 5
...-distance transmission charges.) If these changes might affect your modem from its present line, please call the telephone company and let them to state tariffs. If Problems Arise If this change. Fax Branding The following information is subject to make any changes necessary to maintain uninterrupted service. or an authorized representative of Toshiba, or the Toshiba Customer Support Center within...
...-distance transmission charges.) If these changes might affect your modem from its present line, please call the telephone company and let them to state tariffs. If Problems Arise If this change. Fax Branding The following information is subject to make any changes necessary to maintain uninterrupted service. or an authorized representative of Toshiba, or the Toshiba Customer Support Center within...

User Guide
Page 30
... size partition 68 Creating recovery DVDs/media 70 Restoring from recovery DVDs/media 73 Erasing the Internal Storage Drive 75 Checking the internal storage drive operating status 76 Installing drivers and applications 77 Using the Toshiba Dual Pointing Device 77 Using the touch pad 78 Adjusting touch pad settings 82 Scrolling with the touch pad 82 Control buttons 82 Disabling or enabling the touch pad 83 Using external display devices 83 Selecting video cables 84 Connecting an HDMI™-compatible television or display device 84 Connecting an external monitor or projector...
... size partition 68 Creating recovery DVDs/media 70 Restoring from recovery DVDs/media 73 Erasing the Internal Storage Drive 75 Checking the internal storage drive operating status 76 Installing drivers and applications 77 Using the Toshiba Dual Pointing Device 77 Using the touch pad 78 Adjusting touch pad settings 82 Scrolling with the touch pad 82 Control buttons 82 Disabling or enabling the touch pad 83 Using external display devices 83 Selecting video cables 84 Connecting an HDMI™-compatible television or display device 84 Connecting an external monitor or projector...

User Guide
Page 33
... desktop 136 Setting up for communications 138 Connecting your computer to a network .........139 Exploring audio features 140 Recording sounds 140 Using external speakers or headphones..........140 Using the Web Camera 141 Using an ExpressCard 142 Inserting an ExpressCard 142 Removing an ExpressCard 142 Using the Memory card reader 143 Inserting memory media 143 Removing memory media 144 Using the eSATA/USB combo port 145 Using the expansion port 145 Chapter 5: Utilities 146 TOSHIBA Assist 147 Connect 148 Secure...
... desktop 136 Setting up for communications 138 Connecting your computer to a network .........139 Exploring audio features 140 Recording sounds 140 Using external speakers or headphones..........140 Using the Web Camera 141 Using an ExpressCard 142 Inserting an ExpressCard 142 Removing an ExpressCard 142 Using the Memory card reader 143 Inserting memory media 143 Removing memory media 144 Using the eSATA/USB combo port 145 Using the expansion port 145 Chapter 5: Utilities 146 TOSHIBA Assist 147 Connect 148 Secure...
User Guide
Page 34
... TOSHIBA Application Installer 152 Setting passwords 153 Using an instant password 153 Using a supervisor password 154 Using a user password 155 TOSHIBA Face Recognition Utility 157 TOSHIBA Security Assist 158 TOSHIBA PC Diagnostic Tool Utility 160 TOSHIBA HDD Protection Utility 161 Mouse Utility 162 TOSHIBA Hardware Setup 163 TOSHIBA Sleep Utility 165 Starting the TOSHIBA Sleep Utility 165 USB Sleep and Charge 165 Enabling/Disabling USB Sleep and Charge......167 Power supply mode settings 167 TOSHIBA Button Support 168 TOSHIBA Accessibility 169 Trusted Platform Module...
... TOSHIBA Application Installer 152 Setting passwords 153 Using an instant password 153 Using a supervisor password 154 Using a user password 155 TOSHIBA Face Recognition Utility 157 TOSHIBA Security Assist 158 TOSHIBA PC Diagnostic Tool Utility 160 TOSHIBA HDD Protection Utility 161 Mouse Utility 162 TOSHIBA Hardware Setup 163 TOSHIBA Sleep Utility 165 Starting the TOSHIBA Sleep Utility 165 USB Sleep and Charge 165 Enabling/Disabling USB Sleep and Charge......167 Power supply mode settings 167 TOSHIBA Button Support 168 TOSHIBA Accessibility 169 Trusted Platform Module...

User Guide
Page 53
... slot. NOTE For this model, Slot A is the top slot. Start button Shut down button (Sample Image) Shut down button 2 Click the Shut down on , begin at step 1; If you install or remove a memory module, turn off . 3 Unplug and remove any cables connected to the computer, including the AC adaptor. 4 Place a soft cloth on the work surface to prevent scratching the top cover of the Start menu. You can install one memory module...
... slot. NOTE For this model, Slot A is the top slot. Start button Shut down button (Sample Image) Shut down button 2 Click the Shut down on , begin at step 1; If you install or remove a memory module, turn off . 3 Unplug and remove any cables connected to the computer, including the AC adaptor. 4 Place a soft cloth on the work surface to prevent scratching the top cover of the Start menu. You can install one memory module...

User Guide
Page 60
... damage or a fire, possibly resulting in Sleep mode). Make sure to remove the soft cloth from overheating when the power is turned on page 130. 6 Turn the computer right side up. Using your computer is connected to a 30-degree angle and slide it using the screw. 5 Re-insert the main battery. Slot B Slot A (Sample Illustration) Removing the memory module 4 Replace the memory module slot cover and secure it out of the...
... damage or a fire, possibly resulting in Sleep mode). Make sure to remove the soft cloth from overheating when the power is turned on page 130. 6 Turn the computer right side up. Using your computer is connected to a 30-degree angle and slide it using the screw. 5 Re-insert the main battery. Slot B Slot A (Sample Illustration) Removing the memory module 4 Replace the memory module slot cover and secure it out of the...

User Guide
Page 61
... memory configuration, turn off the computer and remove the memory module slot cover (complete steps 1-8 in "Installing a memory module" on page 63. TECHNICAL NOTE: You must have at least one memory module installed for the computer to this : ❖ Click Start, Control Panel, System and Security, and then System. Recovering the Internal Storage Drive Your computer includes recovery utilities to allow the following internal storage drive recovery options are available: Recovery option Recover to your internal storage drive, returning your internal storage drive...
... memory configuration, turn off the computer and remove the memory module slot cover (complete steps 1-8 in "Installing a memory module" on page 63. TECHNICAL NOTE: You must have at least one memory module installed for the computer to this : ❖ Click Start, Control Panel, System and Security, and then System. Recovering the Internal Storage Drive Your computer includes recovery utilities to allow the following internal storage drive recovery options are available: Recovery option Recover to your internal storage drive, returning your internal storage drive...
User Guide
Page 82
... 83. ❖ Disable the tapping feature. Scrolling with these problems, try one or more information, please visit www.support.toshiba.com, and enter the phrase "Mouse pointer jumps around "by itself" to the left -hand) button. For help with the touch pad There are accessible through the Mouse Properties option of the touch pad. See "Disabling or enabling the touch pad" on -screen pointer may be disabled or changed in rapid succession...
... 83. ❖ Disable the tapping feature. Scrolling with these problems, try one or more information, please visit www.support.toshiba.com, and enter the phrase "Mouse pointer jumps around "by itself" to the left -hand) button. For help with the touch pad There are accessible through the Mouse Properties option of the touch pad. See "Disabling or enabling the touch pad" on -screen pointer may be disabled or changed in rapid succession...

User Guide
Page 84
... the computer. 3 Connect the device's power cable to a live electrical outlet. 4 Turn on the external device. Your computer will automatically detect the external display device. NOTE In the future you first need a larger screen. 84 Getting Started Using external display devices Selecting video cables To connect a device to your computer if you need to install new software. 2 Connect the monitor's video cable to the RGB (monitor) port on certain models.) To connect a DisplayPort™-compatible monitor to your television or display device. Connecting an HDMI™-compatible...
... the computer. 3 Connect the device's power cable to a live electrical outlet. 4 Turn on the external device. Your computer will automatically detect the external display device. NOTE In the future you first need a larger screen. 84 Getting Started Using external display devices Selecting video cables To connect a device to your computer if you need to install new software. 2 Connect the monitor's video cable to the RGB (monitor) port on certain models.) To connect a DisplayPort™-compatible monitor to your television or display device. Connecting an HDMI™-compatible...
User Guide
Page 114
... optical disc drive icon. 114 Learning the Basics Using the optical disc drive Playing an audio CD Insert an audio CD and close the disc tray. To do this method, try launching the optical disc manually. If your computer's detailed specifications at pcsupport.toshiba.com. Recording optical media Depending on the configuration, your hearing. For more information regarding supported optical media formats please refer to loud sound can...
... optical disc drive icon. 114 Learning the Basics Using the optical disc drive Playing an audio CD Insert an audio CD and close the disc tray. To do this method, try launching the optical disc manually. If your computer's detailed specifications at pcsupport.toshiba.com. Recording optical media Depending on the configuration, your hearing. For more information regarding supported optical media formats please refer to loud sound can...
User Guide
Page 156
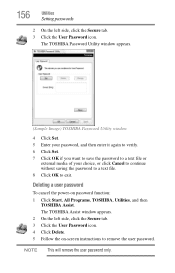
... tab. 3 Click the User Password icon. NOTE This will remove the user password only. Deleting a user password To cancel the power-on -screen instructions to exit. 156 Utilities Setting passwords 2 On the left side, click the Secure tab. 3 Click the User Password icon. 4 Click Delete. 5 Follow the on password function: 1 Click Start, All Programs, TOSHIBA, Utilities, and then TOSHIBA Assist. The TOSHIBA Password Utility window appears. (Sample Image) TOSHIBA Password Utility window 4 Click Set. 5 Enter your password, and then enter it again to...
... tab. 3 Click the User Password icon. NOTE This will remove the user password only. Deleting a user password To cancel the power-on -screen instructions to exit. 156 Utilities Setting passwords 2 On the left side, click the Secure tab. 3 Click the User Password icon. 4 Click Delete. 5 Follow the on password function: 1 Click Start, All Programs, TOSHIBA, Utilities, and then TOSHIBA Assist. The TOSHIBA Password Utility window appears. (Sample Image) TOSHIBA Password Utility window 4 Click Set. 5 Enter your password, and then enter it again to...
User Guide
Page 176
... internal storage drive may use , and also computer and device usage (e.g.: power settings, battery temperature and recharging, CPU, memory, backlight illumination time, and temperatures for quality assurance analysis. It also tracks the usage of your home country or region. The collected information includes device operation time and number of actuations or status changes (e.g.: number of power button and Fn key combination uses, and AC adaptor, battery, LCD, fan, HDD, sound volume, wireless communication switch, docking and USB...
... internal storage drive may use , and also computer and device usage (e.g.: power settings, battery temperature and recharging, CPU, memory, backlight illumination time, and temperatures for quality assurance analysis. It also tracks the usage of your home country or region. The collected information includes device operation time and number of actuations or status changes (e.g.: number of power button and Fn key combination uses, and AC adaptor, battery, LCD, fan, HDD, sound volume, wireless communication switch, docking and USB...
User Guide
Page 185
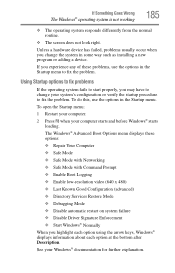
... way such as installing a new program or adding a device. The Windows® Advanced Boot Options menu displays these problems, use the options in the Startup menu to fix the problem. If you experience any of these options: ❖ Repair Your Computer ❖ Safe Mode ❖ Safe Mode with Networking ❖ Safe Mode with Command Prompt ❖ Enable Boot Logging ❖ Enable low-resolution video (640 x 480) ❖ Last Known Good Configuration (advanced) ❖ Directory Services Restore Mode ❖ Debugging Mode ❖ Disable automatic restart...
... way such as installing a new program or adding a device. The Windows® Advanced Boot Options menu displays these problems, use the options in the Startup menu to fix the problem. If you experience any of these options: ❖ Repair Your Computer ❖ Safe Mode ❖ Safe Mode with Networking ❖ Safe Mode with Command Prompt ❖ Enable Boot Logging ❖ Enable low-resolution video (640 x 480) ❖ Last Known Good Configuration (advanced) ❖ Directory Services Restore Mode ❖ Debugging Mode ❖ Disable automatic restart...

User Guide
Page 190
... control overlay light is registered, press any key to its previous setting. The keyboard you have activated the instant password feature by pressing Fn and F1 simultaneously. If you connected may be related to update your keyboard driver. The screen reactivates and allows you through the display options. Display problems Here are off the numlock light. The keyboard produces unexpected characters. 190 If Something Goes Wrong Keyboard problems Keyboard problems If, while typing...
... control overlay light is registered, press any key to its previous setting. The keyboard you have activated the instant password feature by pressing Fn and F1 simultaneously. If you connected may be related to update your keyboard driver. The screen reactivates and allows you through the display options. Display problems Here are off the numlock light. The keyboard produces unexpected characters. 190 If Something Goes Wrong Keyboard problems Keyboard problems If, while typing...
User Guide
Page 195
... a microphone is fed to be defective. Most ExpressCard problems occur during installation and setup of devices, such as a removable hard disk, additional memory, or a pager. If your ExpressCard and the card did not come with a ExpressCard slot is too loud. If the card malfunctions again, it may be dead. If another computer with an operating system driver, it may not work under System, click Device Manager. Adjust the volume control...
... a microphone is fed to be defective. Most ExpressCard problems occur during installation and setup of devices, such as a removable hard disk, additional memory, or a pager. If your ExpressCard and the card did not come with a ExpressCard slot is too loud. If the card malfunctions again, it may be dead. If another computer with an operating system driver, it may not work under System, click Device Manager. Adjust the volume control...

User Guide
Page 233
... the change. See also cache, CPU cache, L1 cache. Interlaced monitors take two passes to the same state it was when the computer was turned off . HDMI-CEC (HDMI Consumer Electronics Control)-One A/V component can control another while using this function, if connected with the Fn key can set system options or control system parameters, such as the battery save mode. (2) A key or combination of using a pointing device such as a mouse.
... the change. See also cache, CPU cache, L1 cache. Interlaced monitors take two passes to the same state it was when the computer was turned off . HDMI-CEC (HDMI Consumer Electronics Control)-One A/V component can control another while using this function, if connected with the Fn key can set system options or control system parameters, such as the battery save mode. (2) A key or combination of using a pointing device such as a mouse.
User Guide
Page 241
Index 241 safety precautions 131 setting notifications 125 taking care of 131 battery indicator light 123 BIOS Setup see TOSHIBA Hardware Setup button eco Utility™ 128 eject, optical disc drive 111 power 50 Shut down 53, 90 start 137 C Call2Recycle™ battery 134 caring for your computer 98 changing battery 129 character keys 102 charging the battery 48 cleaning the computer 98 click 82 communications network connection 139 set up 138 computer caring for...
Index 241 safety precautions 131 setting notifications 125 taking care of 131 battery indicator light 123 BIOS Setup see TOSHIBA Hardware Setup button eco Utility™ 128 eject, optical disc drive 111 power 50 Shut down 53, 90 start 137 C Call2Recycle™ battery 134 caring for your computer 98 changing battery 129 character keys 102 charging the battery 48 cleaning the computer 98 click 82 communications network connection 139 set up 138 computer caring for...
User Guide
Page 243
... hot key disabling or enabling wireless devices 220 display brightness 219 Hibernation mode 217 keyboard overlays 223 Lock (Instant security) 214 optical disk drive 212 Output (Display switch) 218 power plan 215 Sleep mode 216 using to set a power plan 127 volume mute 213 zoom 223 zoom in 223 zoom out 223 Hot Key Cards 210 Hot key functions 212 I icon desktop 136 moving to desktop 136 recycle bin 136 safety 40 inserting ExpressCard® 142 installation memory module 52 installing a charged battery 130 battery...
... hot key disabling or enabling wireless devices 220 display brightness 219 Hibernation mode 217 keyboard overlays 223 Lock (Instant security) 214 optical disk drive 212 Output (Display switch) 218 power plan 215 Sleep mode 216 using to set a power plan 127 volume mute 213 zoom 223 zoom in 223 zoom out 223 Hot Key Cards 210 Hot key functions 212 I icon desktop 136 moving to desktop 136 recycle bin 136 safety 40 inserting ExpressCard® 142 installation memory module 52 installing a charged battery 130 battery...
User Guide
Page 247
... external display problems 191 external keyboard 190 external monitor 191 good computing habits 201 hard disk drive is slow 193 Help and Support, Windows® operating system 186 high-pitched noise 195 installing hardware/software 204 keyboard 190 keyboard will not respond 182 memory problems 188 missing files/trouble accessing a drive 192 on-screen eject button 194 optical disc drive 193 power and batteries 188 printer 197 restore points 202 screen does not look correct/ flickers 191 slow Internet connection 186 sound system 194 trouble...
... external display problems 191 external keyboard 190 external monitor 191 good computing habits 201 hard disk drive is slow 193 Help and Support, Windows® operating system 186 high-pitched noise 195 installing hardware/software 204 keyboard 190 keyboard will not respond 182 memory problems 188 missing files/trouble accessing a drive 192 on-screen eject button 194 optical disc drive 193 power and batteries 188 printer 197 restore points 202 screen does not look correct/ flickers 191 slow Internet connection 186 sound system 194 trouble...

User Guide
Page 248
... computer more quickly 90 options 88 turning on power 50 U USB Sleep and Charge cannot use 205 USB Wakeup function does not work 206 USB-compatible printer 86 user password, deleting 156 user password, setting 155 using a microphone 140 computer lock 99 DVDs 110 expansion port 145 ExpressCard® 142 Hibernation mode 92 hot key to set a power plan 127 Memory card reader 143 optical disc drive 110 Shut down command 90 Sleep mode 95 TOSHIBA eco power plan 128 touch pad 78 Web Camera 141 using the keyboard 101 using the...
... computer more quickly 90 options 88 turning on power 50 U USB Sleep and Charge cannot use 205 USB Wakeup function does not work 206 USB-compatible printer 86 user password, deleting 156 user password, setting 155 using a microphone 140 computer lock 99 DVDs 110 expansion port 145 ExpressCard® 142 Hibernation mode 92 hot key to set a power plan 127 Memory card reader 143 optical disc drive 110 Shut down command 90 Sleep mode 95 TOSHIBA eco power plan 128 touch pad 78 Web Camera 141 using the keyboard 101 using the...


