

User Guide
Page 29
... output when you turn on the computer 63 Adjusting the quality of the external display......64 Video limitations 65 Using an external keyboard 65 Connecting a keyboard 65 Making your external keyboard emulate the Fn key 66 Using a mouse 66 Connecting a mouse 66 Connecting a local printer 67 Connecting a USB printer 67 Connecting a parallel printer...
... output when you turn on the computer 63 Adjusting the quality of the external display......64 Video limitations 65 Using an external keyboard 65 Connecting a keyboard 65 Making your external keyboard emulate the Fn key 66 Using a mouse 66 Connecting a mouse 66 Connecting a local printer 67 Connecting a USB printer 67 Connecting a parallel printer...
User Guide
Page 30
... Connecting to a phone line 98 Using the i.LINK® port 100 Chapter 3: Learning the Basics 101 Computing tips 101 Using the keyboard 103 Character keys 103 Making your keyboard emulate a full-size keyboard 103 Ctrl, Fn, and Alt keys 104 Function keys 104 Windows® special keys 105 Overlay keys 105 Using the...
... Connecting to a phone line 98 Using the i.LINK® port 100 Chapter 3: Learning the Basics 101 Computing tips 101 Using the keyboard 103 Character keys 103 Making your keyboard emulate a full-size keyboard 103 Ctrl, Fn, and Alt keys 104 Function keys 104 Windows® special keys 105 Overlay keys 105 Using the...

User Guide
Page 33
... Starting Fn-esse 172 Using the keyboard or pointing device to assign keys 174 Viewing existing key assignments 175 Changing or removing existing key assignments 176 TOSHIBA HW Setup 176 Accessing TOSHIBA HW Setup 176 TOSHIBA Power Saver 179 TOSHIBA Mobile Extension 180 TOSHIBA Password Utility 182 TOSHIBA Zooming Utility 184 TOSHIBA CD/DVD Drive Acoustic Silencer ...........185...
... Starting Fn-esse 172 Using the keyboard or pointing device to assign keys 174 Viewing existing key assignments 175 Changing or removing existing key assignments 176 TOSHIBA HW Setup 176 Accessing TOSHIBA HW Setup 176 TOSHIBA Power Saver 179 TOSHIBA Mobile Extension 180 TOSHIBA Password Utility 182 TOSHIBA Zooming Utility 184 TOSHIBA CD/DVD Drive Acoustic Silencer ...........185...

User Guide
Page 35
35 Contents Fixing a problem with Device Manager ...........216 Memory problems 218 Power and the batteries 219 Keyboard problems 221 Display problems 222 Disk drive problems 224 DVD-ROM or multi-function drive problems...227 Sound system problems 228 ...computing habits 240 Data and system configuration backup in Windows XP 241 If you need further assistance 247 Before you contact Toshiba 247 Contacting Toshiba 248 Other Toshiba Internet Web sites 249 Toshiba's worldwide offices 249 Appendix A: Hot Keys 251 Volume Mute 251 Password security 252 Without a password 252 With a ...
35 Contents Fixing a problem with Device Manager ...........216 Memory problems 218 Power and the batteries 219 Keyboard problems 221 Display problems 222 Disk drive problems 224 DVD-ROM or multi-function drive problems...227 Sound system problems 228 ...computing habits 240 Data and system configuration backup in Windows XP 241 If you need further assistance 247 Before you contact Toshiba 247 Contacting Toshiba 248 Other Toshiba Internet Web sites 249 Toshiba's worldwide offices 249 Appendix A: Hot Keys 251 Volume Mute 251 Password security 252 Without a password 252 With a ...

User Guide
Page 36
36 Contents Disabling or enabling wireless devices 257 Disabling or enabling the TouchPad 257 Keyboard hot keys 257 Zooming applications in/out 258 Appendix B: Power Cord/Cable Connectors 259 Appendix C: Using ConfigFree™ with your Toshiba Computer 260 Getting Started 261 Starting ConfigFree 261 ConfigFree Utilities 263 Connectivity Doctor 263 Search for Wireless Devices 266 Profile Settings 271 ConfigFree SUMMIT 275 Quick Connect 279 Using the Automatic Switch 282 Semi-Automatic Switch Feature 282 Glossary 284 Index 299
36 Contents Disabling or enabling wireless devices 257 Disabling or enabling the TouchPad 257 Keyboard hot keys 257 Zooming applications in/out 258 Appendix B: Power Cord/Cable Connectors 259 Appendix C: Using ConfigFree™ with your Toshiba Computer 260 Getting Started 261 Starting ConfigFree 261 ConfigFree Utilities 263 Connectivity Doctor 263 Search for Wireless Devices 266 Profile Settings 271 ConfigFree SUMMIT 275 Quick Connect 279 Using the Automatic Switch 282 Semi-Automatic Switch Feature 282 Glossary 284 Index 299

User Guide
Page 46
... outside air into the computer. 46 Getting Started Setting up your software" on page 47 before you must complete all setup steps up to , a mouse, keyboard, printer, memory, and PC Cards. The cooling fan may have a CPU cooling fan that can block the air intake, preventing air from reaching the CPU...
... outside air into the computer. 46 Getting Started Setting up your software" on page 47 before you must complete all setup steps up to , a mouse, keyboard, printer, memory, and PC Cards. The cooling fan may have a CPU cooling fan that can block the air intake, preventing air from reaching the CPU...

User Guide
Page 49
... components to a power source" on page 50. After setting up your computer, you must connect the built-in modem to , a mouse, keyboard, printer, memory, and PC cards. Your computer comes with a rechargeable battery pack that must be sure to : ❖ Add more information ...on installing specific devices, see "Connecting Other External Devices" on page 71. ❖ Connect a mouse. See "Using an external keyboard" on page 93. Getting Started Adding external devices 49 Adding external devices TECHNICAL NOTE: You must complete all setup steps up to "Setting up...
... components to a power source" on page 50. After setting up your computer, you must connect the built-in modem to , a mouse, keyboard, printer, memory, and PC cards. Your computer comes with a rechargeable battery pack that must be sure to : ❖ Add more information ...on installing specific devices, see "Connecting Other External Devices" on page 71. ❖ Connect a mouse. See "Using an external keyboard" on page 93. Getting Started Adding external devices 49 Adding external devices TECHNICAL NOTE: You must complete all setup steps up to "Setting up...
User Guide
Page 58
... exterior case with a lightly dampened cloth. Never spray cleaner directly onto the computer. Cleaning the computer Keep liquids, including cleaning fluid, out of the computer's keyboard, speaker, and other openings.
... exterior case with a lightly dampened cloth. Never spray cleaner directly onto the computer. Cleaning the computer Keep liquids, including cleaning fluid, out of the computer's keyboard, speaker, and other openings.
User Guide
Page 65
...the LCD Display Stretch option enabled and the display area (resolution) set for more information. To connect a PS2 keyboard, gently push the keyboard cable into the USB port. See your Toshiba sales representative for a higher resolution, only part of the desktop appears on the screen. You can scroll to...overscan by 15 to 20 percent, some of the desktop will be outside the viewing area. Connecting Other External Devices Using an external keyboard 65 Video limitations Keep in mind that the quality of the display is limited to the capabilities of the external video device. ❖...
...the LCD Display Stretch option enabled and the display area (resolution) set for more information. To connect a PS2 keyboard, gently push the keyboard cable into the USB port. See your Toshiba sales representative for a higher resolution, only part of the desktop appears on the screen. You can scroll to...overscan by 15 to 20 percent, some of the desktop will be outside the viewing area. Connecting Other External Devices Using an external keyboard 65 Video limitations Keep in mind that the quality of the display is limited to the capabilities of the external video device. ❖...

User Guide
Page 66
... the Fn key An external keyboard does not have the Fn key provided by setting key combinations in the keyboard option of an optional Advanced Port Replicator III. Using a mouse If you prefer to use the Fn Key Emulation option in keyboard. In Toshiba Hardware Setup, you can emulate ...the Fn key by the computer's built-in Toshiba Hardware Setup to assign an external keyboard key combination ...
... the Fn key An external keyboard does not have the Fn key provided by setting key combinations in the keyboard option of an optional Advanced Port Replicator III. Using a mouse If you prefer to use the Fn Key Emulation option in keyboard. In Toshiba Hardware Setup, you can emulate ...the Fn key by the computer's built-in Toshiba Hardware Setup to assign an external keyboard key combination ...

User Guide
Page 71
... If you will become hot. Your computer comes with your system or visit accessories.toshiba.com. For more information on page 47. NOTE Before adding external devices or memory, Toshiba recommends setting up your software" on memory options, check the accessories information that came ... computer for a long time, the memory module will install or replace a memory module in your computer's keyboard. See "Setting up your computer, or visit accessories.toshiba.com. There are two memory expansion slots (primary and secondary) located under your computer. Connecting Other External ...
... If you will become hot. Your computer comes with your system or visit accessories.toshiba.com. For more information on page 47. NOTE Before adding external devices or memory, Toshiba recommends setting up your software" on memory options, check the accessories information that came ... computer for a long time, the memory module will install or replace a memory module in your computer's keyboard. See "Setting up your computer, or visit accessories.toshiba.com. There are two memory expansion slots (primary and secondary) located under your computer. Connecting Other External ...

User Guide
Page 73
The brace is fragile and should not be bent. Sample removing the retaining screw 5 Turn the computer over and slide the display latch to locate and remove the retaining screw. Place the screw in a safe place so that you can retrieve it later. Pull the brace out by grasping the left and the right sides. Connecting Other External Devices Adding memory 73 4 Close the display panel and turn the computer upside down to the right and open the display panel. 6 Carefully insert a thin object under the rim of the keyboard brace and lift out the brace.
The brace is fragile and should not be bent. Sample removing the retaining screw 5 Turn the computer over and slide the display latch to locate and remove the retaining screw. Place the screw in a safe place so that you can retrieve it later. Pull the brace out by grasping the left and the right sides. Connecting Other External Devices Adding memory 73 4 Close the display panel and turn the computer upside down to the right and open the display panel. 6 Carefully insert a thin object under the rim of the keyboard brace and lift out the brace.
User Guide
Page 74
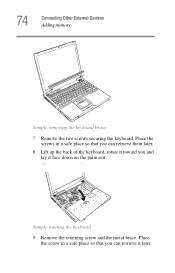
74 Connecting Other External Devices Adding memory Sample removing the keyboard brace 7 Remove the two screws securing the keyboard. Sample rotating the keyboard 9 Remove the retaining screw and the metal brace. Place the screw in a safe place so that you and lay it later. Place the screws in a safe place so that you can retrieve them later. 8 Lift up the back of the keyboard, rotate it toward you can retrieve it face down on the palm rest.
74 Connecting Other External Devices Adding memory Sample removing the keyboard brace 7 Remove the two screws securing the keyboard. Sample rotating the keyboard 9 Remove the retaining screw and the metal brace. Place the screw in a safe place so that you and lay it later. Place the screws in a safe place so that you can retrieve them later. 8 Lift up the back of the keyboard, rotate it toward you can retrieve it face down on the palm rest.

User Guide
Page 77
...of the tasks in this section. For more information on creating Recovery media, see "Creating Recovery CDs/DVDs" on the computer, seat the keyboard, and secure it with a hard disk partition to recover your system. Hard Drive Recovery Utilities Your computer has been configured with the two... screws. 18 Seat the keyboard brace and press to secure latches. 19 Install the battery pack. 20 Turn the computer over and restart it automatically recognizes the additional ...
...of the tasks in this section. For more information on creating Recovery media, see "Creating Recovery CDs/DVDs" on the computer, seat the keyboard, and secure it with a hard disk partition to recover your system. Hard Drive Recovery Utilities Your computer has been configured with the two... screws. 18 Seat the keyboard brace and press to secure latches. 19 Install the battery pack. 20 Turn the computer over and restart it automatically recognizes the additional ...
User Guide
Page 80
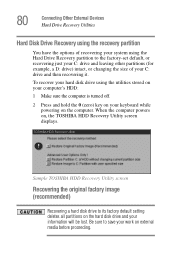
... drive and then recovering it. Be sure to save your work on the hard disk drive and your information will be lost. Sample TOSHIBA HDD Recovery Utility screen Recovering the original factory image (recommended) Recovering a hard disk drive to the factory-set default, or recovering just ...your C: drive and leaving other partitions (for example, a D: drive) intact, or changing the size of your keyboard while powering on , the TOSHIBA HDD Recovery Utility screen displays. To recover your hard disk drive using the Hard Drive Recovery partition to its factory default setting ...
... drive and then recovering it. Be sure to save your work on the hard disk drive and your information will be lost. Sample TOSHIBA HDD Recovery Utility screen Recovering the original factory image (recommended) Recovering a hard disk drive to the factory-set default, or recovering just ...your C: drive and leaving other partitions (for example, a D: drive) intact, or changing the size of your keyboard while powering on , the TOSHIBA HDD Recovery Utility screen displays. To recover your hard disk drive using the Hard Drive Recovery partition to its factory default setting ...
User Guide
Page 81
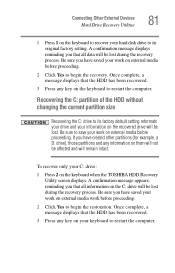
...2 Click Yes to begin the recovery. A confirmation message displays reminding you that the HDD has been recovered. 3 Press any key on the keyboard to restart the computer. If you that the HDD has been recovered. 3 Press any information on them will be lost. A confirmation message ... restart the computer. Connecting Other External Devices Hard Drive Recovery Utilities 81 1 Press 1 on the keyboard to recover your C: drive: 1 Press 2 on the keyboard when the TOSHIBA HDD Recovery Utility screen displays. To recover only your hard disk drive to its factory default setting reformats your...
...2 Click Yes to begin the recovery. A confirmation message displays reminding you that the HDD has been recovered. 3 Press any key on the keyboard to restart the computer. If you that the HDD has been recovered. 3 Press any information on them will be lost. A confirmation message ... restart the computer. Connecting Other External Devices Hard Drive Recovery Utilities 81 1 Press 1 on the keyboard to recover your C: drive: 1 Press 2 on the keyboard when the TOSHIBA HDD Recovery Utility screen displays. To recover only your hard disk drive to its factory default setting reformats your...

User Guide
Page 82
... the size of the C: drive displays on the progress bar as you have saved your C: drive: 1 Press 3 on the keyboard when the TOSHIBA HDD Recovery Utility screen displays. Be sure to save your keyboard to restart the computer. A confirmation message appears, reminding you that the HDD has been recovered. 4 Press any key on...
... the size of the C: drive displays on the progress bar as you have saved your C: drive: 1 Press 3 on the keyboard when the TOSHIBA HDD Recovery Utility screen displays. Be sure to save your keyboard to restart the computer. A confirmation message appears, reminding you that the HDD has been recovered. 4 Press any key on...
User Guide
Page 83
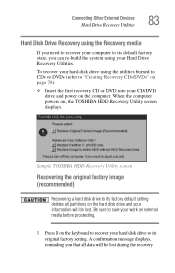
When the computer powers on the keyboard to recover your hard disk drive to its original factory ...on the computer. Be sure to save your work on external media before proceeding. 1 Press 1 on , the TOSHIBA HDD Recovery Utility screen displays. To recover your hard disk drive using your information will be lost during the recovery...utilities burned to CDs or DVDs (refer to its factory default setting deletes all data will be lost . Sample TOSHIBA HDD Recovery Utility screen Recovering the original factory image (recommended) Recovering a hard disk drive to "Creating Recovery ...
When the computer powers on the keyboard to recover your hard disk drive to its original factory ...on the computer. Be sure to save your work on external media before proceeding. 1 Press 1 on , the TOSHIBA HDD Recovery Utility screen displays. To recover your hard disk drive using your information will be lost during the recovery...utilities burned to CDs or DVDs (refer to its factory default setting deletes all data will be lost . Sample TOSHIBA HDD Recovery Utility screen Recovering the original factory image (recommended) Recovering a hard disk drive to "Creating Recovery ...
User Guide
Page 84
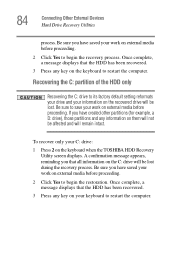
... have saved your work on external media before proceeding. 2 Click Yes to its factory default setting reformats your drive and your work on the keyboard when the TOSHIBA HDD Recovery Utility screen displays. If you that the HDD has been recovered. 3 Press any key on the C: drive will be lost . 84 Connecting...
... have saved your work on external media before proceeding. 2 Click Yes to its factory default setting reformats your drive and your work on the keyboard when the TOSHIBA HDD Recovery Utility screen displays. If you that the HDD has been recovered. 3 Press any key on the C: drive will be lost . 84 Connecting...

User Guide
Page 85
... display its factory default state without the recovery partition reformats all data will be lost during the recovery process), and your work on the keyboard when the TOSHIBA HDD Recovery Utility screen displays. This will be lost . Be sure you have saved your hard disk drive, you that the HDD has been... Recovery Utilities partition. Connecting Other External Devices Hard Drive Recovery Utilities 85 Recovering the entire HDD without the HDD Recovery Area This option recovers your keyboard to restart the computer.
... display its factory default state without the recovery partition reformats all data will be lost during the recovery process), and your work on the keyboard when the TOSHIBA HDD Recovery Utility screen displays. This will be lost . Be sure you have saved your hard disk drive, you that the HDD has been... Recovery Utilities partition. Connecting Other External Devices Hard Drive Recovery Utilities 85 Recovering the entire HDD without the HDD Recovery Area This option recovers your keyboard to restart the computer.

