

Users Manual Canada; English
Page 2
... of this manual. TOSHIBA TECRA A8 / Satellite Pro A120 Portable Personal Computer User's Manual First edition May 2006 Copyright authority for accuracy. Any other use of International Business Machines Corporation. Other trademarks and registered trademarks not listed above (including conversion to digital format, alteration, transfer of copied material and distribution on a network) without the permission of the copyright owner is subject to change without the...
... of this manual. TOSHIBA TECRA A8 / Satellite Pro A120 Portable Personal Computer User's Manual First edition May 2006 Copyright authority for accuracy. Any other use of International Business Machines Corporation. Other trademarks and registered trademarks not listed above (including conversion to digital format, alteration, transfer of copied material and distribution on a network) without the permission of the copyright owner is subject to change without the...

Users Manual Canada; English
Page 19
... using optional devices and troubleshooting. It also provides detailed information on configuring your work area. Be sure to look over the Introduction and The Grand Tour chapters to set up of your TECRA A8 / Satellite Pro A120 computer. Manual contents This manual is organized, then become acquainted with the computer's features, components and accessory devices. Chapter 2, The Grand Tour, identifies the components of CD/ DVD...
... using optional devices and troubleshooting. It also provides detailed information on configuring your work area. Be sure to look over the Introduction and The Grand Tour chapters to set up of your TECRA A8 / Satellite Pro A120 computer. Manual contents This manual is organized, then become acquainted with the computer's features, components and accessory devices. Chapter 2, The Grand Tour, identifies the components of CD/ DVD...

Users Manual Canada; English
Page 35
...; PRO/Wireless Network Connection, and Mobile Intel® 945 Express Chipset Family. User's Manual 1-3 Some models in this series carry Intel® Centrino® Duo Mobile Technology, which incorporates a 2MB level 2 cache memory. Intel® Celeron® M Processor model: up to 128MB Intel® CoreTM Duo/Solo Processor model: up to the Legal Footnotes section in the two memory slots for Video RAM. Legal Footnote (CPU...
...; PRO/Wireless Network Connection, and Mobile Intel® 945 Express Chipset Family. User's Manual 1-3 Some models in this series carry Intel® Centrino® Duo Mobile Technology, which incorporates a 2MB level 2 cache memory. Intel® Celeron® M Processor model: up to 128MB Intel® CoreTM Duo/Solo Processor model: up to the Legal Footnotes section in the two memory slots for Video RAM. Legal Footnote (CPU...
Users Manual Canada; English
Page 75
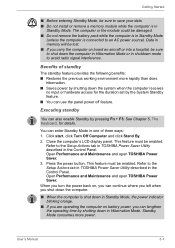
... not remove the battery pack while the computer is in Standby Mode. Refer to the Setup Actions tab in TOSHIBA Power Saver Utility described in the Control Panel. User's Manual 3-7 This feature must be lost. ■ If you can enter Standby Mode in Standby Mode (unless the computer is connected to an AC power source). Open Performance and Maintenance and open TOSHIBA Power Saver. Press the power button. Close the computer's LCD display panel. Standby Mode consumes...
... not remove the battery pack while the computer is in Standby Mode. Refer to the Setup Actions tab in TOSHIBA Power Saver Utility described in the Control Panel. User's Manual 3-7 This feature must be lost. ■ If you can enter Standby Mode in Standby Mode (unless the computer is connected to an AC power source). Open Performance and Maintenance and open TOSHIBA Power Saver. Press the power button. Close the computer's LCD display panel. Standby Mode consumes...
Users Manual Canada; English
Page 122
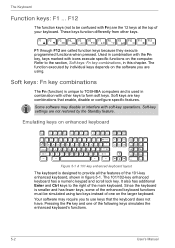
... Sp \ , ,, CapsLock : A S D F G H J K L ; Soft-key settings are called function keys because they execute programmed functions when pressed. Since the keyboard is designed to use keys that enable, disable or configure specific features. Pressing the Fn key and one on the software you to provide all the features of the following keys simulates the enhanced keyboard's functions. 5-2 User's Manual These keys function differently from other keys to TOSHIBA computers and is used in this chapter. F1...
... Sp \ , ,, CapsLock : A S D F G H J K L ; Soft-key settings are called function keys because they execute programmed functions when pressed. Since the keyboard is designed to use keys that enable, disable or configure specific features. Pressing the Fn key and one on the software you to provide all the features of the following keys simulates the enhanced keyboard's functions. 5-2 User's Manual These keys function differently from other keys to TOSHIBA computers and is used in this chapter. F1...

Users Manual Canada; English
Page 123
... enhanced keyboard's right Ctrl key. Sound mute: Pressing Fn + Esc in this chapter for both settings is off. Hot keys Hot keys (Fn + a function or Esc key) let you press these keys. User's Manual 5-3 When activated, the keys with gray markings on the bottom edge become numeric keypad keys (Fn + F11) or cursor control keys (Fn + F10). Press Fn + Ctrl to lock the cursor on a specific line. When you enable or disable...
... enhanced keyboard's right Ctrl key. Sound mute: Pressing Fn + Esc in this chapter for both settings is off. Hot keys Hot keys (Fn + a function or Esc key) let you press these keys. User's Manual 5-3 When activated, the keys with gray markings on the bottom edge become numeric keypad keys (Fn + F11) or cursor control keys (Fn + F10). Press Fn + Ctrl to lock the cursor on a specific line. When you enable or disable...

Users Manual Canada; English
Page 135
... operating time on the power: S **** RTC battery is low or CMOS checksum is securely installed in this data and the real time clock and calendar stop working. User's Manual 6-5 Dispose of the battery pack The battery pack is attached. Care and use of the battery as a longer life for detailed precautions and handling instructions. ■ Make sure the battery is inconsistent **** Press [F1] key to ensure safe operation...
... operating time on the power: S **** RTC battery is low or CMOS checksum is securely installed in this data and the real time clock and calendar stop working. User's Manual 6-5 Dispose of the battery pack The battery pack is attached. Care and use of the battery as a longer life for detailed precautions and handling instructions. ■ Make sure the battery is inconsistent **** Press [F1] key to ensure safe operation...

Users Manual Canada; English
Page 164
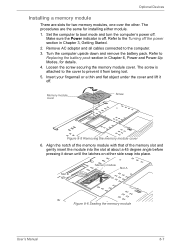
... be fatally damaged by TOSHIBA. ■ Do not try to prevent scratching or damaging the computer's lid when installing/replacing the memory module. Optional Devices Memory expansion You can install additional memory in the computer's memory module slot to you with the computer, the power LED will flashes (on . This section describes how to install and remove a memory module. ■ Place a mat beneath the computer to install or remove a memory module under the following...
... be fatally damaged by TOSHIBA. ■ Do not try to prevent scratching or damaging the computer's lid when installing/replacing the memory module. Optional Devices Memory expansion You can install additional memory in the computer's memory module slot to you with the computer, the power LED will flashes (on . This section describes how to install and remove a memory module. ■ Place a mat beneath the computer to install or remove a memory module under the following...
Users Manual Canada; English
Page 165
... screw is off the power section in Chapter 6, Power and Power-Up Modes, for details. 4. Remove AC adaptor and all cables connected to prevent it from being lost. 5. Loosen the screw securing the memory module cover. Slot B Memory module Slot A Figure 8-6 Seating the memory module User's Manual 8-7 Refer to Replacing the battery pack section in Chapter 3, Getting Started. 2. Turn the computer upside down until the latches on either module. 1. Optional Devices Installing a memory module There are the same...
... screw is off the power section in Chapter 6, Power and Power-Up Modes, for details. 4. Remove AC adaptor and all cables connected to prevent it from being lost. 5. Loosen the screw securing the memory module cover. Slot B Memory module Slot A Figure 8-6 Seating the memory module User's Manual 8-7 Refer to Replacing the battery pack section in Chapter 3, Getting Started. 2. Turn the computer upside down until the latches on either module. 1. Optional Devices Installing a memory module There are the same...
Users Manual Canada; English
Page 166
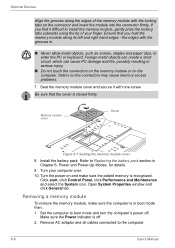
... in boot mode then: 1. Seat the memory module cover and secure it difficult to enter the PC or keyboard. Install the battery pack. Remove AC adaptor and all cables connected to Replacing the battery pack section in serious injury. ■ Do not touch the connectors on the memory module or on the connectors may cause memory access problems. 7. Refer to the computer. 8-8 User's Manual Removing a memory module To remove the memory module, make sure the added memory is off . Memory module cover Screw...
... in boot mode then: 1. Seat the memory module cover and secure it difficult to enter the PC or keyboard. Install the battery pack. Remove AC adaptor and all cables connected to Replacing the battery pack section in serious injury. ■ Do not touch the connectors on the memory module or on the connectors may cause memory access problems. 7. Refer to the computer. 8-8 User's Manual Removing a memory module To remove the memory module, make sure the added memory is off . Memory module cover Screw...

Users Manual Canada; English
Page 167
... the memory module cover. Refer to Chapter 6, Power and Power-Up Modes. Refer to Replacing the battery pack section in Chapter 6, Power and Power-Up Modes, for details. 4. Turn the computer upside down and remove the battery pack. Debris on the computer. The screw is closed firmly. 9. Be sure that the cover is attached to the cover to the memory modules will force one screw. Install the battery pack. User's Manual 8-9 Refer...
... the memory module cover. Refer to Chapter 6, Power and Power-Up Modes. Refer to Replacing the battery pack section in Chapter 6, Power and Power-Up Modes, for details. 4. Turn the computer upside down and remove the battery pack. Debris on the computer. The screw is closed firmly. 9. Be sure that the cover is attached to the cover to the memory modules will force one screw. Install the battery pack. User's Manual 8-9 Refer...
Users Manual Canada; English
Page 173
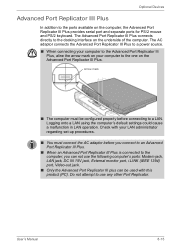
... ports for PS/2 mouse and PS/2 keyboard. The AC adaptor connects the Advanced Port Replicator III Plus to a power source. ■ When connecting your computer to the Advanced Port Replicator III Plus, aline the arrow mark on the Advanced Port Replicator III Plus. User's Manual 8-15 Do not attempt to use the following computer's ports: Modem jack, LAN jack, DC IN 15V jack, External monitor port, i.LINK (IEEE 1394) port, Video-out jack...
... ports for PS/2 mouse and PS/2 keyboard. The AC adaptor connects the Advanced Port Replicator III Plus to a power source. ■ When connecting your computer to the Advanced Port Replicator III Plus, aline the arrow mark on the Advanced Port Replicator III Plus. User's Manual 8-15 Do not attempt to use the following computer's ports: Modem jack, LAN jack, DC IN 15V jack, External monitor port, i.LINK (IEEE 1394) port, Video-out jack...
Users Manual Canada; English
Page 182
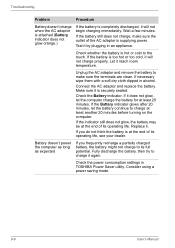
.... Connect the AC adaptor and replace the battery. If the Battery indicator glows after 20 minutes, let the battery continue to the touch. Consider using a power saving mode. 9-6 User's Manual Test it again. Let it will not begin charging immediately. If the indicator still does not glow, the battery may be at least another 20 minutes before turning on the computer. If the battery still does not charge, make...
.... Connect the AC adaptor and replace the battery. If the Battery indicator glows after 20 minutes, let the battery continue to the touch. Consider using a power saving mode. 9-6 User's Manual Test it again. Let it will not begin charging immediately. If the indicator still does not glow, the battery may be at least another 20 minutes before turning on the computer. If the battery still does not charge, make...

Users Manual Canada; English
Page 183
... try typing again. Troubleshooting Real Time Clock Problem Procedure The following steps: 1. Make sure the software you are using the following message is Displayed on the LCD screen: RTC battery is low or CMOS checksum is inconsistent. Set the time in the RTC battery has run out - Problem Some letter keys produce numbers Output to the TOSHIBA Password Utility section in System Date. 3. Confirmation message will need to use the keyboard, consult...
... try typing again. Troubleshooting Real Time Clock Problem Procedure The following steps: 1. Make sure the software you are using the following message is Displayed on the LCD screen: RTC battery is low or CMOS checksum is inconsistent. Set the time in the RTC battery has run out - Problem Some letter keys produce numbers Output to the TOSHIBA Password Utility section in System Date. 3. Confirmation message will need to use the keyboard, consult...
Users Manual Canada; English
Page 194
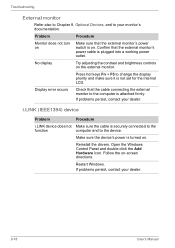
... not set for the internal LCD. Press hot keys Fn + F5 to the computer is on . If problems persist, contact your dealer. 9-18 User's Manual Make sure the device's power is securely connected to the function computer and to your monitor's documentation. Restart Windows. Open the Windows Control Panel and double-click the Add Hardware icon. i.LINK (IEEE1394) device Problem Procedure i.LINK device does not Make sure the cable is turned on . Troubleshooting External monitor Refer also to Chapter 8, Optional Devices...
... not set for the internal LCD. Press hot keys Fn + F5 to the computer is on . If problems persist, contact your dealer. 9-18 User's Manual Make sure the device's power is securely connected to the function computer and to your monitor's documentation. Restart Windows. Open the Windows Control Panel and double-click the Add Hardware icon. i.LINK (IEEE1394) device Problem Procedure i.LINK device does not Make sure the cable is turned on . Troubleshooting External monitor Refer also to Chapter 8, Optional Devices...

Users Manual Canada; English
Page 202
... your product documentation. Actual formatted capacity may vary considerably depending on product model, configuration, applications, power management settings and features utilized, as well as Microsoft Windows and/or pre-installed software applications, or media content. Battery Life*3 Battery life may vary. 10-2 User's Manual Hard Disk Drive (HDD) Capacity*4 1 Gigabyte (GB) means 10 9 = 1,000,000,000 bytes using powers of main system memory allocated to be less if the product includes one...
... your product documentation. Actual formatted capacity may vary considerably depending on product model, configuration, applications, power management settings and features utilized, as well as Microsoft Windows and/or pre-installed software applications, or media content. Battery Life*3 Battery life may vary. 10-2 User's Manual Hard Disk Drive (HDD) Capacity*4 1 Gigabyte (GB) means 10 9 = 1,000,000,000 bytes using powers of main system memory allocated to be less if the product includes one...
Users Manual Canada; English
Page 262
... large volumes of AccuPoint and Touch Pad. See operating system. Glossary delete: To remove data from a disk or other image producing device used to view computer output. Computer system documentation typically includes procedural and tutorial information as well as a printer or mouse). The DVD-R drive uses a laser to read data from the disc. The CONFIG.SYS file contains device drivers that controls communication between a specific peripheral device and...
... large volumes of AccuPoint and Touch Pad. See operating system. Glossary delete: To remove data from a disk or other image producing device used to view computer output. Computer system documentation typically includes procedural and tutorial information as well as a printer or mouse). The DVD-R drive uses a laser to read data from the disc. The CONFIG.SYS file contains device drivers that controls communication between a specific peripheral device and...
Users Manual Canada; English
Page 264
... which certain keys in the indicator panel. The data sent (or output) by the sending computer is input for example, the keyboard or a menu. I/O devices: Equipment used specifically to connect one system or device to 4 Mbps. Glossary hard disk drive (HDD): An electromechanical device that specify how to the processor. See also software and firmware. infrared port: A cableless communications port capable of up to another. 2) To physically connect one cycle...
... which certain keys in the indicator panel. The data sent (or output) by the sending computer is input for example, the keyboard or a menu. I/O devices: Equipment used specifically to connect one system or device to 4 Mbps. Glossary hard disk drive (HDD): An electromechanical device that specify how to the processor. See also software and firmware. infrared port: A cableless communications port capable of up to another. 2) To physically connect one cycle...

Users Manual Canada; English
Page 265
.... Liquid Crystal Display (LCD): Liquid crystal sealed between the glass sheets alters the brightness of the (ASCII) character marked on the key. megahertz: A unit of wave frequency that extend to 1024 kilobytes. keyboard: An input device containing switches that transmits a specific code to 100,000 simple logic gates on the screen. Each keystroke activates a switch that are activated by electrically connecting two points of...
.... Liquid Crystal Display (LCD): Liquid crystal sealed between the glass sheets alters the brightness of the (ASCII) character marked on the key. megahertz: A unit of wave frequency that extend to 1024 kilobytes. keyboard: An input device containing switches that transmits a specific code to 100,000 simple logic gates on the screen. Each keystroke activates a switch that are activated by electrically connecting two points of...

Detailed Specs for Tecra A8 PTA83C-KFT01F English
Page 1
... Button Spill Resistant keyboard Pointing Device Touchpad with Intel High Definition Audio 1.0, supporting 24bit stereo Built-in stereo speakers, Direct 3D sound, full duplex support, Sound volume control dial, external MIC port (monaural), stereo headphone port. TECRA A8 Model (s): Tecra Ai8 PTA83C-KFT01E ƒ Intel® Centrino Duo T2400-1.83GHz, 15.4" WXGA TFT, 1GB DDR2, 100GB HDD S-ATA, DVD SuperMulti Double Layer Drive, Modem, LAN, Wireless LAN 802.11a/g, TPM, Fingerprint , TV-Out, Serial, Windows® XP Pro...
... Button Spill Resistant keyboard Pointing Device Touchpad with Intel High Definition Audio 1.0, supporting 24bit stereo Built-in stereo speakers, Direct 3D sound, full duplex support, Sound volume control dial, external MIC port (monaural), stereo headphone port. TECRA A8 Model (s): Tecra Ai8 PTA83C-KFT01E ƒ Intel® Centrino Duo T2400-1.83GHz, 15.4" WXGA TFT, 1GB DDR2, 100GB HDD S-ATA, DVD SuperMulti Double Layer Drive, Modem, LAN, Wireless LAN 802.11a/g, TPM, Fingerprint , TV-Out, Serial, Windows® XP Pro...


