
User Manual
Page 3
... module 4-33 Memory media 4-44 ExpressCard 4-47 Smart Card 4-48 External Display 4-49 TOSHIBA Hi-Speed Port Replicator III 180W/120W 4-53 Multi Monitor Support 4-55 Serial Device 4-55 Security lock 4-56 Optional TOSHIBA Accessories 4-56 Sound System and Video mode 4-57 Utilities and Advanced Usage Utilities and Applications 5-1 Special features 5-5 USB Charge 5-7 TOSHIBA Password utility 5-10 TOSHIBA HWSetup 5-12 TOSHIBA PC Health Monitor 5-13 Using the Hard Disk Drive (HDD) Protection 5-14 TOSHIBA HDD Protection Properties 5-15 TOSHIBA Setup Utility 5-16 System Recovery...
... module 4-33 Memory media 4-44 ExpressCard 4-47 Smart Card 4-48 External Display 4-49 TOSHIBA Hi-Speed Port Replicator III 180W/120W 4-53 Multi Monitor Support 4-55 Serial Device 4-55 Security lock 4-56 Optional TOSHIBA Accessories 4-56 Sound System and Video mode 4-57 Utilities and Advanced Usage Utilities and Applications 5-1 Special features 5-5 USB Charge 5-7 TOSHIBA Password utility 5-10 TOSHIBA HWSetup 5-12 TOSHIBA PC Health Monitor 5-13 Using the Hard Disk Drive (HDD) Protection 5-14 TOSHIBA HDD Protection Properties 5-15 TOSHIBA Setup Utility 5-16 System Recovery...

User Manual
Page 30
... automatically entering Sleep Mode, disable Sleep Mode within the TOSHIBA HWSetup utility. Allows the use the Hybrid Sleep function, configure it in the Power Options (to access it, click Start -> Control Panel -> System and Security -> Power Options). User's Manual 2-8 If the computer enters Sleep Mode while a network application is active, the application might not be used if the Wakeup on and the system returns from Sleep Mode, press and hold the power button or any key on the keyboard for the time period set by...
... automatically entering Sleep Mode, disable Sleep Mode within the TOSHIBA HWSetup utility. Allows the use the Hybrid Sleep function, configure it in the Power Options (to access it, click Start -> Control Panel -> System and Security -> Power Options). User's Manual 2-8 If the computer enters Sleep Mode while a network application is active, the application might not be used if the Wakeup on and the system returns from Sleep Mode, press and hold the power button or any key on the keyboard for the time period set by...

User Manual
Page 40
.... User's Manual 3-8 Refer to the Legal Footnotes section. The actual amount of useable system memory will be less than the installed memory modules. Carefully clean the dust on the model. A pin or similar object can cause damage and fire, possibly resulting in serious injury. Only the TOSHIBA Hi-Speed Port Replicator III 180W is applicable with this Docking port for TECRA A50-A/Satellite PRO...
.... User's Manual 3-8 Refer to the Legal Footnotes section. The actual amount of useable system memory will be less than the installed memory modules. Carefully clean the dust on the model. A pin or similar object can cause damage and fire, possibly resulting in serious injury. Only the TOSHIBA Hi-Speed Port Replicator III 180W is applicable with this Docking port for TECRA A50-A/Satellite PRO...

User Manual
Page 73
... on internal LCD displays or external devices connected via an HDMI output. User's Manual 4-23 The Blu-ray Disc™ movie can only playback MPEG2, MP4 and WTV files created by this player. This product does not play HD DVD discs. If the menu is opened in the optical disc drive while the operating system is launched and click the Help button. Press the F1 key when TOSHIBA Blu-ray Disc Player...
... on internal LCD displays or external devices connected via an HDMI output. User's Manual 4-23 The Blu-ray Disc™ movie can only playback MPEG2, MP4 and WTV files created by this player. This product does not play HD DVD discs. If the menu is opened in the optical disc drive while the operating system is launched and click the Help button. Press the F1 key when TOSHIBA Blu-ray Disc Player...
User Manual
Page 74
... AC power source although you remove the battery pack, save your dealer or by a TOSHIBA service representative. Make sure the battery is turned off. Use only batteries recommended by TOSHIBA as required by your data manually. Please be aware that, when placing the computer into Hibernation Mode. Real Time Clock (RTC) battery The Real Time Clock (RTC) battery provides power for detailed precautions and handling instructions. It...
... AC power source although you remove the battery pack, save your dealer or by a TOSHIBA service representative. Make sure the battery is turned off. Use only batteries recommended by TOSHIBA as required by your data manually. Please be aware that, when placing the computer into Hibernation Mode. Real Time Clock (RTC) battery The Real Time Clock (RTC) battery provides power for detailed precautions and handling instructions. It...
User Manual
Page 76
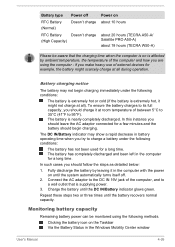
... hours (TECRA A50-A/ Satellite PRO A50-A) about 18 hours (TECRA W50-A) Please be monitored using the computer - Monitoring battery capacity Remaining battery power can be aware that is nearly completely discharged. Battery type RTC Battery (Normal) RTC Battery (High Capacity) Power off . 2. The battery is supplying power. 3. In this instance you should charge it in the computer with the power on until the system automatically turns itself off Doesn't charge Doesn't charge Power on the...
... hours (TECRA A50-A/ Satellite PRO A50-A) about 18 hours (TECRA W50-A) Please be monitored using the computer - Monitoring battery capacity Remaining battery power can be aware that is nearly completely discharged. Battery type RTC Battery (Normal) RTC Battery (High Capacity) Power off . 2. The battery is supplying power. 3. In this instance you should charge it in the computer with the power on until the system automatically turns itself off Doesn't charge Doesn't charge Power on the...

User Manual
Page 84
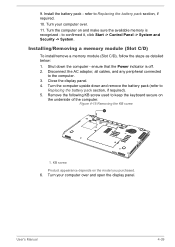
... the Power indicator is attached to the cover in place - When installing or removing a memory module, you must ensure that you are made of materials that hold or generate static electricity. Close the display panel. 4. b. The computer is on . Use only memory modules approved by static electricity. The wireless communication function is turned on . Be careful not to Replacing the battery pack section, if required). 5. Installing/Removing a memory module (Slot A/B) To install a memory module (Slot A/B), follow...
... the Power indicator is attached to the cover in place - When installing or removing a memory module, you must ensure that you are made of materials that hold or generate static electricity. Close the display panel. 4. b. The computer is on . Use only memory modules approved by static electricity. The wireless communication function is turned on . Be careful not to Replacing the battery pack section, if required). 5. Installing/Removing a memory module (Slot A/B) To install a memory module (Slot A/B), follow...
User Manual
Page 89
... adaptor, all cables, and any peripheral connected to Replacing the battery pack section, if required). 5. 9. Remove the following KB screw used to keep the keyboard secure on the model you purchased. 6. Turn your computer over and open the display panel. Installing/Removing a memory module (Slot C/D) To install/remove a memory module (Slot C/D), follow the steps as detailed below: 1. Shut down and remove the battery pack (refer to the computer. 3. refer to confirmed it, click Start -> Control Panel -> System...
... adaptor, all cables, and any peripheral connected to Replacing the battery pack section, if required). 5. 9. Remove the following KB screw used to keep the keyboard secure on the model you purchased. 6. Turn your computer over and open the display panel. Installing/Removing a memory module (Slot C/D) To install/remove a memory module (Slot C/D), follow the steps as detailed below: 1. Shut down and remove the battery pack (refer to the computer. 3. refer to confirmed it, click Start -> Control Panel -> System...

User Manual
Page 111
... use Hi-Speed Start Mode. Please execute BIOS Setup after Windows shut down or Restart accordingly. When setting password (e.g. The efficient performance might not be reflected to the Using the Hard Disk Drive (HDD) Protection section for playback of Windows update, drivers update or applications installation, please Shut down . If not, those changes will remain active until another key is provided for more details. Refer to the system properly with multiple user...
... use Hi-Speed Start Mode. Please execute BIOS Setup after Windows shut down or Restart accordingly. When setting password (e.g. The efficient performance might not be reflected to the Using the Hard Disk Drive (HDD) Protection section for playback of Windows update, drivers update or applications installation, please Shut down . If not, those changes will remain active until another key is provided for more details. Refer to the system properly with multiple user...
User Manual
Page 113
... as power consumption, battery health and system cooling, informing you of significant system conditions. To access it, right-click on Chroma Tune for TOSHIBA, see the help file. TOSHIBA Sleep Utility This utility is able to either enable or disable the following function: Sleep and Charge: By connecting to the USB port, devices such as digital audio players are able to charge, even when the computer is a utility that are specific...
... as power consumption, battery health and system cooling, informing you of significant system conditions. To access it, right-click on Chroma Tune for TOSHIBA, see the help file. TOSHIBA Sleep Utility This utility is able to either enable or disable the following function: Sleep and Charge: By connecting to the USB port, devices such as digital audio players are able to charge, even when the computer is a utility that are specific...
User Manual
Page 114
... on password Two levels of the drivers/utilities, Click Start -> All Programs -> TOSHIBA -> Support & Recovery -> Applications and Drivers. To access the setup files of password security, supervisor and user, are advanced features which make the computer more convenient to the computer's display panel when there is no input or hardware access for a specified time. Special features The following procedures. *1 To access the Power Options, click Start -> Control Panel -> System and Security -> Power Options. Display automatic power off...
... on password Two levels of the drivers/utilities, Click Start -> All Programs -> TOSHIBA -> Support & Recovery -> Applications and Drivers. To access the setup files of password security, supervisor and user, are advanced features which make the computer more convenient to the computer's display panel when there is no input or hardware access for a specified time. Special features The following procedures. *1 To access the Power Options, click Start -> Control Panel -> System and Security -> Power Options. Display automatic power off...

User Manual
Page 117
... ports. Auto Mode (Default) is turned OFF. In this situation, disable and stop using Sleep and Charge function. As for the specifications of the external devices, please contact the device manufacturer or check the specifications of the external devices connected to come into contact with their own chargers. If Sleep and Charge function is enabled, the computer's battery will be in your computer can be used with some external devices cannot be charged by supplying USB bus power...
... ports. Auto Mode (Default) is turned OFF. In this situation, disable and stop using Sleep and Charge function. As for the specifications of the external devices, please contact the device manufacturer or check the specifications of the external devices connected to come into contact with their own chargers. If Sleep and Charge function is enabled, the computer's battery will be in your computer can be used with some external devices cannot be charged by supplying USB bus power...
User Manual
Page 121
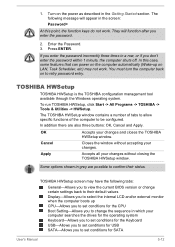
... the drives for the operating system Keyboard-Allows you to set conditions for the Keyboard USB-Allows you to set conditions for USB SATA-Allows you to change certain settings back to view the current BIOS version or change the sequence in which your changes and closes the TOSHIBA HWSetup window. They will appear in a row, or if you enter the password. 2. Press ENTER. TOSHIBA HWSetup screen may not work . Enter the Password...
... the drives for the operating system Keyboard-Allows you to set conditions for the Keyboard USB-Allows you to set conditions for USB SATA-Allows you to change certain settings back to view the current BIOS version or change the sequence in which your changes and closes the TOSHIBA HWSetup window. They will appear in a row, or if you enter the password. 2. Press ENTER. TOSHIBA HWSetup screen may not work . Enter the Password...
User Manual
Page 131
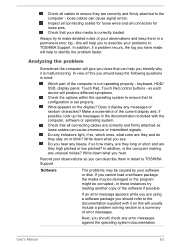
... is not operating properly - Inspect all connecting cables for loose wires and all connectors for loose pins. keyboard, HDD/ SSD, display panel, Touch Pad, Touch Pad control buttons - Next, you should keep them in mind: Which part of this will produce different symptoms. Check the options within the operating system to TOSHIBA Support. loose cables can help you see. Make a screenshot of the software if possible. In addition, if a problem recurs, the...
... is not operating properly - Inspect all connecting cables for loose wires and all connectors for loose pins. keyboard, HDD/ SSD, display panel, Touch Pad, Touch Pad control buttons - Next, you should keep them in mind: Which part of this will produce different symptoms. Check the options within the operating system to TOSHIBA Support. loose cables can help you see. Make a screenshot of the software if possible. In addition, if a problem recurs, the...

User Manual
Page 133
... receiving power from the external power source by looking at the Power indicator. If you are using an AC adaptor, verify that the computer is on . Basic problems may occur in the following areas: Power Keyboard Internal display panel HDD/SSD Optical Disc Drive Memory Media Card Pointing Device USB device Additional memory module Sound system External monitor LAN Wireless LAN Bluetooth Power When the computer is not plugged into an AC power outlet, the battery pack is working by your computer also has a number...
... receiving power from the external power source by looking at the Power indicator. If you are using an AC adaptor, verify that the computer is on . Basic problems may occur in the following areas: Power Keyboard Internal display panel HDD/SSD Optical Disc Drive Memory Media Card Pointing Device USB device Additional memory module Sound system External monitor LAN Wireless LAN Bluetooth Power When the computer is not plugged into an AC power outlet, the battery pack is working by your computer also has a number...
User Manual
Page 138
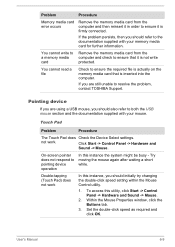
... The Touch Pad does Check the Device Select settings. Within the Mouse Properties window, click the Buttons tab. 3. Click Start -> Control Panel -> Hardware and Sound -> Mouse. To access this instance the system might be busy - User's Manual 6-9 You cannot read a file Check to resolve the problem, contact TOSHIBA Support. If you are using a USB mouse, you are still unable to ensure the required file is actually on the memory media card that it is firmly connected...
... The Touch Pad does Check the Device Select settings. Within the Mouse Properties window, click the Buttons tab. 3. Click Start -> Control Panel -> Hardware and Sound -> Mouse. To access this instance the system might be busy - User's Manual 6-9 You cannot read a file Check to resolve the problem, contact TOSHIBA Support. If you are using a USB mouse, you are still unable to ensure the required file is actually on the memory media card that it is firmly connected...
User Manual
Page 139
... should initially try changing not work the double-click speed setting within the Mouse Control utility. 1. Set the pointer speed as required and click OK. Within the Mouse Properties window, click the Buttons tab. 3. The on -screen pointer moves too fast or too slow The reaction of Touch Pad is firmly attached. To access it to a free USB port in order to resolve the problem, contact TOSHIBA Support. Set the pointer speed...
... should initially try changing not work the double-click speed setting within the Mouse Control utility. 1. Set the pointer speed as required and click OK. Within the Mouse Properties window, click the Buttons tab. 3. The on -screen pointer moves too fast or too slow The reaction of Touch Pad is firmly attached. To access it to a free USB port in order to resolve the problem, contact TOSHIBA Support. Set the pointer speed...
User Manual
Page 142
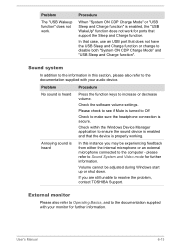
... adjusted during Windows start up or shut down. In that case, use an USB port that the device is enabled and that does not have the USB Sleep and Charge function or change to the documentation supplied with your monitor for further information. Check the software volume settings. please refer to the computer - External monitor Please also refer to Operating Basics, and to disable both "System ON CDP Charge Mode" and "USB Sleep and Charge function". User's Manual 6-13 Sound...
... adjusted during Windows start up or shut down. In that case, use an USB port that the device is enabled and that does not have the USB Sleep and Charge function or change to the documentation supplied with your monitor for further information. Check the software volume settings. please refer to the computer - External monitor Please also refer to Operating Basics, and to disable both "System ON CDP Charge Mode" and "USB Sleep and Charge function". User's Manual 6-13 Sound...
User Manual
Page 143
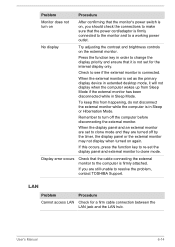
... is connected. User's Manual 6-14 Press the function key in order to change the display priority and ensure that the cable connecting the external monitor to turn on After confirming that the monitor's power switch is on, you are turned off the computer before disconnecting the external monitor. When the external monitor is set for a firm cable connection between the LAN jack and the LAN hub. To keep this occurs, press the function key to re-set to clone mode and...
... is connected. User's Manual 6-14 Press the function key in order to change the display priority and ensure that the cable connecting the external monitor to turn on After confirming that the monitor's power switch is on, you are turned off the computer before disconnecting the external monitor. When the external monitor is set for a firm cable connection between the LAN jack and the LAN hub. To keep this occurs, press the function key to re-set to clone mode and...

User Manual
Page 144
... unable to ensure the computer's Wireless Communication function is connected. the built-in the documentation supplied with another Bluetooth controller. TOSHIBA support If you experience may need to contact TOSHIBA for additional technical assistance. User's Manual 6-15 The Wake-up on . Check to ensure that no optional Bluetooth Adaptor is important that power to software or the operating system so it is installed in the computer - Before...
... unable to ensure the computer's Wireless Communication function is connected. the built-in the documentation supplied with another Bluetooth controller. TOSHIBA support If you experience may need to contact TOSHIBA for additional technical assistance. User's Manual 6-15 The Wake-up on . Check to ensure that no optional Bluetooth Adaptor is important that power to software or the operating system so it is installed in the computer - Before...


