
Tecra A10 User Guide
Page 5
... fax software instructions installed on the first page of each transmitted page or on this change. Also, you to make changes in advance that you should ever decide to permanently disconnect your equipment, the telephone company will give you in their equipment, operations or procedures. Contact the state public utility commission, public service commission or corporation commission for repair or...
... fax software instructions installed on the first page of each transmitted page or on this change. Also, you to make changes in advance that you should ever decide to permanently disconnect your equipment, the telephone company will give you in their equipment, operations or procedures. Contact the state public utility commission, public service commission or corporation commission for repair or...
Tecra A10 User Guide
Page 29
...Utilities 61 Creating Recovery DVDs 62 Hard Disk Drive Recovery options 63 Hard Disk Drive Recovery using the Recovery media 68 Checking the HDD operating status 71 Installing drivers and applications 71 Using the Toshiba Dual Pointing Device 71 Using the TouchPad 72 Scrolling with the TouchPad 73 Control buttons 73 Disabling or enabling the TouchPad 73 Using external display devices 73 Directing the display output when you turn on the computer 74 Adjusting the quality of the external display......75 Using an external keyboard 75 Using a mouse 75 Connecting a printer 76 Setting...
...Utilities 61 Creating Recovery DVDs 62 Hard Disk Drive Recovery options 63 Hard Disk Drive Recovery using the Recovery media 68 Checking the HDD operating status 71 Installing drivers and applications 71 Using the Toshiba Dual Pointing Device 71 Using the TouchPad 72 Scrolling with the TouchPad 73 Control buttons 73 Disabling or enabling the TouchPad 73 Using external display devices 73 Directing the display output when you turn on the computer 74 Adjusting the quality of the external display......75 Using an external keyboard 75 Using a mouse 75 Connecting a printer 76 Setting...
Tecra A10 User Guide
Page 33
... Card Format Utility...........157 TOSHIBA SD™ Memory Boot Utility 158 Booting from a bootable SD card 159 Mouse Utility 160 TOSHIBA Hardware Setup 161 USB Sleep and Charge Utility 163 Starting the USB Sleep and Charge Utility.......163 USB Sleep and Charge 163 Enabling USB Sleep and Charge 165 Power supply mode settings 165 Battery settings 165 TOSHIBA Zooming Utility 166 TOSHIBA Button Support 167 CD/DVD Drive Acoustic Silencer 168 TOSHIBA Accessibility 169 Trusted Platform Module (TPM 170 Fingerprint Authentication Utility 171 Fingerprint utility limitations 171 Using...
... Card Format Utility...........157 TOSHIBA SD™ Memory Boot Utility 158 Booting from a bootable SD card 159 Mouse Utility 160 TOSHIBA Hardware Setup 161 USB Sleep and Charge Utility 163 Starting the USB Sleep and Charge Utility.......163 USB Sleep and Charge 163 Enabling USB Sleep and Charge 165 Power supply mode settings 165 Battery settings 165 TOSHIBA Zooming Utility 166 TOSHIBA Button Support 167 CD/DVD Drive Acoustic Silencer 168 TOSHIBA Accessibility 169 Trusted Platform Module (TPM 170 Fingerprint Authentication Utility 171 Fingerprint utility limitations 171 Using...
Tecra A10 User Guide
Page 53
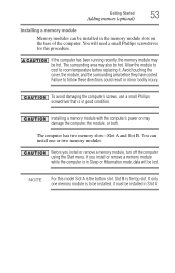
Avoid touching the cover, the module, and the surrounding area before replacing it must be installed in Slot A. If you install or remove a memory module, turn off the computer using the Start menu. You will be hot. The computer has two memory slots-Slot A and Slot B. Before you install or remove a memory module while the computer is in Sleep or Hibernation mode, data will need a small Phillips screwdriver for this model Slot A is to follow these directions could result...
Avoid touching the cover, the module, and the surrounding area before replacing it must be installed in Slot A. If you install or remove a memory module, turn off the computer using the Start menu. You will be hot. The computer has two memory slots-Slot A and Slot B. Before you install or remove a memory module while the computer is in Sleep or Hibernation mode, data will need a small Phillips screwdriver for this model Slot A is to follow these directions could result...
Tecra A10 User Guide
Page 55
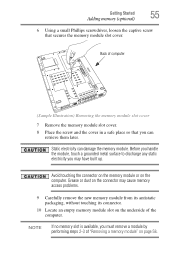
... cause memory access problems. 9 Carefully remove the new memory module from its antistatic packaging, without touching its connector. 10 Locate an empty memory module slot on page 58. Before you handle the module, touch a grounded metal surface to discharge any static electricity you must remove a module by performing steps 2-3 of "Removing a memory module" on the underside of computer (Sample Illustration) Removing the memory module slot cover 7 Remove the memory module slot cover. 8 Place the screw and the cover in a safe place...
... cause memory access problems. 9 Carefully remove the new memory module from its antistatic packaging, without touching its connector. 10 Locate an empty memory module slot on page 58. Before you handle the module, touch a grounded metal surface to discharge any static electricity you must remove a module by performing steps 2-3 of "Removing a memory module" on the underside of computer (Sample Illustration) Removing the memory module slot cover 7 Remove the memory module slot cover. 8 Place the screw and the cover in a safe place...
Tecra A10 User Guide
Page 58
... continue setting up the computer. When the operating system has loaded, you turn it using the screw. 15 Re-insert the main battery. For more information on inserting the main battery, see "Inserting a charged battery" on and data in Sleep or Hibernation mode. Do not remove the memory module while the computer is in memory will not be lost. 58 Getting Started Adding memory (optional) 14 Replace the memory module slot cover...
... continue setting up the computer. When the operating system has loaded, you turn it using the screw. 15 Re-insert the main battery. For more information on inserting the main battery, see "Inserting a charged battery" on and data in Sleep or Hibernation mode. Do not remove the memory module while the computer is in memory will not be lost. 58 Getting Started Adding memory (optional) 14 Replace the memory module slot cover...
Tecra A10 User Guide
Page 60
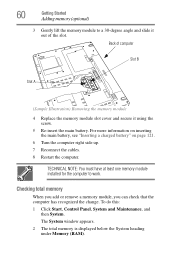
... computer Slot B Slot A (Sample Illustration) Removing the memory module 4 Replace the memory module slot cover and secure it using the screw. 5 Re-insert the main battery. 60 Getting Started Adding memory (optional) 3 Gently lift the memory module to work. For more information on inserting the main battery, see "Inserting a charged battery" on page 121. 6 Turn the computer right side up. 7 Reconnect the cables. 8 Restart the computer. Checking total memory When you add or remove a memory module, you...
... computer Slot B Slot A (Sample Illustration) Removing the memory module 4 Replace the memory module slot cover and secure it using the screw. 5 Re-insert the main battery. 60 Getting Started Adding memory (optional) 3 Gently lift the memory module to work. For more information on inserting the main battery, see "Inserting a charged battery" on page 121. 6 Turn the computer right side up. 7 Reconnect the cables. 8 Restart the computer. Checking total memory When you add or remove a memory module, you...
Tecra A10 User Guide
Page 61
... software features or utilities. otherwise, click Cancel. Getting Started Hard Drive Recovery Utilities 61 If the computer does not recognize the memory configuration, turn off the computer and remove the memory module slot cover (complete steps 1-8 in "Installing a memory module" on page 53), and then check that you create recovery DVDs before using a writable drive. ❖ Recover your hard disk drive to the factory-set default. ❖ Recover just your C: drive, leaving any other partitions you may have created intact, for example, a D: drive. ❖ Recover your hard...
... software features or utilities. otherwise, click Cancel. Getting Started Hard Drive Recovery Utilities 61 If the computer does not recognize the memory configuration, turn off the computer and remove the memory module slot cover (complete steps 1-8 in "Installing a memory module" on page 53), and then check that you create recovery DVDs before using a writable drive. ❖ Recover your hard disk drive to the factory-set default. ❖ Recover just your C: drive, leaving any other partitions you may have created intact, for example, a D: drive. ❖ Recover your hard...

Tecra A10 User Guide
Page 73
...-click, press the primary button twice in the Mouse Properties dialog box. To change the enable/disable TouchPad setting, press Fn + F9. For more information, see if you first need to install new software. 2 Connect the monitor's video cable to the RGB (monitor) port on the TouchPad™ that came with the monitor to the right mouse button ("right-clicking"). Getting Started Using external display devices 73 Scrolling with the TouchPad™ There are using. To scroll horizontally, run your...
...-click, press the primary button twice in the Mouse Properties dialog box. To change the enable/disable TouchPad setting, press Fn + F9. For more information, see if you first need to install new software. 2 Connect the monitor's video cable to the RGB (monitor) port on the TouchPad™ that came with the monitor to the right mouse button ("right-clicking"). Getting Started Using external display devices 73 Scrolling with the TouchPad™ There are using. To scroll horizontally, run your...

Tecra A10 User Guide
Page 132
... Lines (DSL), cable, and satellite links. You can connect to the Internet by communications lines. Special programs called Hypertext Transfer Protocol (HTTP). They make it easier to connect to maintain an Internet connection. An ISP is an association of thousands of networks and millions of interlinked documents (located on computers connected to share information. They all work together to the Internet) that has...
... Lines (DSL), cable, and satellite links. You can connect to the Internet by communications lines. Special programs called Hypertext Transfer Protocol (HTTP). They make it easier to connect to maintain an Internet connection. An ISP is an association of thousands of networks and millions of interlinked documents (located on computers connected to share information. They all work together to the Internet) that has...
Tecra A10 User Guide
Page 152
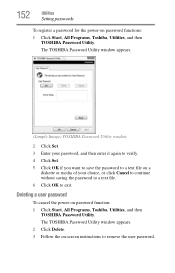
... remove the user password. The TOSHIBA Password Utility window appears. (Sample Image) TOSHIBA Password Utility window 2 Click Set. 3 Enter your password, and then enter it again to verify. 4 Click Set. 5 Click OK if you want to save the password to a text file on -screen instructions to exit. Deleting a user password To cancel the power-on password functions: 1 Click Start, All Programs, Toshiba, Utilities, and then TOSHIBA Password Utility. 152 Utilities Setting passwords To register a password for the power-on password function: 1 Click Start, All Programs, Toshiba, Utilities, and...
... remove the user password. The TOSHIBA Password Utility window appears. (Sample Image) TOSHIBA Password Utility window 2 Click Set. 3 Enter your password, and then enter it again to verify. 4 Click Set. 5 Click OK if you want to save the password to a text file on -screen instructions to exit. Deleting a user password To cancel the power-on password functions: 1 Click Start, All Programs, Toshiba, Utilities, and then TOSHIBA Password Utility. 152 Utilities Setting passwords To register a password for the power-on password function: 1 Click Start, All Programs, Toshiba, Utilities, and...

Tecra A10 User Guide
Page 176
... (User Account Control) setting A profile contains the currently configured network settings on the computer, as well as information about any network devices. The following settings can be saved (or "captured") in a profile: ❖ Internet settings-includes LAN settings (proxy server settings) and the address of a home page that opens automatically when Internet Explorer® starts ❖ Devices-lets you enable or disable settings of wired and wireless network devices, infrared devices, and set the power status of Wireless Connection switch...
... (User Account Control) setting A profile contains the currently configured network settings on the computer, as well as information about any network devices. The following settings can be saved (or "captured") in a profile: ❖ Internet settings-includes LAN settings (proxy server settings) and the address of a home page that opens automatically when Internet Explorer® starts ❖ Devices-lets you enable or disable settings of wired and wireless network devices, infrared devices, and set the power status of Wireless Connection switch...
Tecra A10 User Guide
Page 182
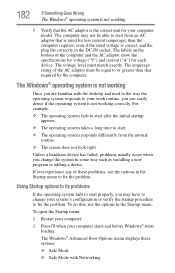
... computer. To do this, use the options in some way such as installing a new program or adding a device. If you change your work routine, you may not be equal to start from the normal routine. ❖ The screen does not look right. The Windows® operating system is not working Once you are familiar with Networking Using Startup options to fix problems If the operating system fails to or...
... computer. To do this, use the options in some way such as installing a new program or adding a device. If you change your work routine, you may not be equal to start from the normal routine. ❖ The screen does not look right. The Windows® operating system is not working Once you are familiar with Networking Using Startup options to fix problems If the operating system fails to or...

Tecra A10 User Guide
Page 186
..., which lists resources assigned to the monitor, optional external optical drive, optional external diskette drive, and other power-using resources. ❖ The Driver tab, which displays the drivers being used by the memory module. For more information about Device Manager, refer to the Lock button in the dialog box vary from one memory module installed for these first: 1 Click Start, and then click the arrow next to Windows® online Help. It is not using functions. This...
..., which lists resources assigned to the monitor, optional external optical drive, optional external diskette drive, and other power-using resources. ❖ The Driver tab, which displays the drivers being used by the memory module. For more information about Device Manager, refer to the Lock button in the dialog box vary from one memory module installed for these first: 1 Click Start, and then click the arrow next to Windows® online Help. It is not using functions. This...

Tecra A10 User Guide
Page 189
... the display options. If Something Goes Wrong Resolving a hardware conflict 189 Nothing happens when you to continue working power outlet. ❖ Check that the cable connecting the external monitor to the computer is firmly attached. Using the computer's TouchPad: 1 Click Start, and then click the arrow next to the Lock button in screen, make sure the display priority is not set for an external monitor. You may have plugged the external keyboard...
... the display options. If Something Goes Wrong Resolving a hardware conflict 189 Nothing happens when you to continue working power outlet. ❖ Check that the cable connecting the external monitor to the computer is firmly attached. Using the computer's TouchPad: 1 Click Start, and then click the arrow next to the Lock button in screen, make sure the display priority is not set for an external monitor. You may have plugged the external keyboard...
Tecra A10 User Guide
Page 240
... of your work , including all open files and programs, when you use to help improve processing speed. The decentralized, world-wide network of computers that you turn on the screen that activates a memory resident program. K keyboard shortcut - A feature of many Toshiba computers that enables any device to interact with the Fn key can set system options or control system parameters, such as a mouse. See also Sleep, Suspend. A 3.5-inch...
... of your work , including all open files and programs, when you use to help improve processing speed. The decentralized, world-wide network of computers that you turn on the screen that activates a memory resident program. K keyboard shortcut - A feature of many Toshiba computers that enables any device to interact with the Fn key can set system options or control system parameters, such as a mouse. See also Sleep, Suspend. A 3.5-inch...
Tecra A10 User Guide
Page 246
... Application Cards 212 audio files 134 audio features 134 B backing up files 92 battery changing 119 charge indicator light 49, 113 charge not lasting 188 charging 47, 49 conserving power 116 disposal 124 246 low charge 115 monitoring power 49, 113 not charging 187 notifications 115 power plan 217 power plan hot key 118 real-time clock (RTC) 110 removing 119 BIOS Setup see TOSHIBA Hardware Setup Bridge Media Adapter inserting memory media 139 removing memory media 140 button power 52, 62 start 128 C CD, using...
... Application Cards 212 audio files 134 audio features 134 B backing up files 92 battery changing 119 charge indicator light 49, 113 charge not lasting 188 charging 47, 49 conserving power 116 disposal 124 246 low charge 115 monitoring power 49, 113 not charging 187 notifications 115 power plan 217 power plan hot key 118 real-time clock (RTC) 110 removing 119 BIOS Setup see TOSHIBA Hardware Setup Bridge Media Adapter inserting memory media 139 removing memory media 140 button power 52, 62 start 128 C CD, using...

Tecra A10 User Guide
Page 247
... connecting to a power source 47 connection set up 130 control buttons 73 Ctrl keys 94 D desktop creating new icon 127 major features 127 desktop exploration 126 desktop icons 127 Device Manager 185 checking properties 185 devices keyboard 75 mouse 75 Disk Defragmenter 192 disk drive corrupted/damaged data files 192 missing files/trouble accessing a disk 191 running slow 192 diskette drive cannot insert a diskette 192 cannot read a diskette 192 connecting 77 external, connecting 77 display...
... connecting to a power source 47 connection set up 130 control buttons 73 Ctrl keys 94 D desktop creating new icon 127 major features 127 desktop exploration 126 desktop icons 127 Device Manager 185 checking properties 185 devices keyboard 75 mouse 75 Disk Defragmenter 192 disk drive corrupted/damaged data files 192 missing files/trouble accessing a disk 191 running slow 192 diskette drive cannot insert a diskette 192 cannot read a diskette 192 connecting 77 external, connecting 77 display...
Tecra A10 User Guide
Page 249
... monitor 73 connecting 73 not working 189 mouse installing 75 mouse utility 160 N network accessing 130 Connect to the Internet 130 networking wireless 129 Notification Area 128 O Opening the display panel 50 optical disc positioning 104 optical discs handling 104 inserting 103 removing 106 optical drive problems 193 troubleshooting 193 using 101 optical media recording 105 other documentation 40 overlay keys 95 P password deleting a supervisor 151 disabling a user 152 setting a user 151 supervisor set up 150 types 149 passwords instant, using 149 setting 149 PC Card...
... monitor 73 connecting 73 not working 189 mouse installing 75 mouse utility 160 N network accessing 130 Connect to the Internet 130 networking wireless 129 Notification Area 128 O Opening the display panel 50 optical disc positioning 104 optical discs handling 104 inserting 103 removing 106 optical drive problems 193 troubleshooting 193 using 101 optical media recording 105 other documentation 40 overlay keys 95 P password deleting a supervisor 151 disabling a user 152 setting a user 151 supervisor set up 150 types 149 passwords instant, using 149 setting 149 PC Card...
Tecra A10 User Guide
Page 251
... problems 200 external keyboard 188 keyboard 188 keypad overlay 188 optical drive 193 turning on the computer 51 turning on the power 51 U USB Sleep and Charge Utility 163 user password, disabling 152 user password, setting 151 using 134 using a file extension 100 using the Toshiba Dual Pointing Device 71 Utilities 142 V video projector adjusting display 75 W warranty standard limited warranty 40 Web 132 Web Camera 136 Web sites 207 Wi-Fi® wireless networking 129 Windows® Explorer 97 Windows® operating...
... problems 200 external keyboard 188 keyboard 188 keypad overlay 188 optical drive 193 turning on the computer 51 turning on the power 51 U USB Sleep and Charge Utility 163 user password, disabling 152 user password, setting 151 using 134 using a file extension 100 using the Toshiba Dual Pointing Device 71 Utilities 142 V video projector adjusting display 75 W warranty standard limited warranty 40 Web 132 Web Camera 136 Web sites 207 Wi-Fi® wireless networking 129 Windows® Explorer 97 Windows® operating...


