

Users Manual Canada; English
Page 3
... LAN Card Specifications C-1 Radio Characteristics C-2 Supported Frequency Sub-bands C-2 User's Manual iii F12 5-2 Soft keys: FN key combinations 5-2 Hot keys 5-3 Windows special keys 5-5 Keypad overlay 5-6 Generating ASCII characters 5-7 Chapter 6 Power and Power-Up Modes Power conditions 6-1 Monitoring of power condition 6-2 Battery 6-3 TOSHIBA Password Utility 6-10 Power-up modes 6-13 Panel power on DVD Super Multi drives 4-22 Media care 4-28 Sound System 4-29 Modem 4-31 Wireless communications 4-34 LAN 4-37 Computer Handling 4-39 Using the Hard Disk Drive (HDD...
... LAN Card Specifications C-1 Radio Characteristics C-2 Supported Frequency Sub-bands C-2 User's Manual iii F12 5-2 Soft keys: FN key combinations 5-2 Hot keys 5-3 Windows special keys 5-5 Keypad overlay 5-6 Generating ASCII characters 5-7 Chapter 6 Power and Power-Up Modes Power conditions 6-1 Monitoring of power condition 6-2 Battery 6-3 TOSHIBA Password Utility 6-10 Power-up modes 6-13 Panel power on DVD Super Multi drives 4-22 Media care 4-28 Sound System 4-29 Modem 4-31 Wireless communications 4-34 LAN 4-37 Computer Handling 4-39 Using the Hard Disk Drive (HDD...

Users Manual Canada; English
Page 5
... User's Manual First edition June 2008 Copyright authority for music, movies, computer programs, databases and other use within the home. The instructions and descriptions it contains are trademarks or registered trademarks of this manual cannot be reproduced only for the TOSHIBA TECRA A10/S10/M10/Satellite Pro S300 Portable Personal Computer at the time of Sony Corporation. Memory Stick, Memory Stick PRO, Memory Stick PRO...
... User's Manual First edition June 2008 Copyright authority for music, movies, computer programs, databases and other use within the home. The instructions and descriptions it contains are trademarks or registered trademarks of this manual cannot be reproduced only for the TOSHIBA TECRA A10/S10/M10/Satellite Pro S300 Portable Personal Computer at the time of Sony Corporation. Memory Stick, Memory Stick PRO, Memory Stick PRO...
Users Manual Canada; English
Page 12
... manual tells how to setup and configure these features. Read Chapter 3, Hardware, Utilities and Options if connecting optional products or external devices. TECRA A10/S10/M10/SatellitePro S300 Preface Congratulations on configuring your computer, basic operations and care, using your TECRA A10/S10/ M10/Satellite Pro S300 series computer. This powerful notebook computer provides excellent expansion capability, includes multimedia functionality, and is organized, then become acquainted with the computer's features, components and accessory devices...
... manual tells how to setup and configure these features. Read Chapter 3, Hardware, Utilities and Options if connecting optional products or external devices. TECRA A10/S10/M10/SatellitePro S300 Preface Congratulations on configuring your computer, basic operations and care, using your TECRA A10/S10/ M10/Satellite Pro S300 series computer. This powerful notebook computer provides excellent expansion capability, includes multimedia functionality, and is organized, then become acquainted with the computer's features, components and accessory devices...

Users Manual Canada; English
Page 20
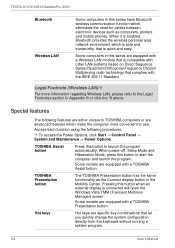
... SD Memory Boot Utility ■ TOSHIBA Assist ■ TOSHIBA ConfigFree™ ■ TOSHIBA HDD Protection ■ TOSHIBA Disc Creator ■ TOSHIBA Face Recognition* ■ TOSHIBA PC Health Monitor* ■ TOSHIBA USB Sleep and Charge Utility ■ Bluetooth Stack for Windows by Toshiba ■ CD/DVD Drive Acoustic Silencer ■ Fingerprint Utility ■ Windows Mobility Center ■ Online Manual * Indicates software that is preinstalled with some models Documentation ■ TECRA A10/S10/M10/Satellite Pro S300 User´s Manual ■ TECRA A10/S10/M10/Satellite Pro...
... SD Memory Boot Utility ■ TOSHIBA Assist ■ TOSHIBA ConfigFree™ ■ TOSHIBA HDD Protection ■ TOSHIBA Disc Creator ■ TOSHIBA Face Recognition* ■ TOSHIBA PC Health Monitor* ■ TOSHIBA USB Sleep and Charge Utility ■ Bluetooth Stack for Windows by Toshiba ■ CD/DVD Drive Acoustic Silencer ■ Fingerprint Utility ■ Windows Mobility Center ■ Online Manual * Indicates software that is preinstalled with some models Documentation ■ TECRA A10/S10/M10/Satellite Pro S300 User´s Manual ■ TECRA A10/S10/M10/Satellite Pro...

Users Manual Canada; English
Page 31
... blank media into your computer. You should therefore verify the optical disc drive supports the blank media you have chosen before proceeding. 3. TECRA A10/S10/M10/SatellitePro S300 Restoring the pre-installed Software Depending on the model you purchased, different ways for it to load the Windows Vista® operating system from the hard disk drive as screen savers which the recovery image can be copied including DVD-R, DVD-RW, DVD+R, DVD+RW...
... blank media into your computer. You should therefore verify the optical disc drive supports the blank media you have chosen before proceeding. 3. TECRA A10/S10/M10/SatellitePro S300 Restoring the pre-installed Software Depending on the model you purchased, different ways for it to load the Windows Vista® operating system from the hard disk drive as screen savers which the recovery image can be copied including DVD-R, DVD-RW, DVD+R, DVD+RW...

Users Manual Canada; English
Page 43
... AccuPoint control buttons Fingerprint Sensor Power button TOSHIBA Assist button TOSHIBA Presentation button Keyboard Bluetooth antenna (Not shown) Touch Pad control buttons Touch Pad Figure 2-6 The front of the computer with the display panel open Display hinges Display screen Web Camera LED The display hinges allow the display panel to be somewhat brighter than when it at a variety of easy-to the Display Controller and Video mode section in brightness levels is intended to open the display, lift the display panel up and position it operates on batteries.
... AccuPoint control buttons Fingerprint Sensor Power button TOSHIBA Assist button TOSHIBA Presentation button Keyboard Bluetooth antenna (Not shown) Touch Pad control buttons Touch Pad Figure 2-6 The front of the computer with the display panel open Display hinges Display screen Web Camera LED The display hinges allow the display panel to be somewhat brighter than when it at a variety of easy-to the Display Controller and Video mode section in brightness levels is intended to open the display, lift the display panel up and position it operates on batteries.
Users Manual Canada; English
Page 58
... quickly change the system configuration directly from the keyboard without running a system program. 3-6 User's Manual TOSHIBA Presentation button The TOSHIBA Presentation button has the same functionality as the Connect display button in this button to launch the program automatically. Hot keys Hot keys are equipped with a TOSHIBA Assist button. Access each function using the following features are either unique to TOSHIBA computers or are equipped with a TOSHIBA Presentation button. When power-off, Sleep Mode and Hibernation Mode, press this series have Bluetooth...
... quickly change the system configuration directly from the keyboard without running a system program. 3-6 User's Manual TOSHIBA Presentation button The TOSHIBA Presentation button has the same functionality as the Connect display button in this button to launch the program automatically. Hot keys Hot keys are equipped with a TOSHIBA Assist button. Access each function using the following features are either unique to TOSHIBA computers or are equipped with a TOSHIBA Presentation button. When power-off, Sleep Mode and Hibernation Mode, press this series have Bluetooth...
Users Manual Canada; English
Page 76
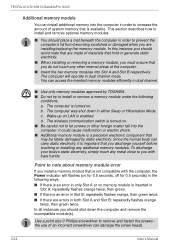
... incorrect screwdriver can damage the screw heads. 3-24 User's Manual In all instances you with the computer, the Power indicator will operate in dual channel mode. Use a point size 0 Phillips screwdriver to install or remove a memory module under the following ways; ■ If there is an error in only Slot A or no memory module is inserted in Slot A: repeatedly flashes orange twice, then green. ■ If there...
... incorrect screwdriver can damage the screw heads. 3-24 User's Manual In all instances you with the computer, the Power indicator will operate in dual channel mode. Use a point size 0 Phillips screwdriver to install or remove a memory module under the following ways; ■ If there is an error in only Slot A or no memory module is inserted in Slot A: repeatedly flashes orange twice, then green. ■ If there...
Users Manual Canada; English
Page 125
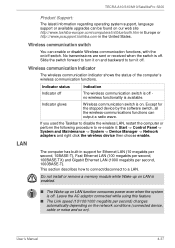
.... Indicator status Indication Indicator off The wireless communication switch is off no wireless functionality is off . If you used the Taskbar to disable the wireless LAN, restart the computer or perform the following procedure to re-enable it off . Do not install or remove a memory module while Wake-up on LAN is enabled. ■ The Wake-up on LAN function consumes power even when the system is available. User's Manual 4-37 Slide the switch...
.... Indicator status Indication Indicator off The wireless communication switch is off no wireless functionality is off . If you used the Taskbar to disable the wireless LAN, restart the computer or perform the following procedure to re-enable it off . Do not install or remove a memory module while Wake-up on LAN is enabled. ■ The Wake-up on LAN function consumes power even when the system is available. User's Manual 4-37 Slide the switch...
Users Manual Canada; English
Page 146
...] key to set Date/Time. Care and use of infants and children. The RTC battery does not charge while the computer is turned off . If the RTC battery becomes completely discharged, the system will lose this instance the following message will stop working - Please refer to Chapter 8, Troubleshooting, for detailed precautions and handling instructions. ■ Make sure the battery is securely installed in order...
...] key to set Date/Time. Care and use of infants and children. The RTC battery does not charge while the computer is turned off . If the RTC battery becomes completely discharged, the system will lose this instance the following message will stop working - Please refer to Chapter 8, Troubleshooting, for detailed precautions and handling instructions. ■ Make sure the battery is securely installed in order...

Users Manual Canada; English
Page 171
... BIOS setup application will end and the computer will load. 2. Keyboard Keyboard problems can be displayed. 5. press the FN + F11 hot key and try typing again. User's Manual 8-7 Press the F1 key - Password Problem Procedure Cannot enter password Please refer to Chapter 5, The Keyboard, for further information. Press [F1] key to set Date/Time. a confirmation message will need to set the date and time in Chapter 6, Power and Power-Up Modes, for further information. TECRA A10...
... BIOS setup application will end and the computer will load. 2. Keyboard Keyboard problems can be displayed. 5. press the FN + F11 hot key and try typing again. User's Manual 8-7 Press the F1 key - Password Problem Procedure Cannot enter password Please refer to Chapter 5, The Keyboard, for further information. Press [F1] key to set Date/Time. a confirmation message will need to set the date and time in Chapter 6, Power and Power-Up Modes, for further information. TECRA A10...

Users Manual Canada; English
Page 188
... firmly connected to the monitor and to a working power outlet. To keep this occurs, press FN + F5 to re-set as the primary display device in order to change the display priority and ensure that the power cord/adaptor is in Sleep Mode. Display error occurs Check that the monitor's power switch is on After confirming that the cable connecting the external monitor to the computer is connected. No display Try adjusting the contrast and brightness controls...
... firmly connected to the monitor and to a working power outlet. To keep this occurs, press FN + F5 to re-set as the primary display device in order to change the display priority and ensure that the power cord/adaptor is in Sleep Mode. Display error occurs Check that the monitor's power switch is on After confirming that the cable connecting the external monitor to the computer is connected. No display Try adjusting the contrast and brightness controls...

Users Manual Canada; English
Page 231
I /O devices: Equipment used to communicate with any other devices dispersed over a relatively limited area and connected by manually pressing marked keys. often used specifically to connect one system or device to another to exchange information. 3) The point of contact between user, the computer, and the program, for example, the keyboard or a menu. keyboard: An input device containing switches that are activated by a communications link that enables any device to interact...
I /O devices: Equipment used to communicate with any other devices dispersed over a relatively limited area and connected by manually pressing marked keys. often used specifically to connect one system or device to another to exchange information. 3) The point of contact between user, the computer, and the program, for example, the keyboard or a menu. keyboard: An input device containing switches that are activated by a communications link that enables any device to interact...
Users Manual Canada; English
Page 234
... provides indicating it is essential instructions the computer reads when you to and from you turn off (also called "warm boot", "soft reset" or "reboot"). A Class A device is ready for office use . Compare RAM. pointing device: Any device, such as the number of the printer or computer to automatically recognize connections of memory is used for home equipment use . See also memory. Random Access Memory (RAM): Volatile memory that enables you start it...
... provides indicating it is essential instructions the computer reads when you to and from you turn off (also called "warm boot", "soft reset" or "reboot"). A Class A device is ready for office use . Compare RAM. pointing device: Any device, such as the number of the printer or computer to automatically recognize connections of memory is used for home equipment use . See also memory. Random Access Memory (RAM): Volatile memory that enables you start it...

Users Manual Canada; English
Page 4
... module G-3 Appendix H Legal Footnotes Non-applicable Icons*1 H-1 CPU*2 H-1 Memory (Main System)*3 H-2 User's Manual iv TECRA A10/S10/P10/M10/Satellite S300L/Satellite Pro S300/S300L Chapter 6 Power and Power-Up Modes Power conditions 6-1 Monitoring of power condition 6-2 Battery 6-3 TOSHIBA Password Utility 6-10 Power-up modes 6-13 Panel power on/off 6-13 System automatic Sleep/Hibernation 6-13 Chapter 7 HW Setup Accessing HW Setup 7-1 HW Setup window 7-1 Chapter 8 Troubleshooting Problem solving process 8-1 Hardware and system checklist 8-3 TOSHIBA support 8-29...
... module G-3 Appendix H Legal Footnotes Non-applicable Icons*1 H-1 CPU*2 H-1 Memory (Main System)*3 H-2 User's Manual iv TECRA A10/S10/P10/M10/Satellite S300L/Satellite Pro S300/S300L Chapter 6 Power and Power-Up Modes Power conditions 6-1 Monitoring of power condition 6-2 Battery 6-3 TOSHIBA Password Utility 6-10 Power-up modes 6-13 Panel power on/off 6-13 System automatic Sleep/Hibernation 6-13 Chapter 7 HW Setup Accessing HW Setup 7-1 HW Setup window 7-1 Chapter 8 Troubleshooting Problem solving process 8-1 Hardware and system checklist 8-3 TOSHIBA support 8-29...

Users Manual Canada; English
Page 6
... of Intel Corporation. Memory Stick, Memory Stick PRO, Memory Stick PRO Duo and i.LINK are trademarks or registered trademarks of this manual. TOSHIBA TECRA A10/S10/P10/M10/Satellite S300L/Satellite Pro S300/S300L Portable Personal Computer User's Manual First edition July 2009 Copyright authority for music, movies, computer programs, databases and other use beyond that stipulated above (including conversion to digital format, alteration, transfer of...
... of Intel Corporation. Memory Stick, Memory Stick PRO, Memory Stick PRO Duo and i.LINK are trademarks or registered trademarks of this manual. TOSHIBA TECRA A10/S10/P10/M10/Satellite S300L/Satellite Pro S300/S300L Portable Personal Computer User's Manual First edition July 2009 Copyright authority for music, movies, computer programs, databases and other use beyond that stipulated above (including conversion to digital format, alteration, transfer of...
Users Manual Canada; English
Page 90
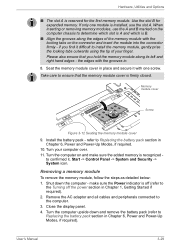
... - Turn the computer upside down the computer - When inserting or removing memory modules, use the A and B marked on and make sure the Power indicator is off (refer to install the memory module, gently prise the locking tabs outwards using the tip of the memory module with one module is installed, use the slot A. Seat the memory module cover in Chapter 6, Power and Power-Up Modes, if required). refer to ensure that you find it , Start -> Control Panel -> System...
... - Turn the computer upside down the computer - When inserting or removing memory modules, use the A and B marked on and make sure the Power indicator is off (refer to install the memory module, gently prise the locking tabs outwards using the tip of the memory module with one module is installed, use the slot A. Seat the memory module cover in Chapter 6, Power and Power-Up Modes, if required). refer to ensure that you find it , Start -> Control Panel -> System...

Users Manual Canada; English
Page 178
... service provider. press the FN + F11 hot key and try typing again. Please refer to Chapter 5, The Keyboard for further information. Press the END key - Problem Some letter keys produce numbers Output to set Date/Time. 2. inconsistent. Set the time in the System Date field. 3. Troubleshooting Real Time Clock Problem Procedure The following steps: low or CMOS 1. User's Manual 8-7 Press the F1 key - the BIOS setup application checksum is Displayed...
... service provider. press the FN + F11 hot key and try typing again. Please refer to Chapter 5, The Keyboard for further information. Press the END key - Problem Some letter keys produce numbers Output to set Date/Time. 2. inconsistent. Set the time in the System Date field. 3. Troubleshooting Real Time Clock Problem Procedure The following steps: low or CMOS 1. User's Manual 8-7 Press the F1 key - the BIOS setup application checksum is Displayed...

Users Manual Canada; English
Page 235
... of glass coated with leads that enables any other devices dispersed over a relatively limited area and connected by manually pressing marked keys. M main board: See motherboard. I /O: Input/output. For each key, the transmitted code is applied. L L1 cache: Level one system or device to another . 2) To physically connect one cache. User's Manual Glossary-9 L2 cache: Memory cache installed on the key. LAN: A group of computers or other...
... of glass coated with leads that enables any other devices dispersed over a relatively limited area and connected by manually pressing marked keys. M main board: See motherboard. I /O: Input/output. For each key, the transmitted code is applied. L L1 cache: Level one system or device to another . 2) To physically connect one cache. User's Manual Glossary-9 L2 cache: Memory cache installed on the key. LAN: A group of computers or other...
Detailed Specs for Tecra A10 PTSB0C-04200S English
Page 1
...) Computrace™ BIOS support Protect & Fix Spill-Resistant Keyboard Shock Absorbing Design LCD Panel Shock Absorber LCD Inverter Shock Absorber Hard Disk Drive Protection HDD Dome Shock Protector HDD Shock Absorber 3D Accelerometer Toshiba Key Component Access Magnesium Alloy Casework Toshiba PC Diagnostic Tool Toshiba PC Health Monitor Connect Diversity Antenna Toshiba ConfigFree® WiFi Easy Locator Optimize Presentation Button Toshiba Zooming Utility One-touch Resolution Change Toshiba Power Saver Utility Toshiba Optical Disc Drive Power On/Off Wireless On/Off Switch Toshiba Fn-esse...
...) Computrace™ BIOS support Protect & Fix Spill-Resistant Keyboard Shock Absorbing Design LCD Panel Shock Absorber LCD Inverter Shock Absorber Hard Disk Drive Protection HDD Dome Shock Protector HDD Shock Absorber 3D Accelerometer Toshiba Key Component Access Magnesium Alloy Casework Toshiba PC Diagnostic Tool Toshiba PC Health Monitor Connect Diversity Antenna Toshiba ConfigFree® WiFi Easy Locator Optimize Presentation Button Toshiba Zooming Utility One-touch Resolution Change Toshiba Power Saver Utility Toshiba Optical Disc Drive Power On/Off Wireless On/Off Switch Toshiba Fn-esse...


