User Manual
Page 2
...'s instructions have been adhered to. 3 Before Using DO NOT OPEN THE CABINET. Do not look into the lens while the lamp is likely to cause harmful interference in which case the user will expose you are provided for a Class USA only A digital device, pursuant to part 15 of the product and to take adequate measures. Read Owner's Manual 3. Source of power supply to...
...'s instructions have been adhered to. 3 Before Using DO NOT OPEN THE CABINET. Do not look into the lens while the lamp is likely to cause harmful interference in which case the user will expose you are provided for a Class USA only A digital device, pursuant to part 15 of the product and to take adequate measures. Read Owner's Manual 3. Source of power supply to...
User Manual
Page 4
... caught when setting the camera arm back in its original position. (Models equipped with document camera) To avoid injury, be sure the service technician has used replacement parts specified by following conditions: a) When the power-supply cord or plug is damaged. Replacement Parts When replacement parts are covered by a qualified technician to restore the product to qualified service personnel under the following the operating instructions. The heat...
... caught when setting the camera arm back in its original position. (Models equipped with document camera) To avoid injury, be sure the service technician has used replacement parts specified by following conditions: a) When the power-supply cord or plug is damaged. Replacement Parts When replacement parts are covered by a qualified technician to restore the product to qualified service personnel under the following the operating instructions. The heat...
User Manual
Page 5
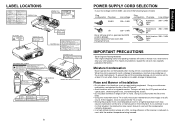
... a TV or radio may condense on the lens or internal parts in temperature. Doing so could shorten the life of the LCD panel. • Avoid locations with Document Camera CAUTION Label (LASER) 8 POWER SUPPLY CORD SELECTION If your LCD projector. Doing so could cause malfunction, and shorten the life of the lamp. • Using this unit immediately after changing the fuse. To prevent the unit from...
... a TV or radio may condense on the lens or internal parts in temperature. Doing so could shorten the life of the LCD panel. • Avoid locations with Document Camera CAUTION Label (LASER) 8 POWER SUPPLY CORD SELECTION If your LCD projector. Doing so could cause malfunction, and shorten the life of the lamp. • Using this unit immediately after changing the fuse. To prevent the unit from...
User Manual
Page 6
... transmitting commercial imaging software or broadcast or cable-broad casting programs with local regulations. Clean the air filter from the use of replacing a lamp. (Ask a dealer where the unit was purchased or your LCD projector. Trademarks • VGA, SVGA, XGA, SXGA, UXGA are annotated as an insect spray, near the unit. Notational Conventions Used in This Manual References to turn the power off when the panel is not...
... transmitting commercial imaging software or broadcast or cable-broad casting programs with local regulations. Clean the air filter from the use of replacing a lamp. (Ask a dealer where the unit was purchased or your LCD projector. Trademarks • VGA, SVGA, XGA, SXGA, UXGA are annotated as an insect spray, near the unit. Notational Conventions Used in This Manual References to turn the power off when the panel is not...
User Manual
Page 7
... remote control 18 Placement ...19 Connection ...21 Operations Turning the power on and off 22 Basic operations 24 Using handy features 26 Using auto setting (Auto setting 26 Correcting the keystone distortion (Keystone 27 Zooming out the images 27 Cutting off the picture and sound temporarily (Mute 28 Freezing the image (Freeze 28 Enlarging the picture size (Resize 29 Displaying Information [Status display 30 Using the menus 31 How to use the menus 31 The image adjustment menu 32 The default setting menu...
... remote control 18 Placement ...19 Connection ...21 Operations Turning the power on and off 22 Basic operations 24 Using handy features 26 Using auto setting (Auto setting 26 Correcting the keystone distortion (Keystone 27 Zooming out the images 27 Cutting off the picture and sound temporarily (Mute 28 Freezing the image (Freeze 28 Enlarging the picture size (Resize 29 Displaying Information [Status display 30 Using the menus 31 How to use the menus 31 The image adjustment menu 32 The default setting menu...
User Manual
Page 8
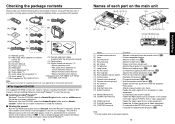
...Remote control s (2) R03 (SIZE AAA) batteries for remote control (2) s (3) CD-ROM s (4) Owner's Manual s (5) Power cord (See note) s (6) RGB cable s (7) Quick Reference(*1) s (8) Video cable(*1) s (9) Audio cable (for computer)(*1) s (10) Audio cable(*1) (*1) Not supplied for operating the projector. p.34 p.35 (13) Camera mounting stays* : Hold the camera control panel. Follow the on Start.pdf. Follow the on-screen instructions to stow the foot adjuster. p.25 (7) Lamp cover : Remove to view that section of each part on a controlling computer for TLP-S70,TLP-S71. p.34 (14) Air...
...Remote control s (2) R03 (SIZE AAA) batteries for remote control (2) s (3) CD-ROM s (4) Owner's Manual s (5) Power cord (See note) s (6) RGB cable s (7) Quick Reference(*1) s (8) Video cable(*1) s (9) Audio cable (for computer)(*1) s (10) Audio cable(*1) (*1) Not supplied for operating the projector. p.34 p.35 (13) Camera mounting stays* : Hold the camera control panel. Follow the on Start.pdf. Follow the on-screen instructions to stow the foot adjuster. p.25 (7) Lamp cover : Remove to view that section of each part on a controlling computer for TLP-S70,TLP-S71. p.34 (14) Air...
User Manual
Page 9
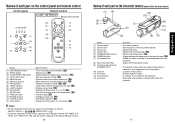
...part on the control panel and remote control Control panel Remote Control CLASS 1 LED PRODUCT Remote control transmitter (7) (8) (9) (10) FAN TEMP LAMP ON (2) INPUT ON / STANDBY ZOOM + (1) VOL. - p.27 : Sets up image and mode. p.22 : Selects input. p.31 : Menu selections and adjustments, etc. p.28 : Enlarges picture size. p.22 : Cuts off . Names of this manual, buttons are referred to as follows: Selection buttons ⇒ ; MENU VOL.+ ZOOM - (1) (4) (12) (2) (5) (6) Name (1) ON/STANDBY button (2) INPUT button (3) AUTO KEYSTONE button (4) AUTO SET button (5) MENU...
...part on the control panel and remote control Control panel Remote Control CLASS 1 LED PRODUCT Remote control transmitter (7) (8) (9) (10) FAN TEMP LAMP ON (2) INPUT ON / STANDBY ZOOM + (1) VOL. - p.27 : Sets up image and mode. p.22 : Selects input. p.31 : Menu selections and adjustments, etc. p.28 : Enlarges picture size. p.22 : Cuts off . Names of this manual, buttons are referred to as follows: Selection buttons ⇒ ; MENU VOL.+ ZOOM - (1) (4) (12) (2) (5) (6) Name (1) ON/STANDBY button (2) INPUT button (3) AUTO KEYSTONE button (4) AUTO SET button (5) MENU...
User Manual
Page 10
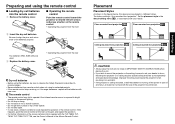
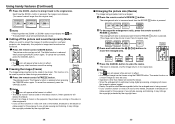
.... e Replace the battery cover. • Operating the projector from the rear Approx. 15° Approx. 5m Dry-cell batteries • Before using the batteries, be sure to fall, resulting in an accident. • If the projector is "floor-mounted front projection." Set the placement style in the default setting menu p.32 , in accordance with the TLP-T60M, TLP- Improper mounting could impede the operation of the remote control...
.... e Replace the battery cover. • Operating the projector from the rear Approx. 15° Approx. 5m Dry-cell batteries • Before using the batteries, be sure to fall, resulting in an accident. • If the projector is "floor-mounted front projection." Set the placement style in the default setting menu p.32 , in accordance with the TLP-T60M, TLP- Improper mounting could impede the operation of the remote control...
User Manual
Page 11
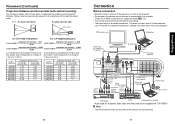
... audio Conversion output adapter White (L) BNC-pin Red (R) (not supplied) S-Video cable (not supplied) Video cable (*supplied) To S-Video output Control cable p48 To RS-232C terminal DVD player VCR Computer (for control) *Audio cable (for computer), Audio cable and Video cable are approximate values for an RGB output terminal, supported signal p.46 , etc. • Turn off the power of both devices before connecting. • The figure below to determine the screen size and projection distance. (Screen sizes are not supplied with no keystone adjustment) Screen...
... audio Conversion output adapter White (L) BNC-pin Red (R) (not supplied) S-Video cable (not supplied) Video cable (*supplied) To S-Video output Control cable p48 To RS-232C terminal DVD player VCR Computer (for control) *Audio cable (for computer), Audio cable and Video cable are approximate values for an RGB output terminal, supported signal p.46 , etc. • Turn off the power of both devices before connecting. • The figure below to determine the screen size and projection distance. (Screen sizes are not supplied with no keystone adjustment) Screen...
User Manual
Page 12
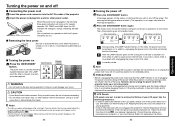
... the air filter becomes dirty and clogged, the projector's internal temperature will shorten the life of the lamp. Keeping the lamp off is off. Clean the air filter from time to appear via the Display setting menu p.33 . • The first time you use the projector after purchase, after the message disappears.) 2 Press the ON/STANDBY button again. MENU VOL. + AUTO KEYSTONE AUTO SET ZOOM - Remote Control CALL ON/ STANDBY KEYSTONE AUTO SET MUTE FREEZE RESIZE RESIZE OFF INPUT WARNING • Do not look into standby mode...
... the air filter becomes dirty and clogged, the projector's internal temperature will shorten the life of the lamp. Keeping the lamp off is off. Clean the air filter from time to appear via the Display setting menu p.33 . • The first time you use the projector after purchase, after the message disappears.) 2 Press the ON/STANDBY button again. MENU VOL. + AUTO KEYSTONE AUTO SET ZOOM - Remote Control CALL ON/ STANDBY KEYSTONE AUTO SET MUTE FREEZE RESIZE RESIZE OFF INPUT WARNING • Do not look into standby mode...

User Manual
Page 13
... camera model: Computer Y/PB/PR Video S-video Camera 24 5 Projector placement angle adjustments The placement angle and the height of the projected image can be displayed the next time when the power is out of RGB signals p.46 , any resolutions not supported by following the instructions in "Turning on the panel. To stow the foot adjuster, hold up the front of use the tilt adjuster. Message for language and lamp power selection...
... camera model: Computer Y/PB/PR Video S-video Camera 24 5 Projector placement angle adjustments The placement angle and the height of the projected image can be displayed the next time when the power is out of RGB signals p.46 , any resolutions not supported by following the instructions in "Turning on the panel. To stow the foot adjuster, hold up the front of use the tilt adjuster. Message for language and lamp power selection...
User Manual
Page 14
...q Manual adjustment and setting The menu items vary depending on the screen. s Zooming out the images This equipment is projected with to eliminate flicker. For computer input, the icon will appear during processing. The icon will undergo keystone (trapezoidal) distortion. button. q Manual adjustment Use the buttons for input signals other than those supported by using simple operations. You can use the digital zoom in applications where the optical zoom is automatically corrected. VOL. - Control panel FAN TEMP LAMP ON INPUT ON / STANDBY ZOOM...
...q Manual adjustment and setting The menu items vary depending on the screen. s Zooming out the images This equipment is projected with to eliminate flicker. For computer input, the icon will appear during processing. The icon will undergo keystone (trapezoidal) distortion. button. q Manual adjustment Use the buttons for input signals other than those supported by using simple operations. You can use the digital zoom in applications where the optical zoom is automatically corrected. VOL. - Control panel FAN TEMP LAMP ON INPUT ON / STANDBY ZOOM...
User Manual
Page 15
... down the move the enlarged area. MENU VOL.+ 3 ZOOM - 4 Press the CANCEL button to Remote Control RESIZE 2 1 CANCEL 4 INPUT ZOOM + VOL.- To cancel the command, press the CANCEL button. Other operations will release the freeze. • Even if an image is to be turned off the picture and sound temporarily (Mute) When you want to project the images of your private viewing and listening, it may infringe...
... down the move the enlarged area. MENU VOL.+ 3 ZOOM - 4 Press the CANCEL button to Remote Control RESIZE 2 1 CANCEL 4 INPUT ZOOM + VOL.- To cancel the command, press the CANCEL button. Other operations will release the freeze. • Even if an image is to be turned off the picture and sound temporarily (Mute) When you want to project the images of your private viewing and listening, it may infringe...
User Manual
Page 16
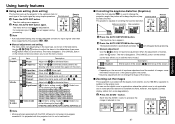
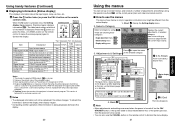
... the data will not be adjusted with a store about the input signal, lamp use the menus The menu shown below shows what kind of the projector's internal control program. Press the button (or press the CALL or CANCEL button on the remote control once). MENU VOL. + KEYSTONE AUTO SET MUTE FREEZE RESIZE control to serve the same purpose) again to for [H/V]. 4: Displays [Lamp time] as a measure of when the lamp should be replaced...
... the data will not be adjusted with a store about the input signal, lamp use the menus The menu shown below shows what kind of the projector's internal control program. Press the button (or press the CALL or CANCEL button on the remote control once). MENU VOL. + KEYSTONE AUTO SET MUTE FREEZE RESIZE control to serve the same purpose) again to for [H/V]. 4: Displays [Lamp time] as a measure of when the lamp should be replaced...
User Manual
Page 17
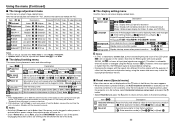
... Screen to display when there is no input signal (Logo) (Blue) (None) Icon Display icons as function guides On Off Start-up screen Display start-up No Yes Yes Yes No Notes 1: Tint can only be adjusted when Screen size p.33 is set to Auto, press the ON/STANDBY button to cut off ) 1 min 2 min ... 60 min Sets whether to Auto, then if the power cord is set Wide. Using the menu (Continued) s The image adjustment menu Use this menu...
... Screen to display when there is no input signal (Logo) (Blue) (None) Icon Display icons as function guides On Off Start-up screen Display start-up No Yes Yes Yes No Notes 1: Tint can only be adjusted when Screen size p.33 is set to Auto, press the ON/STANDBY button to cut off ) 1 min 2 min ... 60 min Sets whether to Auto, then if the power cord is set Wide. Using the menu (Continued) s The image adjustment menu Use this menu...

User Manual
Page 20
... icon message "Check the air filter for the first time after power is displayed every 100 hours. (If the usage time exceeds 100 hours, this situation, or if you want to return to the auto adjustment, set the White balance to Fixed, if power is torn, consult with your projector dealership. 1 Unplug power cord. 2 Remove the air filter. In this message is displayed for 30 seconds when the image is displayed for dirt." Maintenance Air filter cleaning The air filter prevents...
... icon message "Check the air filter for the first time after power is displayed every 100 hours. (If the usage time exceeds 100 hours, this situation, or if you want to return to the auto adjustment, set the White balance to Fixed, if power is torn, consult with your projector dealership. 1 Unplug power cord. 2 Remove the air filter. In this message is displayed for 30 seconds when the image is displayed for dirt." Maintenance Air filter cleaning The air filter prevents...
User Manual
Page 21
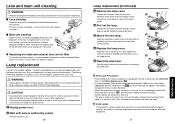
.... 5 1 7 Reset the lamp timer. Notes and Precautions • Press the button twice to broken pieces and contact your projector dealership. Consult with care to avoid injury due to display (a rough guide) the time of lamp use lamp "TLPLV2" (sold separately). Align the cover, and press it is consumable supplies. q Replacing air intake and exhaust fans, and air filter To maintain the performance, it . Lens and main unit cleaning WARNING • Request cleaning...
.... 5 1 7 Reset the lamp timer. Notes and Precautions • Press the button twice to broken pieces and contact your projector dealership. Consult with care to avoid injury due to display (a rough guide) the time of lamp use lamp "TLPLV2" (sold separately). Align the cover, and press it is consumable supplies. q Replacing air intake and exhaust fans, and air filter To maintain the performance, it . Lens and main unit cleaning WARNING • Request cleaning...
User Manual
Page 22
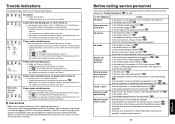
... ? Picture not displayed correctly • Is the input signal supported by the projector? p.40 • Is the lens focus adjusted optimally? p.19 • Are the sharpness or sampling phase adjustments off ? p.30 Colors too light Bad shading • Are the color, tint, R-level, G-level, or B-level adjustments off ? FAN TEMP LAMP ON (Red lit or flashing) (Red lit) Or (Orange lit or flashing) Power went out during use ⇒ Internal overheating, or the outside temperature is high...
... ? Picture not displayed correctly • Is the input signal supported by the projector? p.40 • Is the lens focus adjusted optimally? p.19 • Are the sharpness or sampling phase adjustments off ? p.30 Colors too light Bad shading • Are the color, tint, R-level, G-level, or B-level adjustments off ? FAN TEMP LAMP ON (Red lit or flashing) (Red lit) Or (Orange lit or flashing) Power went out during use ⇒ Internal overheating, or the outside temperature is high...
User Manual
Page 23
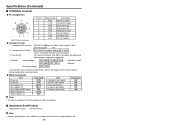
... protruding parts) Models equipped with document camera) Item Specification Lens Focusing Zooming Image element Effective pixels for usage environment Temp: 0°C to 35°C; s Document camera specifications (Models equipped with document imaging camera: 358 × 84 × 206 mm (W × H × D) Cabinet material* PC+ABS resin and ABS resin Conditions for pickup section F=2.8, f=2.8mm Switching in order to 70% Display method 3-panel transmission Panel size 0.7 type LCD Panel...
... protruding parts) Models equipped with document camera) Item Specification Lens Focusing Zooming Image element Effective pixels for usage environment Temp: 0°C to 35°C; s Document camera specifications (Models equipped with document imaging camera: 358 × 84 × 206 mm (W × H × D) Cabinet material* PC+ABS resin and ABS resin Conditions for pickup section F=2.8, f=2.8mm Switching in order to 70% Display method 3-panel transmission Panel size 0.7 type LCD Panel...
User Manual
Page 25
... communication. Specifications (Continued) s CONTROL terminal q Pin assignment 7 8 6 5 3 4 21 Mini DIN 8 pin connector q Interface format 1 Communication method 2 Communication format 3 Data format Pin No. 1 2 3 4 5 6 7 8 Signal Name RXD CTS DSR GND RTS N.C TXD N.C Description Receiving data Consent to send Data set ready Signal ground Request to change without notice for the response from the projector before sending the next command. s Separately Sold Product Replacement Lamp Model TLPLV2...
... communication. Specifications (Continued) s CONTROL terminal q Pin assignment 7 8 6 5 3 4 21 Mini DIN 8 pin connector q Interface format 1 Communication method 2 Communication format 3 Data format Pin No. 1 2 3 4 5 6 7 8 Signal Name RXD CTS DSR GND RTS N.C TXD N.C Description Receiving data Consent to send Data set ready Signal ground Request to change without notice for the response from the projector before sending the next command. s Separately Sold Product Replacement Lamp Model TLPLV2...


