Owner's Manual - English
Page 3
...They will come in handy if you ever have to such a change in temperature, moisture may condense on the crucial internal parts. located at the bottom of your LCD projector. For maximum protection, repack the set as an insect spray, near the unit. Model No. Do not leave rubber or ...a long time. Retain this unit immediately after moving it was originally packed at least 2 hours when there is exposed to ship your LCD projector. IMPORTANT PRECAUTIONS 3 CONTENTS Before use the unit for at the factory. In the spaces provided below, record the Model and Serial No.
...They will come in handy if you ever have to such a change in temperature, moisture may condense on the crucial internal parts. located at the bottom of your LCD projector. For maximum protection, repack the set as an insect spray, near the unit. Model No. Do not leave rubber or ...a long time. Retain this unit immediately after moving it was originally packed at least 2 hours when there is exposed to ship your LCD projector. IMPORTANT PRECAUTIONS 3 CONTENTS Before use the unit for at the factory. In the spaces provided below, record the Model and Serial No.
Owner's Manual - English
Page 4
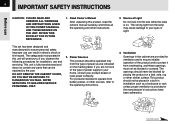
... ventilation and to ensure reliable operation of Light Do not look into the lens while the lamp is fully transistorized and does not contain any parts that can result in this product, read the owner's manual carefully, and follow all the operating and other sources, refer to your product dealer or...
... ventilation and to ensure reliable operation of Light Do not look into the lens while the lamp is fully transistorized and does not contain any parts that can result in this product, read the owner's manual carefully, and follow all the operating and other sources, refer to your product dealer or...
Owner's Manual - English
Page 6
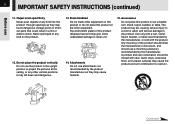
... any kind on the other equipment on this product or do not place this product develops heat and may touch dangerous voltage points or shortout parts that could result in the upright position to other vertical positions. Stack Inhibited Do not stack other equipment. Top and bottom plates of any other...
... any kind on the other equipment on this product or do not place this product develops heat and may touch dangerous voltage points or shortout parts that could result in the upright position to other vertical positions. Stack Inhibited Do not stack other equipment. Top and bottom plates of any other...

Owner's Manual - English
Page 7
...-supply cord or plug is in that the product is damaged. The broken pieces of the lamp rupturing, thoroughly clean the area around the projector and discard any edible items placed in proper operating condition. Refer all servicing to rain or water. f) When the product exhibits a distinct ...safety checks to determine that area. 18. d) If the product does not operate normally by users.) 20. this product yourself as the original part. e) If the product has been dropped or damaged in performance - In the unlikely event of glass may expose you to qualified service personnel under...
...-supply cord or plug is in that the product is damaged. The broken pieces of the lamp rupturing, thoroughly clean the area around the projector and discard any edible items placed in proper operating condition. Refer all servicing to rain or water. f) When the product exhibits a distinct ...safety checks to determine that area. 18. d) If the product does not operate normally by users.) 20. this product yourself as the original part. e) If the product has been dropped or damaged in performance - In the unlikely event of glass may expose you to qualified service personnel under...

Owner's Manual - English
Page 9
... 9 Names of each part on the remote control 13 Loading batteries 14 Remote control operation 15 Installation and connections Floor-mounted projector placement 16 Projector placement angle adjustment 19 Ceiling-mounted projector placement 20 Connecting video equipment 21 Connecting a computer 23 Projector operation control by a... Settings Adjustments and settings on the main unit 10 Names of COMPONENT IN connector 72 Applicable signal 73 Controlling the projector by using RS-232C 75 Specifications 80 Audio 50 FULL MENU settings - Display 54 FULL MENU settings - Factory ...
... 9 Names of each part on the remote control 13 Loading batteries 14 Remote control operation 15 Installation and connections Floor-mounted projector placement 16 Projector placement angle adjustment 19 Ceiling-mounted projector placement 20 Connecting video equipment 21 Connecting a computer 23 Projector operation control by a... Settings Adjustments and settings on the main unit 10 Names of COMPONENT IN connector 72 Applicable signal 73 Controlling the projector by using RS-232C 75 Specifications 80 Audio 50 FULL MENU settings - Display 54 FULL MENU settings - Factory ...
Owner's Manual - English
Page 10
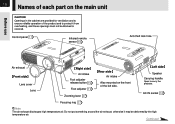
... air. AC IN socket 18 Focusing ring 27 Note The air exhaust discharges high temperature air. Left side Speaker Carrying handle Open to carry the projector. SAEUTTO Air exhaust Front side Lens cover Lens CONTROL C(OCMOPMOPNUETNETRI)N AUINDIO VIDEOVIIDNEO S-VIDEO R - L Right side Air intake Foot adjuster release button 19 Foot adjuster 19... TEMP BUSY Infrared remote sensor 15 Anti-theft lock hole MENU INPUT ON/STANDBY ON EXIT ENTER KEYSATUOTNOE VOL/ADJ. Continued 10 Names of each part on the front of the product and to protect it may be blocked or covered.
... air. AC IN socket 18 Focusing ring 27 Note The air exhaust discharges high temperature air. Left side Speaker Carrying handle Open to carry the projector. SAEUTTO Air exhaust Front side Lens cover Lens CONTROL C(OCMOPMOPNUETNETRI)N AUINDIO VIDEOVIIDNEO S-VIDEO R - L Right side Air intake Foot adjuster release button 19 Foot adjuster 19... TEMP BUSY Infrared remote sensor 15 Anti-theft lock hole MENU INPUT ON/STANDBY ON EXIT ENTER KEYSATUOTNOE VOL/ADJ. Continued 10 Names of each part on the front of the product and to protect it may be blocked or covered.
Owner's Manual - English
Page 11
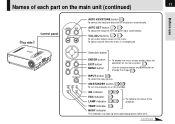
Names of the picture automatically. ON/STANDBY button 25 28 To turn the projector on the menu screen. 37 Use the selection button and EXIT button to enlarge the image. 30 INPUT button 26... indicator This indicator may light up when operating process takes time. AUTO KEYSTONE button 29 To correct the keystone distortion of each part on the menu. ON indicator 25 28 FAN indicator 25 LAMP indicator 25 28 To indicate the status of the Computer input ...side Control panel AUTO KEYSTONE AUTO SET VOL/ADJ. AUTO SET button 27 33 To adjust the image of the projector.
Names of the picture automatically. ON/STANDBY button 25 28 To turn the projector on the menu screen. 37 Use the selection button and EXIT button to enlarge the image. 30 INPUT button 26... indicator This indicator may light up when operating process takes time. AUTO KEYSTONE button 29 To correct the keystone distortion of each part on the menu. ON indicator 25 28 FAN indicator 25 LAMP indicator 25 28 To indicate the status of the Computer input ...side Control panel AUTO KEYSTONE AUTO SET VOL/ADJ. AUTO SET button 27 33 To adjust the image of the projector.
Owner's Manual - English
Page 12
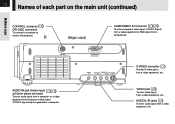
... (Y/PB/PR signal output) supported or a computer. L VIDEO S-VIDEO S-VIDEO connector 22 To enter S-video signal from a video equipment, etc. AUDIO - 12 Names of each part on the main unit (continued) Before use CONTROL connector 24 (RS-232C connector) To connect a computer to control the...
... (Y/PB/PR signal output) supported or a computer. L VIDEO S-VIDEO S-VIDEO connector 22 To enter S-video signal from a video equipment, etc. AUDIO - 12 Names of each part on the main unit (continued) Before use CONTROL connector 24 (RS-232C connector) To connect a computer to control the...
Owner's Manual - English
Page 13
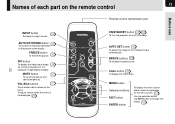
... STANDBY KEYSTONE AUTO SET FREEZE MUTE PIP CALL RESIZE MENU VOL/ADJ ENTER CT-90072 EXIT ON/STANDBY button 25 28 To turn the projector on the menu. AUTO SET button 33 To adjust the image of the picture automatically. MENU button Selection buttons EXIT button ENTER button To... display the menu screen and/or select the operation on the remote control 13 CONTENTS Remote control transmission part Before use INPUT button 26 To select the input source. AUTO KEYSTONE button 29 To correct the keystone distortion of the Computer input ...
... STANDBY KEYSTONE AUTO SET FREEZE MUTE PIP CALL RESIZE MENU VOL/ADJ ENTER CT-90072 EXIT ON/STANDBY button 25 28 To turn the projector on the menu. AUTO SET button 33 To adjust the image of the picture automatically. MENU button Selection buttons EXIT button ENTER button To... display the menu screen and/or select the operation on the remote control 13 CONTENTS Remote control transmission part Before use INPUT button 26 To select the input source. AUTO KEYSTONE button 29 To correct the keystone distortion of the Computer input ...

Owner's Manual - English
Page 36
... settings on the menu screen QUICK MENU 38 Item Meaning Contrast Adjust the image contrast Brightness Adjust the image brightness (paying attention to the dark parts) Color Adjust the image color (except for Computer inputs) Phase Adjust the image flicker (Computer input) Picture mode Computer input: Set brightness priority or picture...
... settings on the menu screen QUICK MENU 38 Item Meaning Contrast Adjust the image contrast Brightness Adjust the image brightness (paying attention to the dark parts) Color Adjust the image color (except for Computer inputs) Phase Adjust the image flicker (Computer input) Picture mode Computer input: Set brightness priority or picture...
Owner's Manual - English
Page 65
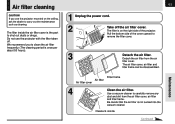
...frame. Filter frame Air filter Air filter cover 4 Clean the air filter. Use a vacuum cleaner to remove the filter cover. Do not use the projector mounted on the right side of the cover upward to carefully remove any dust and dirt from the air filter cover. R AUDIO IN Pull the...air filter cover, air filter and filter frame can be disassembled. Be careful that the air filter is the part to shut out dusts or dregs. We recommend you use the projector with the filter taken off the air filter cover. Cleaner's nozzle Continued The filter inside the air filter cover...
...frame. Filter frame Air filter Air filter cover 4 Clean the air filter. Use a vacuum cleaner to remove the filter cover. Do not use the projector mounted on the right side of the cover upward to carefully remove any dust and dirt from the air filter cover. R AUDIO IN Pull the...air filter cover, air filter and filter frame can be disassembled. Be careful that the air filter is the part to shut out dusts or dregs. We recommend you use the projector with the filter taken off the air filter cover. Cleaner's nozzle Continued The filter inside the air filter cover...
Owner's Manual - English
Page 80
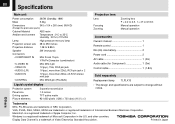
... trademarks of Video Electronics Standard Association. 80 Specifications Main unit Power consumption 265W (Standby: 18W) Mass 5.3kg Dimensions 345 x 104 x 281 (mm) (W/H/D) (Except the protrusion parts) Cabinet Material ABS resin Ambient environment Temperature : 0°C to 35°C Humidity : 30% to 70% RH Lamp High pressure mercury lamp Projection screen size 28...
... trademarks of Video Electronics Standard Association. 80 Specifications Main unit Power consumption 265W (Standby: 18W) Mass 5.3kg Dimensions 345 x 104 x 281 (mm) (W/H/D) (Except the protrusion parts) Cabinet Material ABS resin Ambient environment Temperature : 0°C to 35°C Humidity : 30% to 70% RH Lamp High pressure mercury lamp Projection screen size 28...