
Owners Manual
Page 4
Source of power supply to . This set has been designed and manufactured to your product dealer or local power company. Power Sources This product should be blocked by the user. The openings should not be placed in a built-in installation such as a bookcase or rack unless proper ventilation is provided or the manufacturer's instructions have been adhered to your home, consult your eyes...
Source of power supply to . This set has been designed and manufactured to your product dealer or local power company. Power Sources This product should be blocked by the user. The openings should not be placed in a built-in installation such as a bookcase or rack unless proper ventilation is provided or the manufacturer's instructions have been adhered to your home, consult your eyes...

Owners Manual
Page 7
... the product exhibits a distinct change in any service or repairs to its normal operation. To avoid injury, be sure the service technician has used replacement parts specified by following conditions: a) When the power-supply cord or plug is in its original position. Families with children should be particularly careful. Replacement Parts When replacement parts are covered by the operating instructions as opening or removing covers may expose you to determine that...
... the product exhibits a distinct change in any service or repairs to its normal operation. To avoid injury, be sure the service technician has used replacement parts specified by following conditions: a) When the power-supply cord or plug is in its original position. Families with children should be particularly careful. Replacement Parts When replacement parts are covered by the operating instructions as opening or removing covers may expose you to determine that...
Owners Manual
Page 10
... use Contents Before use SAFETY PRECAUTIONS 2 IMPORTANT PRECAUTIONS 3 IMPORTANT SAFETY INSTRUCTIONS 4 Power supply cord selection 9 Part names and functions 11 Connections and installation Connections 16 Projector placement 18 Operations Picture projection 21 Operating the computer by the remote control 25 Adjustments Setting and adjustments on the menu 27 Initial settings - Default 28 Keystone correction - Audio 33 Saving data - Keystone 30 Projection adjustments - Image 31 Picture adjustments - Save 34 CONTENTS 10 Camera Part names and functions of document imaging...
... use Contents Before use SAFETY PRECAUTIONS 2 IMPORTANT PRECAUTIONS 3 IMPORTANT SAFETY INSTRUCTIONS 4 Power supply cord selection 9 Part names and functions 11 Connections and installation Connections 16 Projector placement 18 Operations Picture projection 21 Operating the computer by the remote control 25 Adjustments Setting and adjustments on the menu 27 Initial settings - Default 28 Keystone correction - Audio 33 Saving data - Keystone 30 Projection adjustments - Image 31 Picture adjustments - Save 34 CONTENTS 10 Camera Part names and functions of document imaging...

Owners Manual
Page 11
Before use Part names and functions Main unit Lens cover Projection lens Exhaust holes Control panel ON/STANDBY MENU SELECT/ADJUST ENTER INPUT ON LAMP TEMP 123 4 5 6 78 Zooming ring 21 Focusing ring 21 CONTENTS 11 1 ON/STANDBY button 21 To turn the projector on or off. 2 MENU button 27 To display or close the menu. 3 SELECT/ADJUST button 28 ( / / / ) To select items or adjust values on the menu. 4 ENTER button 30 To enter your selection on the menu. 5 INPUT button 21 To...
Before use Part names and functions Main unit Lens cover Projection lens Exhaust holes Control panel ON/STANDBY MENU SELECT/ADJUST ENTER INPUT ON LAMP TEMP 123 4 5 6 78 Zooming ring 21 Focusing ring 21 CONTENTS 11 1 ON/STANDBY button 21 To turn the projector on or off. 2 MENU button 27 To display or close the menu. 3 SELECT/ADJUST button 28 ( / / / ) To select items or adjust values on the menu. 4 ENTER button 30 To enter your selection on the menu. 5 INPUT button 21 To...
Owners Manual
Page 13
...: To operate the projector. 5 button 28 / Pointer control* 26 • To select items or adjust values on the screen. POINTER: To operate a computer. (The supplied REMOTE MOUSE RECEIVER should be connected to "POINTER". 1 AUTO SET ON/STANDBY KEYSTONE 2 MARKER LASER POINTER 3 PJ 4 L-CLICK R-CLICK 5 MENU ENTER RGB VIDEO CAMERA 6 RESIZE RESET FREEZE 7 MUTE CALL 8 9 1 AUTO SET button 23 To adjust the image automaticcally. 10 2 KEYSTONE button 22 To correct the keystone distortion of the remote control. Location of...
...: To operate the projector. 5 button 28 / Pointer control* 26 • To select items or adjust values on the screen. POINTER: To operate a computer. (The supplied REMOTE MOUSE RECEIVER should be connected to "POINTER". 1 AUTO SET ON/STANDBY KEYSTONE 2 MARKER LASER POINTER 3 PJ 4 L-CLICK R-CLICK 5 MENU ENTER RGB VIDEO CAMERA 6 RESIZE RESET FREEZE 7 MUTE CALL 8 9 1 AUTO SET button 23 To adjust the image automaticcally. 10 2 KEYSTONE button 22 To correct the keystone distortion of the remote control. Location of...
Owners Manual
Page 14
...; To enter your selection on the menu. 12 VIDEO button 21 To select the video input. 13 CAMERA button (for document imaging camera model only) 37 To select the camera input. 14 RESET button 29 To restore the settings and adjustments to the default. 15 FREEZE button 23 To freeze the picture. Make sure that the +/- Before use Laser emission part 1 AUTO SET ON/STANDBY KEYSTONE 9 2 MARKER LASER 10 POINTER 3 PJ 11...
...; To enter your selection on the menu. 12 VIDEO button 21 To select the video input. 13 CAMERA button (for document imaging camera model only) 37 To select the camera input. 14 RESET button 29 To restore the settings and adjustments to the default. 15 FREEZE button 23 To freeze the picture. Make sure that the +/- Before use Laser emission part 1 AUTO SET ON/STANDBY KEYSTONE 9 2 MARKER LASER 10 POINTER 3 PJ 11...

Owners Manual
Page 15
... out of the remote control. • When the remote control stops working or only works from the front of locations with excessively high temperature or humidity. • Do not get water on the remote control or place wet objects on it . • Keep the remote control out of the remote sensor. Remote control operation Point the remote control at the infrared remote sensor and press a button. Before use a more longer life alkaline batteries. •...
... out of the remote control. • When the remote control stops working or only works from the front of locations with excessively high temperature or humidity. • Do not get water on the remote control or place wet objects on it . • Keep the remote control out of the remote sensor. Remote control operation Point the remote control at the infrared remote sensor and press a button. Before use a more longer life alkaline batteries. •...

Owners Manual
Page 19
... screen. Adjust the projection size by changing the distances as a table. Screen 90° Lens 90° b a Point the lens straight at the screen for the best possible picture. The ON indicator lights in a wall outlet. CONTENTS 19 3 Connect the power cord. • Insert one end in the AC IN socket on the projector. • Insert the other end in orange and the projector turns to standby mode. 4 Take off the lens cover. (Continued) a: Distance...
... screen. Adjust the projection size by changing the distances as a table. Screen 90° Lens 90° b a Point the lens straight at the screen for the best possible picture. The ON indicator lights in a wall outlet. CONTENTS 19 3 Connect the power cord. • Insert one end in the AC IN socket on the projector. • Insert the other end in orange and the projector turns to standby mode. 4 Take off the lens cover. (Continued) a: Distance...

Owners Manual
Page 20
... to use the foot adjuster The tilt of the height. Lift up . Connections and installation (Continued) Notes • When the projector is moved from a cold location to a warm location, or when the ambient temperature in position. Shut out the light with curtains or other strong light, the projected picture becomes too faint to see. Note Be sure to the ambient temperature. • If the screen...
... to use the foot adjuster The tilt of the height. Lift up . Connections and installation (Continued) Notes • When the projector is moved from a cold location to a warm location, or when the ambient temperature in position. Shut out the light with curtains or other strong light, the projected picture becomes too faint to see. Note Be sure to the ambient temperature. • If the screen...

Owners Manual
Page 21
...; RGB: To project pictures from a computer connected to RGB INPUT. → Video: To project pictures from a document imaging camera. (For document imaging camera model only) 4 Adjust the picture size by turning the focusing ring. Both the ON and LAMP indicators light up in playback mode. Preparation • Install and connect the projector properly. • Take off the lens cover. • Set the POINTER/PJ to enlarge the picture. CONTENTS 21 3 Select the input source. (On the remote control) Press RGB...
...; RGB: To project pictures from a computer connected to RGB INPUT. → Video: To project pictures from a document imaging camera. (For document imaging camera model only) 4 Adjust the picture size by turning the focusing ring. Both the ON and LAMP indicators light up in playback mode. Preparation • Install and connect the projector properly. • Take off the lens cover. • Set the POINTER/PJ to enlarge the picture. CONTENTS 21 3 Select the input source. (On the remote control) Press RGB...

Owners Manual
Page 22
... any signal from the connected equipment. An instruction message appears. 2) Press ON/STANDBY again. Press KEYSTONE. Operations (Continued) Notes • " " is flashing in green. • Before unplugging the power cord, make the "Keystone" adjustment on the menu. 30 (Continued) The ON indicator turns off , the projector may be displayed on the screen. Pressing ON/STANDBY also turns it on. • While operating the projector, " " may occasionally occur in a picture. The projector can correct this keystone distortion...
... any signal from the connected equipment. An instruction message appears. 2) Press ON/STANDBY again. Press KEYSTONE. Operations (Continued) Notes • " " is flashing in green. • Before unplugging the power cord, make the "Keystone" adjustment on the menu. 30 (Continued) The ON indicator turns off , the projector may be displayed on the screen. Pressing ON/STANDBY also turns it on. • While operating the projector, " " may occasionally occur in a picture. The projector can correct this keystone distortion...

Owners Manual
Page 25
... the USB PORT for the first time, insert the "Windows98 CD-ROM" and install the device drivers for a USB interchangeability device and a USB human interface devices (two kinds). Connecting the REMOTE MOUSE RECEIVER Check that the power of the computer. Remove the mouse actually used and change it to the computer, the supplied remote control can work as a mouse of the computer is turned off. Operations Operating the computer by the remote control...
... the USB PORT for the first time, insert the "Windows98 CD-ROM" and install the device drivers for a USB interchangeability device and a USB human interface devices (two kinds). Connecting the REMOTE MOUSE RECEIVER Check that the power of the computer. Remove the mouse actually used and change it to the computer, the supplied remote control can work as a mouse of the computer is turned off. Operations Operating the computer by the remote control...

Owners Manual
Page 27
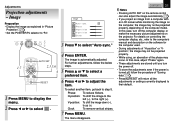
... the sound output. RGB input : To set the signal type of video input. When using this projector for displays. To make the correction of green in the picture. G-level : To adjust the amount of keystone distortion beyond the automatic correction. To display the menu, press MENU. mode : To set . Scrn display : To use or disable on the menu to the factory set the projecting orientation according to the way of installation. Save 34 Save data : To...
... the sound output. RGB input : To set the signal type of video input. When using this projector for displays. To make the correction of green in the picture. G-level : To adjust the amount of keystone distortion beyond the automatic correction. To display the menu, press MENU. mode : To set . Scrn display : To use or disable on the menu to the factory set the projecting orientation according to the way of installation. Save 34 Save data : To...

Owners Manual
Page 28
....43B signal PAL: PAL signal PAL N: PAL N signal SECAM: SECAM signal PAL443: PAL4.43 signal PAL M: PAL M signal (Continued) RGB: Y/Pb/Pr: RGB signal Color difference (Component) video signal from the followings. Standard: Ceiling: Rear: R. Default Make the basic settings for the menu or onscreen displays. ON/STANDBY MENU SELECT/ADJUST ENTER INPUT ON LAMP TEMP 1,5 AUTO SET ON/STANDBY KEYSTONE MARKER POINTER PJ LASER 2-4 L-CLICK MENU R-CLICK ENTER RGB VIDEO CAMERA RESIZE RESET FREEZE RESET 1 Press MENU to display the menu...
....43B signal PAL: PAL signal PAL N: PAL N signal SECAM: SECAM signal PAL443: PAL4.43 signal PAL M: PAL M signal (Continued) RGB: Y/Pb/Pr: RGB signal Color difference (Component) video signal from the followings. Standard: Ceiling: Rear: R. Default Make the basic settings for the menu or onscreen displays. ON/STANDBY MENU SELECT/ADJUST ENTER INPUT ON LAMP TEMP 1,5 AUTO SET ON/STANDBY KEYSTONE MARKER POINTER PJ LASER 2-4 L-CLICK MENU R-CLICK ENTER RGB VIDEO CAMERA RESIZE RESET FREEZE RESET 1 Press MENU to display the menu...
Owners Manual
Page 31
... power is automatically adjusted. CONTENTS 31 Notes • Pressing AUTO SET on the projector. I ma g e Au t o sync . ON/STANDBY MENU SELECT/ADJUST ENTER INPUT ON LAMP TEMP 1,7 AUTO SET ON/STANDBY KEYSTONE MARKER POINTER PJ LASER AUTO SET 2,3,5,6 4 L-CLICK MENU R-CLICK ENTER RGB VIDEO CAMERA RESIZE RESET FREEZE RESET 1 Press MENU to display the menu. 2 Press or to select "Auto sync." 4 Press ENTER. Image Preparation • Display the image as explained in "Picture Projection". 21 • Set the POINTER/PJ selector to their default...
... power is automatically adjusted. CONTENTS 31 Notes • Pressing AUTO SET on the projector. I ma g e Au t o sync . ON/STANDBY MENU SELECT/ADJUST ENTER INPUT ON LAMP TEMP 1,7 AUTO SET ON/STANDBY KEYSTONE MARKER POINTER PJ LASER AUTO SET 2,3,5,6 4 L-CLICK MENU R-CLICK ENTER RGB VIDEO CAMERA RESIZE RESET FREEZE RESET 1 Press MENU to display the menu. 2 Press or to select "Auto sync." 4 Press ENTER. Image Preparation • Display the image as explained in "Picture Projection". 21 • Set the POINTER/PJ selector to their default...

Owners Manual
Page 37
... on the camera control panel or INPUT on . (Continued) "Camera" is displayed. 4 Move the camera head to select the camera input mode. Camera Picture projection with the document imaging camera Preparation Display the image as explained in "Picture Projection" . 21 OVERLAY PHOTO/TEXT ARM LIGHT 1 LOCK W.BALANCE CAMERA 3 6 ON/STANDBY MENU SELECT/ADJUST ENTER INPUT ON LAMP TEMP 3 AUTO SET ON/STANDBY KEYSTONE MARKER POINTER PJ LASER L-CLICK MENU R-CLICK ENTER RGB VIDEO CAMERA RESIZE RESET FREEZE 3 2 Place...
... on the camera control panel or INPUT on . (Continued) "Camera" is displayed. 4 Move the camera head to select the camera input mode. Camera Picture projection with the document imaging camera Preparation Display the image as explained in "Picture Projection" . 21 OVERLAY PHOTO/TEXT ARM LIGHT 1 LOCK W.BALANCE CAMERA 3 6 ON/STANDBY MENU SELECT/ADJUST ENTER INPUT ON LAMP TEMP 3 AUTO SET ON/STANDBY KEYSTONE MARKER POINTER PJ LASER L-CLICK MENU R-CLICK ENTER RGB VIDEO CAMERA RESIZE RESET FREEZE 3 2 Place...

Owners Manual
Page 40
... exhaust fans' holes are not covered. • Turn the projector off, and leave it for a while, and turn it on again. • Clean the air filter. 41 The power turns off or does not come on . → The inside the projector, the indicators light up . → The lamp's end, or malfunction of the SELECT/ADJUST ON/STANDBY MENU ON ENTER INPUT ON Indicator LAMP LAMP Indicator TEMP TEMP Indicator unit. • Lamp's life length is some problem inside...
... exhaust fans' holes are not covered. • Turn the projector off, and leave it for a while, and turn it on again. • Clean the air filter. 41 The power turns off or does not come on . → The inside the projector, the indicators light up . → The lamp's end, or malfunction of the SELECT/ADJUST ON/STANDBY MENU ON ENTER INPUT ON Indicator LAMP LAMP Indicator TEMP TEMP Indicator unit. • Lamp's life length is some problem inside...

Owners Manual
Page 42
... working time exceeds about 2,000 hours. • Attach the lamp cover firmly after replacing the lamp. For detail, refer to TLPL6 instruction. • If you use the projector mounted on ; If it is not set correctly, the power will not turn on the bottom panel. Refer to pull out the lamp. 1 2 1 Unplug the power cord. 5 Load a new lamp. Do not use an exhausted lamp. Slide until the lamp gets cold 1 enough. 7 Reset the lamp timer. Maintenance Lamp replacement...
... working time exceeds about 2,000 hours. • Attach the lamp cover firmly after replacing the lamp. For detail, refer to TLPL6 instruction. • If you use the projector mounted on ; If it is not set correctly, the power will not turn on the bottom panel. Refer to pull out the lamp. 1 2 1 Unplug the power cord. 5 Load a new lamp. Do not use an exhausted lamp. Slide until the lamp gets cold 1 enough. 7 Reset the lamp timer. Maintenance Lamp replacement...
Owners Manual
Page 43
... The power turns off the lens cover. 19 • The wrong input is selected. → Select the input source correctly. 21 • The muting mode is ending. → Replace the lamp. 42 The colors are not correct. → Make the "Picture" adjustments. 32 • The lamp life is dirty. → Clean the lens. Refer also to "Trouble indications". 40 • The "Brightness" adjustment is at the minimum. → Adjust the sound volume...
... The power turns off the lens cover. 19 • The wrong input is selected. → Select the input source correctly. 21 • The muting mode is ending. → Replace the lamp. 42 The colors are not correct. → Make the "Picture" adjustments. 32 • The lamp life is dirty. → Clean the lens. Refer also to "Trouble indications". 40 • The "Brightness" adjustment is at the minimum. → Adjust the sound volume...

Owners Manual
Page 46
Check the compatibility of the connectors, signal levels, timing, and resolutions. (Continued) Others (Continued) CONTENTS 46 : full compatible : simplified display : dot resizing display : high resolution serial transfer control Mode XGA60 XGA70 XGA75 XGA85 MAC19 SXGA75-1 MAC21 SXGA60-1 SXGA85-1 SXGA43i SXGA60-2 SXGA75-2 SXGA85-2 UXGA60 UXGA65 UXGA70 UXGA75 Signal System XGA 60Hz XGA 70Hz XGA 75Hz XGA 85Hz MAC-19" SXGA 75Hz MAC-21" SXGA 60Hz SXGA 85Hz SXGA 43Hz interlace SXGA...
Check the compatibility of the connectors, signal levels, timing, and resolutions. (Continued) Others (Continued) CONTENTS 46 : full compatible : simplified display : dot resizing display : high resolution serial transfer control Mode XGA60 XGA70 XGA75 XGA85 MAC19 SXGA75-1 MAC21 SXGA60-1 SXGA85-1 SXGA43i SXGA60-2 SXGA75-2 SXGA85-2 UXGA60 UXGA65 UXGA70 UXGA75 Signal System XGA 60Hz XGA 70Hz XGA 75Hz XGA 85Hz MAC-19" SXGA 75Hz MAC-21" SXGA 60Hz SXGA 85Hz SXGA 43Hz interlace SXGA...


