
User Guide
Page 1
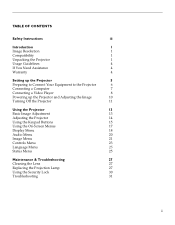
... 4 If You Need Assistance 4 Warranty 4 Setting up the Projector 5 Preparing to Connect Your Equipment to the Projector 6 Connecting a Computer 7 Connecting a Video Player 8 Powering up the Projector and Adjusting the Image 10 Turning Off the Projector 11 Using the Projector 13 Basic Image Adjustment 13 Adjusting the Projector 14 Using the Keypad Buttons 15 Using the On...
... 4 If You Need Assistance 4 Warranty 4 Setting up the Projector 5 Preparing to Connect Your Equipment to the Projector 6 Connecting a Computer 7 Connecting a Video Player 8 Powering up the Projector and Adjusting the Image 10 Turning Off the Projector 11 Using the Projector 13 Basic Image Adjustment 13 Adjusting the Projector 14 Using the Keypad Buttons 15 Using the On...
User Guide
Page 3
...result in fire, electrical shock, or personal injury and may damage or impair protection provided by equipment. An arrow pointing to your own projector will void the warranty. Follow all service to comply with a protective safety (earth) ground terminal. • Warning: Refer all ... follow all safety instructions. Do not touch. Safety Terms: • Warning: Don't look directly into the lens when the projector is turned on the projector. To avoid burns, wait 30 minutes before opening the lamp door. Safety Definitions: • Warning: Statements identify conditions or ...
...result in fire, electrical shock, or personal injury and may damage or impair protection provided by equipment. An arrow pointing to your own projector will void the warranty. Follow all service to comply with a protective safety (earth) ground terminal. • Warning: Refer all ... follow all safety instructions. Do not touch. Safety Terms: • Warning: Don't look directly into the lens when the projector is turned on the projector. To avoid burns, wait 30 minutes before opening the lamp door. Safety Definitions: • Warning: Statements identify conditions or ...

User Guide
Page 4
... page 37 and follow all instructions provided with it. Spilled liquids may damage your Toshiba dealer or projectors.toshiba.com for more information. • Caution: For ceiling mount installations, please use the ceiling mount recommended in this User's Guide on a hot surface or in a ...
... page 37 and follow all instructions provided with it. Spilled liquids may damage your Toshiba dealer or projectors.toshiba.com for more information. • Caution: For ceiling mount installations, please use the ceiling mount recommended in this User's Guide on a hot surface or in a ...

User Guide
Page 5
... "Resize" on connecting and operating the projector, refer to transport the 7.4 pound projector. Check to make sure all are experienced in the shipping box. The projector is compatible with a wide variety of the TDP-S1's projected image is specifically designed for download...(DLP) technology. Compatibility The projector is easy to connect, easy to use the Quick Start card that was included in setting up to 1024x768 resolution at projectors.toshiba.com. If you connect the projector. INTRODUCTION The Toshiba® TDP-S1™ lightweight multimedia projector is 800x600.
... "Resize" on connecting and operating the projector, refer to transport the 7.4 pound projector. Check to make sure all are experienced in the shipping box. The projector is compatible with a wide variety of the TDP-S1's projected image is specifically designed for download...(DLP) technology. Compatibility The projector is easy to connect, easy to use the Quick Start card that was included in setting up to 1024x768 resolution at projectors.toshiba.com. If you connect the projector. INTRODUCTION The Toshiba® TDP-S1™ lightweight multimedia projector is 800x600.

User Guide
Page 6
Introduction NOTE: The contents of your 2 shipping box may vary depending on page 37 for details. 1. TDP-S1 projector and lens cap 2. User's Guide, quick start card, and Online User Guide CD 4. Audio cable 8. Soft carry case 3. RCA audio/video (A/V) cable 7. Mac adapter 2 Power cord 5. See "Optional Accessories" on the projector configuration you've ordered. 1 4 3 5 6 7 9 8 FIGURE 1 Shipping box contents NOTE: Various optional accessories, including remote controls, cases, and cables, are available. S-video cable 9. CableWizard Lite computer cable 6.
Introduction NOTE: The contents of your 2 shipping box may vary depending on page 37 for details. 1. TDP-S1 projector and lens cap 2. User's Guide, quick start card, and Online User Guide CD 4. Audio cable 8. Soft carry case 3. RCA audio/video (A/V) cable 7. Mac adapter 2 Power cord 5. See "Optional Accessories" on the projector configuration you've ordered. 1 4 3 5 6 7 9 8 FIGURE 1 Shipping box contents NOTE: Various optional accessories, including remote controls, cases, and cables, are available. S-video cable 9. CableWizard Lite computer cable 6.
User Guide
Page 7
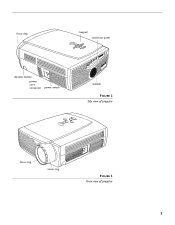
focus ring keypad connector panel elevator button power cord connector power switch speaker FIGURE 2 Side view of projector focus ring zoom ring FIGURE 3 Front view of projector 3
focus ring keypad connector panel elevator button power cord connector power switch speaker FIGURE 2 Side view of projector focus ring zoom ring FIGURE 3 Front view of projector 3
User Guide
Page 8
...ANSI/NFPA 75. • Transport the projector in this manual. Restricting the air flow can be purchased from your Toshiba dealer or projectors.toshiba.com for more information. If this happens, allow it . • Avoid leaving the projector in "Troubleshooting" on the projector. Be sure to your eyes. •... 7 days a week). • For web-based or other electronic technical support, please visit Toshiba at the back of this happens, you must wait a minute before use. • This projector is in a vendor-approved hard or soft case; refer to overheat and turn it to your...
...ANSI/NFPA 75. • Transport the projector in this manual. Restricting the air flow can be purchased from your Toshiba dealer or projectors.toshiba.com for more information. If this happens, allow it . • Avoid leaving the projector in "Troubleshooting" on the projector. Be sure to your eyes. •... 7 days a week). • For web-based or other electronic technical support, please visit Toshiba at the back of this happens, you must wait a minute before use. • This projector is in a vendor-approved hard or soft case; refer to overheat and turn it to your...
User Guide
Page 9
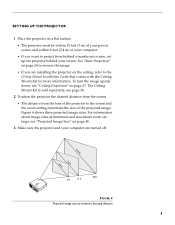
... image sizes at minimum focusing distance 5 The Ceiling Mount Kit is sold separately; see page 38. 2 Position the projector the desired distance from the screen. • The distance from the lens of the projector to the screen and the zoom setting determine the size of your computer. • If you are turned... image sizes. To turn the image upside down, see "Projected Image Size" on the ceiling, refer to project from behind a translucent screen, set up the projector behind your computer are installing the projector on page 45. 3 Make sure the...
... image sizes at minimum focusing distance 5 The Ceiling Mount Kit is sold separately; see page 38. 2 Position the projector the desired distance from the screen. • The distance from the lens of the projector to the screen and the zoom setting determine the size of your computer. • If you are turned... image sizes. To turn the image upside down, see "Projected Image Size" on the ceiling, refer to project from behind a translucent screen, set up the projector behind your computer are installing the projector on page 45. 3 Make sure the...

User Guide
Page 10
...have a hole for video source) CableWizard computer audio in (for Pin 9. Equipment you want to control your computer's mouse from the projector, purchase the optional remote control and receiver or the remote and CableWizard. 6 If you 're ready to connect your equipment. s-video ...disconnect cables. Steps for connecting the different types of equipment are given on the pages listed below. Setting up the Projector CAUTION: Turn off the computer, monitor and projector whenever you want to connect Computer Video player Page page 7 page 8 NOTE: In some older computers, the ...
...have a hole for video source) CableWizard computer audio in (for Pin 9. Equipment you want to control your computer's mouse from the projector, purchase the optional remote control and receiver or the remote and CableWizard. 6 If you 're ready to connect your equipment. s-video ...disconnect cables. Steps for connecting the different types of equipment are given on the pages listed below. Setting up the Projector CAUTION: Turn off the computer, monitor and projector whenever you want to connect Computer Video player Page page 7 page 8 NOTE: In some older computers, the ...

User Guide
Page 11
...the CableWizard Lite cable into the video connector on your computer. 2 Plug the end of the audio cable into the connector on the projector's connector panel audio cable CableWizard Lite cable NOTE: Many portable computers do not automatically turn on page 10. connector Now you must ...the CableWizard Lite. NOTE: If you are listed in the Appendix. Skip to power up the Projector and Adjusting the Image" on their external video port when a secondary display device such as a projector is connected. Activation commands for the command that does not have a 15-pin connector, you...
...the CableWizard Lite cable into the video connector on your computer. 2 Plug the end of the audio cable into the connector on the projector's connector panel audio cable CableWizard Lite cable NOTE: Many portable computers do not automatically turn on page 10. connector Now you must ...the CableWizard Lite. NOTE: If you are listed in the Appendix. Skip to power up the Projector and Adjusting the Image" on their external video port when a secondary display device such as a projector is connected. Activation commands for the command that does not have a 15-pin connector, you...

User Guide
Page 12
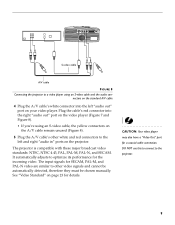
...player uses a round, four-prong S-video connector, you'll need only the A/V cable that shipped with composite video connector) 8 audio/video cable FIGURE 7 Connecting the projector to a video player using the CableWizard Lite cable. This port may be labeled "To Monitor." • If you 'll need the S-video cable in addition... to the "s-video out" connector on the video player (Figure 8). 3 Plug the other yellow connector into the composite connector on the back of the projector. • If you're using S-video, plug the other end of the cable into the "video-out" port on the...
...player uses a round, four-prong S-video connector, you'll need only the A/V cable that shipped with composite video connector) 8 audio/video cable FIGURE 7 Connecting the projector to a video player using the CableWizard Lite cable. This port may be labeled "To Monitor." • If you 'll need the S-video cable in addition... to the "s-video out" connector on the video player (Figure 8). 3 Plug the other yellow connector into the composite connector on the back of the projector. • If you're using S-video, plug the other end of the cable into the "video-out" port on the...
User Guide
Page 13
...A/V cable 4 Plug the A/V cable's white connector into the left and right "audio in" ports on page 23 for the incoming video. The projector is compatible with these major broadcast video standards: NTSC, NTSC 4.43, PAL, PAL-M, PAL-N, and SECAM. See "Video Standard" on the... projector. DO NOT use this to connect to optimize its performance for details. S-video cable A/V cable FIGURE 8 Connecting the projector to a video player using an S-video cable, the yellow connectors on the A/V cable remain unused ...
...A/V cable 4 Plug the A/V cable's white connector into the left and right "audio in" ports on page 23 for the incoming video. The projector is compatible with these major broadcast video standards: NTSC, NTSC 4.43, PAL, PAL-M, PAL-N, and SECAM. See "Video Standard" on the... projector. DO NOT use this to connect to optimize its performance for details. S-video cable A/V cable FIGURE 8 Connecting the projector to a video player using an S-video cable, the yellow connectors on the A/V cable remain unused ...
User Guide
Page 14
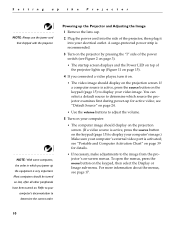
... up (Figure 11 on page 15). 4 If you power up for details. • If necessary, make adjustments to the image from the projector's on-screen menus. To open the menus, press the menu button on the projection screen. For more information about the menus, see Figure 2 on page ...3). • The startup screen displays and the Power LED on top of the projector, then plug it on. • The video image should display on the keypad, then select the Display or Image sub-menu. see "Default Source" ...
... up (Figure 11 on page 15). 4 If you power up for details. • If necessary, make adjustments to the image from the projector's on-screen menus. To open the menus, press the menu button on the projection screen. For more information about the menus, see Figure 2 on page ...3). • The startup screen displays and the Power LED on top of the projector, then plug it on. • The video image should display on the keypad, then select the Display or Image sub-menu. see "Default Source" ...
User Guide
Page 15
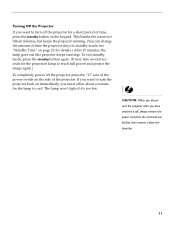
... see "Standby Time" on page 23 for a short period of time, press the standby button on the side of time the projector stays in standby mode; The lamp won't light if it's too hot. To exit standby mode, press the standby button again. (It may take several ...seconds for fifteen minutes, but keeps the projector running ). This blanks the screen for the projection lamp to reach full power and project the image again.) To completely power off the...
... see "Standby Time" on page 23 for a short period of time, press the standby button on the side of time the projector stays in standby mode; The lamp won't light if it's too hot. To exit standby mode, press the standby button again. (It may take several ...seconds for fifteen minutes, but keeps the projector running ). This blanks the screen for the projection lamp to reach full power and project the image again.) To completely power off the...
User Guide
Page 17
...) and/or the tracking (page 22) manually. 5 If the colors don't look right, adjust the brightness (page 18). 13 Be sure the projector is at a 90 degree angle to the projector. USING THE PROJECTOR This section describes how to use and make adjustments to the screen. 3 If the image is out of the...
...) and/or the tracking (page 22) manually. 5 If the colors don't look right, adjust the brightness (page 18). 13 Be sure the projector is at a 90 degree angle to the projector. USING THE PROJECTOR This section describes how to use and make adjustments to the screen. 3 If the image is out of the...
User Guide
Page 18
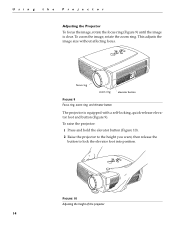
... FIGURE 9 Focus ring, zoom ring, and elevator button The projector is clear. FIGURE 10 Adjusting the height of the projector 14 This adjusts the image size without affecting focus. To raise the projector: 1 Press and hold the elevator button (Figure 10). 2 Raise the projector to the height you want, then release the button to...
... FIGURE 9 Focus ring, zoom ring, and elevator button The projector is clear. FIGURE 10 Adjusting the height of the projector 14 This adjusts the image size without affecting focus. To raise the projector: 1 Press and hold the elevator button (Figure 10). 2 Raise the projector to the height you want, then release the button to...
User Guide
Page 19
... details. left and right mouse buttons to make selections and adjustments in the menus. Using the Keypad Buttons The keypad is lit orange when the projector is on and lit green while the menus are displayed, the volume, source, and standby buttons act as navigation buttons. For more than one source... you made. While the menus are displayed. Mouse buttons Use the left /right mouse buttons power LED FIGURE 11 Keypad Menu Press menu to the projector, select between them by pressing the source button on page 17 for details. Press menu again to close the menus, the...
... details. left and right mouse buttons to make selections and adjustments in the menus. Using the Keypad Buttons The keypad is lit orange when the projector is on and lit green while the menus are displayed, the volume, source, and standby buttons act as navigation buttons. For more than one source... you made. While the menus are displayed. Mouse buttons Use the left /right mouse buttons power LED FIGURE 11 Keypad Menu Press menu to the projector, select between them by pressing the source button on page 17 for details. Press menu again to close the menus, the...
User Guide
Page 20
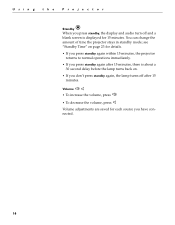
... adjustments are saved for details. • If you press standby again within 15 minutes, the projector returns to normal operations immediately. • If you press standby again after 15 minutes. Using the Projector Standby When you press standby, the display and audio turn off after 15 minutes, there is about... second delay before the lamp turns back on page 23 for each source you have connected. 16 You can change the amount of time the projector stays in standby mode; see "Standby Time" on . • If you don't press standby again, the lamp turns off and a blank screen is...
... adjustments are saved for details. • If you press standby again within 15 minutes, the projector returns to normal operations immediately. • If you press standby again after 15 minutes. Using the Projector Standby When you press standby, the display and audio turn off after 15 minutes, there is about... second delay before the lamp turns back on page 23 for each source you have connected. 16 You can change the amount of time the projector stays in standby mode; see "Standby Time" on . • If you don't press standby again, the lamp turns off and a blank screen is...

User Guide
Page 21
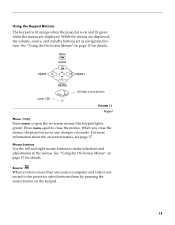
Using the On-Screen Menus The projector has six drop-down menus that allow you to make image adjustments and change a variety of options you scroll through to select the desired one. ...
Using the On-Screen Menus The projector has six drop-down menus that allow you to make image adjustments and change a variety of options you scroll through to select the desired one. ...
User Guide
Page 22
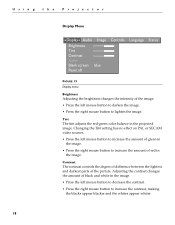
... contrast. • Press the right mouse button to lighten the image. Tint The tint adjusts the red-green color balance in the image. Using the Projector Display Menu FIGURE 13 Display menu Brightness Adjusting the brightness changes the intensity of the image. • Press the left mouse button to darken the...
... contrast. • Press the right mouse button to lighten the image. Tint The tint adjusts the red-green color balance in the image. Using the Projector Display Menu FIGURE 13 Display menu Brightness Adjusting the brightness changes the intensity of the image. • Press the left mouse button to darken the...


