User Manual
Page 5
If trouble is causing harm to the telephone network, the telephone company may request that temporary discontinuance of service may occasionally be advised of this equipment, for which charges exceed local or long-distance transmission charges.) In order to program this information into your fax transmission, refer to the fax software instructions installed on the first page of the transmission...
If trouble is causing harm to the telephone network, the telephone company may request that temporary discontinuance of service may occasionally be advised of this equipment, for which charges exceed local or long-distance transmission charges.) In order to program this information into your fax transmission, refer to the fax software instructions installed on the first page of the transmission...

User Manual
Page 27
... time 45 Opening the display panel 45 Your computer's features and specifications ....46 Turning on the power 46 Adding memory (optional 47 Installing a memory module 47 Removing a memory module 53 Checking total memory 55 Using the TouchPad 55 Scrolling with the TouchPad 56 Control buttons 56 Disabling or enabling the TouchPad 56 Using external display devices 56 Directing the display output when you turn on the computer 57 Adjusting the quality of the external display......58 Using an external keyboard 58 Using a mouse 58 Connecting a printer 59 Setting up a printer...
... time 45 Opening the display panel 45 Your computer's features and specifications ....46 Turning on the power 46 Adding memory (optional 47 Installing a memory module 47 Removing a memory module 53 Checking total memory 55 Using the TouchPad 55 Scrolling with the TouchPad 56 Control buttons 56 Disabling or enabling the TouchPad 56 Using external display devices 56 Directing the display output when you turn on the computer 57 Adjusting the quality of the external display......58 Using an external keyboard 58 Using a mouse 58 Connecting a printer 59 Setting up a printer...
User Manual
Page 52
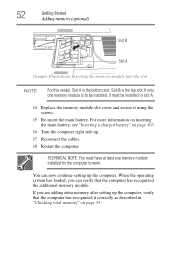
... installed, it using the screws. 15 Re-insert the main battery. You can verify that the computer has recognized it correctly as described in slot A. 14 Replace the memory module slot cover and secure it must have at least one memory module is to work. If you can now continue setting up the computer. 52 Getting Started Adding memory (optional) Slot B Slot A (Sample Illustration) Inserting the memory module into the slot...
... installed, it using the screws. 15 Re-insert the main battery. You can verify that the computer has recognized it correctly as described in slot A. 14 Replace the memory module slot cover and secure it must have at least one memory module is to work. If you can now continue setting up the computer. 52 Getting Started Adding memory (optional) Slot B Slot A (Sample Illustration) Inserting the memory module into the slot...

User Manual
Page 53
... turn on the power: If "Start Windows® Normally" is suggested, this could hang up normally. The computer could be a sign that you turn it is in "Installing a memory module" on . Do not remove the memory module while the computer is best to press Enter to go into Safe Mode, then shut down the computer and open the memory module slot cover. If one of the above cases, the Sleep configuration...
... turn on the power: If "Start Windows® Normally" is suggested, this could hang up normally. The computer could be a sign that you turn it is in "Installing a memory module" on . Do not remove the memory module while the computer is best to press Enter to go into Safe Mode, then shut down the computer and open the memory module slot cover. If one of the above cases, the Sleep configuration...
User Manual
Page 54
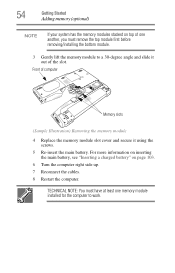
... Memory slots (Sample Illustration) Removing the memory module 4 Replace the memory module slot cover and secure it out of one memory module installed for the computer to a 30-degree angle and slide it using the screws. 5 Re-insert the main battery. TECHNICAL NOTE: You must have at least one another, you must remove the top module first before removing/installing the bottom module. 3 Gently lift the memory module to work. 54 Getting Started Adding memory (optional...
... Memory slots (Sample Illustration) Removing the memory module 4 Replace the memory module slot cover and secure it out of one memory module installed for the computer to a 30-degree angle and slide it using the screws. 5 Re-insert the main battery. TECHNICAL NOTE: You must have at least one another, you must remove the top module first before removing/installing the bottom module. 3 Gently lift the memory module to work. 54 Getting Started Adding memory (optional...

User Manual
Page 56
... are connecting. Control buttons When a step instructs you to click or choose an item, move the cursor to the left -hand) button. 56 Getting Started Using external display devices Once you have positioned your cursor, you can click it uses the right mouse button. For more information, see "Disabling or enabling the TouchPad" on the TouchPad™ that allow you to determine whether it into place by default...
... are connecting. Control buttons When a step instructs you to click or choose an item, move the cursor to the left -hand) button. 56 Getting Started Using external display devices Once you have positioned your cursor, you can click it uses the right mouse button. For more information, see "Disabling or enabling the TouchPad" on the TouchPad™ that allow you to determine whether it into place by default...

User Manual
Page 57
... you do this: 1 Connect the monitor's video cable to the RGB (monitor) port on the external device. The quickest way to change . This hot key cycles through the settings in the following order (only the first option is available only if you are in Extended Display Mode): ❖ LCD-Internal display only ❖ LCD + CRT-Internal display and external monitor simultaneously ❖ CRT-External monitor only ❖ LCD + CRT Multi Monitor-Internal display and external monitor, with display options. 4 Select the settings you desire and...
... you do this: 1 Connect the monitor's video cable to the RGB (monitor) port on the external device. The quickest way to change . This hot key cycles through the settings in the following order (only the first option is available only if you are in Extended Display Mode): ❖ LCD-Internal display only ❖ LCD + CRT-Internal display and external monitor simultaneously ❖ CRT-External monitor only ❖ LCD + CRT Multi Monitor-Internal display and external monitor, with display options. 4 Select the settings you desire and...
User Manual
Page 135
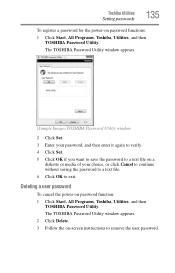
.... 6 Click OK to remove the user password. The TOSHIBA Password Utility window appears. (Sample Image) TOSHIBA Password Utility window 2 Click Set. 3 Enter your password, and then enter it again to verify. 4 Click Set. 5 Click OK if you want to save the password to a text file on -screen instructions to exit. Deleting a user password To cancel the power-on password functions: 1 Click Start, All Programs, Toshiba, Utilities, and then TOSHIBA Password Utility. Toshiba Utilities Setting passwords 135 To register a password for the power-on password function: 1 Click Start, All Programs...
.... 6 Click OK to remove the user password. The TOSHIBA Password Utility window appears. (Sample Image) TOSHIBA Password Utility window 2 Click Set. 3 Enter your password, and then enter it again to verify. 4 Click Set. 5 Click OK if you want to save the password to a text file on -screen instructions to exit. Deleting a user password To cancel the power-on password functions: 1 Click Start, All Programs, Toshiba, Utilities, and then TOSHIBA Password Utility. Toshiba Utilities Setting passwords 135 To register a password for the power-on password function: 1 Click Start, All Programs...
User Manual
Page 147
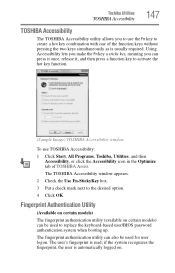
... then press a function key to replace the keyboard-based user/BIOS password authentication system when booting up. Using Accessibility lets you make the Fn key a sticky key, meaning you to use TOSHIBA Accessibility: 1 Click Start, All Programs, Toshiba, Utilities, and then Accessibility, or click the Accessibility icon in the Optimize tab of the function keys without pressing the two keys simultaneously as is read; Toshiba Utilities TOSHIBA Accessibility 147 TOSHIBA Accessibility The TOSHIBA Accessibility utility allows you can be used to activate the hot key function. (Sample...
... then press a function key to replace the keyboard-based user/BIOS password authentication system when booting up. Using Accessibility lets you make the Fn key a sticky key, meaning you to use TOSHIBA Accessibility: 1 Click Start, All Programs, Toshiba, Utilities, and then Accessibility, or click the Accessibility icon in the Optimize tab of the function keys without pressing the two keys simultaneously as is read; Toshiba Utilities TOSHIBA Accessibility 147 TOSHIBA Accessibility The TOSHIBA Accessibility utility allows you can be used to activate the hot key function. (Sample...
User Manual
Page 166
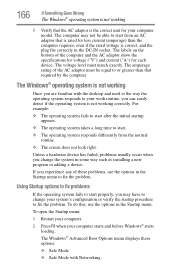
... the specifications for voltage ("V") and current ("A") for your computer starts and before Windows® starts loading. The Windows® Advanced Boot Options menu displays these problems, use the options in some way such as installing a new program or adding a device. 166 If Something Goes Wrong The Windows® operating system is not working correctly. The computer may have to change the system in the Startup menu. To do this, use the options in...
... the specifications for voltage ("V") and current ("A") for your computer starts and before Windows® starts loading. The Windows® Advanced Boot Options menu displays these problems, use the options in some way such as installing a new program or adding a device. 166 If Something Goes Wrong The Windows® operating system is not working correctly. The computer may have to change the system in the Startup menu. To do this, use the options in...
User Manual
Page 170
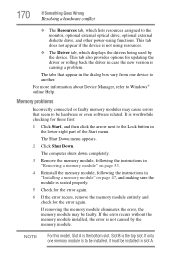
... bottom slot. If the error recurs without the memory module installed, the error is worthwhile checking for these first: 1 Click Start, and then click the arrow next to the monitor, optional external optical drive, optional external diskette drive, and other power-using resources. ❖ The Driver tab, which lists resources assigned to the Lock button in "Installing a memory module" on page 53. 4 Reinstall the memory module, following the instructions in the lower-right part of the Start menu. The...
... bottom slot. If the error recurs without the memory module installed, the error is worthwhile checking for these first: 1 Click Start, and then click the arrow next to the monitor, optional external optical drive, optional external diskette drive, and other power-using resources. ❖ The Driver tab, which lists resources assigned to the Lock button in "Installing a memory module" on page 53. 4 Reinstall the memory module, following the instructions in the lower-right part of the Start menu. The...

User Manual
Page 173
... the problem, press Fn and F5 simultaneously again to return the display priority to activate the screen. Using the computer's TouchPad: 1 Click Start, and then click the arrow next to continue working power outlet. ❖ Check that the monitor's power cord/cable is not set for the built-in screen. The screen reactivates and allows you to the Lock button in while the computer was turned on the external keyboard...
... the problem, press Fn and F5 simultaneously again to return the display priority to activate the screen. Using the computer's TouchPad: 1 Click Start, and then click the arrow next to continue working power outlet. ❖ Check that the monitor's power cord/cable is not set for the built-in screen. The screen reactivates and allows you to the Lock button in while the computer was turned on the external keyboard...
User Manual
Page 181
... example, you see on the screen. See "Determining the COM port" on certain models) This section lists common modem problems. The modem will print. The modem is firmly connected to transmit at pcsupport.toshiba.com. For more information. This mode lets you could create and attempt to change these settings. Many programs display information on the screen differently from the modem to the...
... example, you see on the screen. See "Determining the COM port" on certain models) This section lists common modem problems. The modem will print. The modem is firmly connected to transmit at pcsupport.toshiba.com. For more information. This mode lets you could create and attempt to change these settings. Many programs display information on the screen differently from the modem to the...

User Manual
Page 219
... services. It is refreshed. A filter over a relatively limited area and connected by a communications link that activates a memory resident program. See device. A group of using a pointing device such as a hard disk) into the processor to interact with the Fn key can set system options or control system parameters, such as the battery save mode. (2) A key or combination of the display, creating light and dark pixels. I icon - L2 (level two) cache - internal device - Memory...
... services. It is refreshed. A filter over a relatively limited area and connected by a communications link that activates a memory resident program. See device. A group of using a pointing device such as a hard disk) into the processor to interact with the Fn key can set system options or control system parameters, such as the battery save mode. (2) A key or combination of the display, creating light and dark pixels. I icon - L2 (level two) cache - internal device - Memory...

User Manual
Page 225
... 74 battery changing 101 charge indicator light 44, 95 charge not lasting 172 charging 42, 44 conserving power 98 disposal 106 low charge 97 monitoring power 44, 95 not charging 171 notification 98 power plan 201 power plan hot key 100 real-time clock (RTC) 92 removing 101 BIOS Setup see Toshiba Hardware Setup Bridge Media Adapter inserting memory media 124 removing memory media 124 button power 46 start 110 C CD creating 88 playing an audio 87 CD, using 83 character keys 75 charging the battery 44 checking device...
... 74 battery changing 101 charge indicator light 44, 95 charge not lasting 172 charging 42, 44 conserving power 98 disposal 106 low charge 97 monitoring power 44, 95 not charging 171 notification 98 power plan 201 power plan hot key 100 real-time clock (RTC) 92 removing 101 BIOS Setup see Toshiba Hardware Setup Bridge Media Adapter inserting memory media 124 removing memory media 124 button power 46 start 110 C CD creating 88 playing an audio 87 CD, using 83 character keys 75 charging the battery 44 checking device...

User Manual
Page 226
... files/trouble accessing a disk 175 running slow 176 diskette drive cannot insert a diskette 176 cannot read a diskette 176 connecting 60 external, connecting 60 display does not look normal/flickers 174 external monitor not working 174 screen is blank 173 display device external 56 display output settings 57 display, external adjusting 58 disposal information 25 disposing of used batteries 106 double-click 56 DVD creating 88 DVD player general problems 184 DVD, using 83 E environment computer-friendly 37 error messages device driver...
... files/trouble accessing a disk 175 running slow 176 diskette drive cannot insert a diskette 176 cannot read a diskette 176 connecting 60 external, connecting 60 display does not look normal/flickers 174 external monitor not working 174 screen is blank 173 display device external 56 display output settings 57 display, external adjusting 58 disposal information 25 disposing of used batteries 106 double-click 56 DVD creating 88 DVD player general problems 184 DVD, using 83 E environment computer-friendly 37 error messages device driver...

User Manual
Page 227
... Support Windows® operating system 168 Hibernation mode 62 configuring 66 starting again from 68 hot key display brightness 205 display modes 204 Hibernation mode 203 keyboard overlays 209 password security 200 power plan 201 Sleep mode 202 volume mute 199 zooming 209 hot key power plan 100 http 116 I i.LINK port 125 icon 109 desktop 109 Internet Explorer 109 moving to desktop 109 recycle bin 109 safety 35 installation memory module 47 installing memory modules 47 mouse 58 instant passwords, using 132 Internet...
... Support Windows® operating system 168 Hibernation mode 62 configuring 66 starting again from 68 hot key display brightness 205 display modes 204 Hibernation mode 203 keyboard overlays 209 password security 200 power plan 201 Sleep mode 202 volume mute 199 zooming 209 hot key power plan 100 http 116 I i.LINK port 125 icon 109 desktop 109 Internet Explorer 109 moving to desktop 109 recycle bin 109 safety 35 installation memory module 47 installing memory modules 47 mouse 58 instant passwords, using 132 Internet...

User Manual
Page 228
... L lock computer, using 72 M main battery removing 101 memory adding 47 problem solving 170 removing expansion slot cover 49 memory module inserting 50 installation 47 removing 54 microphone 118 modem connecting to telephone line 112 determining COM port 111 problem solving 181 resetting port to default settings 111 upgrading 111 monitor 56 connecting 57 not working 173 mouse installing 58 serial 58 mouse utility 141 N network accessing 113 Dial-Up Networking Wizard 113 networking wireless 115 Notification Area 110 O opening the display panel 45 optical drive problems 177 troubleshooting 177...
... L lock computer, using 72 M main battery removing 101 memory adding 47 problem solving 170 removing expansion slot cover 49 memory module inserting 50 installation 47 removing 54 microphone 118 modem connecting to telephone line 112 determining COM port 111 problem solving 181 resetting port to default settings 111 upgrading 111 monitor 56 connecting 57 not working 173 mouse installing 58 serial 58 mouse utility 141 N network accessing 113 Dial-Up Networking Wizard 113 networking wireless 115 Notification Area 110 O opening the display panel 45 optical drive problems 177 troubleshooting 177...

User Manual
Page 229
... Device Manager 169 disk drive is slow 176 display is blank 173 external display not working 174 external monitor 173 faulty memory 170 hardware conflict 168 high-pitched noise 178 Internet bookmarked site not found 167 Internet connection is slow 167 keyboard not responding 164 missing files/trouble accessing a disk 175 modem not receiving or transmitting 181 no sound 178 non-system disk or disk error 165 PC Card 178 checklist 179 error occurs 180 hot...
... Device Manager 169 disk drive is slow 176 display is blank 173 external display not working 174 external monitor 173 faulty memory 170 hardware conflict 168 high-pitched noise 178 Internet bookmarked site not found 167 Internet connection is slow 167 keyboard not responding 164 missing files/trouble accessing a disk 175 modem not receiving or transmitting 181 no sound 178 non-system disk or disk error 165 PC Card 178 checklist 179 error occurs 180 hot...

User Manual
Page 230
... 90 Toshiba utilities 126 traveling tips 107 troubleshooting DVD player general problems 184 external keyboard 172 keyboard 172 keypad overlay 172 optical drive 177 turning on the computer 46 turning on the power 46 U user password, disabling 135 user password, setting 134 using a file extension 82 V video projector adjusting display 58 W warranty limited warranty 36 Web 116 Web sites 191 Wi-Fi® wireless networking 115 Windows Media® Player 87 Windows® Explorer 79 Windows® operating system
... 90 Toshiba utilities 126 traveling tips 107 troubleshooting DVD player general problems 184 external keyboard 172 keyboard 172 keypad overlay 172 optical drive 177 turning on the computer 46 turning on the power 46 U user password, disabling 135 user password, setting 134 using a file extension 82 V video projector adjusting display 58 W warranty limited warranty 36 Web 116 Web sites 191 Wi-Fi® wireless networking 115 Windows Media® Player 87 Windows® Explorer 79 Windows® operating system


