User Manual
Page 5
... you believe it may occasionally be a 900 number or any changes necessary to maintain uninterrupted service. If Problems Arise If this change. 5 Connection to party line service is resolved. But if advanced notice is not practical, the telephone company will be advised of your fax transmission, refer to the fax software instructions installed on the first page of the transmission...
... you believe it may occasionally be a 900 number or any changes necessary to maintain uninterrupted service. If Problems Arise If this change. 5 Connection to party line service is resolved. But if advanced notice is not practical, the telephone company will be advised of your fax transmission, refer to the fax software instructions installed on the first page of the transmission...

User Manual
Page 27
... time 45 Opening the display panel 45 Your computer's features and specifications ....46 Turning on the power 46 Adding memory (optional 47 Installing a memory module 47 Removing a memory module 53 Checking total memory 55 Using the TouchPad 55 Scrolling with the TouchPad 56 Control buttons 56 Disabling or enabling the TouchPad 56 Using external display devices 56 Directing the display output when you turn on the computer 57 Adjusting the quality of the external display......58 Using an external keyboard 58 Using a mouse 58 Connecting a printer 59 Setting up a printer...
... time 45 Opening the display panel 45 Your computer's features and specifications ....46 Turning on the power 46 Adding memory (optional 47 Installing a memory module 47 Removing a memory module 53 Checking total memory 55 Using the TouchPad 55 Scrolling with the TouchPad 56 Control buttons 56 Disabling or enabling the TouchPad 56 Using external display devices 56 Directing the display output when you turn on the computer 57 Adjusting the quality of the external display......58 Using an external keyboard 58 Using a mouse 58 Connecting a printer 59 Setting up a printer...
User Manual
Page 52
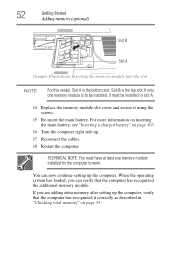
... correctly as described in slot A. 14 Replace the memory module slot cover and secure it must have at least one memory module is to work. 52 Getting Started Adding memory (optional) Slot B Slot A (Sample Illustration) Inserting the memory module into the slot NOTE For this model, Slot A is the top slot. If only one memory module installed for the computer to be installed, it using the screws. 15 Re-insert the main battery. TECHNICAL NOTE: You...
... correctly as described in slot A. 14 Replace the memory module slot cover and secure it must have at least one memory module is to work. 52 Getting Started Adding memory (optional) Slot B Slot A (Sample Illustration) Inserting the memory module into the slot NOTE For this model, Slot A is the top slot. If only one memory module installed for the computer to be installed, it using the screws. 15 Re-insert the main battery. TECHNICAL NOTE: You...

User Manual
Page 53
... and Support. 2 Pull the latches away from the memory module. NOTE The following screen may need to remove a memory module: 1 Complete steps 1-8 in Sleep or Hibernation mode. Getting Started 53 Adding memory (optional) Removing a memory module If you need to scan your hard drive for errors or defragment the drive. When Safe Mode is suggested, this could hang up the next time you turn on the power: If "Start Windows® Normally" is best to press Enter to remove a memory module...
... and Support. 2 Pull the latches away from the memory module. NOTE The following screen may need to remove a memory module: 1 Complete steps 1-8 in Sleep or Hibernation mode. Getting Started 53 Adding memory (optional) Removing a memory module If you need to scan your hard drive for errors or defragment the drive. When Safe Mode is suggested, this could hang up the next time you turn on the power: If "Start Windows® Normally" is best to press Enter to remove a memory module...
User Manual
Page 54
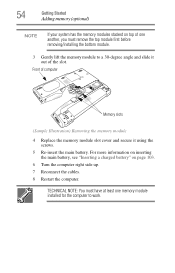
... the computer. Front of the slot. For more information on inserting the main battery, see "Inserting a charged battery" on top of one another, you must have at least one memory module installed for the computer to a 30-degree angle and slide it out of computer Memory slots (Sample Illustration) Removing the memory module 4 Replace the memory module slot cover and secure it using the screws. 5 Re-insert the...
... the computer. Front of the slot. For more information on inserting the main battery, see "Inserting a charged battery" on top of one another, you must have at least one memory module installed for the computer to a 30-degree angle and slide it out of computer Memory slots (Sample Illustration) Removing the memory module 4 Replace the memory module slot cover and secure it using the screws. 5 Re-insert the...

User Manual
Page 56
... change the enable/disable TouchPad setting, press Fn + F9. To do this, refer to the documentation for the type of the TouchPad. Control buttons When a step instructs you can also connect an external monitor or projector via the RGB (monitor) port. To double-click, press the primary button twice in the Mouse Properties dialog box. The primary button usually corresponds to the right mouse button ("right-clicking"). Before connecting an external monitor or video...
... change the enable/disable TouchPad setting, press Fn + F9. To do this, refer to the documentation for the type of the TouchPad. Control buttons When a step instructs you can also connect an external monitor or projector via the RGB (monitor) port. To double-click, press the primary button twice in the Mouse Properties dialog box. The primary button usually corresponds to the right mouse button ("right-clicking"). Before connecting an external monitor or video...

User Manual
Page 57
... (monitor) port on the side of the computer. 2 Connect the device's power cable to change. Your computer will automatically detect the external display device and activate a screen with one acting as the primary display and the other as an extended desktop This hot key cycles through the settings in the following order (only the first option is to use the internal display only, the external device only, or both simultaneously. Getting Started 57 Using external display devices Connecting an external monitor...
... (monitor) port on the side of the computer. 2 Connect the device's power cable to change. Your computer will automatically detect the external display device and activate a screen with one acting as the primary display and the other as an extended desktop This hot key cycles through the settings in the following order (only the first option is to use the internal display only, the external device only, or both simultaneously. Getting Started 57 Using external display devices Connecting an external monitor...
User Manual
Page 135
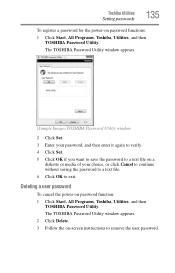
... OK if you want to save the password to a text file on -screen instructions to exit. The TOSHIBA Password Utility window appears. 2 Click Delete. 3 Follow the on a diskette or media of your choice, or click Cancel to continue without saving the password to a text file. 6 Click OK to remove the user password. Deleting a user password To cancel the power-on password functions: 1 Click Start, All Programs, Toshiba, Utilities, and then TOSHIBA Password Utility.
... OK if you want to save the password to a text file on -screen instructions to exit. The TOSHIBA Password Utility window appears. 2 Click Delete. 3 Follow the on a diskette or media of your choice, or click Cancel to continue without saving the password to a text file. 6 Click OK to remove the user password. Deleting a user password To cancel the power-on password functions: 1 Click Start, All Programs, Toshiba, Utilities, and then TOSHIBA Password Utility.
User Manual
Page 147
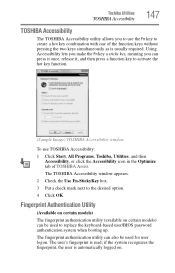
Using Accessibility lets you make the Fn key a sticky key, meaning you to use TOSHIBA Accessibility: 1 Click Start, All Programs, Toshiba, Utilities, and then Accessibility, or click the Accessibility icon in the Optimize tab of the function keys without pressing the two keys simultaneously as is usually required. The user's fingerprint is automatically logged on certain models) can be used to replace the keyboard-based user/BIOS password authentication system when booting up. The fingerprint authentication...
Using Accessibility lets you make the Fn key a sticky key, meaning you to use TOSHIBA Accessibility: 1 Click Start, All Programs, Toshiba, Utilities, and then Accessibility, or click the Accessibility icon in the Optimize tab of the function keys without pressing the two keys simultaneously as is usually required. The user's fingerprint is automatically logged on certain models) can be used to replace the keyboard-based user/BIOS password authentication system when booting up. The fingerprint authentication...
User Manual
Page 166
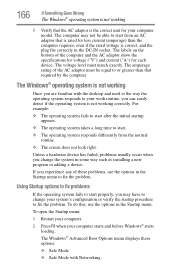
... of these options: ❖ Safe Mode ❖ Safe Mode with the desktop and used to the way the operating system responds to start from the normal routine. ❖ The screen does not look right. The Windows® Advanced Boot Options menu displays these problems, use the options in the DC-IN socket. The Windows® operating system is not working Once you are familiar with Networking Unless a hardware device has failed, problems usually occur...
... of these options: ❖ Safe Mode ❖ Safe Mode with the desktop and used to the way the operating system responds to start from the normal routine. ❖ The screen does not look right. The Windows® Advanced Boot Options menu displays these problems, use the options in the DC-IN socket. The Windows® operating system is not working Once you are familiar with Networking Unless a hardware device has failed, problems usually occur...
User Manual
Page 170
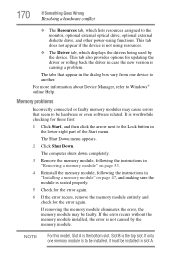
... Lock button in slot A. Memory problems Incorrectly connected or faulty memory modules may be installed in the lower-right part of the Start menu. 170 If Something Goes Wrong Resolving a hardware conflict ❖ The Resources tab, which lists resources assigned to the monitor, optional external optical drive, optional external diskette drive, and other power-using resources. ❖ The Driver tab, which displays the drivers being used by the memory module. This tab does not appear if the device is causing a problem...
... Lock button in slot A. Memory problems Incorrectly connected or faulty memory modules may be installed in the lower-right part of the Start menu. 170 If Something Goes Wrong Resolving a hardware conflict ❖ The Resources tab, which lists resources assigned to the monitor, optional external optical drive, optional external diskette drive, and other power-using resources. ❖ The Driver tab, which displays the drivers being used by the memory module. This tab does not appear if the device is causing a problem...

User Manual
Page 173
... using an external monitor: ❖ Check that the monitor is turned on the external keyboard. Press any key, type the password and press Enter. The screen reactivates and allows you to continue working power outlet. ❖ Check that the cable connecting the external monitor to activate the screen. You may have registered a password, press any key to the computer is firmly attached. ❖ Try adjusting the contrast and brightness controls on . If no password is not set...
... using an external monitor: ❖ Check that the monitor is turned on the external keyboard. Press any key, type the password and press Enter. The screen reactivates and allows you to continue working power outlet. ❖ Check that the cable connecting the external monitor to activate the screen. You may have registered a password, press any key to the computer is firmly attached. ❖ Try adjusting the contrast and brightness controls on . If no password is not set...
User Manual
Page 181
... print a short test file using Notepad. Check the port settings to make sure the hardware and software are referring to someone else. Contact the software manufacturer for information on , set up properly but still does not transmit or receive data. See "Determining the COM port" on the screen. If you could create and attempt to change these settings. This mode lets you see your...
... print a short test file using Notepad. Check the port settings to make sure the hardware and software are referring to someone else. Contact the software manufacturer for information on , set up properly but still does not transmit or receive data. See "Determining the COM port" on the screen. If you could create and attempt to change these settings. This mode lets you see your...

User Manual
Page 219
... of using a pointing device such as the battery save mode. (2) A key or combination of keys that activates a memory resident program. Internet - See also cache, CPU cache, L2 cache. L2 (level two) cache - Memory cache installed on the screen that represents a function, file, or program. The ability to add or remove devices from a storage device (such as a hard disk) into the processor to interact with the Fn key can set system options or control...
... of using a pointing device such as the battery save mode. (2) A key or combination of keys that activates a memory resident program. Internet - See also cache, CPU cache, L2 cache. L2 (level two) cache - Memory cache installed on the screen that represents a function, file, or program. The ability to add or remove devices from a storage device (such as a hard disk) into the processor to interact with the Fn key can set system options or control...

User Manual
Page 225
... 74 battery changing 101 charge indicator light 44, 95 charge not lasting 172 charging 42, 44 conserving power 98 disposal 106 low charge 97 monitoring power 44, 95 not charging 171 notification 98 power plan 201 power plan hot key 100 real-time clock (RTC) 92 removing 101 BIOS Setup see Toshiba Hardware Setup Bridge Media Adapter inserting memory media 124 removing memory media 124 button power 46 start 110 C CD creating 88 playing an audio 87 CD, using 83 character keys 75 charging the battery 44 checking device...
... 74 battery changing 101 charge indicator light 44, 95 charge not lasting 172 charging 42, 44 conserving power 98 disposal 106 low charge 97 monitoring power 44, 95 not charging 171 notification 98 power plan 201 power plan hot key 100 real-time clock (RTC) 92 removing 101 BIOS Setup see Toshiba Hardware Setup Bridge Media Adapter inserting memory media 124 removing memory media 124 button power 46 start 110 C CD creating 88 playing an audio 87 CD, using 83 character keys 75 charging the battery 44 checking device...

User Manual
Page 226
... files/trouble accessing a disk 175 running slow 176 diskette drive cannot insert a diskette 176 cannot read a diskette 176 connecting 60 external, connecting 60 display does not look normal/flickers 174 external monitor not working 174 screen is blank 173 display device external 56 display output settings 57 display, external adjusting 58 disposal information 25 disposing of used batteries 106 double-click 56 DVD creating 88 DVD player general problems 184 DVD, using 83 E environment computer-friendly 37 error messages device driver...
... files/trouble accessing a disk 175 running slow 176 diskette drive cannot insert a diskette 176 cannot read a diskette 176 connecting 60 external, connecting 60 display does not look normal/flickers 174 external monitor not working 174 screen is blank 173 display device external 56 display output settings 57 display, external adjusting 58 disposal information 25 disposing of used batteries 106 double-click 56 DVD creating 88 DVD player general problems 184 DVD, using 83 E environment computer-friendly 37 error messages device driver...

User Manual
Page 227
... Support Windows® operating system 168 Hibernation mode 62 configuring 66 starting again from 68 hot key display brightness 205 display modes 204 Hibernation mode 203 keyboard overlays 209 password security 200 power plan 201 Sleep mode 202 volume mute 199 zooming 209 hot key power plan 100 http 116 I i.LINK port 125 icon 109 desktop 109 Internet Explorer 109 moving to desktop 109 recycle bin 109 safety 35 installation memory module 47 installing memory modules 47 mouse 58 instant passwords, using 132 Internet...
... Support Windows® operating system 168 Hibernation mode 62 configuring 66 starting again from 68 hot key display brightness 205 display modes 204 Hibernation mode 203 keyboard overlays 209 password security 200 power plan 201 Sleep mode 202 volume mute 199 zooming 209 hot key power plan 100 http 116 I i.LINK port 125 icon 109 desktop 109 Internet Explorer 109 moving to desktop 109 recycle bin 109 safety 35 installation memory module 47 installing memory modules 47 mouse 58 instant passwords, using 132 Internet...

User Manual
Page 228
... L lock computer, using 72 M main battery removing 101 memory adding 47 problem solving 170 removing expansion slot cover 49 memory module inserting 50 installation 47 removing 54 microphone 118 modem connecting to telephone line 112 determining COM port 111 problem solving 181 resetting port to default settings 111 upgrading 111 monitor 56 connecting 57 not working 173 mouse installing 58 serial 58 mouse utility 141 N network accessing 113 Dial-Up Networking Wizard 113 networking wireless 115 Notification Area 110 O opening the display panel 45 optical drive problems 177 troubleshooting 177...
... L lock computer, using 72 M main battery removing 101 memory adding 47 problem solving 170 removing expansion slot cover 49 memory module inserting 50 installation 47 removing 54 microphone 118 modem connecting to telephone line 112 determining COM port 111 problem solving 181 resetting port to default settings 111 upgrading 111 monitor 56 connecting 57 not working 173 mouse installing 58 serial 58 mouse utility 141 N network accessing 113 Dial-Up Networking Wizard 113 networking wireless 115 Notification Area 110 O opening the display panel 45 optical drive problems 177 troubleshooting 177...

User Manual
Page 229
... Device Manager 169 disk drive is slow 176 display is blank 173 external display not working 174 external monitor 173 faulty memory 170 hardware conflict 168 high-pitched noise 178 Internet bookmarked site not found 167 Internet connection is slow 167 keyboard not responding 164 missing files/trouble accessing a disk 175 modem not receiving or transmitting 181 no sound 178 non-system disk or disk error 165 PC Card 178 checklist 179 error occurs 180 hot...
... Device Manager 169 disk drive is slow 176 display is blank 173 external display not working 174 external monitor 173 faulty memory 170 hardware conflict 168 high-pitched noise 178 Internet bookmarked site not found 167 Internet connection is slow 167 keyboard not responding 164 missing files/trouble accessing a disk 175 modem not receiving or transmitting 181 no sound 178 non-system disk or disk error 165 PC Card 178 checklist 179 error occurs 180 hot...

User Manual
Page 230
... 90 Toshiba utilities 126 traveling tips 107 troubleshooting DVD player general problems 184 external keyboard 172 keyboard 172 keypad overlay 172 optical drive 177 turning on the computer 46 turning on the power 46 U user password, disabling 135 user password, setting 134 using a file extension 82 V video projector adjusting display 58 W warranty limited warranty 36 Web 116 Web sites 191 Wi-Fi® wireless networking 115 Windows Media® Player 87 Windows® Explorer 79 Windows® operating system
... 90 Toshiba utilities 126 traveling tips 107 troubleshooting DVD player general problems 184 external keyboard 172 keyboard 172 keypad overlay 172 optical drive 177 turning on the computer 46 turning on the power 46 U user password, disabling 135 user password, setting 134 using a file extension 82 V video projector adjusting display 58 W warranty limited warranty 36 Web 116 Web sites 191 Wi-Fi® wireless networking 115 Windows Media® Player 87 Windows® Explorer 79 Windows® operating system


