User Manual
Page 27
... Using the computer for the first time 50 Opening the display panel 50 Your computer's features and specifications ....52 Turning on the power 52 Adding memory (optional 53 Using the TouchPad 54 Scrolling with the TouchPad 55 Control buttons 55 Disabling or enabling the TouchPad 55 Using external display devices 57...
... Using the computer for the first time 50 Opening the display panel 50 Your computer's features and specifications ....52 Turning on the power 52 Adding memory (optional 53 Using the TouchPad 54 Scrolling with the TouchPad 55 Control buttons 55 Disabling or enabling the TouchPad 55 Using external display devices 57...
User Manual
Page 30
... Card 134 Setting up a PC Card for your computer .........135 Using the Bridge Media Adapter Slot 135 Inserting memory media 135 Removing memory media 136 Using the i.LINK® port 137 Chapter 5: Toshiba Utilities 138 Toshiba Assist 139 Connect 140 Secure 141 Protect & Fix 142 Optimize 143 Setting passwords 144 Using an instant password...
... Card 134 Setting up a PC Card for your computer .........135 Using the Bridge Media Adapter Slot 135 Inserting memory media 135 Removing memory media 136 Using the i.LINK® port 137 Chapter 5: Toshiba Utilities 138 Toshiba Assist 139 Connect 140 Secure 141 Protect & Fix 142 Optimize 143 Setting passwords 144 Using an instant password...
User Manual
Page 31
... Quickly creating a new power profile 155 Customizing a power profile 155 Mouse Utility 156 Toshiba Hotkey Utility 157 Toshiba Hardware Setup 158 Toshiba Zooming Utility 160 Toshiba SD™ Memory Card Format Utility 161 Toshiba Button Controls 162 CD/DVD Drive Acoustic Silencer 163 Toshiba Accessibility 165 Trusted Platform Module (TPM 166 Fingerprint Authentication Utility 167 Fingerprint utility...
... Quickly creating a new power profile 155 Customizing a power profile 155 Mouse Utility 156 Toshiba Hotkey Utility 157 Toshiba Hardware Setup 158 Toshiba Zooming Utility 160 Toshiba SD™ Memory Card Format Utility 161 Toshiba Button Controls 162 CD/DVD Drive Acoustic Silencer 163 Toshiba Accessibility 165 Trusted Platform Module (TPM 166 Fingerprint Authentication Utility 167 Fingerprint utility...
User Manual
Page 32
... 187 A plan of action 187 Resolving hardware conflicts on your own .....188 Fixing a problem with Device Manager ...........189 Memory problems 191 Power and the batteries 192 Keyboard problems 193 Display problems 194 Disk drive problems 197 Optical drive problems 200 ... system configuration backup in the Windows operating system 214 If you need further assistance 220 Before you contact Toshiba 221 Contacting Toshiba 221 Other Toshiba Internet Web sites 222 Toshiba's worldwide offices 223 Appendix A: Hot Keys 225 Volume Mute 225 Password security 226 Without a password 226...
... 187 A plan of action 187 Resolving hardware conflicts on your own .....188 Fixing a problem with Device Manager ...........189 Memory problems 191 Power and the batteries 192 Keyboard problems 193 Display problems 194 Disk drive problems 197 Optical drive problems 200 ... system configuration backup in the Windows operating system 214 If you need further assistance 220 Before you contact Toshiba 221 Contacting Toshiba 221 Other Toshiba Internet Web sites 222 Toshiba's worldwide offices 223 Appendix A: Hot Keys 225 Volume Mute 225 Password security 226 Without a password 226...

User Manual
Page 43
... wrappers, or other similar materials can use external power or to be drawn in air by the cooling fan. See "Connecting to , a mouse, keyboard, printer, memory, and PC Cards. To prevent possible overheating of the computer. These components include, but are not limited to a power source" on the computer. If the...
... wrappers, or other similar materials can use external power or to be drawn in air by the cooling fan. See "Connecting to , a mouse, keyboard, printer, memory, and PC Cards. To prevent possible overheating of the computer. These components include, but are not limited to a power source" on the computer. If the...

User Manual
Page 53
... power button and the on the system indicator panel glows blue-about one second. Your computer comes with your system or visit accessories.toshiba.com. Getting Started Adding memory (optional) 53 3 Press and hold the power button in until the operating system has loaded completely. The preinstalled operating system will load automatically...
... power button and the on the system indicator panel glows blue-about one second. Your computer comes with your system or visit accessories.toshiba.com. Getting Started Adding memory (optional) 53 3 Press and hold the power button in until the operating system has loaded completely. The preinstalled operating system will load automatically...

User Manual
Page 54
... to right. ❖ To move the cursor with your computer, or visit accessories.toshiba.com. Simply move your software" on page 44. NOTE Before adding external devices or memory, Toshiba recommends setting up your finger on the TouchPad in the preferred direction. See "Setting up...slots are located under the keyboard and should only be accessed by a Toshiba authorized service provider. Your computer has two memory module slots. 54 Getting Started Using the TouchPad™ For more information on memory options, check the accessories information that came with the stroke of a ...
... to right. ❖ To move the cursor with your computer, or visit accessories.toshiba.com. Simply move your software" on page 44. NOTE Before adding external devices or memory, Toshiba recommends setting up your finger on the TouchPad in the preferred direction. See "Setting up...slots are located under the keyboard and should only be accessed by a Toshiba authorized service provider. Your computer has two memory module slots. 54 Getting Started Using the TouchPad™ For more information on memory options, check the accessories information that came with the stroke of a ...

User Manual
Page 64
...consumes less main battery power than restarting from turning off the computer. ❖ Since information is being retrieved from the hard disk rather than from memory, restarting from Hibernation takes a little more time and consumes more main battery power to start up than restarting from where you left it, including all... save your work before putting your hard disk. 64 Getting Started Turning off the computer ❖ Because the state of the computer in system memory (RAM) so that, when you restart the computer, you can continue working from turning off the computer or using .
...consumes less main battery power than restarting from turning off the computer. ❖ Since information is being retrieved from the hard disk rather than from memory, restarting from Hibernation takes a little more time and consumes more main battery power to start up than restarting from where you left it, including all... save your work before putting your hard disk. 64 Getting Started Turning off the computer ❖ Because the state of the computer in system memory (RAM) so that, when you restart the computer, you can continue working from turning off the computer or using .
User Manual
Page 74
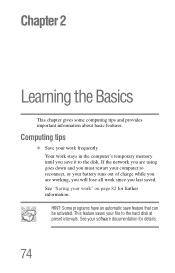
See your work stays in the computer's temporary memory until you must restart your computer to reconnect, or your file to the disk. Computing tips ❖ Save your software documentation for further information. Chapter 2 ...
See your work stays in the computer's temporary memory until you must restart your computer to reconnect, or your file to the disk. Computing tips ❖ Save your software documentation for further information. Chapter 2 ...

User Manual
Page 99
... settings and the current time and date information. Mobile Computing Running the computer on battery power 99 The RTC battery powers the RTC memory that will provide the most stable operating environment and optimum system performance for both AC power and battery modes. You can then replace...use the preset configuration. TECHNICAL NOTE: The RTC battery does not charge while the computer is powered on batteries and accessories, see accessories.toshiba.com. If you travel and need to the main battery, you may purchase a battery module for many hours without an AC power source...
... settings and the current time and date information. Mobile Computing Running the computer on battery power 99 The RTC battery powers the RTC memory that will provide the most stable operating environment and optimum system performance for both AC power and battery modes. You can then replace...use the preset configuration. TECHNICAL NOTE: The RTC battery does not charge while the computer is powered on batteries and accessories, see accessories.toshiba.com. If you travel and need to the main battery, you may purchase a battery module for many hours without an AC power source...
User Manual
Page 101
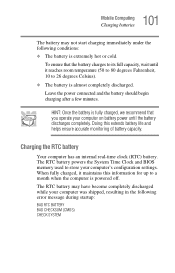
... degrees Fahrenheit, 10 to 26 degrees Celsius). ❖ The battery is extremely hot or cold. The RTC battery powers the System Time Clock and BIOS memory used to a month when the computer is fully charged, we recommend that the battery charges to its full capacity, wait until it maintains this extends...
... degrees Fahrenheit, 10 to 26 degrees Celsius). ❖ The battery is extremely hot or cold. The RTC battery powers the System Time Clock and BIOS memory used to a month when the computer is fully charged, we recommend that the battery charges to its full capacity, wait until it maintains this extends...

User Manual
Page 135
.... This media can be set up your PC Card, refer to the documentation that the contacts (metal areas) are ready to use of media. Inserting memory media The following instructions apply to all media devices. 1 Turn the media so that came with the card or refer to your operating system manual... Your Computer's Features Using the Bridge Media Adapter Slot Setting up to work with your computer. To set up a PC Card for this type of Memory Stick™ or Memory Stick™ PRO media, Secure Digital™ (SD™) Cards, MMC (MultiMedia Card™) or xD-Picture Cards.
.... This media can be set up your PC Card, refer to the documentation that the contacts (metal areas) are ready to use of media. Inserting memory media The following instructions apply to all media devices. 1 Turn the media so that came with the card or refer to your operating system manual... Your Computer's Features Using the Bridge Media Adapter Slot Setting up to work with your computer. To set up a PC Card for this type of Memory Stick™ or Memory Stick™ PRO media, Secure Digital™ (SD™) Cards, MMC (MultiMedia Card™) or xD-Picture Cards.
User Manual
Page 136
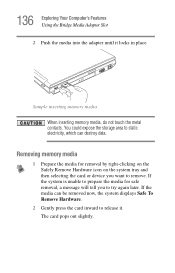
... To Remove Hardware. 2 Gently press the card inward to remove. The card pops out slightly. Sample inserting memory media When inserting memory media, do not touch the metal contacts. If the media can destroy data. Removing memory media 1 Prepare the media for safe removal, a message will tell you want to release it locks...
... To Remove Hardware. 2 Gently press the card inward to remove. The card pops out slightly. Sample inserting memory media When inserting memory media, do not touch the metal contacts. If the media can destroy data. Removing memory media 1 Prepare the media for safe removal, a message will tell you want to release it locks...
User Manual
Page 137
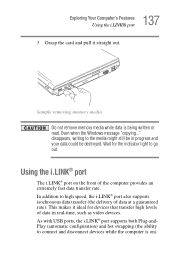
... addition to go out. Wait for devices that transfer high levels of data in progress and your data could be destroyed. Sample removing memory media Do not remove memory media while data is on the front of the computer provides an extremely fast data transfer rate. disappears, writing to connect and disconnect...
... addition to go out. Wait for devices that transfer high levels of data in progress and your data could be destroyed. Sample removing memory media Do not remove memory media while data is on the front of the computer provides an extremely fast data transfer rate. disappears, writing to connect and disconnect...
User Manual
Page 138
... needs. This chapter describes the utilities supplied by Toshiba: ❖ Toshiba Assist ❖ User Password ❖ Supervisor Password ❖ Fn-esse® ❖ PC Diagnostic Tool Utility ❖ Toshiba Power Saver ❖ Mouse Utility ❖ Toshiba Hotkey Utility ❖ Toshiba Hardware Setup ❖ Toshiba Zooming Utility ❖ Toshiba SD™ Memory Card Format Utility ❖ Toshiba Button Controls 138
... needs. This chapter describes the utilities supplied by Toshiba: ❖ Toshiba Assist ❖ User Password ❖ Supervisor Password ❖ Fn-esse® ❖ PC Diagnostic Tool Utility ❖ Toshiba Power Saver ❖ Mouse Utility ❖ Toshiba Hotkey Utility ❖ Toshiba Hardware Setup ❖ Toshiba Zooming Utility ❖ Toshiba SD™ Memory Card Format Utility ❖ Toshiba Button Controls 138
User Manual
Page 143
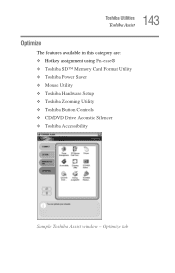
143 Toshiba Utilities Toshiba Assist Optimize The features available in this category are: ❖ Hotkey assignment using Fn-esse® ❖ Toshiba SD™ Memory Card Format Utility ❖ Toshiba Power Saver ❖ Mouse Utility ❖ Toshiba Hardware Setup ❖ Toshiba Zooming Utility ❖ Toshiba Button Controls ❖ CD/DVD Drive Acoustic Silencer ❖ Toshiba Accessibility Sample Toshiba Assist window - Optimize tab
143 Toshiba Utilities Toshiba Assist Optimize The features available in this category are: ❖ Hotkey assignment using Fn-esse® ❖ Toshiba SD™ Memory Card Format Utility ❖ Toshiba Power Saver ❖ Mouse Utility ❖ Toshiba Hardware Setup ❖ Toshiba Zooming Utility ❖ Toshiba Button Controls ❖ CD/DVD Drive Acoustic Silencer ❖ Toshiba Accessibility Sample Toshiba Assist window - Optimize tab

User Manual
Page 161
...utility: 1 Click Start, All Programs, Toshiba, Utilities, SD Memory Card Format utility, or click the SD Memory Card icon in , hold down the Fn key and press 2; The SD Memory Card Format screen appears. To zoom in the Optimize tab of Toshiba Assist. Toshiba SD™ Memory Card Format Utility This utility is used ... to format SD cards used to zoom out, hold down the Fn key and press 1. For more information about how to the SD memory card. 161 Toshiba Utilities Toshiba SD™ Memory Card Format Utility 3 Click OK. The zoom in the taskbar and then click Help. Sample SD...
...utility: 1 Click Start, All Programs, Toshiba, Utilities, SD Memory Card Format utility, or click the SD Memory Card icon in , hold down the Fn key and press 2; The SD Memory Card Format screen appears. To zoom in the Optimize tab of Toshiba Assist. Toshiba SD™ Memory Card Format Utility This utility is used ... to format SD cards used to zoom out, hold down the Fn key and press 1. For more information about how to the SD memory card. 161 Toshiba Utilities Toshiba SD™ Memory Card Format Utility 3 Click OK. The zoom in the taskbar and then click Help. Sample SD...

User Manual
Page 171
... enrollment wizard. Available options depend on button above it is displayed with your fingerprint software. The button appears "pressed in memory during enrollment. The number of your user name and password. 171 Toshiba Utilities Fingerprint Authentication Utility To enable power-on security is implemented, control whether they are associated with a power-on...
... enrollment wizard. Available options depend on button above it is displayed with your fingerprint software. The button appears "pressed in memory during enrollment. The number of your user name and password. 171 Toshiba Utilities Fingerprint Authentication Utility To enable power-on security is implemented, control whether they are associated with a power-on...

User Manual
Page 172
...Data-Existing fingerprints can be exported to a *.vtp file and imported back to be used only for power-on Security-The memory of these settings can be modified only by a password that is extremely important for your satisfaction with basic information about product features.... ❖ Tutorial-Runs the fingerprint tutorial which fingerprints are present in the device memory and can see the contents of your fingerprint software. 172 Toshiba Utilities Fingerprint Authentication Utility ❖ Delete-In convenient mode, deletes all users. ❖ User Settings...
...Data-Existing fingerprints can be exported to a *.vtp file and imported back to be used only for power-on Security-The memory of these settings can be modified only by a password that is extremely important for your satisfaction with basic information about product features.... ❖ Tutorial-Runs the fingerprint tutorial which fingerprints are present in the device memory and can see the contents of your fingerprint software. 172 Toshiba Utilities Fingerprint Authentication Utility ❖ Delete-In convenient mode, deletes all users. ❖ User Settings...
User Manual
Page 176
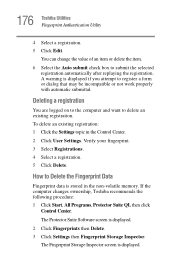
... registration: 1 Click the Settings topic in the non-volatile memory. How to register a form or dialog that may be incompatible or not work properly with automatic submittal. The Fingerprint Storage Inspector screen is stored in the Control Center. 2 Click User Settings. 176 Toshiba Utilities Fingerprint Authentication Utility 4 Select a registration. 5 Click Edit. The...
... registration: 1 Click the Settings topic in the non-volatile memory. How to register a form or dialog that may be incompatible or not work properly with automatic submittal. The Fingerprint Storage Inspector screen is stored in the Control Center. 2 Click User Settings. 176 Toshiba Utilities Fingerprint Authentication Utility 4 Select a registration. 5 Click Edit. The...


