
User Guide
Page 19
... in Sleep mode 43 Adding optional external devices 44 Adding memory (optional 44 Installing a memory module 45 Removing a memory module 50 Checking total memory 52 Recovering the Internal Storage Drive 53 Creating recovery media 54 Restoring from recovery media 56 Refresh your PC (with user's data 57 Reset your PC 59 Installing drivers and applications 62 Using the touch pad 63 Adjusting touch pad settings 65 Disabling or enabling the touch pad 66 Connecting an external device 66 Using external display devices 66 Selecting video cables 67 Connecting an HDMI™-compatible...
... in Sleep mode 43 Adding optional external devices 44 Adding memory (optional 44 Installing a memory module 45 Removing a memory module 50 Checking total memory 52 Recovering the Internal Storage Drive 53 Creating recovery media 54 Restoring from recovery media 56 Refresh your PC (with user's data 57 Reset your PC 59 Installing drivers and applications 62 Using the touch pad 63 Adjusting touch pad settings 65 Disabling or enabling the touch pad 66 Connecting an external device 66 Using external display devices 66 Selecting video cables 67 Connecting an HDMI™-compatible...

User Guide
Page 23
... Wireless networking problems 148 DVD Blu-ray Disc™ operating problems 149 Develop good computing habits 150 Data and system configuration backup in the Windows® operating system 151 If you need further assistance 156 Contacting Toshiba 157 Other Toshiba Internet Web sites 157 Toshiba's worldwide offices 157 Appendix A: TOSHIBA Function Keys 159 Functions 159 Help file 160 Display brightness 160 Output (Display switch 161 Disabling or enabling the touch pad 162 Media buttons 162 Volume Mute 163 Disabling or enabling wireless devices............163 Keyboard Function...
... Wireless networking problems 148 DVD Blu-ray Disc™ operating problems 149 Develop good computing habits 150 Data and system configuration backup in the Windows® operating system 151 If you need further assistance 156 Contacting Toshiba 157 Other Toshiba Internet Web sites 157 Toshiba's worldwide offices 157 Appendix A: TOSHIBA Function Keys 159 Functions 159 Help file 160 Display brightness 160 Output (Display switch 161 Disabling or enabling the touch pad 162 Media buttons 162 Volume Mute 163 Disabling or enabling wireless devices............163 Keyboard Function...

User Guide
Page 26
...-to-date product information about the features and specifications on your computer, or to change without notice. Your particular model may not have all subject to stay current with the various computer software or hardware options, visit Toshiba's Web site at support.toshiba.com. 26 Introduction This guide NOTE The product specifications and configuration information are all the features and specifications listed or illustrated.
...-to-date product information about the features and specifications on your computer, or to change without notice. Your particular model may not have all subject to stay current with the various computer software or hardware options, visit Toshiba's Web site at support.toshiba.com. 26 Introduction This guide NOTE The product specifications and configuration information are all the features and specifications listed or illustrated.

User Guide
Page 45
... memory slots-Slot A and Slot B. You can be installed in the memory module slots on the underside of the screen or swipe in from the right edge. 2 When the Windows® charms appear, click or touch the Settings ( ) charm. If you install or remove a memory module, turn off the computer. Slot B is in Sleep or Hibernation mode, data will need a small Phillips screwdriver for this model, Slot A is on may also be installed in Slot...
... memory slots-Slot A and Slot B. You can be installed in the memory module slots on the underside of the screen or swipe in from the right edge. 2 When the Windows® charms appear, click or touch the Settings ( ) charm. If you install or remove a memory module, turn off the computer. Slot B is in Sleep or Hibernation mode, data will need a small Phillips screwdriver for this model, Slot A is on may also be installed in Slot...
User Guide
Page 51
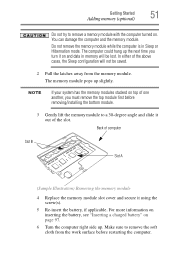
... the battery, see "Inserting a charged battery" on . Getting Started 51 Adding memory (optional) Do not try to remove a memory module with the computer turned on page 97. 6 Turn the computer right side up. Back of computer Slot B Slot A (Sample Illustration) Removing the memory module 4 Replace the memory module slot cover and secure it out of the slot. NOTE If your system has the memory modules stacked on top of the above cases, the Sleep configuration will...
... the battery, see "Inserting a charged battery" on . Getting Started 51 Adding memory (optional) Do not try to remove a memory module with the computer turned on page 97. 6 Turn the computer right side up. Back of computer Slot B Slot A (Sample Illustration) Removing the memory module 4 Replace the memory module slot cover and secure it out of the slot. NOTE If your system has the memory modules stacked on top of the above cases, the Sleep configuration will...
User Guide
Page 52
If the computer does not recognize the memory configuration, turn off the computer and remove the memory module slot cover (complete steps 1-10 in "Installing a memory module" on page 45), and then check that the computer has recognized the change. TECHNICAL NOTE: You must have adequate ventilation and are protected from overheating when the power is turned on a hard flat surface. Installed memory (RAM) is inserted completely into the...
If the computer does not recognize the memory configuration, turn off the computer and remove the memory module slot cover (complete steps 1-10 in "Installing a memory module" on page 45), and then check that the computer has recognized the change. TECHNICAL NOTE: You must have adequate ventilation and are protected from overheating when the power is turned on a hard flat surface. Installed memory (RAM) is inserted completely into the...
User Guide
Page 66
... To locate your HDMI™ or RGB port, please refer to your Quick Start document. 66 Getting Started Using external display devices ❖ Adjust the sensitivity of the touch pad, so that came with a built-in display, but you first need to install new software. 2 Connect the device's video or USB cable to the port on the computer and to the device. 3 Connect the device's power cable to accidental light taps and lighter finger pressure. Disabling or enabling the touch pad The touch pad is less...
... To locate your HDMI™ or RGB port, please refer to your Quick Start document. 66 Getting Started Using external display devices ❖ Adjust the sensitivity of the touch pad, so that came with a built-in display, but you first need to install new software. 2 Connect the device's video or USB cable to the port on the computer and to the device. 3 Connect the device's power cable to accidental light taps and lighter finger pressure. Disabling or enabling the touch pad The touch pad is less...
User Guide
Page 67
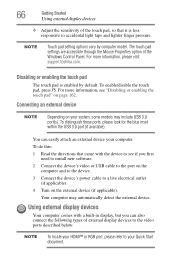
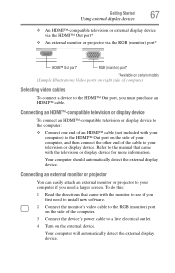
... Started 67 Using external display devices ❖ An HDMI™-compatible television or external display device via the HDMI™ Out port* ❖ An external monitor or projector via the RGB (monitor) port* HDMI™ Out port* RGB (monitor) port* *Available on certain models (Sample Illustration) Video ports on right side of computer Selecting video cables To connect a device to the HDMI™ Out port, you need to install new software. 2 Connect the monitor's video cable to the RGB (monitor) port on the side of the computer. 3 Connect the device's power cable...
... Started 67 Using external display devices ❖ An HDMI™-compatible television or external display device via the HDMI™ Out port* ❖ An external monitor or projector via the RGB (monitor) port* HDMI™ Out port* RGB (monitor) port* *Available on certain models (Sample Illustration) Video ports on right side of computer Selecting video cables To connect a device to the HDMI™ Out port, you need to install new software. 2 Connect the monitor's video cable to the RGB (monitor) port on the side of the computer. 3 Connect the device's power cable...
User Guide
Page 80
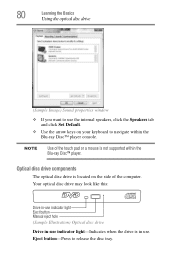
... touch pad or a mouse is located on your keyboard to navigate within the Blu-ray Disc™ player. Eject button-Press to release the disc tray. Optical disc drive components The optical disc drive is not supported within the Blu-ray Disc™ player console. Your optical disc drive may look like this: Drive in-use indicator light Eject button Manual eject hole (Sample Illustration) Optical disc drive Drive in-use indicator light-Indicates when the drive is in use the internal...
... touch pad or a mouse is located on your keyboard to navigate within the Blu-ray Disc™ player. Eject button-Press to release the disc tray. Optical disc drive components The optical disc drive is not supported within the Blu-ray Disc™ player console. Your optical disc drive may look like this: Drive in-use indicator light Eject button Manual eject hole (Sample Illustration) Optical disc drive Drive in-use indicator light-Indicates when the drive is in use the internal...

User Guide
Page 122
... access it: 1 To access System Settings from the Start screen begin typing System Settings, or while in Sleep mode, press the ( ) + P keys to change the sequence in which your computer searches the drives for the operating system ❖ Boot Priority-Allows you to configure boot priority settings. ❖ Panel open/Power on-Allows you to turn on the computer when opening the display panel while the computer is the TOSHIBA configuration management tool available through the Windows® operating...
... access it: 1 To access System Settings from the Start screen begin typing System Settings, or while in Sleep mode, press the ( ) + P keys to change the sequence in which your computer searches the drives for the operating system ❖ Boot Priority-Allows you to configure boot priority settings. ❖ Panel open/Power on-Allows you to turn on the computer when opening the display panel while the computer is the TOSHIBA configuration management tool available through the Windows® operating...
User Guide
Page 133
... options to start . ❖ The operating system responds differently from depending on page 157. To enter the Boot menu manually: 1 Press Ctrl, Alt, and Del simultaneously (once). If the specifications do not match, locate and use the options in some way such as installing a new program or adding a device. If you change the system in the Startup menu to troubleshoot the Operating System and/or its settings. If the battery light is blinking...
... options to start . ❖ The operating system responds differently from depending on page 157. To enter the Boot menu manually: 1 Press Ctrl, Alt, and Del simultaneously (once). If the specifications do not match, locate and use the options in some way such as installing a new program or adding a device. If you change the system in the Startup menu to troubleshoot the Operating System and/or its settings. If the battery light is blinking...
User Guide
Page 134
... information, see "Refresh your personal files and apps are removed ❖ Your computer settings are changed back to their defaults For more information, see "Reset your screen. 3 Click or touch the Restart option from the menu. 4 Click or touch Troubleshoot from the Windows® Store are created: ❖ When new hardware or software is not working 2 Press the Power button in the lower right corner of your PC" on...
... information, see "Refresh your personal files and apps are removed ❖ Your computer settings are changed back to their defaults For more information, see "Reset your screen. 3 Click or touch the Restart option from the menu. 4 Click or touch Troubleshoot from the Windows® Store are created: ❖ When new hardware or software is not working 2 Press the Power button in the lower right corner of your PC" on...
User Guide
Page 141
.../cable is firmly plugged into a working power outlet. ❖ Check that the cable connecting the external monitor to the computer is firmly attached. ❖ Try adjusting the contrast and brightness controls on the external monitor. ❖ Press F4 to make sure the display priority is not set for the builtin screen. A message displays saying that the adapter type is incorrect or the current settings do this does not correct the problem...
.../cable is firmly plugged into a working power outlet. ❖ Check that the cable connecting the external monitor to the computer is firmly attached. ❖ Try adjusting the contrast and brightness controls on the external monitor. ❖ Press F4 to make sure the display priority is not set for the builtin screen. A message displays saying that the adapter type is incorrect or the current settings do this does not correct the problem...
User Guide
Page 149
... frequently addressed in new firmware releases. Problems with a support technician at a later time. The IP address for recent firmware upgrades. DVD Blu-ray Disc™ operating problems (Available on page 159. ❖ Use IPCONFIG to get it cleaned. NOTE To enable or disable wireless communication, use the F12 key. If your connection problem disappears, the problem lies in the drive tray. 3 Use the DVD or Blu-ray Disc™ player software that came with...
... frequently addressed in new firmware releases. Problems with a support technician at a later time. The IP address for recent firmware upgrades. DVD Blu-ray Disc™ operating problems (Available on page 159. ❖ Use IPCONFIG to get it cleaned. NOTE To enable or disable wireless communication, use the F12 key. If your connection problem disappears, the problem lies in the drive tray. 3 Use the DVD or Blu-ray Disc™ player software that came with...

User Guide
Page 154
... guess - Search for your web browser). ❖ Create a restore point (refer to launch the Windows® Help and Support screen. follow the installation instructions that appears. 2 Click or touch Save backup copies of new hardware (printers, pointing devices, external hard drives, optical disc drive writers, scanners, etc.) and software (applications like Microsoft® Office and Adobe® Photoshop®, or utility software such as special toolbars for "back up the...
... guess - Search for your web browser). ❖ Create a restore point (refer to launch the Windows® Help and Support screen. follow the installation instructions that appears. 2 Click or touch Save backup copies of new hardware (printers, pointing devices, external hard drives, optical disc drive writers, scanners, etc.) and software (applications like Microsoft® Office and Adobe® Photoshop®, or utility software such as special toolbars for "back up the...
User Guide
Page 173
... Toshiba computers that you use to transmit high quality audio and video signal via a single cable in which only every other services. Compare software. hot swapping-The ability to create a complete screen image. Interlaced monitors take two passes to add or remove devices from a computer while the computer is refreshed. Compare non-interlaced. K keyboard shortcut-A key or combination of using this function, if connected with HDMI cables. See also cache, CPU...
... Toshiba computers that you use to transmit high quality audio and video signal via a single cable in which only every other services. Compare software. hot swapping-The ability to create a complete screen image. Interlaced monitors take two passes to add or remove devices from a computer while the computer is refreshed. Compare non-interlaced. K keyboard shortcut-A key or combination of using this function, if connected with HDMI cables. See also cache, CPU...
User Guide
Page 181
... or display device 67 monitor 67 power cord/cable 39 power source 38 cooling fan adequate ventilation 36 customize computer settings 69 D data/entire system backup troubleshooting 153 desktop creating new icon 104 exploring the 104 icons 104 recycle bin 105 standard features 103, 104 Desktop Assist 113 Media & Entertainment tab 114 Support & Recovery tab 116 Tools & Utilities tab 115 Device Manager fixing a problem 137 directing display output 68 disabling touch pad 66 display troubleshooting 141 display devices external...
... or display device 67 monitor 67 power cord/cable 39 power source 38 cooling fan adequate ventilation 36 customize computer settings 69 D data/entire system backup troubleshooting 153 desktop creating new icon 104 exploring the 104 icons 104 recycle bin 105 standard features 103, 104 Desktop Assist 113 Media & Entertainment tab 114 Support & Recovery tab 116 Tools & Utilities tab 115 Device Manager fixing a problem 137 directing display output 68 disabling touch pad 66 display troubleshooting 141 display devices external...

User Guide
Page 182
... Disc™ player troubleshooting 149 DVDs using 78 E eco power plan 94 eco Utility® 117 eject button optical disc drive 80 eject, optical disc drive 81 enabling touch pad 66 enabling/disabling touch pad 162 ENERGY STAR® 24 exploring desktop 104 Start screen 102 external display device HDMI™ Out port 67 external display, adjusting 69 F files backing up 73, 78 saving 78 Function Key 127 Function Keys disabling or enabling wireless devices 163 Function keys 162 display brightness 160 Help file 160 keyboard Function keys 163 media buttons 162 Output (Display switch) 161 volume...
... Disc™ player troubleshooting 149 DVDs using 78 E eco power plan 94 eco Utility® 117 eject button optical disc drive 80 eject, optical disc drive 81 enabling touch pad 66 enabling/disabling touch pad 162 ENERGY STAR® 24 exploring desktop 104 Start screen 102 external display device HDMI™ Out port 67 external display, adjusting 69 F files backing up 73, 78 saving 78 Function Key 127 Function Keys disabling or enabling wireless devices 163 Function keys 162 display brightness 160 Help file 160 keyboard Function keys 163 media buttons 162 Output (Display switch) 161 volume...
User Guide
Page 184
... 85 power down shut down 42 power light 90 power management 87 optimum performance 87 power plans selecting power plan options 93 power saving options 92 precautions safety 34 printer troubleshooting 147 problem solving contacting Toshiba 157 Startup options 133 projector connecting 67 R real-time clock (RTC) battery 86 recording sounds 108 recovery creating recovery media 54 installing drivers and applications 62 internal storage drive 53 refresh your PC 57 reset your PC 59 restoring from recovery media 56 Recovery Media Creator...
... 85 power down shut down 42 power light 90 power management 87 optimum performance 87 power plans selecting power plan options 93 power saving options 92 precautions safety 34 printer troubleshooting 147 problem solving contacting Toshiba 157 Startup options 133 projector connecting 67 R real-time clock (RTC) battery 86 recording sounds 108 recovery creating recovery media 54 installing drivers and applications 62 internal storage drive 53 refresh your PC 57 reset your PC 59 restoring from recovery media 56 Recovery Media Creator...
User Guide
Page 185
... Sleep mode 43 Sleep Utilities 123 sounds recording 108 speakers using external 108 Start screen exploring the 102 starting an app 77 starting an app from Start screen 77 Startup menu problem solving 133 supervisor password, deleting 119 supervisor password, set up 118 system indicator lights AC power 37 drive in-use indicator 80 LEDs 39, 40, 89, 90, 109 System Settings 122 T taking care of battery 98 taskbar 105 television adjusting display 69 Tiles Start screen 104 tips for computing 72 Toshiba...
... Sleep mode 43 Sleep Utilities 123 sounds recording 108 speakers using external 108 Start screen exploring the 102 starting an app 77 starting an app from Start screen 77 Startup menu problem solving 133 supervisor password, deleting 119 supervisor password, set up 118 system indicator lights AC power 37 drive in-use indicator 80 LEDs 39, 40, 89, 90, 109 System Settings 122 T taking care of battery 98 taskbar 105 television adjusting display 69 Tiles Start screen 104 tips for computing 72 Toshiba...


