

User Guide 1
Page 5
...company is to provide you to make changes in their equipment, operations or procedures. If Problems Arise If this equipment, for any person to use a computer or other electronic device, including Fax machines, to the telephone network, the telephone company will give ...number provided may not be required. Contact the state public utility commission, public service commission or corporation commission for them know of your fax transmission, refer to the fax software instructions installed on this computer. or an authorized representative of Toshiba, or the Toshiba Customer Support...
...company is to provide you to make changes in their equipment, operations or procedures. If Problems Arise If this equipment, for any person to use a computer or other electronic device, including Fax machines, to the telephone network, the telephone company will give ...number provided may not be required. Contact the state public utility commission, public service commission or corporation commission for them know of your fax transmission, refer to the fax software instructions installed on this computer. or an authorized representative of Toshiba, or the Toshiba Customer Support...
User Guide 1
Page 30
... 51 Opening the display panel 51 Your computer's features and specifications ....52 Turning on the power 52 Adding memory (optional 53 Installing a memory module 54 Removing a memory module 59 Checking total memory 61 Hard Drive Recovery Utilities 62 Creating Recovery DVDs 63 Hard Disk Drive Recovery options 64 Hard Disk Drive Recovery using the Recovery media 69 Checking the HDD operating status 71 Installing drivers and applications 71 Using the TouchPad 72 Scrolling with the TouchPad 72 Control buttons 73 Disabling or enabling the TouchPad 73 Using external display devices...
... 51 Opening the display panel 51 Your computer's features and specifications ....52 Turning on the power 52 Adding memory (optional 53 Installing a memory module 54 Removing a memory module 59 Checking total memory 61 Hard Drive Recovery Utilities 62 Creating Recovery DVDs 63 Hard Disk Drive Recovery options 64 Hard Disk Drive Recovery using the Recovery media 69 Checking the HDD operating status 71 Installing drivers and applications 71 Using the TouchPad 72 Scrolling with the TouchPad 72 Control buttons 73 Disabling or enabling the TouchPad 73 Using external display devices...

User Guide 1
Page 34
...bootable SD card 157 Mouse Utility 158 TOSHIBA Hardware Setup 159 USB Sleep and Charge Utility 161 Starting the USB Sleep and Charge Utility.......161 USB Sleep and Charge 161 Enabling USB Sleep and Charge 163 Power supply mode settings 163 Battery settings 163 TOSHIBA Zooming Utility 164 TOSHIBA Button Support 165 CD/DVD Drive Acoustic Silencer 166 TOSHIBA Accessibility 167 Trusted Platform Module (TPM 168 Fingerprint Authentication Utility 169 Fingerprint utility limitations 169 Using the Fingerprint Authentication Utility.....169 Fingerprint Logon 170 Care and maintenance of...
...bootable SD card 157 Mouse Utility 158 TOSHIBA Hardware Setup 159 USB Sleep and Charge Utility 161 Starting the USB Sleep and Charge Utility.......161 USB Sleep and Charge 161 Enabling USB Sleep and Charge 163 Power supply mode settings 163 Battery settings 163 TOSHIBA Zooming Utility 164 TOSHIBA Button Support 165 CD/DVD Drive Acoustic Silencer 166 TOSHIBA Accessibility 167 Trusted Platform Module (TPM 168 Fingerprint Authentication Utility 169 Fingerprint utility limitations 169 Using the Fingerprint Authentication Utility.....169 Fingerprint Logon 170 Care and maintenance of...
User Guide 1
Page 54
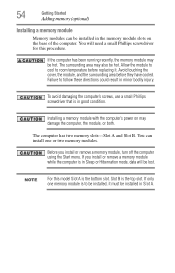
... cover, the module, and the surrounding area before replacing it must be installed in the memory module slots on may also be hot. If only one or two memory modules. The surrounding area may damage the computer, the module, or both. 54 Getting Started Adding memory (optional) Installing a memory module Memory modules can install one memory module is the top slot. Slot B is to follow these directions could result in Sleep or Hibernation mode, data will need...
... cover, the module, and the surrounding area before replacing it must be installed in the memory module slots on may also be hot. If only one or two memory modules. The surrounding area may damage the computer, the module, or both. 54 Getting Started Adding memory (optional) Installing a memory module Memory modules can install one memory module is the top slot. Slot B is to follow these directions could result in Sleep or Hibernation mode, data will need...
User Guide 1
Page 56
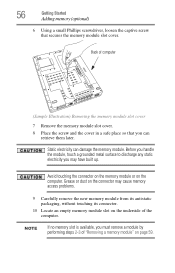
... Started Adding memory (optional) 6 Using a small Phillips screwdriver, loosen the captive screw that you can damage the memory module. Grease or dust on the connector may have built up. Avoid touching the connector on the memory module or on the underside of the computer. NOTE If no memory slot is available, you may cause memory access problems. 9 Carefully remove the new memory module from its antistatic packaging, without touching...
... Started Adding memory (optional) 6 Using a small Phillips screwdriver, loosen the captive screw that you can damage the memory module. Grease or dust on the connector may have built up. Avoid touching the connector on the memory module or on the underside of the computer. NOTE If no memory slot is available, you may cause memory access problems. 9 Carefully remove the new memory module from its antistatic packaging, without touching...

User Guide 1
Page 59
... computer has recognized the additional memory module. When the operating system has loaded, you turn it using the screw. 15 Re-insert the main battery. The computer could hang up . 17 Reconnect the cables. 18 Restart the computer. In either of the above cases, the Sleep configuration will be saved. Getting Started 59 Adding memory (optional) 14 Replace the memory module slot cover and secure it on...
... computer has recognized the additional memory module. When the operating system has loaded, you turn it using the screw. 15 Re-insert the main battery. The computer could hang up . 17 Reconnect the cables. 18 Restart the computer. In either of the above cases, the Sleep configuration will be saved. Getting Started 59 Adding memory (optional) 14 Replace the memory module slot cover and secure it on...
User Guide 1
Page 61
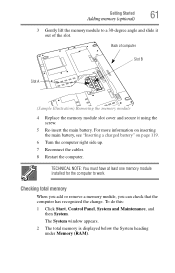
... computer Slot B Slot A (Sample Illustration) Removing the memory module 4 Replace the memory module slot cover and secure it using the screw. 5 Re-insert the main battery. Getting Started 61 Adding memory (optional) 3 Gently lift the memory module to work. For more information on inserting the main battery, see "Inserting a charged battery" on page 119. 6 Turn the computer right side up. 7 Reconnect the cables. 8 Restart the computer. Checking total memory When you add or remove a memory module, you...
... computer Slot B Slot A (Sample Illustration) Removing the memory module 4 Replace the memory module slot cover and secure it using the screw. 5 Re-insert the main battery. Getting Started 61 Adding memory (optional) 3 Gently lift the memory module to work. For more information on inserting the main battery, see "Inserting a charged battery" on page 119. 6 Turn the computer right side up. 7 Reconnect the cables. 8 Restart the computer. Checking total memory When you add or remove a memory module, you...
User Guide 1
Page 62
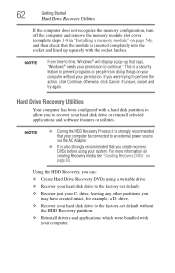
... been configured with a hard disk partition to allow you to the factory-set default. ❖ Recover just your C: drive, leaving any other partitions you can: ❖ Create Hard Drive Recovery DVDs using your system. If unsure, cancel and try again. 62 Getting Started Hard Drive Recovery Utilities If the computer does not recognize the memory configuration, turn off the computer and remove the memory module slot cover (complete steps 1-8 in "Installing a memory module" on page 54), and then check that says, "Windows® needs...
... been configured with a hard disk partition to allow you to the factory-set default. ❖ Recover just your C: drive, leaving any other partitions you can: ❖ Create Hard Drive Recovery DVDs using your system. If unsure, cancel and try again. 62 Getting Started Hard Drive Recovery Utilities If the computer does not recognize the memory configuration, turn off the computer and remove the memory module slot cover (complete steps 1-8 in "Installing a memory module" on page 54), and then check that says, "Windows® needs...
User Guide 1
Page 64
...Hard Disk Drive Recovery using the Recovery media ❖ Checking the HDD operating status Hard Disk Drive Recovery using the recovery partition NOTE During the HDD Recovery Process it . To recover your hard disk drive using the utilities stored on your computer's HDD: 1 Make sure the computer is strongly recommended that your computer be connected to an external power source via the AC Adaptor. 64 Getting Started Hard Drive Recovery Utilities Hard Disk Drive Recovery options The following are the available hard disk drive recovery options: ❖ Recovering the original factory...
...Hard Disk Drive Recovery using the Recovery media ❖ Checking the HDD operating status Hard Disk Drive Recovery using the recovery partition NOTE During the HDD Recovery Process it . To recover your hard disk drive using the utilities stored on your computer's HDD: 1 Make sure the computer is strongly recommended that your computer be connected to an external power source via the AC Adaptor. 64 Getting Started Hard Drive Recovery Utilities Hard Disk Drive Recovery options The following are the available hard disk drive recovery options: ❖ Recovering the original factory...
User Guide 1
Page 73
... OK. Disabling or enabling the TouchPad™ The TouchPad™ is enabled by configuring the display properties settings. Your computer will automatically detect the external display device and activate a screen with a built-in rapid succession. Getting Started 73 Using external display devices Control buttons When a step instructs you to click or choose an item, move the cursor to the left -hand) button. This hot key enables/disables the TouchPad. Connecting an external monitor or projector You can change the enable/disable TouchPad setting, press Fn...
... OK. Disabling or enabling the TouchPad™ The TouchPad™ is enabled by configuring the display properties settings. Your computer will automatically detect the external display device and activate a screen with a built-in rapid succession. Getting Started 73 Using external display devices Control buttons When a step instructs you to click or choose an item, move the cursor to the left -hand) button. This hot key enables/disables the TouchPad. Connecting an external monitor or projector You can change the enable/disable TouchPad setting, press Fn...
User Guide 1
Page 91
..., or download from or writing to learn more about Sleep. This precaution is active. NOTE The Windows® operating system records information, such as new icon positions may damage the disk, the drive, or both. ❖ Before turning off the computer if a drive indicator light indicates a drive is especially important for viruses. Using the keyboard Your computer's keyboard contains character keys, control keys, function keys, and special Windows® keys, providing all new files for...
..., or download from or writing to learn more about Sleep. This precaution is active. NOTE The Windows® operating system records information, such as new icon positions may damage the disk, the drive, or both. ❖ Before turning off the computer if a drive indicator light indicates a drive is especially important for viruses. Using the keyboard Your computer's keyboard contains character keys, control keys, function keys, and special Windows® keys, providing all new files for...
User Guide 1
Page 150
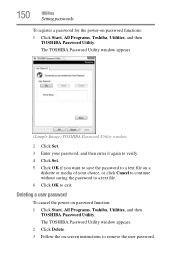
... -screen instructions to exit. The TOSHIBA Password Utility window appears. 2 Click Delete. 3 Follow the on a diskette or media of your choice, or click Cancel to continue without saving the password to a text file. 6 Click OK to remove the user password. Deleting a user password To cancel the power-on password functions: 1 Click Start, All Programs, Toshiba, Utilities, and then TOSHIBA Password Utility. 150 Utilities Setting passwords To register a password for the power-on password function: 1 Click Start, All Programs, Toshiba, Utilities, and then TOSHIBA Password Utility.
... -screen instructions to exit. The TOSHIBA Password Utility window appears. 2 Click Delete. 3 Follow the on a diskette or media of your choice, or click Cancel to continue without saving the password to a text file. 6 Click OK to remove the user password. Deleting a user password To cancel the power-on password functions: 1 Click Start, All Programs, Toshiba, Utilities, and then TOSHIBA Password Utility. 150 Utilities Setting passwords To register a password for the power-on password function: 1 Click Start, All Programs, Toshiba, Utilities, and then TOSHIBA Password Utility.
User Guide 1
Page 180
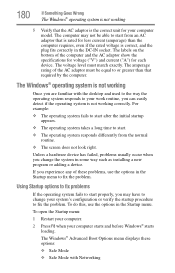
... way such as installing a new program or adding a device. Unless a hardware device has failed, problems usually occur when you may not be equal to start from the normal routine. ❖ The screen does not look right. Using Startup options to fix problems If the operating system fails to start properly, you change your computer starts and before Windows® starts loading. The Windows® operating system is not working Once you experience...
... way such as installing a new program or adding a device. Unless a hardware device has failed, problems usually occur when you may not be equal to start from the normal routine. ❖ The screen does not look right. Using Startup options to fix problems If the operating system fails to start properly, you change your computer starts and before Windows® starts loading. The Windows® operating system is not working Once you experience...

User Guide 1
Page 184
..., remove the memory module entirely and check for updating the driver or rolling back the driver in the lower-right part of the Start menu. TECHNICAL NOTE: You must have at least one device to the monitor, optional external optical drive, optional external diskette drive, and other power-using resources. ❖ The Driver tab, which lists resources assigned to another. For more information about Device Manager, refer to work. Memory problems Incorrectly connected or faulty memory modules may be hardware...
..., remove the memory module entirely and check for updating the driver or rolling back the driver in the lower-right part of the Start menu. TECHNICAL NOTE: You must have at least one device to the monitor, optional external optical drive, optional external diskette drive, and other power-using resources. ❖ The Driver tab, which lists resources assigned to another. For more information about Device Manager, refer to work. Memory problems Incorrectly connected or faulty memory modules may be hardware...
User Guide 1
Page 187
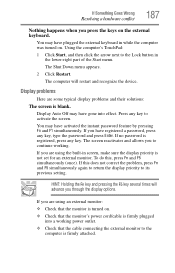
... continue working power outlet. ❖ Check that the cable connecting the external monitor to the computer is not set for an external monitor. The Shut Down menu appears. 2 Click Restart. The computer will advance you have plugged the external keyboard in the lower-right part of the Start menu. Display problems Here are some typical display problems and their solutions: The screen is registered, press any key. If you through the display options...
... continue working power outlet. ❖ Check that the cable connecting the external monitor to the computer is not set for an external monitor. The Shut Down menu appears. 2 Click Restart. The computer will advance you have plugged the external keyboard in the lower-right part of the Start menu. Display problems Here are some typical display problems and their solutions: The screen is registered, press any key. If you through the display options...
User Guide 1
Page 239
... Fn key can set system options or control system parameters, such as a mouse. Interlaced monitors take two passes to the internal storage drive the current state of your work , including all open files and programs, when you turn the computer off . K keyboard shortcut - L L1 (level one) cache - It is running and have the operating system automatically recognize the change. I icon - Compare non-interlaced. internal device - Internet - A key or...
... Fn key can set system options or control system parameters, such as a mouse. Interlaced monitors take two passes to the internal storage drive the current state of your work , including all open files and programs, when you turn the computer off . K keyboard shortcut - L L1 (level one) cache - It is running and have the operating system automatically recognize the change. I icon - Compare non-interlaced. internal device - Internet - A key or...
User Guide 1
Page 245
... battery changing 117 charge indicator light 50, 111 charge not lasting 186 charging 48, 50 conserving power 114 disposal 122 low charge 113 monitoring power 50, 111 not charging 185 notifications 113 power plan 216 power plan hot key 116 real-time clock (RTC) 108 removing 117 BIOS Setup see TOSHIBA Hardware Setup Bridge Media Adapter inserting memory media 137 removing memory media 137 button power 53, 63 start 126 C CD, using 100 character keys 92 charging the battery 50 checking device properties 183 click 73 communications network connection...
... battery changing 117 charge indicator light 50, 111 charge not lasting 186 charging 48, 50 conserving power 114 disposal 122 low charge 113 monitoring power 50, 111 not charging 185 notifications 113 power plan 216 power plan hot key 116 real-time clock (RTC) 108 removing 117 BIOS Setup see TOSHIBA Hardware Setup Bridge Media Adapter inserting memory media 137 removing memory media 137 button power 53, 63 start 126 C CD, using 100 character keys 92 charging the battery 50 checking device properties 183 click 73 communications network connection...
User Guide 1
Page 246
... files/trouble accessing a disk 189 running slow 190 diskette drive cannot insert a diskette 190 cannot read a diskette 190 connecting 77 external, connecting 77 display does not look normal/flickers 188 external monitor not working 188 screen is blank 187 display device external 73 display output settings 74 display, external adjusting 75 disposal information 28 disposing of used batteries 122 double-click 73 DVD player general problems 198 DVD, using 100 E ENERGY STAR® 37 error messages device driver conflict...
... files/trouble accessing a disk 189 running slow 190 diskette drive cannot insert a diskette 190 cannot read a diskette 190 connecting 77 external, connecting 77 display does not look normal/flickers 188 external monitor not working 188 screen is blank 187 display device external 73 display output settings 74 display, external adjusting 75 disposal information 28 disposing of used batteries 122 double-click 73 DVD player general problems 198 DVD, using 100 E ENERGY STAR® 37 error messages device driver conflict...
User Guide 1
Page 248
... memory module slot 56 microphone 132 modem connecting to telephone line 128 problem solving 195 monitor 73 connecting 73 not working 187 mouse installing 75 mouse utility 158 N network accessing 128 Connect to the Internet 128 networking wireless 127 Notification Area 126 O Opening the display panel 51 optical disc positioning 102 optical discs handling 102 inserting 101 removing 104 optical drive problems 191 troubleshooting 191 using 100 optical media recording 103 other documentation 41 overlay keys 93 P password deleting a supervisor 149 disabling a user 150 setting a user...
... memory module slot 56 microphone 132 modem connecting to telephone line 128 problem solving 195 monitor 73 connecting 73 not working 187 mouse installing 75 mouse utility 158 N network accessing 128 Connect to the Internet 128 networking wireless 127 Notification Area 126 O Opening the display panel 51 optical disc positioning 102 optical discs handling 102 inserting 101 removing 104 optical drive problems 191 troubleshooting 191 using 100 optical media recording 103 other documentation 41 overlay keys 93 P password deleting a supervisor 149 disabling a user 150 setting a user...

User Guide 1
Page 250
... 123 troubleshooting DVD player general problems 198 external keyboard 186 keyboard 186 keypad overlay 186 optical drive 191 turning on the computer 52 turning on the power 52 U USB Sleep and Charge Utility 161 user password, disabling 150 user password, setting 149 using 132 using a file extension 98 Utilities 140 V video projector adjusting display 75 W warranty standard limited warranty 41 Web 130 Web Camera 134 Web sites 206 Wi-Fi® wireless networking 127 Windows® Explorer 95 Windows® operating system...
... 123 troubleshooting DVD player general problems 198 external keyboard 186 keyboard 186 keypad overlay 186 optical drive 191 turning on the computer 52 turning on the power 52 U USB Sleep and Charge Utility 161 user password, disabling 150 user password, setting 149 using 132 using a file extension 98 Utilities 140 V video projector adjusting display 75 W warranty standard limited warranty 41 Web 130 Web Camera 134 Web sites 206 Wi-Fi® wireless networking 127 Windows® Explorer 95 Windows® operating system...


