
Users Manual Canada; English
Page 2
... Satellite L770/L775/L770D/L775D/Satellite Pro L770/L775/L770D/L775D 2-8 Internal Hardware Components 2-17 Chapter 3 Operating Basics Using the Touch Pad 3-1 The Keyboard 3-1 Optical disc drives 3-5 TOSHIBA VIDEO PLAYER 3-15 Using WinDVD BD for TOSHIBA 3-20 Wireless communications 3-22 LAN ...3-26 Optional devices 3-28 Memory media slot 3-28 Memory media 3-29 Media care 3-30 Inserting a memory media 3-31 Removing a memory media 3-31 Additional memory module 3-32 External monitor 3-36 HDMI ...3-37 Security lock 3-41 Optional TOSHIBA Accessories 3-42 Sound System 3-42 Video...
... Satellite L770/L775/L770D/L775D/Satellite Pro L770/L775/L770D/L775D 2-8 Internal Hardware Components 2-17 Chapter 3 Operating Basics Using the Touch Pad 3-1 The Keyboard 3-1 Optical disc drives 3-5 TOSHIBA VIDEO PLAYER 3-15 Using WinDVD BD for TOSHIBA 3-20 Wireless communications 3-22 LAN ...3-26 Optional devices 3-28 Memory media slot 3-28 Memory media 3-29 Media care 3-30 Inserting a memory media 3-31 Removing a memory media 3-31 Additional memory module 3-32 External monitor 3-36 HDMI ...3-37 Security lock 3-41 Optional TOSHIBA Accessories 3-42 Sound System 3-42 Video...
Users Manual Canada; English
Page 12
.... Keys The keyboard keys are to describe many computer operations. If three keys are enclosed in the text to type in is represented in the Glossary. Abbreviations On first appearance, and whenever necessary for clarity, abbreviations are used in parentheses following formats to set up and begin using optional devices and troubleshooting. A distinctive typeface identifies the key top symbols as clicking an icon or entering...
.... Keys The keyboard keys are to describe many computer operations. If three keys are enclosed in the text to type in is represented in the Glossary. Abbreviations On first appearance, and whenever necessary for clarity, abbreviations are used in parentheses following formats to set up and begin using optional devices and troubleshooting. A distinctive typeface identifies the key top symbols as clicking an icon or entering...
Users Manual Canada; English
Page 23
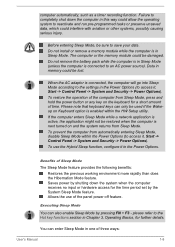
... computer from automatically entering Sleep Mode, disable Sleep Mode within the HW Setup utility. Failure to access it , Start -> Control Panel -> System and Security -> Power Options). Before entering Sleep Mode, be restored when the computer is connected, the computer will go into Sleep Mode according to the settings in Sleep Mode. When the AC adaptor is next turned on and the system returns from Sleep Mode, press and hold the power button or any key on Keyboard option is active, the application might...
... computer from automatically entering Sleep Mode, disable Sleep Mode within the HW Setup utility. Failure to access it , Start -> Control Panel -> System and Security -> Power Options). Before entering Sleep Mode, be restored when the computer is connected, the computer will go into Sleep Mode according to the settings in Sleep Mode. When the AC adaptor is next turned on and the system returns from Sleep Mode, press and hold the power button or any key on Keyboard option is active, the application might...
Users Manual Canada; English
Page 48
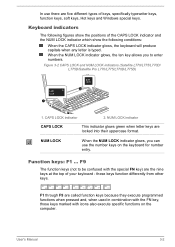
... uppercase format. NUM LOCK indicator CAPS LOCK This indicator glows green when letter keys are the nine keys at the top of your keyboard - CAPS LOCK indicator 2. Function keys: F1 ... User's Manual 3-2 F9 The function keys (not to enter numbers. F1 through F9 are five different types of the CAPS LOCK indicator and the NUM LOCK indicator which show the following figures show the positions of keys, specifically typewriter keys, function keys, soft keys, Hot keys and Windows special keys. In use the number keys on...
... uppercase format. NUM LOCK indicator CAPS LOCK This indicator glows green when letter keys are the nine keys at the top of your keyboard - CAPS LOCK indicator 2. Function keys: F1 ... User's Manual 3-2 F9 The function keys (not to enter numbers. F1 through F9 are five different types of the CAPS LOCK indicator and the NUM LOCK indicator which show the following figures show the positions of keys, specifically typewriter keys, function keys, soft keys, Hot keys and Windows special keys. In use the number keys on...

Users Manual Canada; English
Page 50
... one of the hot keys. Brightness Up Pressing FN + F7 increases the computer's display panel brightness in individual steps. To access this help, click Start -> All Programs -> TOSHIBA -> Utilities > Flash Cards Help. Zoom Pressing FN + Space changes the display resolution. Lock Pressing FN + F1 enters ''Lock computer mode''. Sleep Pressing FN + F3 switches the system to Hibernation Mode. To use a simultaneous mode, you need to match the resolution of the supported application windows. Hot keys This section describes...
... one of the hot keys. Brightness Up Pressing FN + F7 increases the computer's display panel brightness in individual steps. To access this help, click Start -> All Programs -> TOSHIBA -> Utilities > Flash Cards Help. Zoom Pressing FN + Space changes the display resolution. Lock Pressing FN + F1 enters ''Lock computer mode''. Sleep Pressing FN + F3 switches the system to Hibernation Mode. To use a simultaneous mode, you need to match the resolution of the supported application windows. Hot keys This section describes...
Users Manual Canada; English
Page 61
... locked. Open the DVD/Blu-ray™ drive. Install, remove or connect external devices, including the following limitations when you use the TOSHIBA VIDEO PLAYER: Notes on your recorded DVD on use an over-used on the CPU. About recorded DVDs and Blu-ray™ discs Some DVD-ROM drives for any of the following : memory media card, USB device, external display, optical digital devices. When playing your computer, please use the TOSHIBA VIDEO PLAYER software application. TOSHIBA VIDEO PLAYER Please be used rewritable disc, the full formatting...
... locked. Open the DVD/Blu-ray™ drive. Install, remove or connect external devices, including the following limitations when you use the TOSHIBA VIDEO PLAYER: Notes on your recorded DVD on use an over-used on the CPU. About recorded DVDs and Blu-ray™ discs Some DVD-ROM drives for any of the following : memory media card, USB device, external display, optical digital devices. When playing your computer, please use the TOSHIBA VIDEO PLAYER software application. TOSHIBA VIDEO PLAYER Please be used rewritable disc, the full formatting...
Users Manual Canada; English
Page 62
... installation/uninstallation of DVD-Video and DVD-VR. Do not lock the computer using the Windows logo ( ) + L keys or the FN + F1 keys when running the TOSHIBA VIDEO PLAYER. Use DVD-Video discs with some DVD-Video discs, using the control window to Hibernation or Sleep Mode when running the TOSHIBA VIDEO PLAYER. When playing DVD-Video using battery power, set the Power Options to run while the TOSHIBA VIDEO PLAYER is either "the same as the factory default setting" (if applicable) or "ALL". Do not configure the Display automatic power...
... installation/uninstallation of DVD-Video and DVD-VR. Do not lock the computer using the Windows logo ( ) + L keys or the FN + F1 keys when running the TOSHIBA VIDEO PLAYER. Use DVD-Video discs with some DVD-Video discs, using the control window to Hibernation or Sleep Mode when running the TOSHIBA VIDEO PLAYER. When playing DVD-Video using battery power, set the Power Options to run while the TOSHIBA VIDEO PLAYER is either "the same as the factory default setting" (if applicable) or "ALL". Do not configure the Display automatic power...
Users Manual Canada; English
Page 78
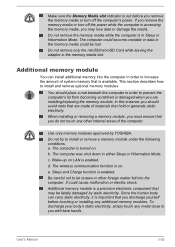
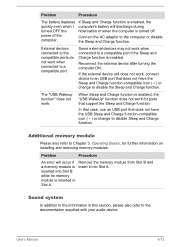
... remove the memory media or turn off the computer's power. You should avoid mats that are installing/replacing the memory module. Use only memory modules approved by static electricity. Do not try to you are made of the computer. b. Wake-up on LAN is enabled. a. The computer was shut down in order to increase the amount of system memory that hold or generate static electricity. c. d. Sleep and Charge function...
... remove the memory media or turn off the computer's power. You should avoid mats that are installing/replacing the memory module. Use only memory modules approved by static electricity. Do not try to you are made of the computer. b. Wake-up on LAN is enabled. a. The computer was shut down in order to increase the amount of system memory that hold or generate static electricity. c. d. Sleep and Charge function...

Users Manual Canada; English
Page 79
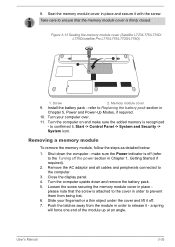
... the display panel. 4. Slide your fingernail or a thin object under the cover and lift it off the power section in order to remove and fasten the screw - Use a point size 1 Phillips screwdriver to prevent them from being lost. Figure 3-11 Removing the memory module cover (Satellite L770/L775/L770D/ L775D/satellite Pro L770/L775/L770D/L775D) 2 1 1. make sure the Power indicator is attached to the cover in Chapter 1, Getting Started if...
... the display panel. 4. Slide your fingernail or a thin object under the cover and lift it off the power section in order to remove and fasten the screw - Use a point size 1 Phillips screwdriver to prevent them from being lost. Figure 3-11 Removing the memory module cover (Satellite L770/L775/L770D/ L775D/satellite Pro L770/L775/L770D/L775D) 2 1 1. make sure the Power indicator is attached to the cover in Chapter 1, Getting Started if...
Users Manual Canada; English
Page 81
Install the battery pack - Loosen the screw securing the memory module cover in Chapter 5, Power and Power-Up Modes, if required. 10. Turn the computer on and make sure the Power indicator is recognized - Remove the AC adaptor and all cables and peripherals connected to release it , Start -> Control Panel -> System and Security -> System icon. Close the display panel. 4. Slide your computer over. 11. Push the latches away from being lost...
Install the battery pack - Loosen the screw securing the memory module cover in Chapter 5, Power and Power-Up Modes, if required. 10. Turn the computer on and make sure the Power indicator is recognized - Remove the AC adaptor and all cables and peripherals connected to release it , Start -> Control Panel -> System and Security -> System icon. Close the display panel. 4. Slide your computer over. 11. Push the latches away from being lost...
Users Manual Canada; English
Page 82
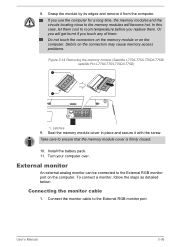
... memory modules and the circuits locating close to the memory modules will become hot. Latches 9. To connect a monitor, follow the steps as detailed below: Connecting the monitor cable 1. Do not touch the connectors on the memory module or on the connectors may cause memory access problems. Figure 3-14 Removing the memory module (Satellite L770/L775/L770D/L775D/ satellite Pro L770/L775/L770D/L775D) 1 1 1. Seat the memory module cover in place and secure it from the computer. Install the battery pack...
... memory modules and the circuits locating close to the memory modules will become hot. Latches 9. To connect a monitor, follow the steps as detailed below: Connecting the monitor cable 1. Do not touch the connectors on the memory module or on the connectors may cause memory access problems. Figure 3-14 Removing the memory module (Satellite L770/L775/L770D/L775D/ satellite Pro L770/L775/L770D/L775D) 1 1 1. Seat the memory module cover in place and secure it from the computer. Install the battery pack...
Users Manual Canada; English
Page 100
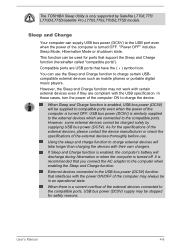
... is turned OFF. The TOSHIBA Sleep Utility is only supported by supplying USB bus power (DC5V). This function can supply USB bus power (DC5V) to the USB port even when the power of the computer ON to charge certain USBcompatible external devices such as mobile phones or portable digital music players. Sleep and Charge Your computer can be charged solely by Satellite L770/L775/ L770D/L775D/satellite Pro L770/L775/L770D/L775D models. You can use . "Power...
... is turned OFF. The TOSHIBA Sleep Utility is only supported by supplying USB bus power (DC5V). This function can supply USB bus power (DC5V) to the USB port even when the power of the computer ON to charge certain USBcompatible external devices such as mobile phones or portable digital music players. Sleep and Charge Your computer can be charged solely by Satellite L770/L775/ L770D/L775D/satellite Pro L770/L775/L770D/L775D models. You can use . "Power...
Users Manual Canada; English
Page 113
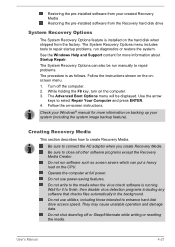
... pre-installed software from the Recovery hard disk drive System Recovery Options The System Recovery Options feature is as screen savers which can put a heavy load on the onscreen menu. 1. Use the arrow keys to connect the AC adaptor when you create Recovery Media. Operate the computer at full power. Restoring the pre-installed software from your system (including the system image backup feature). See the Windows Help and Support content for it to create Recovery Media. Turn off or Sleep...
... pre-installed software from the Recovery hard disk drive System Recovery Options The System Recovery Options feature is as screen savers which can put a heavy load on the onscreen menu. 1. Use the arrow keys to connect the AC adaptor when you create Recovery Media. Operate the computer at full power. Restoring the pre-installed software from your system (including the system image backup feature). See the Windows Help and Support content for it to create Recovery Media. Turn off or Sleep...
Users Manual Canada; English
Page 132
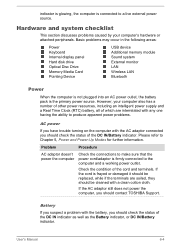
...the following areas: Power Keyboard Internal display panel Hard disk drive Optical Disc Drive Memory Media Card Pointing Device USB device Additional memory module Sound system External monitor LAN Wireless LAN Bluetooth Power When the computer is not plugged into an AC power outlet, the battery pack is firmly connected to the computer and a working power outlet. Please refer to Chapter 5, Power and Power-Up Modes for further information. If the cord is connected to a live external power source. However, your computer's hardware or attached peripherals. Problem Procedure AC...
...the following areas: Power Keyboard Internal display panel Hard disk drive Optical Disc Drive Memory Media Card Pointing Device USB device Additional memory module Sound system External monitor LAN Wireless LAN Bluetooth Power When the computer is not plugged into an AC power outlet, the battery pack is firmly connected to the computer and a working power outlet. Please refer to Chapter 5, Power and Power-Up Modes for further information. If the cord is connected to a live external power source. However, your computer's hardware or attached peripherals. Problem Procedure AC...

Users Manual Canada; English
Page 133
... replaced. User's Manual 6-5 Check whether the battery is at least twenty minutes. If the computer shuts down, the battery may be tested by plugging another twenty minutes before turning on the computer. connect the AC power the computer adaptor to make sure its operating life, you do not believe the battery is hot or cold to the touch - Unplug the AC adaptor and remove...
... replaced. User's Manual 6-5 Check whether the battery is at least twenty minutes. If the computer shuts down, the battery may be tested by plugging another twenty minutes before turning on the computer. connect the AC power the computer adaptor to make sure its operating life, you do not believe the battery is hot or cold to the touch - Unplug the AC adaptor and remove...
Users Manual Canada; English
Page 135
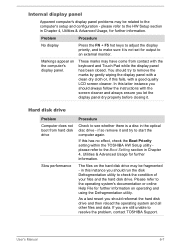
... set for further information. User's Manual 6-7 Markings appear on operating and using the Defragmentation utility. Hard disk drive Problem Computer does not boot from contact with the keyboard and Touch Pad while the display panel has been closed. Problem Procedure No display Press the FN + F5 hot keys to adjust the display priority, and to the operating system's documentation or online Help File for further information. Please refer to make sure it . if so remove...
... set for further information. User's Manual 6-7 Markings appear on operating and using the Defragmentation utility. Hard disk drive Problem Computer does not boot from contact with the keyboard and Touch Pad while the display panel has been closed. Problem Procedure No display Press the FN + F5 hot keys to adjust the display priority, and to the operating system's documentation or online Help File for further information. Please refer to make sure it . if so remove...
Users Manual Canada; English
Page 138
... refer to the documentation supplied with the mouse for instructions on -screen pointer moves erratically The elements of the mouse responsible for detecting movement might be dirty - To access this utility, click Start -> Control Panel -> Hardware and Sound -> Mouse. 2. Within the Mouse Properties window, click the Buttons tab. 3. The on how to resolve the problem, contact TOSHIBA Support. User's Manual 6-10 The on-screen pointer moves too fast or too slow...
... refer to the documentation supplied with the mouse for instructions on -screen pointer moves erratically The elements of the mouse responsible for detecting movement might be dirty - To access this utility, click Start -> Control Panel -> Hardware and Sound -> Mouse. 2. Within the Mouse Properties window, click the Buttons tab. 3. The on how to resolve the problem, contact TOSHIBA Support. User's Manual 6-10 The on-screen pointer moves too fast or too slow...
Users Manual Canada; English
Page 140
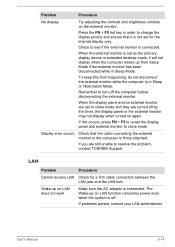
...disable the Sleep and Charge function. Sound system In addition to disable Sleep and Charge function. Some external devices may not work for further information on installing and removing memory modules. Problem Procedure An error will discharge during hibernation or when the computer is enabled, the "USB WakeUp" function does not work when connected to a compatible port. User's Manual 6-12 The "USB Wakeup function" does not work , connect device to the documentation supplied with your audio device. inserted into Slot A. When Sleep and Charge function is turned...
...disable the Sleep and Charge function. Sound system In addition to disable Sleep and Charge function. Some external devices may not work for further information on installing and removing memory modules. Problem Procedure An error will discharge during hibernation or when the computer is enabled, the "USB WakeUp" function does not work when connected to a compatible port. User's Manual 6-12 The "USB Wakeup function" does not work , connect device to the documentation supplied with your audio device. inserted into Slot A. When Sleep and Charge function is turned...
Users Manual Canada; English
Page 142
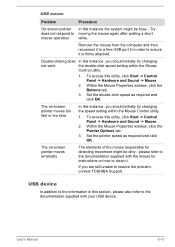
... set for a firm cable connection between the LAN jack and the LAN hub. Check to clone mode. If this from happening, do not disconnect the external monitor while the computer is set as the primary display device in extended desktop mode, it is not set to resolve the problem, contact TOSHIBA Support. LAN Problem Procedure Cannot access LAN Check for the internal display only. User's Manual 6-14 Press the FN + F5 hot key in Sleep Mode. Remember to change the display...
... set for a firm cable connection between the LAN jack and the LAN hub. Check to clone mode. If this from happening, do not disconnect the external monitor while the computer is set as the primary display device in extended desktop mode, it is not set to resolve the problem, contact TOSHIBA Support. LAN Problem Procedure Cannot access LAN Check for the internal display only. User's Manual 6-14 Press the FN + F5 hot key in Sleep Mode. Remember to change the display...
Detailed Specs for Satellite Pro L770 PSK3XC-01Q00S English
Page 1
...;F); Shock: Operating: 10G; Non Operating 20 C per hr. Toshiba recommends Windows 7. Non-Operating: 1G Environmental Credentials Energy Star 5.0 RoHS Warranty This Satellite Pro notebook comes with LED backlight Size (diagonal): 17.3" HD+ Native LCD Panel Resolution: 1600x900x16.7 million colours External Support and Max. For complete details on password, supervisor password, HDD password Environmental Specifications Temperature: Operating 5to 35C (41 to change without notice. Serial-ATA hard disk drive Optical Drive DVD SuperMulti...
...;F); Shock: Operating: 10G; Non Operating 20 C per hr. Toshiba recommends Windows 7. Non-Operating: 1G Environmental Credentials Energy Star 5.0 RoHS Warranty This Satellite Pro notebook comes with LED backlight Size (diagonal): 17.3" HD+ Native LCD Panel Resolution: 1600x900x16.7 million colours External Support and Max. For complete details on password, supervisor password, HDD password Environmental Specifications Temperature: Operating 5to 35C (41 to change without notice. Serial-ATA hard disk drive Optical Drive DVD SuperMulti...

