
User Manual
Page 11
... features 1-7 Utilities 1-10 Options 1-11 Chapter 2: The Grand Tour 2-1 Front with the display closed 2-1 Left side 2-2 Right side 2-3 Back side 2-4 Underside 2-6 Front with the display open 2-7 Indicators 2-8 Drives...2-10 3 ½" diskette drive 2-10 DVD-ROM drive (available for some Satellite Pro 4320 Series) ..... 2-10 CD-ROM drive 2-12 AC adaptor 2-13 User's Manual xi
... features 1-7 Utilities 1-10 Options 1-11 Chapter 2: The Grand Tour 2-1 Front with the display closed 2-1 Left side 2-2 Right side 2-3 Back side 2-4 Underside 2-6 Front with the display open 2-7 Indicators 2-8 Drives...2-10 3 ½" diskette drive 2-10 DVD-ROM drive (available for some Satellite Pro 4320 Series) ..... 2-10 CD-ROM drive 2-12 AC adaptor 2-13 User's Manual xi

User Manual
Page 12
... 3-2 Placement of computer 3-2 Seating and posture 3-3 Lighting 3-4 Work habits 3-4 Connecting the AC adaptor 3-5 Opening the display 3-6 Turning on the power 3-6 Turning off the power 3-7 Restarting the computer 3-7 Restoring the preinstalled software 3-8 Restoring the complete system 3-8 Restoring Toshiba utilities and drivers 3-8 Chapter 4: Operating Basics 4-1 Using AccuPoint™ II 4-1 AccuPoint™ II precautions 4-2 Replacing...
... 3-2 Placement of computer 3-2 Seating and posture 3-3 Lighting 3-4 Work habits 3-4 Connecting the AC adaptor 3-5 Opening the display 3-6 Turning on the power 3-6 Turning off the power 3-7 Restarting the computer 3-7 Restoring the preinstalled software 3-8 Restoring the complete system 3-8 Restoring Toshiba utilities and drivers 3-8 Chapter 4: Operating Basics 4-1 Using AccuPoint™ II 4-1 AccuPoint™ II precautions 4-2 Replacing...

User Manual
Page 16
... need further assistance 9-25 Before you call 9-25 Where to write 9-25 Appendix A: Specifications A-1 Appendix B: AC Power Cord and Connectors B-1 Appendix C: The Toshiba International Warranty C-1 Appendix D: Keyboard Layouts D-1 Appendix E: Display Controller and Modes E-1 Appendix F: If your computer is stolen F-1 Appendix G: ASCII Character Codes G-1 Appendix H: International Modem Guide H-1 Glossary H-1 Index H-1 xvi User's Manual
... need further assistance 9-25 Before you call 9-25 Where to write 9-25 Appendix A: Specifications A-1 Appendix B: AC Power Cord and Connectors B-1 Appendix C: The Toshiba International Warranty C-1 Appendix D: Keyboard Layouts D-1 Appendix E: Display Controller and Modes E-1 Appendix F: If your computer is stolen F-1 Appendix G: ASCII Character Codes G-1 Appendix H: International Modem Guide H-1 Glossary H-1 Index H-1 xvi User's Manual
User Manual
Page 19
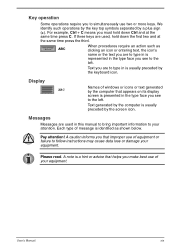
... shown below. A note is a hint or advice that improper use of windows or icons or text generated by the computer that appears on its display screen is presented in the type face you see to the left . If three keys are used in this manual to bring important information to... your equipment. User's Manual xix Please read. Display ABC Names of equipment or failure to follow instructions may cause data loss or damage your equipment. A caution informs you that helps you must hold...
... shown below. A note is a hint or advice that improper use of windows or icons or text generated by the computer that appears on its display screen is presented in the type face you see to the left . If three keys are used in this manual to bring important information to... your equipment. User's Manual xix Please read. Display ABC Names of equipment or failure to follow instructions may cause data loss or damage your equipment. A caution informs you that helps you must hold...
User Manual
Page 21
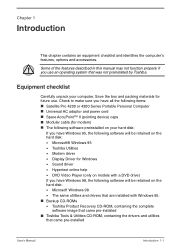
...equipment checklist and identifies the computer's features, options and accessories. Check to make sure you have all the following items: Satellite Pro 4200 or 4300 Series Portable Personal Computer Universal AC adaptor and power cord Spare AccuPoint™ II (pointing device) caps Modular cable (for ... hard disk: • Microsoft® Windows 95 • Toshiba Utilities • Modem driver • Display Driver for future use an operating system that are installed with Windows 95. Backup CD-ROMs • Toshiba Product Recovery CD-ROM, containing the complete software image that came...
...equipment checklist and identifies the computer's features, options and accessories. Check to make sure you have all the following items: Satellite Pro 4200 or 4300 Series Portable Personal Computer Universal AC adaptor and power cord Spare AccuPoint™ II (pointing device) caps Modular cable (for ... hard disk: • Microsoft® Windows 95 • Toshiba Utilities • Modem driver • Display Driver for future use an operating system that are installed with Windows 95. Backup CD-ROMs • Toshiba Product Recovery CD-ROM, containing the complete software image that came...
User Manual
Page 22
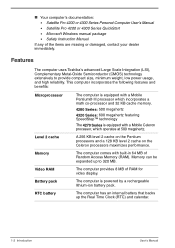
... processors maximizes performance. Your computer's documentation: • Satellite Pro 4200 or 4300 Series Personal Computer User's Manual • Satellite Pro 4200 or 4300 Series QuickStart • Microsoft Windows manual package • Safety Instruction Manual If any of RAM for video display. The computer comes with a Mobile Celeron processor, which... 8 MB of the items are missing or damaged, contact your dealer immediately. Features The computer uses Toshiba's advanced Large Scale Integration (LSI), Complementary Metal-Oxide Semiconductor (CMOS) technology extensively to 320 MB.
... processors maximizes performance. Your computer's documentation: • Satellite Pro 4200 or 4300 Series Personal Computer User's Manual • Satellite Pro 4200 or 4300 Series QuickStart • Microsoft Windows manual package • Safety Instruction Manual If any of RAM for video display. The computer comes with a Mobile Celeron processor, which... 8 MB of the items are missing or damaged, contact your dealer immediately. Features The computer uses Toshiba's advanced Large Scale Integration (LSI), Complementary Metal-Oxide Semiconductor (CMOS) technology extensively to 320 MB.
User Manual
Page 23
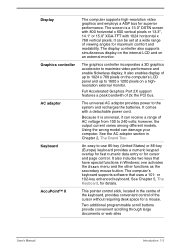
...Chapter 5, The Keyboard, for superior performance. It can receive a range of AC voltage from 100 to 240 volts; The display controller also supports simultaneous display on the internal LCD and on a highresolution external monitor. Full Accelerated Graphics Port 2X support features a peak bandwith of up... bus. Two additional programmable scroll buttons provide convenient scrolling through large documents or web sites User's Manual Introduction 1-3 Display Graphics controller AC adaptor Keyboard AccuPoint™ II The computer supports high-resolution video graphics and employs a AGP bus...
...Chapter 5, The Keyboard, for superior performance. It can receive a range of AC voltage from 100 to 240 volts; The display controller also supports simultaneous display on the internal LCD and on a highresolution external monitor. Full Accelerated Graphics Port 2X support features a peak bandwith of up... bus. Two additional programmable scroll buttons provide convenient scrolling through large documents or web sites User's Manual Introduction 1-3 Display Graphics controller AC adaptor Keyboard AccuPoint™ II The computer supports high-resolution video graphics and employs a AGP bus...
User Manual
Page 25
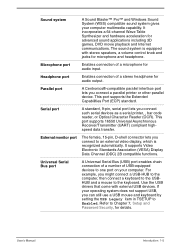
Sound system A Sound Blaster™ Pro™ and Windows Sound System (WSS) compatible sound system gives your computer. Universal Serial Bus port A Universal Serial Bus (USB) port enables chain connection ... 3D games, DVD movie playback and Internet communications. It supports Video Electronic Standards Association (VESA) Display Data Channel (DDC) 2B compatible functions. Headphone port Enables connection of USB-equipped devices to an external video display, which is equipped with external USB devices. Microphone port Enables connection of a microphone for details....
Sound system A Sound Blaster™ Pro™ and Windows Sound System (WSS) compatible sound system gives your computer. Universal Serial Bus port A Universal Serial Bus (USB) port enables chain connection ... 3D games, DVD movie playback and Internet communications. It supports Video Electronic Standards Association (VESA) Display Data Channel (DDC) 2B compatible functions. Headphone port Enables connection of USB-equipped devices to an external video display, which is equipped with external USB devices. Microphone port Enables connection of a microphone for details....
User Manual
Page 27
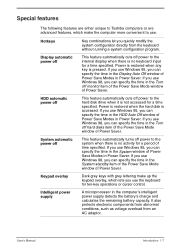
...ten-key operations or cursor control. If you use Windows 98, you can specify the time in the Turn off power to the internal display when there is pressed. It also protects electronic components from abnormal conditions, such as voltage overload from the keyboard without running a system configuration ...capacity. Power is restored when the hard disk is not accessed for a time specified. Special features The following features are either unique to Toshiba computers or are advanced features, which lets you use Windows 98, you can specify the time in the System standby item of the Power...
...ten-key operations or cursor control. If you use Windows 98, you can specify the time in the Turn off power to the internal display when there is pressed. It also protects electronic components from abnormal conditions, such as voltage overload from the keyboard without running a system configuration ...capacity. Power is restored when the hard disk is not accessed for a time specified. Special features The following features are either unique to Toshiba computers or are advanced features, which lets you use Windows 98, you can specify the time in the System standby item of the Power...

User Manual
Page 28
... lets you set a time and date for receiving remote communications while you save mode Power on password Instant security Panel power on/off when the display panel is closed and turns it sends a ring indicator power on signal to the point that computer operation cannot be turned on automatically when a call...
... lets you set a time and date for receiving remote communications while you save mode Power on password Instant security Panel power on/off when the display panel is closed and turns it sends a ring indicator power on signal to the point that computer operation cannot be turned on automatically when a call...

User Manual
Page 33
...Diskette drive Front of the computer with its closed position. User's Manual The Grand Tour 2-1 Front with the display closed This figure shows the computer's front with display closed position. Details are given later in HDD and Diskette/CD-ROM drive. Chapter 2 The Grand Tour ...Built-in this chapter. System indicators The system indicators provide icons for monitoring the status of your computer. Display latch This latch secures the LCD panel in its display panel in the closed This drive lets you operate the computer. Become familiar with each component before you ...
...Diskette drive Front of the computer with its closed position. User's Manual The Grand Tour 2-1 Front with the display closed This figure shows the computer's front with display closed position. Details are given later in HDD and Diskette/CD-ROM drive. Chapter 2 The Grand Tour ...Built-in this chapter. System indicators The system indicators provide icons for monitoring the status of your computer. Display latch This latch secures the LCD panel in its display panel in the closed This drive lets you operate the computer. Become familiar with each component before you ...

User Manual
Page 36
... a telephone line. Serial port Use this socket. A digital line will damage the modem. Modem jack A RJ-11 modem jack lets you connect an external video display. Use only the model of a lighting storm, unplug the modem cable from the telephone jack. This port supports Extended Capabilities Port (ECP) standard. 2-4 The Grand...
... a telephone line. Serial port Use this socket. A digital line will damage the modem. Modem jack A RJ-11 modem jack lets you connect an external video display. Use only the model of a lighting storm, unplug the modem cable from the telephone jack. This port supports Extended Capabilities Port (ECP) standard. 2-4 The Grand...

User Manual
Page 38
Make sure the display is not connected. Refer to remove the battery pack. Battery latch Slide this latch open to the Memory expansion section in Chapter 8, Optional Devices. 2-6 The ...
Make sure the display is not connected. Refer to remove the battery pack. Battery latch Slide this latch open to the Memory expansion section in Chapter 8, Optional Devices. 2-6 The ...

User Manual
Page 39
... generated by your software as well as audio alarms, such as low battery condition, generated by the system. DISPLAY HINGES DISPLAY SCREEN KEYBOARD INDICATORS STEREO SPEAKER (RIGHT) STEREO SPEAKER (LEFT) ACCUPOINT II ACCUPOINT II CONTROL BUTTONS The front with the... lower brightness level is intended to -view angles. Display hinges The display hinges hold the display screen at a comfortable viewing angle. Position the display at easy-to save battery power. User's Manual The Grand Tour 2-7 Front with the display open This illustration shows the front of the computer with...
... generated by your software as well as audio alarms, such as low battery condition, generated by the system. DISPLAY HINGES DISPLAY SCREEN KEYBOARD INDICATORS STEREO SPEAKER (RIGHT) STEREO SPEAKER (LEFT) ACCUPOINT II ACCUPOINT II CONTROL BUTTONS The front with the... lower brightness level is intended to -view angles. Display hinges The display hinges hold the display screen at a comfortable viewing angle. Position the display at easy-to save battery power. User's Manual The Grand Tour 2-7 Front with the display open This illustration shows the front of the computer with...

User Manual
Page 47
... computer and peripheral devices Seating and posture Lighting Work habits User's Manual Getting Started 3-1 for your health and safety Connecting the AC adaptor Opening the display Turning on the power Turning off the power Restarting the computer Restoring the preinstalled software Setting up your computer. This section discusses the following topics...
... computer and peripheral devices Seating and posture Lighting Work habits User's Manual Getting Started 3-1 for your health and safety Connecting the AC adaptor Opening the display Turning on the power Turning off the power Restarting the computer Restoring the preinstalled software Setting up your computer. This section discusses the following topics...

User Manual
Page 48
...computer near objects that is close proximity to the computer and easily accessible. The display should be no higher than eye level to 80 percent. Leave ample ventilation room for proper ventilation. The display should be 20 to avoid eye strain. Do not operate the computer in temperature... in front of dust, moisture, and exposure to provide comfort and safety. Keep the computer free of you when you freely adjust the display. Do not use a paper holder, set it is adequate space around the computer for the fan. Placement of computer Position the computer ...
...computer near objects that is close proximity to the computer and easily accessible. The display should be no higher than eye level to 80 percent. Leave ample ventilation room for proper ventilation. The display should be 20 to avoid eye strain. Do not operate the computer in temperature... in front of dust, moisture, and exposure to provide comfort and safety. Keep the computer free of you when you freely adjust the display. Do not use a paper holder, set it is adequate space around the computer for the fan. Placement of computer Position the computer ...

User Manual
Page 50
... strain injury or repetitive stress syndrome. Lighting Proper lighting can reduce tension in your eyes. Avoid placing the computer in front of the display and reduce eye strain. Sit in your library or book vendor. Frequently, look away from a repetitive strain injury. Good positioning of ...as hands and wrists, please check with your eyes. Position the computer so that sunlight or bright indoor lighting does not reflect off the display or shine in a relaxed posture. Use a lamp to illuminate your eyes examined regularly and visit a doctor promptly, if you suspect you...
... strain injury or repetitive stress syndrome. Lighting Proper lighting can reduce tension in your eyes. Avoid placing the computer in front of the display and reduce eye strain. Sit in your library or book vendor. Frequently, look away from a repetitive strain injury. Good positioning of ...as hands and wrists, please check with your eyes. Position the computer so that sunlight or bright indoor lighting does not reflect off the display or shine in a relaxed posture. Use a lamp to illuminate your eyes examined regularly and visit a doctor promptly, if you suspect you...

User Manual
Page 52
.... Lift the panel up and adjust it shut could damage the computer. Use reasonable care when opening and closing the display panel. Make sure the diskette drive is in a wide range of the computer to the right to unlock the power button. 3. Press and hold the ... describes how to the best viewing angle for you. If a diskette is empty. Slide the display latch on the front of angles for two or three seconds. 3-6 Getting Started Turning on the power. 1. Opening the display The display panel can be rotated in the drive, press the eject button and remove the diskette. 2.
.... Lift the panel up and adjust it shut could damage the computer. Use reasonable care when opening and closing the display panel. Make sure the diskette drive is in a wide range of the computer to the right to unlock the power button. 3. Press and hold the ... describes how to the best viewing angle for you. If a diskette is empty. Slide the display latch on the front of angles for two or three seconds. 3-6 Getting Started Turning on the power. 1. Opening the display The display panel can be rotated in the drive, press the eject button and remove the diskette. 2.

User Manual
Page 63
... also be set automatically. • When you click a country it becomes the modem's current country setting. 5. Click the icon with the primary mouse button to display a list of countries that the modem supports. Click the icon with the secondary mouse button to the currently selected country and telephony location. 3. The country..., the corresponding country is automatically selected and it becomes the modem's country selection, and the New Location for telephony location information will appear next to display the following menu.
... also be set automatically. • When you click a country it becomes the modem's current country setting. 5. Click the icon with the primary mouse button to display a list of countries that the modem supports. Click the icon with the secondary mouse button to the currently selected country and telephony location. 3. The country..., the corresponding country is automatically selected and it becomes the modem's country selection, and the New Location for telephony location information will appear next to display the following menu.

User Manual
Page 64
...the following settings: Show flags for country selection. Location list for country selection. A warning dialog box is displayed if current settings for telephony. Connecting To connect the internal modem cable, follow the steps below. 1. A submenu appears... displaying location information for country code and telephony location are displayed. AutoRun Mode The country-selecting utility starts automatically when you select the country. Open the Dialling Properties ...
...the following settings: Show flags for country selection. Location list for country selection. A warning dialog box is displayed if current settings for telephony. Connecting To connect the internal modem cable, follow the steps below. 1. A submenu appears... displaying location information for country code and telephony location are displayed. AutoRun Mode The country-selecting utility starts automatically when you select the country. Open the Dialling Properties ...


