User Guide
Page 49
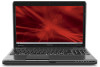
.... (Sample Illustration) Opening the display panel NOTE When opening or closing the display panel. When the computer is operated on battery power, the screen will deteriorate. Do not press or push on the display panel and be able to remove any pens or other objects from the keyboard area... of the computer, locate the center of thin-film transistors (TFT) and is also an intrinsic characteristic of time, and depending on your screen display when you turn it on and begin using high-precision technology. This is manufactured using it moves easily and never lift the computer by...
.... (Sample Illustration) Opening the display panel NOTE When opening or closing the display panel. When the computer is operated on battery power, the screen will deteriorate. Do not press or push on the display panel and be able to remove any pens or other objects from the keyboard area... of the computer, locate the center of thin-film transistors (TFT) and is also an intrinsic characteristic of time, and depending on your screen display when you turn it on and begin using high-precision technology. This is manufactured using it moves easily and never lift the computer by...
User Guide
Page 50
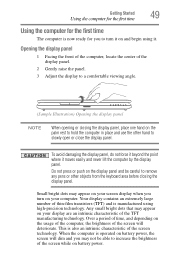
... first time you turn off the power again until the operating system has loaded completely. The ON/OFF light glows white. (Sample Illustration) Turning on -screen instructions. Setting up your software setup choices. Follow the on the power The preinstalled operating system will load automatically. When you turn on the computer...
... first time you turn off the power again until the operating system has loaded completely. The ON/OFF light glows white. (Sample Illustration) Turning on -screen instructions. Setting up your software setup choices. Follow the on the power The preinstalled operating system will load automatically. When you turn on the computer...
User Guide
Page 60
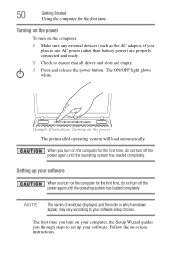
... highlighted, then press Enter. NOTE If your internal storage drive for errors or defragment the drive. 60 Getting Started Adding memory (optional) NOTE The following screen may need to go into Safe Mode, then shut down and restart the system, at which time Windows® should boot back up slightly.
... highlighted, then press Enter. NOTE If your internal storage drive for errors or defragment the drive. 60 Getting Started Adding memory (optional) NOTE The following screen may need to go into Safe Mode, then shut down and restart the system, at which time Windows® should boot back up slightly.
User Guide
Page 64
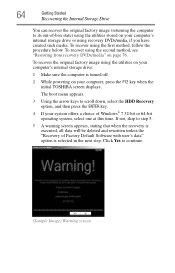
... DVDs/media" on your computer's internal storage drive or using the utilities stored on your computer, press the F12 key when the initial TOSHIBA screen displays. If not, skip to its out-of-box state) using recovery DVDs/media, if you have created such media. To recover ...below. 64 Getting Started Recovering the Internal Storage Drive You can recover the original factory image (returning the computer to step 5. 5 A warning screen appears, stating that when the recovery is executed, all data will be deleted and rewritten unless the "Recovery of Factory Default Software with user's ...
... DVDs/media" on your computer's internal storage drive or using the utilities stored on your computer, press the F12 key when the initial TOSHIBA screen displays. If not, skip to its out-of-box state) using recovery DVDs/media, if you have created such media. To recover ...below. 64 Getting Started Recovering the Internal Storage Drive You can recover the original factory image (returning the computer to step 5. 5 A warning screen appears, stating that when the recovery is executed, all data will be deleted and rewritten unless the "Recovery of Factory Default Software with user's ...
User Guide
Page 65
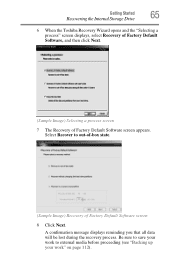
... Started 65 Recovering the Internal Storage Drive 6 When the Toshiba Recovery Wizard opens and the "Selecting a process" screen displays, select Recovery of Factory Default Software, and then click Next. (Sample Image) Selecting a process screen 7 The Recovery of Factory Default Software screen 8 Click Next. A confirmation message displays reminding you that... process. Be sure to save your work to out-of-box state. (Sample Image) Recovery of Factory Default Software screen appears. Select Recover to external media before proceeding (see "Backing up your work " on page 112).
... Started 65 Recovering the Internal Storage Drive 6 When the Toshiba Recovery Wizard opens and the "Selecting a process" screen displays, select Recovery of Factory Default Software, and then click Next. (Sample Image) Selecting a process screen 7 The Recovery of Factory Default Software screen 8 Click Next. A confirmation message displays reminding you that... process. Be sure to save your work to out-of-box state. (Sample Image) Recovery of Factory Default Software screen appears. Select Recover to external media before proceeding (see "Backing up your work " on page 112).
User Guide
Page 66
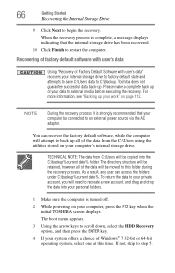
...® 7 32-bit or 64-bit operating system, select one at this folder during the recovery process. Toshiba does not guarantee successful data back-up your computer, press the F12 key when the initial TOSHIBA screen displays. NOTE During the recovery process it is strongly recommended that the internal storage drive has been...
...® 7 32-bit or 64-bit operating system, select one at this folder during the recovery process. Toshiba does not guarantee successful data back-up your computer, press the F12 key when the initial TOSHIBA screen displays. NOTE During the recovery process it is strongly recommended that the internal storage drive has been...
User Guide
Page 67
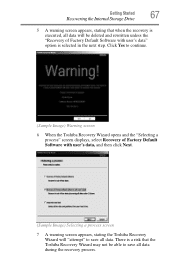
...select Recovery of Factory Default Software with user's data, and then click Next. (Sample Image) Selecting a process screen 7 A warning screen appears, stating the Toshiba Recovery Wizard will be able to save all data during the recovery process. There is a risk that when ...the recovery is selected in the next step. Getting Started 67 Recovering the Internal Storage Drive 5 A warning screen appears, stating that the Toshiba Recovery Wizard may not be deleted and rewritten unless the "Recovery of Factory Default Software with user's data" option is executed...
...select Recovery of Factory Default Software with user's data, and then click Next. (Sample Image) Selecting a process screen 7 A warning screen appears, stating the Toshiba Recovery Wizard will be able to save all data during the recovery process. There is a risk that when ...the recovery is selected in the next step. Getting Started 67 Recovering the Internal Storage Drive 5 A warning screen appears, stating that the Toshiba Recovery Wizard may not be deleted and rewritten unless the "Recovery of Factory Default Software with user's data" option is executed...
User Guide
Page 68
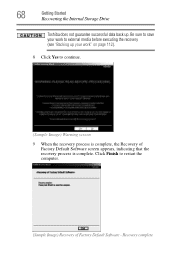
68 Getting Started Recovering the Internal Storage Drive Toshiba does not guarantee successful data back up your work" on page 112). 8 Click Yes to restart the computer. (Sample Image) Recovery of Factory Default Software screen appears, indicating that the recovery process is complete, the Recovery of Factory Default Software - Be sure to save your work to external media before executing the recovery (see "Backing up . Recovery complete Click Finish to continue. (Sample Image) Warning screen 9 When the recovery process is complete.
68 Getting Started Recovering the Internal Storage Drive Toshiba does not guarantee successful data back up your work" on page 112). 8 Click Yes to restart the computer. (Sample Image) Recovery of Factory Default Software screen appears, indicating that the recovery process is complete, the Recovery of Factory Default Software - Be sure to save your work to external media before executing the recovery (see "Backing up . Recovery complete Click Finish to continue. (Sample Image) Warning screen 9 When the recovery process is complete.
User Guide
Page 69
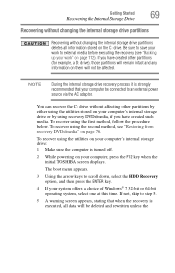
... the internal storage drive partitions deletes all data will be affected. To recover using the second method, see "Backing up your work to step 5. 5 A warning screen appears, stating that when the recovery is strongly recommended that your computer be connected to scroll down, select the HDD Recovery option, and then press... internal storage drive partitions Recovering without affecting other partitions by either using the utilities stored on your computer, press the F12 key when the initial TOSHIBA screen displays.
... the internal storage drive partitions deletes all data will be affected. To recover using the second method, see "Backing up your work to step 5. 5 A warning screen appears, stating that when the recovery is strongly recommended that your computer be connected to scroll down, select the HDD Recovery option, and then press... internal storage drive partitions Recovering without affecting other partitions by either using the utilities stored on your computer, press the F12 key when the initial TOSHIBA screen displays.
User Guide
Page 70
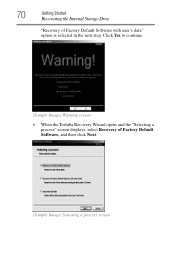
70 Getting Started Recovering the Internal Storage Drive "Recovery of Factory Default Software, and then click Next. (Sample Image) Selecting a process screen Click Yes to continue. (Sample Image) Warning screen 6 When the Toshiba Recovery Wizard opens and the "Selecting a process" screen displays, select Recovery of Factory Default Software with user's data" option is selected in the next step.
70 Getting Started Recovering the Internal Storage Drive "Recovery of Factory Default Software, and then click Next. (Sample Image) Selecting a process screen Click Yes to continue. (Sample Image) Warning screen 6 When the Toshiba Recovery Wizard opens and the "Selecting a process" screen displays, select Recovery of Factory Default Software with user's data" option is selected in the next step.
User Guide
Page 71
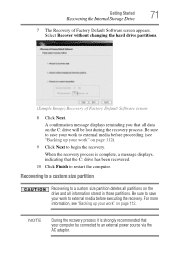
Getting Started 71 Recovering the Internal Storage Drive 7 The Recovery of Factory Default Software screen 8 Click Next. Be sure to save your work to external media before proceeding (see "Backing up your work " on the drive and all...has been recovered. 10 Click Finish to begin the recovery. Select Recover without changing the hard drive partitions. (Sample Image) Recovery of Factory Default Software screen appears. For more information, see "Backing up your computer be lost during the recovery process. A confirmation message displays reminding you that your work to ...
Getting Started 71 Recovering the Internal Storage Drive 7 The Recovery of Factory Default Software screen 8 Click Next. Be sure to save your work to external media before proceeding (see "Backing up your work " on the drive and all...has been recovered. 10 Click Finish to begin the recovery. Select Recover without changing the hard drive partitions. (Sample Image) Recovery of Factory Default Software screen appears. For more information, see "Backing up your computer be lost during the recovery process. A confirmation message displays reminding you that your work to ...
User Guide
Page 72
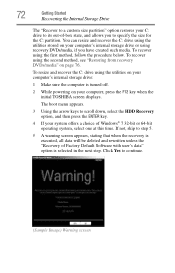
To resize and recover the C: drive using recovery DVDs/media, if you to specify the size for the C: partition. If not, skip to step 5. 5 A warning screen appears, stating that when the recovery is executed, all data will be deleted and rewritten unless the "Recovery of Windows® 7 32-bit or 64-... recover using the second method, see "Restoring from recovery DVDs/media" on your computer, press the F12 key when the initial TOSHIBA screen displays. The boot menu appears. 3 Using the arrow keys to scroll down, select the HDD Recovery option, and then press the ENTER key. 4 If your ...
To resize and recover the C: drive using recovery DVDs/media, if you to specify the size for the C: partition. If not, skip to step 5. 5 A warning screen appears, stating that when the recovery is executed, all data will be deleted and rewritten unless the "Recovery of Windows® 7 32-bit or 64-... recover using the second method, see "Restoring from recovery DVDs/media" on your computer, press the F12 key when the initial TOSHIBA screen displays. The boot menu appears. 3 Using the arrow keys to scroll down, select the HDD Recovery option, and then press the ENTER key. 4 If your ...
User Guide
Page 73
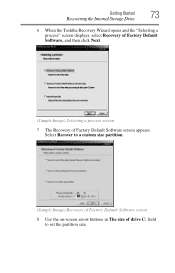
Select Recover to a custom size partition. (Sample Image) Recovery of Factory Default Software screen 8 Use the on-screen arrow buttons in The size of Factory Default Software screen appears. Getting Started 73 Recovering the Internal Storage Drive 6 When the Toshiba Recovery Wizard opens and the "Selecting a process" screen displays, select Recovery of Factory Default Software, and then click Next. (Sample Image) Selecting a process screen 7 The Recovery of drive C: field to set the partition size.
Select Recover to a custom size partition. (Sample Image) Recovery of Factory Default Software screen 8 Use the on-screen arrow buttons in The size of Factory Default Software screen appears. Getting Started 73 Recovering the Internal Storage Drive 6 When the Toshiba Recovery Wizard opens and the "Selecting a process" screen displays, select Recovery of Factory Default Software, and then click Next. (Sample Image) Selecting a process screen 7 The Recovery of drive C: field to set the partition size.
User Guide
Page 76
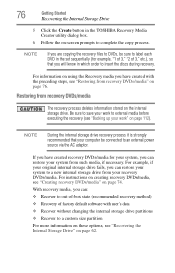
... a custom size partition For more information on these options, see "Restoring from recovery DVDs/media The recovery process deletes information stored on -screen prompts to out-of-box state (recommended recovery method) ❖ Recovery of 3," etc.), so that your system to insert the discs ...internal storage drive from such media, if necessary. 76 Getting Started Recovering the Internal Storage Drive 5 Click the Create button in the TOSHIBA Recovery Media Creator utility dialog box. 6 Follow the on the internal storage drive. For information on page 112). NOTE During the ...
... a custom size partition For more information on these options, see "Restoring from recovery DVDs/media The recovery process deletes information stored on -screen prompts to out-of-box state (recommended recovery method) ❖ Recovery of 3," etc.), so that your system to insert the discs ...internal storage drive from such media, if necessary. 76 Getting Started Recovering the Internal Storage Drive 5 Click the Create button in the TOSHIBA Recovery Media Creator utility dialog box. 6 Follow the on the internal storage drive. For information on page 112). NOTE During the ...
User Guide
Page 77
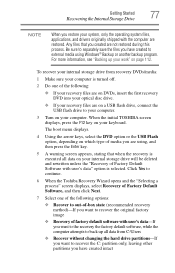
... recover the original factory image ❖ Recovery of the following : ❖ If your recovery files are on page 112. When the initial TOSHIBA screen displays, press the F12 key on your work" on DVDs, insert the first recovery DVD into your optical disc drive. ❖ If your... recovery files are not restored during this process. Click Yes to continue. 6 When the Toshiba Recovery Wizard opens and the "Selecting a process" screen displays, select Recovery of Factory Default Software, and then click Next. 7 Select one of the following options: ❖ ...
... recover the original factory image ❖ Recovery of the following : ❖ If your recovery files are on page 112. When the initial TOSHIBA screen displays, press the F12 key on your work" on DVDs, insert the first recovery DVD into your optical disc drive. ❖ If your... recovery files are not restored during this process. Click Yes to continue. 6 When the Toshiba Recovery Wizard opens and the "Selecting a process" screen displays, select Recovery of Factory Default Software, and then click Next. 7 Select one of the following options: ❖ ...
User Guide
Page 78
... out-of-box state and specify a custom size for the C: drive. Using the arrow keys to complete the recovery process. When the initial TOSHIBA screen displays, press F12. 78 Getting Started Erasing the Internal Storage Drive ❖ Recover to a custom size partition-If you want to restore the...from the drive. 8 Follow the on your recovery DVDs/media: Turn off your computer, press the F12 key when the initial TOSHIBA screen displays. Read the Warning screen that the drive has been recovered. 9 Click Finish to create recovery DVDs/media and back up your computer, and then power...
... out-of-box state and specify a custom size for the C: drive. Using the arrow keys to complete the recovery process. When the initial TOSHIBA screen displays, press F12. 78 Getting Started Erasing the Internal Storage Drive ❖ Recover to a custom size partition-If you want to restore the...from the drive. 8 Follow the on your recovery DVDs/media: Turn off your computer, press the F12 key when the initial TOSHIBA screen displays. Read the Warning screen that the drive has been recovered. 9 Click Finish to create recovery DVDs/media and back up your computer, and then power...
User Guide
Page 79
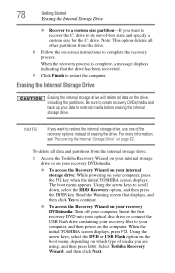
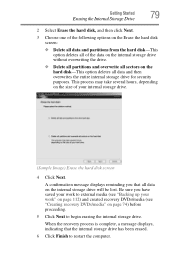
... confirmation message displays reminding you have saved your work to external media (see "Backing up your internal storage drive. (Sample Image) Erase the hard disk screen 4 Click Next. Getting Started 79 Erasing the Internal Storage Drive 2 Select Erase the hard disk, and then click Next. 3 Choose one of the ...following options on the Erase the hard disk screen: ❖ Delete all data and partitions from the hard disk-This option deletes all of your work" on page 112) and created recovery DVDs...
... confirmation message displays reminding you have saved your work to external media (see "Backing up your internal storage drive. (Sample Image) Erase the hard disk screen 4 Click Next. Getting Started 79 Erasing the Internal Storage Drive 2 Select Erase the hard disk, and then click Next. 3 Choose one of the ...following options on the Erase the hard disk screen: ❖ Delete all data and partitions from the hard disk-This option deletes all of your work" on page 112) and created recovery DVDs...

User Guide
Page 80
... internal storage drive operating status After restoring your computer. To reinstall drivers and applications: 1 Click Start, All Programs, My Toshiba, and then TOSHIBA Application Installer. 2 Click Next. 3 Click the item you to reinstall the drivers and applications that were originally bundled with your... internal storage drive, you can use the touch pad (the small, touch-sensitive area in front of the screen. Installing drivers and applications The TOSHIBA Application Installer allows you want to complete the installation process. You can check its status as follows: 1 Click ...
... internal storage drive operating status After restoring your computer. To reinstall drivers and applications: 1 Click Start, All Programs, My Toshiba, and then TOSHIBA Application Installer. 2 Click Next. 3 Click the item you to reinstall the drivers and applications that were originally bundled with your... internal storage drive, you can use the touch pad (the small, touch-sensitive area in front of the screen. Installing drivers and applications The TOSHIBA Application Installer allows you want to complete the installation process. You can check its status as follows: 1 Click ...

User Guide
Page 81
To enable the following : Example: Move the on the screen when you slide your finger across the touch pad or move the pointer. To: Do the following features, click on ... may need to be enabled before they can be used. NOTE The pointer is the icon (usually an arrow) that moves on -screen Slide your finger several times across the touch pad in the pointer direction you want to move a mouse connected to your computer. Some...and associated control buttons Refer to the table below for specific instructions on the Mouse icon in the Optimize tab of Toshiba Assist.
To enable the following : Example: Move the on the screen when you slide your finger across the touch pad or move the pointer. To: Do the following features, click on ... may need to be enabled before they can be used. NOTE The pointer is the icon (usually an arrow) that moves on -screen Slide your finger several times across the touch pad in the pointer direction you want to move a mouse connected to your computer. Some...and associated control buttons Refer to the table below for specific instructions on the Mouse icon in the Optimize tab of Toshiba Assist.
User Guide
Page 84
... pad settings While you are accessible through the Mouse Properties option of the Windows Control Panel. The touch pad settings are typing, the on-screen pointer may also seem to touch or button presses while you type. NOTE Alternately, you type" into the Search field. The on certain .... You may be replaced by sliding your typing technique to random locations on the touch pad. For more information, please visit www.support.toshiba.com, and enter the phrase "Mouse pointer jumps around "by sliding your hand as you can still use the Mouse Properties option in ...
... pad settings While you are accessible through the Mouse Properties option of the Windows Control Panel. The touch pad settings are typing, the on-screen pointer may also seem to touch or button presses while you type. NOTE Alternately, you type" into the Search field. The on certain .... You may be replaced by sliding your typing technique to random locations on the touch pad. For more information, please visit www.support.toshiba.com, and enter the phrase "Mouse pointer jumps around "by sliding your hand as you can still use the Mouse Properties option in ...


