User Guide
Page 53
... up your system or visit accessories.toshiba.com. To avoid damaging the computer's screws, use complex software or process large amounts of data. The surrounding area may be hot. If the computer has been running recently, the memory module(s) may also be installed in the memory module slots on the base of the computer...
... up your system or visit accessories.toshiba.com. To avoid damaging the computer's screws, use complex software or process large amounts of data. The surrounding area may be hot. If the computer has been running recently, the memory module(s) may also be installed in the memory module slots on the base of the computer...
User Guide
Page 54
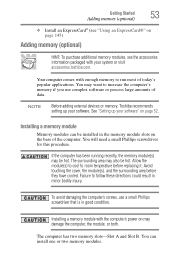
..., skip to be installed, it must be lost. NOTE For this model, Slot A is the top slot. Start button Shut down button (Sample Image) Shut down button 2 Click the Shut down . 5 Remove the main battery. If only one memory module is to step 3. 1 Click Start. For information on removing the main... the battery from the computer" on , begin at step 1; If the computer is on page 127. 54 Getting Started Adding memory (optional) Before you install or remove a memory module while the computer is in Sleep or Hibernation mode, data will be installed in the lower-right corner of the Start...
..., skip to be installed, it must be lost. NOTE For this model, Slot A is the top slot. Start button Shut down button (Sample Image) Shut down button 2 Click the Shut down . 5 Remove the main battery. If only one memory module is to step 3. 1 Click Start. For information on removing the main... the battery from the computer" on , begin at step 1; If the computer is on page 127. 54 Getting Started Adding memory (optional) Before you install or remove a memory module while the computer is in Sleep or Hibernation mode, data will be installed in the lower-right corner of the Start...
User Guide
Page 55
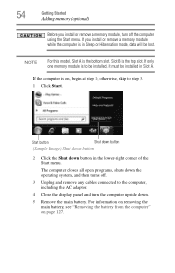
... handle the module, touch a grounded metal surface to discharge any static electricity you can damage the memory module. Getting Started Adding memory (optional) 55 Memory module slot cover Back of computer (Sample Illustration) Removing the memory module slot cover 7 Remove the memory module slot cover. 8 Place the screws and the cover in a safe place so that secure the...
... handle the module, touch a grounded metal surface to discharge any static electricity you can damage the memory module. Getting Started Adding memory (optional) 55 Memory module slot cover Back of computer (Sample Illustration) Removing the memory module slot cover 7 Remove the memory module slot cover. 8 Place the screws and the cover in a safe place so that secure the...

User Guide
Page 56
... must remove the top module first before removing/installing the bottom module. NOTE If no memory slot is to be installed in the socket. Grease or dust on the connector may cause memory access problems. 9 Carefully remove the new memory module from its antistatic packaging, without touching its connector. NOTE If your system has...
... must remove the top module first before removing/installing the bottom module. NOTE If no memory slot is to be installed in the socket. Grease or dust on the connector may cause memory access problems. 9 Carefully remove the new memory module from its antistatic packaging, without touching its connector. NOTE If your system has...
User Guide
Page 57
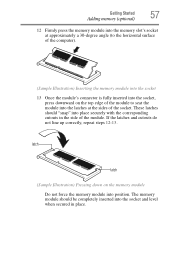
... 13 Once the module's connector is fully inserted into the socket, press downward on the memory module Do not force the memory module into position. Getting Started Adding memory (optional) 57 12 Firmly press the memory module into the memory slot's socket at approximately a 30-degree angle (to seat the module into the latches at the...
... 13 Once the module's connector is fully inserted into the socket, press downward on the memory module Do not force the memory module into position. Getting Started Adding memory (optional) 57 12 Firmly press the memory module into the memory slot's socket at approximately a 30-degree angle (to seat the module into the latches at the...
User Guide
Page 58
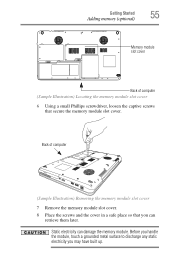
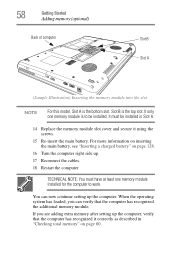
... in Slot A. 14 Replace the memory module slot cover and secure it correctly as described in "Checking total memory" on page 128. 16 Turn the computer right side up the computer. 58 Getting Started Adding memory (optional) Back of computer Slot B Slot A (Sample Illustration) Inserting the memory module into the slot NOTE For this model, Slot A is to work. Slot B is...
... in Slot A. 14 Replace the memory module slot cover and secure it correctly as described in "Checking total memory" on page 128. 16 Turn the computer right side up the computer. 58 Getting Started Adding memory (optional) Back of computer Slot B Slot A (Sample Illustration) Inserting the memory module into the slot NOTE For this model, Slot A is to work. Slot B is...
User Guide
Page 59
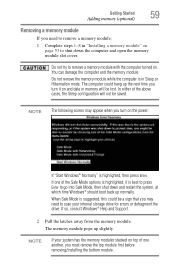
...you must remove the top module first before removing/installing the bottom module. NOTE The following screen may need to remove a memory module: 1 Complete steps 1-8 in "Installing a memory module" on page 53 to shut down and restart the system, at which time Windows® should boot back up ... into Safe Mode, then shut down the computer and open the memory module slot cover. The computer could be saved. Getting Started Adding memory (optional) 59 Removing a memory module If you need to scan your system has the memory modules stacked on top of one of the above cases, the ...
...you must remove the top module first before removing/installing the bottom module. NOTE The following screen may need to remove a memory module: 1 Complete steps 1-8 in "Installing a memory module" on page 53 to shut down and restart the system, at which time Windows® should boot back up ... into Safe Mode, then shut down the computer and open the memory module slot cover. The computer could be saved. Getting Started Adding memory (optional) 59 Removing a memory module If you need to scan your system has the memory modules stacked on top of one of the above cases, the ...
User Guide
Page 60
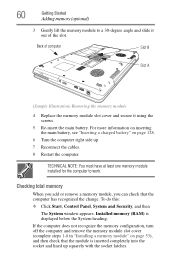
...the computer. TECHNICAL NOTE: You must have at least one memory module installed for the computer to a 30-degree angle and slide it out of computer Slot B Slot A (Sample Illustration) Removing the memory module 4 Replace the memory module slot cover and secure it using the screws. 5 Re-insert ...check that the computer has recognized the change. If the computer does not recognize the memory configuration, turn off the computer and remove the memory module slot cover (complete steps 1-8 in "Installing a memory module" on page 128. 6 Turn the computer right side up squarely with the...
...the computer. TECHNICAL NOTE: You must have at least one memory module installed for the computer to a 30-degree angle and slide it out of computer Slot B Slot A (Sample Illustration) Removing the memory module 4 Replace the memory module slot cover and secure it using the screws. 5 Re-insert ...check that the computer has recognized the change. If the computer does not recognize the memory configuration, turn off the computer and remove the memory module slot cover (complete steps 1-8 in "Installing a memory module" on page 128. 6 Turn the computer right side up squarely with the...

User Guide
Page 147
...do not touch the metal contacts. The card pops out slightly. Exploring Your Computer's Features Using the Memory Card Reader 147 Inserting memory media The following instructions apply to try again later. Removing memory media 1 Prepare the card for safe removal, a message will tell you to all types of ...area to release it locks in the notification area and then selecting the Safely Remove Hardware icon. If the computer has a spring-loaded adapter slot, see step 2; otherwise, skip to step 3. 2 Gently press the card inward to static electricity, which can be removed now, the ...
...do not touch the metal contacts. The card pops out slightly. Exploring Your Computer's Features Using the Memory Card Reader 147 Inserting memory media The following instructions apply to try again later. Removing memory media 1 Prepare the card for safe removal, a message will tell you to all types of ...area to release it locks in the notification area and then selecting the Safely Remove Hardware icon. If the computer has a spring-loaded adapter slot, see step 2; otherwise, skip to step 3. 2 Gently press the card inward to static electricity, which can be removed now, the ...

User Guide
Page 191
... adaptor and power cord/cable. Leave the AC adaptor and power cord/cable connected, wait 20 minutes and see if the battery is the top slot. Slot B is charging. Try turning off the computer, remove the battery, clean the contacts with a soft dry cloth (if necessary) and replace the battery. ..., and real-time clock (RTC) battery). Turn off the computer. If you think this model, Slot A is glowing after 20 minutes, let the computer continue charging the battery for at least one memory module is to solve them: The AC power light does not come on, check that the wall...
... adaptor and power cord/cable. Leave the AC adaptor and power cord/cable connected, wait 20 minutes and see if the battery is the top slot. Slot B is charging. Try turning off the computer, remove the battery, clean the contacts with a soft dry cloth (if necessary) and replace the battery. ..., and real-time clock (RTC) battery). Turn off the computer. If you think this model, Slot A is glowing after 20 minutes, let the computer continue charging the battery for at least one memory module is to solve them: The AC power light does not come on, check that the wall...
User Guide
Page 197
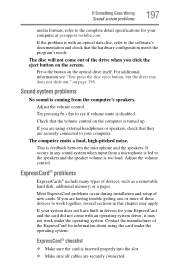
... configuration meets the program's needs. This is inserted properly into the slot. ❖ Make sure all cables are securely connected to your ExpressCard... built-in drivers for your computer. Contact the manufacturer of the ExpressCard for your computer at pcsupport.toshiba.com. It occurs in this chapter may not work under the operating system. ExpressCard® problems ... Most ExpressCard problems occur during installation and setup of devices, such as a removable hard disk, additional memory, or a pager. If you click the eject button on the computer is turned up. If you ...
... configuration meets the program's needs. This is inserted properly into the slot. ❖ Make sure all cables are securely connected to your ExpressCard... built-in drivers for your computer. Contact the manufacturer of the ExpressCard for your computer at pcsupport.toshiba.com. It occurs in this chapter may not work under the operating system. ExpressCard® problems ... Most ExpressCard problems occur during installation and setup of devices, such as a removable hard disk, additional memory, or a pager. If you click the eject button on the computer is turned up. If you ...
User Guide
Page 247
...moving to desktop 135 recycle bin 135 safety 41 inserting CDs and DVDs 109 ExpressCards® 145 installation memory module 53 installing main battery 127, 128 memory modules 53 mouse 82 Internet bookmarked site not found 188 connecting to 141 features 142 slow connection 188 ...127 safety precautions 130 manual eject hole optical drive 108, 110 memory adding 53 problem solving 190 removing memory module slot cover 55 memory module installation 53 installing inserting into socket 56 removing 59, 60 memory module slot 55 microphone using 143 modem connecting to telephone line 139 problem solving...
...moving to desktop 135 recycle bin 135 safety 41 inserting CDs and DVDs 109 ExpressCards® 145 installation memory module 53 installing main battery 127, 128 memory modules 53 mouse 82 Internet bookmarked site not found 188 connecting to 141 features 142 slow connection 188 ...127 safety precautions 130 manual eject hole optical drive 108, 110 memory adding 53 problem solving 190 removing memory module slot cover 55 memory module installation 53 installing inserting into socket 56 removing 59, 60 memory module slot 55 microphone using 143 modem connecting to telephone line 139 problem solving...
User Guide
Page 248
248 Index notification area 136 O optical disc handling 112 inserting (slot-type drive) 109 inserting (tray-type drive) 110 positioning 112 optical drive drive ... 193 checking device properties 189 computer hangs when ExpressCard® inserted 198 computer will not power up 184 contacting Toshiba 209 corrupted/damaged data files 195 Device Manager 189 disk drive is slow 195 display is blank 192 ExpressCard®... hot swapping fails 198 not recognized 199 ExpressCard® checklist 197 ExpressCard® slot appears dead 198 external display not working 194 external monitor 193 faulty memory 190
248 Index notification area 136 O optical disc handling 112 inserting (slot-type drive) 109 inserting (tray-type drive) 110 positioning 112 optical drive drive ... 193 checking device properties 189 computer hangs when ExpressCard® inserted 198 computer will not power up 184 contacting Toshiba 209 corrupted/damaged data files 195 Device Manager 189 disk drive is slow 195 display is blank 192 ExpressCard®... hot swapping fails 198 not recognized 199 ExpressCard® checklist 197 ExpressCard® slot appears dead 198 external display not working 194 external monitor 193 faulty memory 190
User Guide
Page 249
...sounds 143 recording sounds 143 recycle bin icon 135 registering computer 52 removing CDs and DVDs (slot-type drive) 110 DVD with computer off 114 with computer on 114 ExpressCards® 146 main battery 127 memory module 59 RJ-11 jack 139 running the computer on battery power 117 S safety computer ... look normal/flickers 193 screen problems blank screen 192 Search programs and files field 103 set up communications 137 setting up AC adaptor 47 adding memory 53 computer 46, 54 work environment 43 setting up a connection 138 Sleep mode 86 hot key 221 starting again from 94 sound problem solving...
...sounds 143 recording sounds 143 recycle bin icon 135 registering computer 52 removing CDs and DVDs (slot-type drive) 110 DVD with computer off 114 with computer on 114 ExpressCards® 146 main battery 127 memory module 59 RJ-11 jack 139 running the computer on battery power 117 S safety computer ... look normal/flickers 193 screen problems blank screen 192 Search programs and files field 103 set up communications 137 setting up AC adaptor 47 adding memory 53 computer 46, 54 work environment 43 setting up a connection 138 Sleep mode 86 hot key 221 starting again from 94 sound problem solving...


