User Manual
Page 5
... representative of Toshiba, or the Toshiba Support Centre within the United States at (800) 457-7777 or Outside the United States at the top or bottom of this computer. 5 Connection to party line service is subject to provide you with the best service it can. If the equipment is causing harm to the fax software instructions installed on the...
... representative of Toshiba, or the Toshiba Support Centre within the United States at (800) 457-7777 or Outside the United States at the top or bottom of this computer. 5 Connection to party line service is subject to provide you with the best service it can. If the equipment is causing harm to the fax software instructions installed on the...
User Manual
Page 27
... for the first time 45 Opening the display panel 45 Your computer's features and specifications ....46 Turning on the power 46 Adding memory (optional 47 Installing a memory module 48 Removing a memory module 53 Checking total memory 54 Hard Drive Recovery Utilities 55 Creating Recovery CDs/DVDs 56 Hard Disk Drive Recovery Options 57 Installing drivers and applications 63 Using the TouchPad 63 Scrolling with the TouchPad 64 Control buttons 64 Disabling or enabling the TouchPad 64 Using the Dual Mode Pad 65 Using Dual Mode 65 Using external display devices 67 Directing the...
... for the first time 45 Opening the display panel 45 Your computer's features and specifications ....46 Turning on the power 46 Adding memory (optional 47 Installing a memory module 48 Removing a memory module 53 Checking total memory 54 Hard Drive Recovery Utilities 55 Creating Recovery CDs/DVDs 56 Hard Disk Drive Recovery Options 57 Installing drivers and applications 63 Using the TouchPad 63 Scrolling with the TouchPad 64 Control buttons 64 Disabling or enabling the TouchPad 64 Using the Dual Mode Pad 65 Using Dual Mode 65 Using external display devices 67 Directing the...
User Manual
Page 48
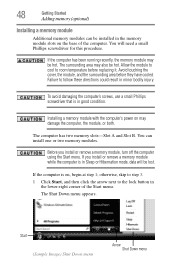
... module, or both. Installing a memory module with the computer's power on , begin at step 1; Before you install or remove a memory module while the computer is in the memory module slots on the base of the Start menu. If you install or remove a memory module, turn off the computer using the Start menu. Avoid touching the cover, the module, and the surrounding area before replacing it. 48 Getting Started Adding memory (optional) Installing a memory module Additional memory modules can install one or two memory modules. You will be installed...
... module, or both. Installing a memory module with the computer's power on , begin at step 1; Before you install or remove a memory module while the computer is in the memory module slots on the base of the Start menu. If you install or remove a memory module, turn off the computer using the Start menu. Avoid touching the cover, the module, and the surrounding area before replacing it. 48 Getting Started Adding memory (optional) Installing a memory module Additional memory modules can install one or two memory modules. You will be installed...
User Manual
Page 54
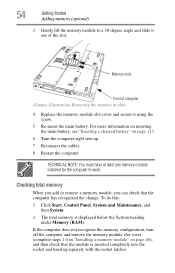
... recognize the memory configuration, turn off the computer and remove the memory module slot cover (complete steps 1-8 in "Installing a memory module" on page 113. 6 Turn the computer right side up squarely with the socket latches. Memory slots Front of computer (Sample Illustration) Removing the memory module 4 Replace the memory module slot cover and secure it out of the slot. 54 Getting Started Adding memory (optional) 3 Gently lift the memory module to work. Checking total memory When you add or remove a memory module, you...
... recognize the memory configuration, turn off the computer and remove the memory module slot cover (complete steps 1-8 in "Installing a memory module" on page 113. 6 Turn the computer right side up squarely with the socket latches. Memory slots Front of computer (Sample Illustration) Removing the memory module 4 Replace the memory module slot cover and secure it out of the slot. 54 Getting Started Adding memory (optional) 3 Gently lift the memory module to work. Checking total memory When you add or remove a memory module, you...
User Manual
Page 58
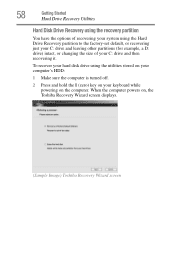
... using the Hard Drive Recovery partition to the factory-set default, or recovering just your C: drive and leaving other partitions (for example, a D: drive) intact, or changing the size of your keyboard while powering on , the Toshiba Recovery Wizard screen displays. (Sample Image) Toshiba Recovery Wizard screen 58 Getting Started Hard Drive Recovery Utilities Hard Disk Drive Recovery using the recovery partition You have the options of recovering your system using the utilities stored on your computer's HDD: 1 Make sure the computer is turned off. 2 Press and hold the 0 (zero) key...
... using the Hard Drive Recovery partition to the factory-set default, or recovering just your C: drive and leaving other partitions (for example, a D: drive) intact, or changing the size of your keyboard while powering on , the Toshiba Recovery Wizard screen displays. (Sample Image) Toshiba Recovery Wizard screen 58 Getting Started Hard Drive Recovery Utilities Hard Disk Drive Recovery using the recovery partition You have the options of recovering your system using the utilities stored on your computer's HDD: 1 Make sure the computer is turned off. 2 Press and hold the 0 (zero) key...
User Manual
Page 67
... computer for the type of these buttons if you must only be used if the cable's outer conductive shielding has been grounded by default. In order to digital monitors. Getting Started 67 Using external display devices Configuring virtual buttons The virtual buttons at the building premises as close the Mouse Properties window. The virtual buttons on the bottom of the Dual Mode Pad (buttons 4, 5, and 6 in "Enabling Dual Mode" on certain models) NOTE DVI...
... computer for the type of these buttons if you must only be used if the cable's outer conductive shielding has been grounded by default. In order to digital monitors. Getting Started 67 Using external display devices Configuring virtual buttons The virtual buttons at the building premises as close the Mouse Properties window. The virtual buttons on the bottom of the Dual Mode Pad (buttons 4, 5, and 6 in "Enabling Dual Mode" on certain models) NOTE DVI...
User Manual
Page 85
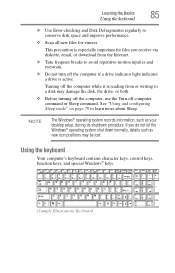
... character keys, control keys, function keys, and special Windows® keys. (Sample Illustration) Keyboard See "Using and configuring Sleep mode" on page 79 to a disk may be lost. If you receive via diskette, email, or download from or writing to learn more about Sleep. This precaution is especially important for viruses. NOTE The Windows® operating system records information, such as new icon positions may damage the disk, the drive...
... character keys, control keys, function keys, and special Windows® keys. (Sample Illustration) Keyboard See "Using and configuring Sleep mode" on page 79 to a disk may be lost. If you receive via diskette, email, or download from or writing to learn more about Sleep. This precaution is especially important for viruses. NOTE The Windows® operating system records information, such as new icon positions may damage the disk, the drive...
User Manual
Page 146
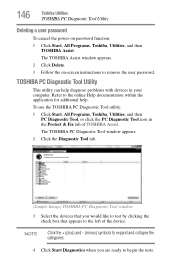
.... (Sample Image) TOSHIBA PC Diagnostic Tool window 3 Select the devices that you are ready to the online Help documentation within the application for additional help diagnose problems with devices in the Protect & Fix tab of the device. TOSHIBA PC Diagnostic Tool Utility This utility can help . 146 Toshiba Utilities TOSHIBA PC Diagnostic Tool Utility Deleting a user password To cancel the power-on -screen instructions to remove the user password. NOTE Click the...
.... (Sample Image) TOSHIBA PC Diagnostic Tool window 3 Select the devices that you are ready to the online Help documentation within the application for additional help diagnose problems with devices in the Protect & Fix tab of the device. TOSHIBA PC Diagnostic Tool Utility This utility can help . 146 Toshiba Utilities TOSHIBA PC Diagnostic Tool Utility Deleting a user password To cancel the power-on -screen instructions to remove the user password. NOTE Click the...
User Manual
Page 173
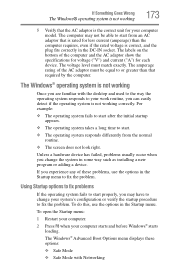
... working correctly. Unless a hardware device has failed, problems usually occur when you change your work routine, you may not be equal to start after the initial startup appears. ❖ The operating system takes a long time to fix the problem. If you are familiar with Networking The Windows® operating system is not working Once you experience any of these options: ❖ Safe Mode ❖ Safe Mode with the desktop and used...
... working correctly. Unless a hardware device has failed, problems usually occur when you change your work routine, you may not be equal to start after the initial startup appears. ❖ The operating system takes a long time to fix the problem. If you are familiar with Networking The Windows® operating system is not working Once you experience any of these options: ❖ Safe Mode ❖ Safe Mode with the desktop and used...
User Manual
Page 177
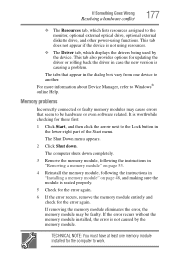
... the monitor, optional external optical drive, optional external diskette drive, and other power-using functions. The computer shuts down . This tab also provides options for updating the driver or rolling back the driver in "Installing a memory module" on page 53. 4 Reinstall the memory module, following the instructions in case the new version is causing a problem. Memory problems Incorrectly connected or faulty memory modules may be hardware or even software related. The Shut Down menu appears. 2 Click Shut down completely. 3 Remove the memory module...
... the monitor, optional external optical drive, optional external diskette drive, and other power-using functions. The computer shuts down . This tab also provides options for updating the driver or rolling back the driver in "Installing a memory module" on page 53. 4 Reinstall the memory module, following the instructions in case the new version is causing a problem. Memory problems Incorrectly connected or faulty memory modules may be hardware or even software related. The Shut Down menu appears. 2 Click Shut down completely. 3 Remove the memory module...
User Manual
Page 179
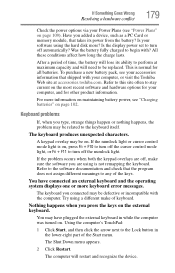
... Resolving a hardware conflict 179 Check the power options via your software using the hard disk more? Is your Power Plans (see "Charging batteries" on , press Fn + F10 to turn off automatically? Is the display power set to begin with your computer, and for all batteries. The keyboard you press the keys on . Was the battery fully charged to turn off , make sure the software you added a device, such as a PC Card or memory module, that the...
... Resolving a hardware conflict 179 Check the power options via your software using the hard disk more? Is your Power Plans (see "Charging batteries" on , press Fn + F10 to turn off automatically? Is the display power set to begin with your computer, and for all batteries. The keyboard you press the keys on . Was the battery fully charged to turn off , make sure the software you added a device, such as a PC Card or memory module, that the...
User Manual
Page 180
.... This opens the Personalization window. The screen reactivates and allows you are using the built-in screen, make sure the display priority is not set for the screen. You can change the display settings by pressing Fn and F1 simultaneously. 180 If Something Goes Wrong Resolving a hardware conflict Display problems Here are using an external monitor: ❖ Check that the monitor is turned on. ❖ Check that the monitor's power cord/cable is...
.... This opens the Personalization window. The screen reactivates and allows you are using the built-in screen, make sure the display priority is not set for the screen. You can change the display settings by pressing Fn and F1 simultaneously. 180 If Something Goes Wrong Resolving a hardware conflict Display problems Here are using an external monitor: ❖ Check that the monitor is turned on. ❖ Check that the monitor's power cord/cable is...
User Manual
Page 187
Make sure the printer cable is firmly connected to print a short test file using Notepad. Disable Sleep mode, turn off the printer. Turn the printer back on, make sure it is online, and then turn off the computer, and turn the computer back on. See if your original file. Check that the printer has plenty of paper left in the instructions that the printer...
Make sure the printer cable is firmly connected to print a short test file using Notepad. Disable Sleep mode, turn off the printer. Turn the printer back on, make sure it is online, and then turn off the computer, and turn the computer back on. See if your original file. Check that the printer has plenty of paper left in the instructions that the printer...
User Manual
Page 225
... work is running and have the operating system automatically recognize the change. It is refreshed. high-density diskette - I icon - Compare non-interlaced. internal device - The decentralized, world-wide network of using a pointing device such as the battery save mode. (2) A key or combination of data. Memory cache built into the processor to interact with the Fn key can set system options or control system parameters, such as a mouse. hot key...
... work is running and have the operating system automatically recognize the change. It is refreshed. high-density diskette - I icon - Compare non-interlaced. internal device - The decentralized, world-wide network of using a pointing device such as the battery save mode. (2) A key or combination of data. Memory cache built into the processor to interact with the Fn key can set system options or control system parameters, such as a mouse. hot key...
User Manual
Page 231
... battery changing 111 charge indicator light 44, 104 charge not lasting 178 charging 42, 44 conserving power 108 disposal 116 low charge 106 monitoring power 44, 104 not charging 178 notification 107 power plan 208 power plan hot key card 110 real-time clock (RTC) 101 removing 111 BIOS Setup see Toshiba Hardware Setup Bridge Media Adapter inserting memory media 133 removing memory media 134 button power 47, 56 start 120 C CD creating 97 playing an audio 96 CD, using 92 character keys 86 charging the battery 44 checking device...
... battery changing 111 charge indicator light 44, 104 charge not lasting 178 charging 42, 44 conserving power 108 disposal 116 low charge 106 monitoring power 44, 104 not charging 178 notification 107 power plan 208 power plan hot key card 110 real-time clock (RTC) 101 removing 111 BIOS Setup see Toshiba Hardware Setup Bridge Media Adapter inserting memory media 133 removing memory media 134 button power 47, 56 start 120 C CD creating 97 playing an audio 96 CD, using 92 character keys 86 charging the battery 44 checking device...
User Manual
Page 232
... files/trouble accessing a disk 182 running slow 182 diskette drive cannot insert a diskette 183 cannot read a diskette 183 connecting 71 external, connecting 71 display does not look normal/flickers 180 external monitor not working 181 screen is blank 180 display device external 67 display output settings 68 display, external adjusting 69 disposal information 25 disposing of used batteries 116 double-click 64 DVD creating 97 DVD player general problems 191 DVD, using 92 E environment computer-friendly 37 error messages device driver...
... files/trouble accessing a disk 182 running slow 182 diskette drive cannot insert a diskette 183 cannot read a diskette 183 connecting 71 external, connecting 71 display does not look normal/flickers 180 external monitor not working 181 screen is blank 180 display device external 67 display output settings 68 display, external adjusting 69 disposal information 25 disposing of used batteries 116 double-click 64 DVD creating 97 DVD player general problems 191 DVD, using 92 E environment computer-friendly 37 error messages device driver...

User Manual
Page 233
... Support Windows® 175 Hibernation mode 73 configuring 77 starting again from 79 hot key display brightness 212 display modes 211 Hibernation mode 210 keyboard overlays 215 password security 206 power plan 208 Sleep mode 209 Index 233 volume mute 205 zooming 215 hot key power plan 110 http 126 I i.LINK port 135 icon 119 desktop 119 Internet Explorer 119 moving to desktop 119 recycle bin 119 safety 35 Windows Media Player 119 installation memory module 48 installing memory modules 47 mouse...
... Support Windows® 175 Hibernation mode 73 configuring 77 starting again from 79 hot key display brightness 212 display modes 211 Hibernation mode 210 keyboard overlays 215 password security 206 power plan 208 Sleep mode 209 Index 233 volume mute 205 zooming 215 hot key power plan 110 http 126 I i.LINK port 135 icon 119 desktop 119 Internet Explorer 119 moving to desktop 119 recycle bin 119 safety 35 Windows Media Player 119 installation memory module 48 installing memory modules 47 mouse...
User Manual
Page 234
...L lock computer, using 83 M main battery removing 111 Media button functionality 94 memory adding 47 problem solving 177 removing expansion slot cover 50 memory module inserting 50 installation 48 removing 54 microphone 128 modem connecting to telephone line 122 determining COM port 121 problem solving 187, 188 resetting port to default settings 121 upgrading 121 monitor 67 connecting 68 not working 180 mouse installing 69 serial 69 mouse utility 148 N network accessing 123 Dial-Up Networking Wizard 123 networking wireless 125 Notification Area 120 O opening the display panel 45 optical drive...
...L lock computer, using 83 M main battery removing 111 Media button functionality 94 memory adding 47 problem solving 177 removing expansion slot cover 50 memory module inserting 50 installation 48 removing 54 microphone 128 modem connecting to telephone line 122 determining COM port 121 problem solving 187, 188 resetting port to default settings 121 upgrading 121 monitor 67 connecting 68 not working 180 mouse installing 69 serial 69 mouse utility 148 N network accessing 123 Dial-Up Networking Wizard 123 networking wireless 125 Notification Area 120 O opening the display panel 45 optical drive...

User Manual
Page 235
Index 235 power button 47, 56 power plan hot key card 110 power plans 108 power source 42 connecting 43 precautions 38 primary button 64 printer connecting 70 problem solving 187 printing a file 91 problem solving AC power 178 accessing disk drives 171 battery charge does not last 178 battery not charging 178 cannot insert diskette in drive 183 cannot read a diskette 183 changing display properties 181 checking device properties 176 computer hangs when PC Card inserted...
Index 235 power button 47, 56 power plan hot key card 110 power plans 108 power source 42 connecting 43 precautions 38 primary button 64 printer connecting 70 problem solving 187 printing a file 91 problem solving AC power 178 accessing disk drives 171 battery charge does not last 178 battery not charging 178 cannot insert diskette in drive 183 cannot read a diskette 183 changing display properties 181 checking device properties 176 computer hangs when PC Card inserted...
User Manual
Page 236
... 117 troubleshooting DVD player general problems 191 external keyboard 179 keyboard 179 keypad overlay 179 optical drive 183 turning on the computer 46 turning on the power 46 U user password, disabling 146 user password, setting 145 using a file extension 91 V video projector adjusting display 69 W warranty limited warranty 36 Web 126 Web sites 198 Wi-Fi wireless networking 125 Windows problem solving 173 Windows Explorer 88 Windows Media Player 96 Windows Media Player icon 119 Windows operating system desktop 118 Windows Start menu 87 Windows...
... 117 troubleshooting DVD player general problems 191 external keyboard 179 keyboard 179 keypad overlay 179 optical drive 183 turning on the computer 46 turning on the power 46 U user password, disabling 146 user password, setting 145 using a file extension 91 V video projector adjusting display 69 W warranty limited warranty 36 Web 126 Web sites 198 Wi-Fi wireless networking 125 Windows problem solving 173 Windows Explorer 88 Windows Media Player 96 Windows Media Player icon 119 Windows operating system desktop 118 Windows Start menu 87 Windows...


