User Guide
Page 44
... and click Next. 44 Getting Started Setting up your computer To register your computer online or to sign up your software. 1 From the Welcome screen click Next to enter the Setup Wizard. 2 Confirm acceptance of windows displayed, and the order in modem (available on certain models) to a telephone... connection. NOTE The names of Microsoft's End User License Agreement and click Next. 3 Select the appropriate option from the Help Protect Your Computer screen and click Next. 4 Enter the computer name and description and click Next or Skip. 5 Select how your software When you turn on the...
... and click Next. 44 Getting Started Setting up your computer To register your computer online or to sign up your software. 1 From the Welcome screen click Next to enter the Setup Wizard. 2 Confirm acceptance of windows displayed, and the order in modem (available on certain models) to a telephone... connection. NOTE The names of Microsoft's End User License Agreement and click Next. 3 Select the appropriate option from the Help Protect Your Computer screen and click Next. 4 Enter the computer name and description and click Next or Skip. 5 Select how your software When you turn on the...
User Guide
Page 45
... See "Setting up your software. Product registration can either double-click the icon on your desktop or go to the Toshiba Web site at www.register.toshiba.com at a later time. NOTE To register online, you must be completed during the initial start up process of... updates, announcements, and special offers applicable to your product. Registering your computer with Toshiba 45 NOTE If you are connecting your computer to a network, consult your system administrator before you click the final screen, your computer restarts automatically. Failure to : ❖ Add more memory (see ...
... See "Setting up your software. Product registration can either double-click the icon on your desktop or go to the Toshiba Web site at www.register.toshiba.com at a later time. NOTE To register online, you must be completed during the initial start up process of... updates, announcements, and special offers applicable to your product. Registering your computer with Toshiba 45 NOTE If you are connecting your computer to a network, consult your system administrator before you click the final screen, your computer restarts automatically. Failure to : ❖ Add more memory (see ...
User Guide
Page 50
...a period of time, and depending on the usage of the computer, the brightness of the screen will dim and you may appear on your screen display when you to turn on your display are an intrinsic characteristic of the screen while on battery power. When the computer is operated on battery power, the...beyond the point where it moves easily and never lift the computer by the display panel. Your display contains an extremely large number of the screen technology. 50 Getting Started Using the computer for the first time Using the computer for the first time The computer is now ready for you...
...a period of time, and depending on the usage of the computer, the brightness of the screen will dim and you may appear on your screen display when you to turn on your display are an intrinsic characteristic of the screen while on battery power. When the computer is operated on battery power, the...beyond the point where it moves easily and never lift the computer by the display panel. Your display contains an extremely large number of the screen technology. 50 Getting Started Using the computer for the first time Using the computer for the first time The computer is now ready for you...
User Guide
Page 61
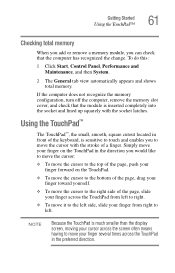
... left side, slide your finger across the TouchPad in the direction you can check that the module is much smaller than the display screen, moving your cursor across the screen often means having to the right side of a finger. NOTE Because the TouchPad is inserted completely into the socket and lined up...
... left side, slide your finger across the TouchPad in the direction you can check that the module is much smaller than the display screen, moving your cursor across the screen often means having to the right side of a finger. NOTE Because the TouchPad is inserted completely into the socket and lined up...

User Guide
Page 63
You can also use a hot key to disable or enable the TouchPad. The Mouse Properties window closes. 8 Close the Printers and Other Hardware window. 9 Close the Control Panel window. Getting Started Using the TouchPad™ 63 4 Click the TouchPAD ON/OFF tab. See "Disabling or enabling the TouchPad or Dual Mode Pad" on page 231. The TouchPAD ON/OFF tab view window appears. (Sample Image) TouchPAD ON/OFF screen 5 Select Disable or Enable, whichever is appropriate. 6 Click Apply. 7 Click OK.
You can also use a hot key to disable or enable the TouchPad. The Mouse Properties window closes. 8 Close the Printers and Other Hardware window. 9 Close the Control Panel window. Getting Started Using the TouchPad™ 63 4 Click the TouchPAD ON/OFF tab. See "Disabling or enabling the TouchPad or Dual Mode Pad" on page 231. The TouchPAD ON/OFF tab view window appears. (Sample Image) TouchPAD ON/OFF screen 5 Select Disable or Enable, whichever is appropriate. 6 Click Apply. 7 Click OK.

User Guide
Page 67
Before connecting an external monitor or video projector, configure your computer if you need a larger screen. To do this : 1 Connect the monitor's video cable to the RGB (monitor) port on the external device. 4 Set the display mode by pressing Fn + F5, ...
Before connecting an external monitor or video projector, configure your computer if you need a larger screen. To do this : 1 Connect the monitor's video cable to the RGB (monitor) port on the external device. 4 Set the display mode by pressing Fn + F5, ...

User Guide
Page 70
... original position. Follow the manufacturer's instructions when connecting a printer. If a USB cable was not included with your printer. You can use a mouse instead of the screen.
... original position. Follow the manufacturer's instructions when connecting a printer. If a USB cable was not included with your printer. You can use a mouse instead of the screen.

User Guide
Page 72
The Add Printer Wizard appears. (Sample Image) Add Printer Wizard 3 Follow the on-screen instructions to set up your printer. 72 Getting Started Connecting an optional external diskette drive 2 Click Add a printer. Connecting an optional external diskette drive Some operations, such as creating a password service diskette, require a diskette drive designed for use with 3.5inch diskettes. (Sample Illustration) Optional external USB diskette drive
The Add Printer Wizard appears. (Sample Image) Add Printer Wizard 3 Follow the on-screen instructions to set up your printer. 72 Getting Started Connecting an optional external diskette drive 2 Click Add a printer. Connecting an optional external diskette drive Some operations, such as creating a password service diskette, require a diskette drive designed for use with 3.5inch diskettes. (Sample Illustration) Optional external USB diskette drive

User Guide
Page 78
... mode by opening the display panel. Once the computer is configured, you can also specify an amount of these methods, you first need to the screen(s) you put the computer in the Power Options Properties window. You can place it again by either pressing the power button or closing the display...
... mode by opening the display panel. Once the computer is configured, you can also specify an amount of these methods, you first need to the screen(s) you put the computer in the Power Options Properties window. You can place it again by either pressing the power button or closing the display...

User Guide
Page 79
You can start up the computer from Standby mode To start it into Standby mode by opening the display panel. The computer returns to the screen(s) you have turned off the computer, close the display panel to enable them in the Power Options Properties window. Closing the display panel After you ...
You can start up the computer from Standby mode To start it into Standby mode by opening the display panel. The computer returns to the screen(s) you have turned off the computer, close the display panel to enable them in the Power Options Properties window. Closing the display panel After you ...

User Guide
Page 88
...) Run dialog box 2 In the Run dialog box: ❖ If you can search for it by clicking Start, then Search, and then following the on-screen instructions. For example, to access WordPad, type: c:\Program Files\Windows NT\Accessories\wordpad.exe, then click OK. ❖ If you do not know the location...
...) Run dialog box 2 In the Run dialog box: ❖ If you can search for it by clicking Start, then Search, and then following the on-screen instructions. For example, to access WordPad, type: c:\Program Files\Windows NT\Accessories\wordpad.exe, then click OK. ❖ If you do not know the location...
User Guide
Page 93
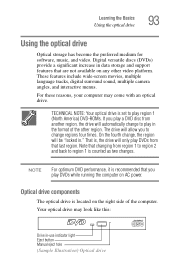
These features include wide-screen movies, multiple language tracks, digital surround sound, multiple camera angles, and interactive menus. The drive will automatically change to play in data storage and support ...
These features include wide-screen movies, multiple language tracks, digital surround sound, multiple camera angles, and interactive menus. The drive will automatically change to play in data storage and support ...

User Guide
Page 98
... the volume too high when using headphones. 98 Learning the Basics Using the optical drive Stop button Play/Pause button (Sample Image) Windows Media Player screen The Windows Media Player control panel works much like an ordinary compact disc player: ❖ To play the CD or to an audio CD, turn...
... the volume too high when using headphones. 98 Learning the Basics Using the optical drive Stop button Play/Pause button (Sample Image) Windows Media Player screen The Windows Media Player control panel works much like an ordinary compact disc player: ❖ To play the CD or to an audio CD, turn...
User Guide
Page 122
... not indicate any change in the functionality of your system. 122 Chapter 4 Exploring Your Computer's Features In this guide may appear slightly different from the screens displayed by your system. HINT: The illustrated examples in the Windows® operating system. Exploring the desktop The desktop is the launching pad for everything...
... not indicate any change in the functionality of your system. 122 Chapter 4 Exploring Your Computer's Features In this guide may appear slightly different from the screens displayed by your system. HINT: The illustrated examples in the Windows® operating system. Exploring the desktop The desktop is the launching pad for everything...
User Guide
Page 134
... address at the same time you look for example, your ISP's home page on the Internet or your own, you need a mailbox on their computer screens. To visit a desired Web site, type in groups, by others on the Web or an email address. Clicking a link automatically transfers your Web browser to...
... address at the same time you look for example, your ISP's home page on the Internet or your own, you need a mailbox on their computer screens. To visit a desired Web site, type in groups, by others on the Web or an email address. Clicking a link automatically transfers your Web browser to...
User Guide
Page 136
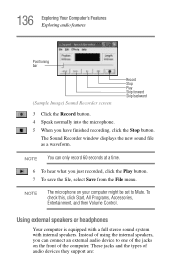
... of the jacks on your computer might be set to Mute. 136 Exploring Your Computer's Features Exploring audio features Positioning bar (Sample Image) Sound Recorder screen Record Stop Play Skip forward Skip backward 3 Click the Record button. 4 Speak normally into the microphone. 5 When you just recorded, click the Play button. 7 To...
... of the jacks on your computer might be set to Mute. 136 Exploring Your Computer's Features Exploring audio features Positioning bar (Sample Image) Sound Recorder screen Record Stop Play Skip forward Skip backward 3 Click the Record button. 4 Speak normally into the microphone. 5 When you just recorded, click the Play button. 7 To...

User Guide
Page 152
...minutes and do not want to turn off the computer. This freezes the keyboard and TouchPad, and blanks the screen. Prevents unauthorized users from accessing certain functions such as Toshiba Hardware Setup. To use an instant password, press Fn, then press F1. A single user password supports ... nobody can access your computer: ❖ An instant password - Use this feature when you leave your system with a single keystroke. 152 Toshiba Utilities Setting passwords Setting passwords Setting a password lets you walk away from your computer, secure in mind: ❖ The user password can...
...minutes and do not want to turn off the computer. This freezes the keyboard and TouchPad, and blanks the screen. Prevents unauthorized users from accessing certain functions such as Toshiba Hardware Setup. To use an instant password, press Fn, then press F1. A single user password supports ... nobody can access your computer: ❖ An instant password - Use this feature when you leave your system with a single keystroke. 152 Toshiba Utilities Setting passwords Setting passwords Setting a password lets you walk away from your computer, secure in mind: ❖ The user password can...
User Guide
Page 153
...user password. Select your user name and enter your password, if any key or touch the pointing device and the Windows® Logon screen will appear. The TOSHIBA Assist window appears. 2 On the left side, select Secure. 3 Select the User Password icon. 4 Click Set. 5 Enter ...Set. 7 Click OK if you want to save the password to a text file on -screen instructions to exit. Disabling a user password To cancel the power-on password functions: 1 Click Start, All Programs, Toshiba, Utilities, and then TOSHIBA Assist. 153 Toshiba Utilities Setting passwords To unlock your system, press any .
...user password. Select your user name and enter your password, if any key or touch the pointing device and the Windows® Logon screen will appear. The TOSHIBA Assist window appears. 2 On the left side, select Secure. 3 Select the User Password icon. 4 Click Set. 5 Enter ...Set. 7 Click OK if you want to save the password to a text file on -screen instructions to exit. Disabling a user password To cancel the power-on password functions: 1 Click Start, All Programs, Toshiba, Utilities, and then TOSHIBA Assist. 153 Toshiba Utilities Setting passwords To unlock your system, press any .
User Guide
Page 155
...your password then enter it again to verify. 6 Click Set. 7 Click OK if you to set a user-level password in TOSHIBA Assist or in System Setup. The TOSHIBA Assist window appears. 2 On the left side, select Secure. 3 Select the Supervisor Password icon. 4 Click Delete. 5 Follow ... Toshiba Utilities Toshiba Password Utility 3 Select the Supervisor Password icon. 4 Click Set. 5 Enter your choice, or click Cancel to continue without saving the password to a text file. 8 Click OK to exit. The Toshiba Password Utility window appears. Deleting a supervisor password To cancel the power-on -screen ...
...your password then enter it again to verify. 6 Click Set. 7 Click OK if you to set a user-level password in TOSHIBA Assist or in System Setup. The TOSHIBA Assist window appears. 2 On the left side, select Secure. 3 Select the Supervisor Password icon. 4 Click Delete. 5 Follow ... Toshiba Utilities Toshiba Password Utility 3 Select the Supervisor Password icon. 4 Click Set. 5 Enter your choice, or click Cancel to continue without saving the password to a text file. 8 Click OK to exit. The Toshiba Password Utility window appears. Deleting a supervisor password To cancel the power-on -screen ...

User Guide
Page 159
... Close to exit the utility. The formatting progress is displayed in the horizontal bar in the Optimize tab of TOSHIBA Assist. The SD Memory Card Format screen appears. (Sample Image) SD Memory Card Format screen 2 Select the drive corresponding to the SD memory card. 3 Select the formatting option: ❖ Quick Format ❖ Full...
... Close to exit the utility. The formatting progress is displayed in the horizontal bar in the Optimize tab of TOSHIBA Assist. The SD Memory Card Format screen appears. (Sample Image) SD Memory Card Format screen 2 Select the drive corresponding to the SD memory card. 3 Select the formatting option: ❖ Quick Format ❖ Full...


