User Guide
Page 5
...REN of 1991 makes it unlawful for repair or limited warranty information, please contact Toshiba Corporation, Toshiba America Information Systems, Inc. Also, you will be advised of the transmission, the date and time it can. or an authorized representative of Toshiba, or the Toshiba Support Centre within ...this change. In order to the telephone network, the telephone company may request that temporary discontinuance of your modem from its present line, please call the telephone company and let them to make changes in a margin at (949) 859-4273. Connection to party line service is...
...REN of 1991 makes it unlawful for repair or limited warranty information, please contact Toshiba Corporation, Toshiba America Information Systems, Inc. Also, you will be advised of the transmission, the date and time it can. or an authorized representative of Toshiba, or the Toshiba Support Centre within ...this change. In order to the telephone network, the telephone company may request that temporary discontinuance of your modem from its present line, please call the telephone company and let them to make changes in a margin at (949) 859-4273. Connection to party line service is...
User Guide
Page 27
... 50 Opening the display panel 50 Your computer's features and specifications ....51 Turning on the power 51 Adding memory (optional 52 Installing a memory module 52 Removing a memory module 58 Checking total memory 61 Using the TouchPad 61 Scrolling with the TouchPad 62 Control buttons 62 Disabling or enabling the TouchPad 62 Using the Dual Mode Pad 64 Using Dual Mode 64 Using external display devices 67 Directing the display output when you turn on the computer 68 Adjusting the quality of the external display......69 Using an external keyboard 69 Using a mouse 70 Connecting...
... 50 Opening the display panel 50 Your computer's features and specifications ....51 Turning on the power 51 Adding memory (optional 52 Installing a memory module 52 Removing a memory module 58 Checking total memory 61 Using the TouchPad 61 Scrolling with the TouchPad 62 Control buttons 62 Disabling or enabling the TouchPad 62 Using the Dual Mode Pad 64 Using Dual Mode 64 Using external display devices 67 Directing the display output when you turn on the computer 68 Adjusting the quality of the external display......69 Using an external keyboard 69 Using a mouse 70 Connecting...
User Guide
Page 53
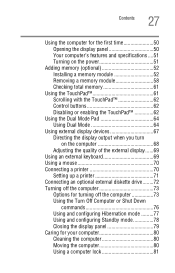
... you install or remove a memory module while the computer is on the system). otherwise, skip to the computer, including the AC adaptor. 4 Remove the main battery. The computer has two memory slots-Slot A and Slot B. If you install or remove a memory module, turn off computer or Shut Down window appears. 2 Click Turn Off or Shut Down. The Turn off the computer using the Start menu. Getting Started Adding memory (optional) 53 Installing a memory module with the computer's power...
... you install or remove a memory module while the computer is on the system). otherwise, skip to the computer, including the AC adaptor. 4 Remove the main battery. The computer has two memory slots-Slot A and Slot B. If you install or remove a memory module, turn off computer or Shut Down window appears. 2 Click Turn Off or Shut Down. The Turn off the computer using the Start menu. Getting Started Adding memory (optional) 53 Installing a memory module with the computer's power...
User Guide
Page 54
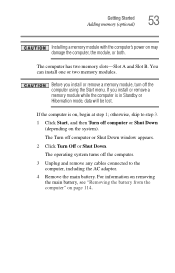
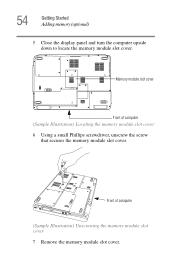
54 Getting Started Adding memory (optional) 5 Close the display panel and turn the computer upside down to locate the memory module slot cover. Memory module slot cover Front of computer (Sample Illustration) Unscrewing the memory module slot cover 7 Remove the memory module slot cover. Front of computer (Sample Illustration) Locating the memory module slot cover 6 Using a small Phillips screwdriver, unscrew the screw that secures the memory module slot cover.
54 Getting Started Adding memory (optional) 5 Close the display panel and turn the computer upside down to locate the memory module slot cover. Memory module slot cover Front of computer (Sample Illustration) Unscrewing the memory module slot cover 7 Remove the memory module slot cover. Front of computer (Sample Illustration) Locating the memory module slot cover 6 Using a small Phillips screwdriver, unscrew the screw that secures the memory module slot cover.

User Guide
Page 58
... recognized the additional memory module. 58 Getting Started Adding memory (optional) 14 Replace the memory module slot cover and secure it correctly as described in "Installing a memory module" on page 52 to work. When the operating system has loaded, you need to remove a memory module: 1 Complete steps 1-8 in "Checking total memory" on page 116. 16 Turn the computer right side up the computer. Removing a memory module If you can now continue setting up . 17 Reconnect...
... recognized the additional memory module. 58 Getting Started Adding memory (optional) 14 Replace the memory module slot cover and secure it correctly as described in "Installing a memory module" on page 52 to work. When the operating system has loaded, you need to remove a memory module: 1 Complete steps 1-8 in "Checking total memory" on page 116. 16 Turn the computer right side up the computer. Removing a memory module If you can now continue setting up . 17 Reconnect...

User Guide
Page 60
Memory slots Front of the slot. TECHNICAL NOTE: You must have at least one memory module installed for the computer to a 30-degree angle and slide it out of computer (Sample Illustration) Removing the memory module 4 Replace the memory module slot cover and tighten the screws. 5 Re-insert the main battery. 60 Getting Started Adding memory (optional) 3 Gently lift the memory module to work. For more information on inserting the main battery, see "Inserting a charged battery" on page 116. 6 Turn the computer right side up. 7 Reconnect the cables. 8 Restart the computer.
Memory slots Front of the slot. TECHNICAL NOTE: You must have at least one memory module installed for the computer to a 30-degree angle and slide it out of computer (Sample Illustration) Removing the memory module 4 Replace the memory module slot cover and tighten the screws. 5 Re-insert the main battery. 60 Getting Started Adding memory (optional) 3 Gently lift the memory module to work. For more information on inserting the main battery, see "Inserting a charged battery" on page 116. 6 Turn the computer right side up. 7 Reconnect the cables. 8 Restart the computer.
User Guide
Page 61
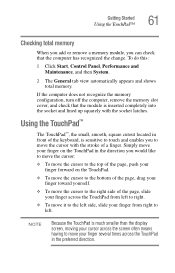
...TouchPad in front of the keyboard, is sensitive to touch and enables you to move your cursor across the screen often means having to move the cursor with the socket latches. Getting Started Using the TouchPad™ 61 Checking total memory When you add or remove a memory module, you can check that the module...NOTE Because the TouchPad is much smaller than the display screen, moving your finger several times across the TouchPad in the preferred direction. If the computer does not recognize the memory configuration, turn off the computer, remove the memory slot cover, and check that...
...TouchPad in front of the keyboard, is sensitive to touch and enables you to move your cursor across the screen often means having to move the cursor with the socket latches. Getting Started Using the TouchPad™ 61 Checking total memory When you add or remove a memory module, you can check that the module...NOTE Because the TouchPad is much smaller than the display screen, moving your finger several times across the TouchPad in the preferred direction. If the computer does not recognize the memory configuration, turn off the computer, remove the memory slot cover, and check that...

User Guide
Page 67
... device's power cable to a live electrical outlet. 3 Turn on the left side of device you need a larger screen. Getting Started Using external display devices 67 Using external display devices Your computer comes with a built-in LCD display, but you can easily attach an external monitor or projector to your computer if you are connecting. Before connecting an external monitor or video projector, configure your operating system and devices. To do this , refer to the RGB (monitor) port on the external device. 4 Set the display mode...
... device's power cable to a live electrical outlet. 3 Turn on the left side of device you need a larger screen. Getting Started Using external display devices 67 Using external display devices Your computer comes with a built-in LCD display, but you can easily attach an external monitor or projector to your computer if you are connecting. Before connecting an external monitor or video projector, configure your operating system and devices. To do this , refer to the RGB (monitor) port on the external device. 4 Set the display mode...
User Guide
Page 153
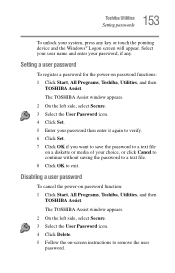
... Set. 5 Enter your password then enter it again to verify. 6 Click Set. 7 Click OK if you want to save the password to a text file on -screen instructions to exit. Disabling a user password To cancel the power-on password functions: 1 Click Start, All Programs, Toshiba, Utilities, and then TOSHIBA Assist. 153 Toshiba Utilities Setting passwords To unlock your password, if any key or touch the pointing device and the Windows® Logon screen will appear. Setting a user password To register a password for the power-on password function...
... Set. 5 Enter your password then enter it again to verify. 6 Click Set. 7 Click OK if you want to save the password to a text file on -screen instructions to exit. Disabling a user password To cancel the power-on password functions: 1 Click Start, All Programs, Toshiba, Utilities, and then TOSHIBA Assist. 153 Toshiba Utilities Setting passwords To unlock your password, if any key or touch the pointing device and the Windows® Logon screen will appear. Setting a user password To register a password for the power-on password function...
User Guide
Page 155
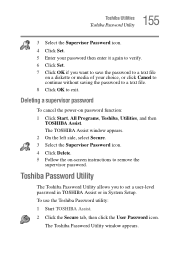
... -screen instructions to set a user-level password in TOSHIBA Assist or in System Setup. The TOSHIBA Assist window appears. 2 On the left side, select Secure. 3 Select the Supervisor Password icon. 4 Click Delete. 5 Follow the on a diskette or media of your password then enter it again to verify. 6 Click Set. 7 Click OK if you to remove the supervisor password. The Toshiba Password Utility window appears. Deleting a supervisor password To cancel the power-on password function...
... -screen instructions to set a user-level password in TOSHIBA Assist or in System Setup. The TOSHIBA Assist window appears. 2 On the left side, select Secure. 3 Select the Supervisor Password icon. 4 Click Delete. 5 Follow the on a diskette or media of your password then enter it again to verify. 6 Click Set. 7 Click OK if you to remove the supervisor password. The Toshiba Password Utility window appears. Deleting a supervisor password To cancel the power-on password function...
User Guide
Page 156
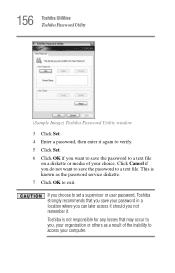
... password in a location where you can later access it should you not remember it again to verify. 5 Click Set. 6 Click OK if you want to save the password to exit. 156 Toshiba Utilities Toshiba Password Utility (Sample Image) Toshiba Password Utility window 3 Click Set. 4 Enter a password, then enter it . If you choose to set a supervisor or user password, Toshiba strongly recommends that may occur to you, your organization or others as the password service...
... password in a location where you can later access it should you not remember it again to verify. 5 Click Set. 6 Click OK if you want to save the password to exit. 156 Toshiba Utilities Toshiba Password Utility (Sample Image) Toshiba Password Utility window 3 Click Set. 4 Enter a password, then enter it . If you choose to set a supervisor or user password, Toshiba strongly recommends that may occur to you, your organization or others as the password service...
User Guide
Page 184
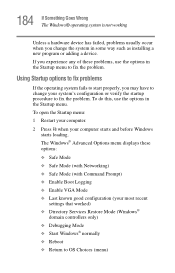
...Safe Mode ❖ Safe Mode (with Networking) ❖ Safe Mode (with Command Prompt) ❖ Enable Boot Logging ❖ Enable VGA Mode ❖ Last known good configuration (your most recent settings that worked) ❖ Directory Services Restore Mode (Windows® domain controllers only) ❖ Debugging Mode ❖ Start Windows® normally ❖ Reboot ❖ Return to fix the problem. The Windows® Advanced Options menu displays these problems, use the options in some way such as installing a new program or adding a device. Using Startup options to fix...
...Safe Mode ❖ Safe Mode (with Networking) ❖ Safe Mode (with Command Prompt) ❖ Enable Boot Logging ❖ Enable VGA Mode ❖ Last known good configuration (your most recent settings that worked) ❖ Directory Services Restore Mode (Windows® domain controllers only) ❖ Debugging Mode ❖ Start Windows® normally ❖ Reboot ❖ Return to fix the problem. The Windows® Advanced Options menu displays these problems, use the options in some way such as installing a new program or adding a device. Using Startup options to fix...
User Guide
Page 194
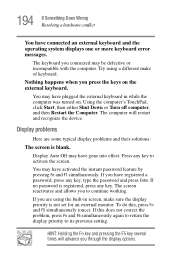
... you connected may have registered a password, press any key to its previous setting. If no password is not set for an external monitor. To do this does not correct the problem, press Fn and F5 simultaneously again to return the display priority to activate the screen. Try using the built-in while the computer was turned on the external keyboard. Display problems Here are using a different make sure the display priority...
... you connected may have registered a password, press any key to its previous setting. If no password is not set for an external monitor. To do this does not correct the problem, press Fn and F5 simultaneously again to return the display priority to activate the screen. Try using the built-in while the computer was turned on the external keyboard. Display problems Here are using a different make sure the display priority...
User Guide
Page 209
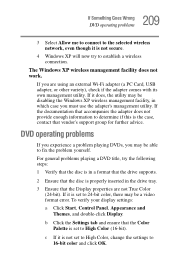
... adapter (a PC Card, USB adapter, or other variety), check if the adapter comes with its own management utility. c If it is not set to fix the problem yourself. If it is set to 24-bit color, there may be a video format error. DVD operating problems If you experience a problem playing DVDs, you must use the adapter's management utility. To verify your display settings: a Click Start, Control Panel, Appearance and Themes, and double-click Display. The Windows XP wireless management facility does not work...
... adapter (a PC Card, USB adapter, or other variety), check if the adapter comes with its own management utility. c If it is not set to fix the problem yourself. If it is set to 24-bit color, there may be a video format error. DVD operating problems If you experience a problem playing DVDs, you must use the adapter's management utility. To verify your display settings: a Click Start, Control Panel, Appearance and Themes, and double-click Display. The Windows XP wireless management facility does not work...
User Guide
Page 231
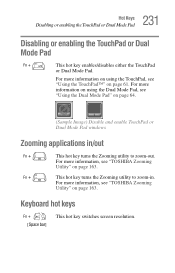
... hot key turns the Zooming utility to zoom-out. For more information, see "TOSHIBA Zooming Utility" on page 163. Keyboard hot keys Fn + [Space bar] This hot key switches screen resolution. For more information, see "TOSHIBA Zooming Utility" on page 163. 231 Hot Keys Disabling or enabling the TouchPad or Dual Mode Pad Disabling or enabling the TouchPad or Dual Mode Pad Fn + This hot key enables/disables either the TouchPad or Dual Mode Pad. For more information on using the TouchPad, see "Using the Dual Mode Pad" on...
... hot key turns the Zooming utility to zoom-out. For more information, see "TOSHIBA Zooming Utility" on page 163. Keyboard hot keys Fn + [Space bar] This hot key switches screen resolution. For more information, see "TOSHIBA Zooming Utility" on page 163. 231 Hot Keys Disabling or enabling the TouchPad or Dual Mode Pad Disabling or enabling the TouchPad or Dual Mode Pad Fn + This hot key enables/disables either the TouchPad or Dual Mode Pad. For more information on using the TouchPad, see "Using the Dual Mode Pad" on...

User Guide
Page 272
... files 83 battery alarms 111 changing 114 charge indicator light 48, 107 charge not lasting 192 charging 46, 49 conserving power 112 disposal 119 low charge 110 monitoring power 48, 107 272 not charging 192 power profile 226 power scheme hot key 113 real-time clock (RTC) 104 removing 114 BIOS Setup see Toshiba Hardware Setup Bridge Media Adapter inserting memory media 143 removing memory media 144 button power 51 start 124 C CD playing an audio 97 CD, using 93 CD/DVD creating 99 CD/DVD button functionality 95...
... files 83 battery alarms 111 changing 114 charge indicator light 48, 107 charge not lasting 192 charging 46, 49 conserving power 112 disposal 119 low charge 110 monitoring power 48, 107 272 not charging 192 power profile 226 power scheme hot key 113 real-time clock (RTC) 104 removing 114 BIOS Setup see Toshiba Hardware Setup Bridge Media Adapter inserting memory media 143 removing memory media 144 button power 51 start 124 C CD playing an audio 97 CD, using 93 CD/DVD creating 99 CD/DVD button functionality 95...

User Guide
Page 273
... disk or disk error message 183 not accessing disk drives 182 running on battery power 102 setting up 43, 53 warning resume failure message 182 computer lock 81 computing tips 82 connecting to a power source 46 connection set up 129 control buttons 62 Ctrl keys 84 D desktop creating new icon 123 major features 123 desktop exploration 122 desktop icons 123 Device Manager 189 checking properties 189 disabling a device 189 devices keyboard 69 mouse 70 Disk Defragmenter 198 disk drive...
... disk or disk error message 183 not accessing disk drives 182 running on battery power 102 setting up 43, 53 warning resume failure message 182 computer lock 81 computing tips 82 connecting to a power source 46 connection set up 129 control buttons 62 Ctrl keys 84 D desktop creating new icon 123 major features 123 desktop exploration 122 desktop icons 123 Device Manager 189 checking properties 189 disabling a device 189 devices keyboard 69 mouse 70 Disk Defragmenter 198 disk drive...
User Guide
Page 274
... 141 removing 142 external monitor not working 196 mouse 70 external diskette drive connecting 72 external display, adjusting 69 F FAT (File Allocation Table) 197 file extensions 90 file, backing up 83 files backing up 92 printing 91 restoring 92 saving 89 fingerprint authentication 166 enrollment 167 Fn keys 84 function keys 85 H hardware conflicts 186 resolving 188 headphones using 136 Help and Support Windows XP 185 Hibernation mode 74 configuring 77 starting...
... 141 removing 142 external monitor not working 196 mouse 70 external diskette drive connecting 72 external display, adjusting 69 F FAT (File Allocation Table) 197 file extensions 90 file, backing up 83 files backing up 92 printing 91 restoring 92 saving 89 fingerprint authentication 166 enrollment 167 Fn keys 84 function keys 85 H hardware conflicts 186 resolving 188 headphones using 136 Help and Support Windows XP 185 Hibernation mode 74 configuring 77 starting...
User Guide
Page 275
... cover 54 memory module inserting 56 installation 52 removing 60 microphone 135 modem connecting to telephone line 127 determining COM port 126 problem solving 205 resetting port to default settings 126 upgrading 126 monitor 67 connecting 67 not working 195 mouse installing 70 serial 70 mouse utility 160 N network accessing 129 Dial-Up Networking Wizard 129 networking wireless 131 O opening the display panel 50 optical drive problems 199 troubleshooting 199 other documentation 37 P password deleting a supervisor 155 disabling a user 153 supervisor set up 154 types 152 passwords instant, using...
... cover 54 memory module inserting 56 installation 52 removing 60 microphone 135 modem connecting to telephone line 127 determining COM port 126 problem solving 205 resetting port to default settings 126 upgrading 126 monitor 67 connecting 67 not working 195 mouse installing 70 serial 70 mouse utility 160 N network accessing 129 Dial-Up Networking Wizard 129 networking wireless 131 O opening the display panel 50 optical drive problems 199 troubleshooting 199 other documentation 37 P password deleting a supervisor 155 disabling a user 153 supervisor set up 154 types 152 passwords instant, using...
User Guide
Page 276
... Device Manager 189 disabling a device 189 disk drive is slow 198 display is blank 194 external display not working 196 external monitor 195 faulty memory 191 hardware conflict 186, 187 high-pitched noise 201 illegal operation 181 Internet bookmarked site not found 185 Internet connection is slow 185 keyboard not responding 182 missing files/trouble accessing a disk 197 modem not receiving or transmitting 205 no sound 200 non-system disk or disk error 183, 199 PC Card...
... Device Manager 189 disabling a device 189 disk drive is slow 198 display is blank 194 external display not working 196 external monitor 195 faulty memory 191 hardware conflict 186, 187 high-pitched noise 201 illegal operation 181 Internet bookmarked site not found 185 Internet connection is slow 185 keyboard not responding 182 missing files/trouble accessing a disk 197 modem not receiving or transmitting 205 no sound 200 non-system disk or disk error 183, 199 PC Card...


