
User Manual
Page 29
29 Contents Using the computer for the first time 52 Opening the display panel 52 Your computer's features and specifications ....53 Turning on the power 54 Adding memory (optional 55 Installing a memory module 55 Removing a memory module 61 ... 64 Disabling or enabling the TouchPad 64 Turning off the computer 65 Closing the display panel 66 Using external display devices 66 Directing the display output when you turn on the computer 67 Adjusting the quality of the external display......68 Using an external keyboard 68 Using a mouse 69 Connecting a local printer 69 Connecting...
29 Contents Using the computer for the first time 52 Opening the display panel 52 Your computer's features and specifications ....53 Turning on the power 54 Adding memory (optional 55 Installing a memory module 55 Removing a memory module 61 ... 64 Disabling or enabling the TouchPad 64 Turning off the computer 65 Closing the display panel 66 Using external display devices 66 Directing the display output when you turn on the computer 67 Adjusting the quality of the external display......68 Using an external keyboard 68 Using a mouse 69 Connecting a local printer 69 Connecting...
User Manual
Page 34
... own .....176 Fixing a problem with Device Manager ...........177 Memory problems 179 Power and the batteries 180 Keyboard problems 182 Display problems 183 Disk drive problems 185 DVD-ROM or multi-function drive problems...188 Sound system problems 189 PC Card problems 189 ...Data and system configuration backup in Windows® XP 202 If you need further assistance 208 Before you contact Toshiba 208 Contacting Toshiba 209 Other Toshiba Internet Web sites 210 Toshiba's worldwide offices 210 Appendix A: Hot Keys 212 Volume Mute 212 Password security 213 Without a password 213 ...
... own .....176 Fixing a problem with Device Manager ...........177 Memory problems 179 Power and the batteries 180 Keyboard problems 182 Display problems 183 Disk drive problems 185 DVD-ROM or multi-function drive problems...188 Sound system problems 189 PC Card problems 189 ...Data and system configuration backup in Windows® XP 202 If you need further assistance 208 Before you contact Toshiba 208 Contacting Toshiba 209 Other Toshiba Internet Web sites 210 Toshiba's worldwide offices 210 Appendix A: Hot Keys 212 Volume Mute 212 Password security 213 Without a password 213 ...

User Manual
Page 35
35 Contents Display brightness 217 Disabling or enabling wireless devices 218 Disabling or enabling the TouchPad 218 Keyboard hot keys 219 Zooming applications in/out 219 Appendix B: Power Cord/Cable Connectors 220 Appendix C: Using ConfigFree™ with your Toshiba Computer 221 Getting Started 222 Starting ConfigFree 222 ConfigFree Utilities 224 Connectivity Doctor 224 Search for Wireless Devices 227 Profile Settings 232 ConfigFree SUMMIT 236 Quick Connect 240 Using the Automatic Switch 243 Semi-Automatic Switch Feature 243 Glossary 245 Index 260
35 Contents Display brightness 217 Disabling or enabling wireless devices 218 Disabling or enabling the TouchPad 218 Keyboard hot keys 219 Zooming applications in/out 219 Appendix B: Power Cord/Cable Connectors 220 Appendix C: Using ConfigFree™ with your Toshiba Computer 221 Getting Started 222 Starting ConfigFree 222 ConfigFree Utilities 224 Connectivity Doctor 224 Search for Wireless Devices 227 Profile Settings 232 ConfigFree SUMMIT 236 Quick Connect 240 Using the Automatic Switch 243 Semi-Automatic Switch Feature 243 Glossary 245 Index 260

User Manual
Page 46
The computer will display the message: "An Internet connection could not be chosen." Setting up your software NOTE The names of Microsoft's End User License Agreement and click Next. 3 ... Wizard guides you through steps to set up your software. 1 From the welcome screen click Next to enter the Setup Wizard. 2 Confirm acceptance of windows displayed, and the order in modem to continue. The first time you must either connect the built-in which windows appear, may vary according to your...
The computer will display the message: "An Internet connection could not be chosen." Setting up your software NOTE The names of Microsoft's End User License Agreement and click Next. 3 ... Wizard guides you through steps to set up your software. 1 From the welcome screen click Next to enter the Setup Wizard. 2 Confirm acceptance of windows displayed, and the order in modem to continue. The first time you must either connect the built-in which windows appear, may vary according to your...
User Manual
Page 52
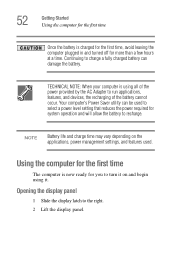
... life and charge time may vary depending on and begin using all of the power provided by the AC Adapter to the right. 2 Lift the display panel. 52 Getting Started Using the computer for the first time Once the battery is charged for the first time, avoid leaving the computer plugged... setting that reduces the power required for system operation and will allow the battery to charge a fully charged battery can damage the battery. Opening the display panel 1 Slide the display latch to run applications, features, and devices, the recharging of the battery cannot occur.
... life and charge time may vary depending on and begin using all of the power provided by the AC Adapter to the right. 2 Lift the display panel. 52 Getting Started Using the computer for the first time Once the battery is charged for the first time, avoid leaving the computer plugged... setting that reduces the power required for system operation and will allow the battery to charge a fully charged battery can damage the battery. Opening the display panel 1 Slide the display latch to run applications, features, and devices, the recharging of the battery cannot occur.
User Manual
Page 53
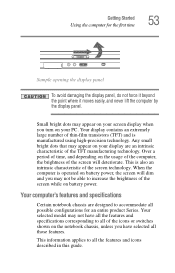
... possible configurations for the first time 53 Sample opening the display panel To avoid damaging the display panel, do not force it beyond the point where it moves easily, and never lift the computer by the display panel. Your display contains an extremely large number of the screen while on... the notebook chassis, unless you turn on your display are designed to all those features. This information applies to accommodate all of...
... possible configurations for the first time 53 Sample opening the display panel To avoid damaging the display panel, do not force it beyond the point where it moves easily, and never lift the computer by the display panel. Your display contains an extremely large number of the screen while on... the notebook chassis, unless you turn on your display are designed to all those features. This information applies to accommodate all of...

User Manual
Page 56
... system) The Turn off the computer. 3 Unplug and remove any cables connected to locate the memory module slot cover. depending on page 116. 5 Close the display panel and turn off (or Shut Down -
... system) The Turn off the computer. 3 Unplug and remove any cables connected to locate the memory module slot cover. depending on page 116. 5 Close the display panel and turn off (or Shut Down -
User Manual
Page 63
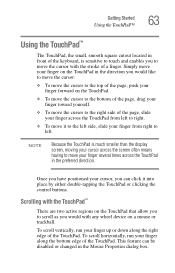
... TouchPad™ 63 Using the TouchPad™ The TouchPad, the small, smooth square cutout located in front of the keyboard, is much smaller than the display screen, moving your cursor across the TouchPad in the preferred direction.
... TouchPad™ 63 Using the TouchPad™ The TouchPad, the small, smooth square cutout located in front of the keyboard, is much smaller than the display screen, moving your cursor across the TouchPad in the preferred direction.

User Manual
Page 66
...of the computer. Before connecting an external monitor or video projector, configure your operating system and devices. Using external display devices Your computer comes with a built-in LCD display, but you are finished, shut the computer down command when connected to the available video port: ❖ An... external monitor or projector via the RGB (monitor) port. 66 Getting Started Using external display devices a domain server or the Shut down and close the computer while it is still on, these actions will occur: ❖ If ...
...of the computer. Before connecting an external monitor or video projector, configure your operating system and devices. Using external display devices Your computer comes with a built-in LCD display, but you are finished, shut the computer down command when connected to the available video port: ❖ An... external monitor or projector via the RGB (monitor) port. 66 Getting Started Using external display devices a domain server or the Shut down and close the computer while it is still on, these actions will occur: ❖ If ...

User Manual
Page 67
... external monitor simultaneously ❖ External monitor only 3 Release the Fn key. Getting Started Using external display devices 67 Connecting an external monitor or projector You can choose to use the display hot key (Fn + F5): 1 Press Fn and F5 simultaneously. 2 While holding down Fn, press F5 ...until the setting you want takes effect. Briefly pause between pressing the F5 key to allow time for the display to change the display output settings is to use the internal display only, the external device only, or both simultaneously. The quickest way to your computer if you need a...
... external monitor simultaneously ❖ External monitor only 3 Release the Fn key. Getting Started Using external display devices 67 Connecting an external monitor or projector You can choose to use the display hot key (Fn + F5): 1 Press Fn and F5 simultaneously. 2 While holding down Fn, press F5 ...until the setting you want takes effect. Briefly pause between pressing the F5 key to allow time for the display to change the display output settings is to use the internal display only, the external device only, or both simultaneously. The quickest way to your computer if you need a...
User Manual
Page 68
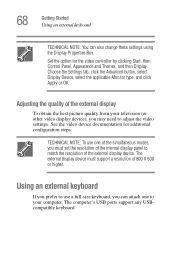
...you may need to adjust the video settings. Using an external keyboard If you prefer to match the resolution of the external display device. The computer's USB ports support any USBcompatible keyboard. See the video device documentation for the video controller by clicking ...Start, then Control Panel, Appearance and Themes, and then Display. Set the option for additional configuration steps. Adjusting the quality of the external display To obtain the best picture quality from your computer. 68 Getting Started Using an external keyboard...
...you may need to adjust the video settings. Using an external keyboard If you prefer to match the resolution of the external display device. The computer's USB ports support any USBcompatible keyboard. See the video device documentation for the video controller by clicking ...Start, then Control Panel, Appearance and Themes, and then Display. Set the option for additional configuration steps. Adjusting the quality of the external display To obtain the best picture quality from your computer. 68 Getting Started Using an external keyboard...
User Manual
Page 74
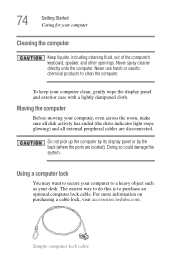
...could damage the system. The easiest way to do this is to clean the computer. Do not pick up the computer by its display panel or by the back (where the ports are disconnected. Never spray cleaner directly onto the computer. 74 Getting Started Caring for ...your computer clean, gently wipe the display panel and exterior case with a lightly dampened cloth. For more information on purchasing a cable lock, visit accessories.toshiba.com. To keep your computer Cleaning the computer Keep liquids, including cleaning fluid, out...
...could damage the system. The easiest way to do this is to clean the computer. Do not pick up the computer by its display panel or by the back (where the ports are disconnected. Never spray cleaner directly onto the computer. 74 Getting Started Caring for ...your computer clean, gently wipe the display panel and exterior case with a lightly dampened cloth. For more information on purchasing a cable lock, visit accessories.toshiba.com. To keep your computer Cleaning the computer Keep liquids, including cleaning fluid, out...

User Manual
Page 82
... a program that has an icon in this example, WordPad. Starting a program from the Start menu When you a view of your program is displayed. 3 Click the program, in the All Programs menu, follow these steps, which lists programs and program groups. To close the program, click ... and location of the program's executable file (this file ends with step 2. 2 Point to All Programs. The Windows® XP operating system displays the All Programs menu, which use this example, Accessories. WordPad opens. 82 Learning the Basics Starting a program The next three sections explain how ...
... a program that has an icon in this example, WordPad. Starting a program from the Start menu When you a view of your program is displayed. 3 Click the program, in the All Programs menu, follow these steps, which lists programs and program groups. To close the program, click ... and location of the program's executable file (this file ends with step 2. 2 Point to All Programs. The Windows® XP operating system displays the All Programs menu, which use this example, Accessories. WordPad opens. 82 Learning the Basics Starting a program The next three sections explain how ...

User Manual
Page 85
... to specify where to store the document and to 255 characters; HINT: To make another copy of the file you created a new document, your program displays a Save As dialog box. Sample Save As dialog box 2 Choose the drive and folder where you need to do. the names can include spaces. If...
... to specify where to store the document and to 255 characters; HINT: To make another copy of the file you created a new document, your program displays a Save As dialog box. Sample Save As dialog box 2 Choose the drive and folder where you need to do. the names can include spaces. If...

User Manual
Page 87
The program displays a Print dialog box. Sample Print dialog box 3 Specify the print parameters. Learning the Basics Printing your work 87 Printing your work Ensure the operating system ...
The program displays a Print dialog box. Sample Print dialog box 3 Specify the print parameters. Learning the Basics Printing your work 87 Printing your work Ensure the operating system ...

User Manual
Page 88
... DVD performance, it is recommended that you play DVDs from that are located to change to region 1 is , the drive will be accessed when the display panel is located on the right side of the computer. Your DVD-ROM or multi-function drive may come with a DVDROM drive or multi-function...
... DVD performance, it is recommended that you play DVDs from that are located to change to region 1 is , the drive will be accessed when the display panel is located on the right side of the computer. Your DVD-ROM or multi-function drive may come with a DVDROM drive or multi-function...
User Manual
Page 99
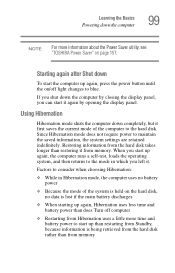
... again, press the power button until the on page 157. If you shut down the computer by closing the display panel, you left it again by opening the display panel. Since Hibernation mode does not require power to blue. Learning the Basics Powering down the computer 99 NOTE...can start it . Starting again after Shut down completely, but it from Hibernation uses a little more information about the Power Saver utility, see "TOSHIBA Power Saver" on /off computer ❖ Restarting from memory. Restoring information from the hard disk takes longer than does Turn off light changes ...
... again, press the power button until the on page 157. If you shut down the computer by closing the display panel, you left it again by opening the display panel. Since Hibernation mode does not require power to blue. Learning the Basics Powering down the computer 99 NOTE...can start it . Starting again after Shut down completely, but it from Hibernation uses a little more information about the Power Saver utility, see "TOSHIBA Power Saver" on /off computer ❖ Restarting from memory. Restoring information from the hard disk takes longer than does Turn off light changes ...

User Manual
Page 100
... is now set to automatically go into Hibernation when your computer for Hibernation 1 Click Start, Control Panel, then click Performance and Maintenance. 2 Click the Toshiba Power Saver icon. 3 Click the Setup Action tab. 4 Select Hibernation for the options you want. ❖ When I press the power button Set...When I close the lid Set this option to the mode in which you left it, including all open programs and files you close the display panel. 5 Click Apply. 6 Click OK. The computer is configured, put the computer into Hibernation mode by either pressing the power button or closing...
... is now set to automatically go into Hibernation when your computer for Hibernation 1 Click Start, Control Panel, then click Performance and Maintenance. 2 Click the Toshiba Power Saver icon. 3 Click the Setup Action tab. 4 Select Hibernation for the options you want. ❖ When I press the power button Set...When I close the lid Set this option to the mode in which you left it, including all open programs and files you close the display panel. 5 Click Apply. 6 Click OK. The computer is configured, put the computer into Hibernation mode by either pressing the power button or closing...
User Manual
Page 101
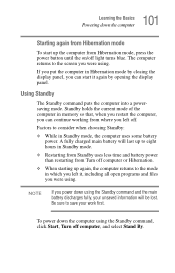
...fully, your work first. NOTE If you left off computer, and select Stand By. If you put the computer in Hibernation mode by closing the display panel, you can continue working from Hibernation mode, press the power button until the on/off computer or Hibernation. ❖ When starting up the...up to consider when choosing Standby: ❖ While in memory so that, when you restart the computer, you left it again by opening the display panel. Be sure to the mode in Standby mode. ❖ Restarting from Standby uses less time and battery power than restarting from Turn off light...
...fully, your work first. NOTE If you left off computer, and select Stand By. If you put the computer in Hibernation mode by closing the display panel, you can continue working from Hibernation mode, press the power button until the on/off computer or Hibernation. ❖ When starting up the...up to consider when choosing Standby: ❖ While in memory so that, when you restart the computer, you left it again by opening the display panel. Be sure to the mode in Standby mode. ❖ Restarting from Standby uses less time and battery power than restarting from Turn off light...

User Manual
Page 102
... display panel. To enter hibernation mode, you must hold down the Shift key while you select Hibernate. 102 Learning the Basics Powering down the computer Sample Turn off computer Windows® dialog box NOTE If you hold down the Shift key, Stand By becomes Hibernate in Toshiba's... Power Saver utility. 1 Click Start, Control Panel, then click Performance and Maintenance. 2 Click the Toshiba Power Saver icon. 3 Click the Setup Action tab. 4 Select Standby for the options you want...
... display panel. To enter hibernation mode, you must hold down the Shift key while you select Hibernate. 102 Learning the Basics Powering down the computer Sample Turn off computer Windows® dialog box NOTE If you hold down the Shift key, Stand By becomes Hibernate in Toshiba's... Power Saver utility. 1 Click Start, Control Panel, then click Performance and Maintenance. 2 Click the Toshiba Power Saver icon. 3 Click the Setup Action tab. 4 Select Standby for the options you want...


