
User Manual
Page 28
... Windows® Explorer....87 Starting a program from the Run dialog box ....88 Saving your work 89 Printing your work 92 Backing up your work 93 Restoring your work 93 Using the optical drive 94 Optical drive components 94 Media control buttons 95 Inserting a compact disc 97 Playing an audio CD 99... Creating a CD/DVD 101 Removing a disc with the computer on...........102 Removing a disc with the computer off ..........103 Caring for CD or DVD discs 103 Toshiba's online resources 104
... Windows® Explorer....87 Starting a program from the Run dialog box ....88 Saving your work 89 Printing your work 92 Backing up your work 93 Restoring your work 93 Using the optical drive 94 Optical drive components 94 Media control buttons 95 Inserting a compact disc 97 Playing an audio CD 99... Creating a CD/DVD 101 Removing a disc with the computer on...........102 Removing a disc with the computer off ..........103 Caring for CD or DVD discs 103 Toshiba's online resources 104

User Manual
Page 93
Also see "Backing up your data to your hard disk, use the Restore page in the backup program. Restoring your work Back up all the files on restoring files. You may take a considerable amount of media such as CDs, DVDs, diskettes, or to use the Microsoft® Windows® backup ...before overwriting the existing file. Look in case something happens to overwrite a file that already exists on the hard disk. TECHNICAL NOTE: When restoring files, the backup program prompts you if you try to your computer. Small files can back up your files to different types of time and...
Also see "Backing up your data to your hard disk, use the Restore page in the backup program. Restoring your work Back up all the files on restoring files. You may take a considerable amount of media such as CDs, DVDs, diskettes, or to use the Microsoft® Windows® backup ...before overwriting the existing file. Look in case something happens to overwrite a file that already exists on the hard disk. TECHNICAL NOTE: When restoring files, the backup program prompts you if you try to your computer. Small files can back up your files to different types of time and...
User Manual
Page 195
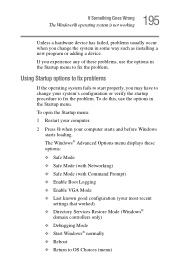
... a new program or adding a device. To open the Startup menu: 1 Restart your computer. 2 Press F8 when your most recent settings that worked) ❖ Directory Services Restore Mode (Windows® domain controllers only) ❖ Debugging Mode ❖ Start Windows® normally ❖ Reboot ❖ Return to fix the problem. The Windows®...
... a new program or adding a device. To open the Startup menu: 1 Restart your computer. 2 Press F8 when your most recent settings that worked) ❖ Directory Services Restore Mode (Windows® domain controllers only) ❖ Debugging Mode ❖ Start Windows® normally ❖ Reboot ❖ Return to fix the problem. The Windows®...
User Manual
Page 224
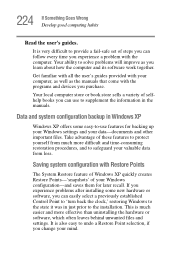
...Windows XP Windows XP offers some new hardware or software, you can easily select a previously established Control Point to 'turn back the clock,' restoring Windows to the state it was in just prior to supplement the information in the manuals. Take advantage of your computer, as well as you...features for later recall. 224 If Something Goes Wrong Develop good computing habits Read the user's guides. It is very difficult to undo a Restore Point selection, if you experience a problem with your Windows configuration-and saves them for backing up your Windows settings and your mind.
...Windows XP Windows XP offers some new hardware or software, you can easily select a previously established Control Point to 'turn back the clock,' restoring Windows to the state it was in just prior to supplement the information in the manuals. Take advantage of your computer, as well as you...features for later recall. 224 If Something Goes Wrong Develop good computing habits Read the user's guides. It is very difficult to undo a Restore Point selection, if you experience a problem with your Windows configuration-and saves them for backing up your Windows settings and your mind.
User Manual
Page 225
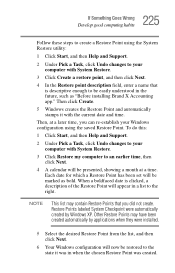
... have been created automatically by Windows XP. Then click Create. 5 Windows creates the Restore Point and automatically stamps it was in when the chosen Restore Point was created. Restore Points labeled System Checkpoint were automatically created by applications when they were installed. 5 Select... Pick a Task, click Undo changes to your computer with System Restore. 3 Click Create a restore point, and then click Next. 4 In the Restore point description field, enter a name that is clicked, a description of the Restore Point will now be easily understood in a list to the state...
... have been created automatically by Windows XP. Then click Create. 5 Windows creates the Restore Point and automatically stamps it was in when the chosen Restore Point was created. Restore Points labeled System Checkpoint were automatically created by applications when they were installed. 5 Select... Pick a Task, click Undo changes to your computer with System Restore. 3 Click Create a restore point, and then click Next. 4 In the Restore point description field, enter a name that is clicked, a description of the Restore Point will now be easily understood in a list to the state...
User Manual
Page 228
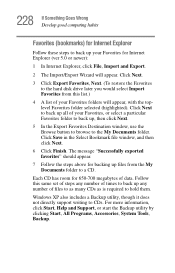
... Next. 5 In the Export Favorites Destination window, use the Browse button to browse to the My Documents folder. Click Next. 3 Click Export Favorites, Next. (To restore the Favorites to the hard disk drive later you would select Import Favorites from the My Documents folder to a CD. Windows XP also includes a Backup...
... Next. 5 In the Export Favorites Destination window, use the Browse button to browse to the My Documents folder. Click Next. 3 Click Export Favorites, Next. (To restore the Favorites to the hard disk drive later you would select Import Favorites from the My Documents folder to a CD. Windows XP also includes a Backup...
User Manual
Page 229
...utility first-before connecting a new hardware item to "Saving system configuration with Windows XP" on page 226). ❖ Have your factory Restore/Reconfiguration CD(s) on page 224). 229 If Something Goes Wrong Develop good computing habits General tips for installing hardware and software Here are... that the installation process introduced. ❖ Back up your data to complete the installation successfully. If anything , use the System Restore utility to do so. Always restart Windows after each installation, even if the installation utility does not prompt you will clean up your...
...utility first-before connecting a new hardware item to "Saving system configuration with Windows XP" on page 226). ❖ Have your factory Restore/Reconfiguration CD(s) on page 224). 229 If Something Goes Wrong Develop good computing habits General tips for installing hardware and software Here are... that the installation process introduced. ❖ Back up your data to complete the installation successfully. If anything , use the System Restore utility to do so. Always restart Windows after each installation, even if the installation utility does not prompt you will clean up your...
User Manual
Page 230
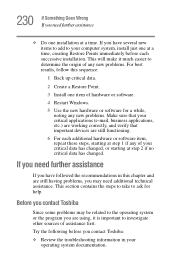
..., install just one at step 2 if no critical data has changed , or starting at a time. Before you contact Toshiba Since some problems may need additional technical assistance. If you have followed the recommendations in your critical data has changed . This...additional hardware or software item, repeat these steps, starting at a time, creating Restore Points immediately before you contact Toshiba: ❖ Review the troubleshooting information in this sequence: 1 Back up critical data. 2 Create a Restore Point. 3 Install one item of hardware or software. 4 Restart Windows. 5...
..., install just one at step 2 if no critical data has changed , or starting at a time. Before you contact Toshiba Since some problems may need additional technical assistance. If you have followed the recommendations in your critical data has changed . This...additional hardware or software item, repeat these steps, starting at a time, creating Restore Points immediately before you contact Toshiba: ❖ Review the troubleshooting information in this sequence: 1 Back up critical data. 2 Create a Restore Point. 3 Install one item of hardware or software. 4 Restart Windows. 5...

User Manual
Page 283
... drive connecting 69 external display, adjusting 66 F FAT (File Allocation Table) 208 file extensions 91 file, backing up 82 files backing up 93 printing 92 restoring 93 saving 89 fingerprint authentication 177 enrollment 177 Fn keys 84 Fn-esse change/remove key assignments 161 starting 158 Fn-esse program 158 assigning...
... drive connecting 69 external display, adjusting 66 F FAT (File Allocation Table) 208 file extensions 91 file, backing up 82 files backing up 93 printing 92 restoring 93 saving 89 fingerprint authentication 177 enrollment 177 Fn keys 84 Fn-esse change/remove key assignments 161 starting 158 Fn-esse program 158 assigning...


