User Guide
Page 2
... Recordable and/or ReWritable optical disc drive(s) and associated software, among the most advanced data storage technologies available. Model: Satellite®/Satellite Pro® L900/S900 Series Recordable and/or ReWritable Drive(s) and Associated Software Warranty The computer system you must read and...your important data, please make periodic back-up and usage instructions in the applicable user guides and/or manuals enclosed or provided electronically. YOU AGREE THAT TOSHIBA, ITS AFFILIATES AND SUPPLIERS SHALL HAVE NO RESPONSIBILITY FOR DAMAGE TO OR LOSS OF ANY BUSINESS, PROFITS,...
... Recordable and/or ReWritable optical disc drive(s) and associated software, among the most advanced data storage technologies available. Model: Satellite®/Satellite Pro® L900/S900 Series Recordable and/or ReWritable Drive(s) and Associated Software Warranty The computer system you must read and...your important data, please make periodic back-up and usage instructions in the applicable user guides and/or manuals enclosed or provided electronically. YOU AGREE THAT TOSHIBA, ITS AFFILIATES AND SUPPLIERS SHALL HAVE NO RESPONSIBILITY FOR DAMAGE TO OR LOSS OF ANY BUSINESS, PROFITS,...

User Guide
Page 15
... export, directly or indirectly, in this guide cannot be controlled under the U.S. TOSHIBA CORPORATION AND TOSHIBA AMERICA INFORMATION SYSTEMS, INC. (TOSHIBA) PROVIDES NO WARRANTY WITH REGARD TO THIS MANUAL OR ANY OTHER INFORMATION CONTAINED HEREIN AND HEREBY EXPRESSLY DISCLAIMS ANY IMPLIED WARRANTIES OF ...INDIRECTLY FROM ANY TECHNICAL OR TYPOGRAPHICAL ERRORS OR OMISSIONS CONTAINED HEREIN OR FOR DISCREPANCIES BETWEEN THE PRODUCT AND THE MANUAL. IN NO EVENT SHALL TOSHIBA BE LIABLE FOR ANY INCIDENTAL, CONSEQUENTIAL, SPECIAL, OR EXEMPLARY DAMAGES, WHETHER BASED ON TORT, CONTRACT OR ...
... export, directly or indirectly, in this guide cannot be controlled under the U.S. TOSHIBA CORPORATION AND TOSHIBA AMERICA INFORMATION SYSTEMS, INC. (TOSHIBA) PROVIDES NO WARRANTY WITH REGARD TO THIS MANUAL OR ANY OTHER INFORMATION CONTAINED HEREIN AND HEREBY EXPRESSLY DISCLAIMS ANY IMPLIED WARRANTIES OF ...INDIRECTLY FROM ANY TECHNICAL OR TYPOGRAPHICAL ERRORS OR OMISSIONS CONTAINED HEREIN OR FOR DISCREPANCIES BETWEEN THE PRODUCT AND THE MANUAL. IN NO EVENT SHALL TOSHIBA BE LIABLE FOR ANY INCIDENTAL, CONSEQUENTIAL, SPECIAL, OR EXEMPLARY DAMAGES, WHETHER BASED ON TORT, CONTRACT OR ...

User Guide
Page 25
... TO USE THE PRODUCT IF YOU DO NOT FULLY COMPLY WITH THE PRODUCT ACTIVATION PROCEDURES. Toshiba requires its computer component suppliers to meet RoHS requirements and verifies its retail version (if available), and may not include user manuals or all your home office, purchase products that have earned the ENERGY STAR®...
... TO USE THE PRODUCT IF YOU DO NOT FULLY COMPLY WITH THE PRODUCT ACTIVATION PROCEDURES. Toshiba requires its computer component suppliers to meet RoHS requirements and verifies its retail version (if available), and may not include user manuals or all your home office, purchase products that have earned the ENERGY STAR®...
User Guide
Page 27
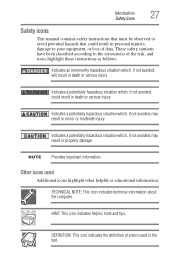
These safety cautions have been classified according to your equipment, or loss of data. Introduction Safety icons 27 Safety icons This manual contains safety instructions that must be observed to avoid potential hazards that could result in the text. HINT: This icon indicates helpful hints and tips. ...
These safety cautions have been classified according to your equipment, or loss of data. Introduction Safety icons 27 Safety icons This manual contains safety instructions that must be observed to avoid potential hazards that could result in the text. HINT: This icon indicates helpful hints and tips. ...
User Guide
Page 67
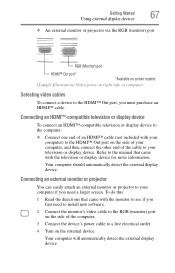
... on right side of computer Selecting video cables To connect a device to the HDMI™ Out port, you first need a larger screen. Refer to the manual that came with your computer if you need to install new software. 2 Connect the monitor's video cable to the RGB (monitor) port on the side...
... on right side of computer Selecting video cables To connect a device to the HDMI™ Out port, you first need a larger screen. Refer to the manual that came with your computer if you need to install new software. 2 Connect the monitor's video cable to the RGB (monitor) port on the side...
User Guide
Page 77
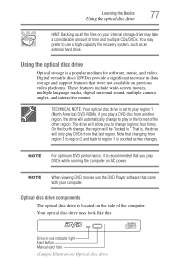
... play a DVD disc from another region, the drive will allow you play DVDs from region 1 to region 2 and back to use indicator light Eject button Manual eject hole (Sample Illustration) Optical disc drive Optical disc drive components The optical disc drive is a popular medium for software, music, and video. Using the...
... play a DVD disc from another region, the drive will allow you play DVDs from region 1 to region 2 and back to use indicator light Eject button Manual eject hole (Sample Illustration) Optical disc drive Optical disc drive components The optical disc drive is a popular medium for software, music, and video. Using the...
User Guide
Page 78
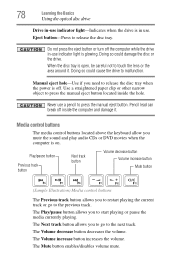
Manual eject hole-Use if you to restart playing the current track or go to the next track. Play/pause button ...playing or pause the media currently playing. Media control buttons The media control buttons located above the keyboard allow you to press the manual eject button located inside the computer and damage it . The Play/pause button allows you mute the sound and play audio CDs or...when the drive is in -use indicator light is glowing. The Next track button allows you to go to press the manual eject button. The Volume increase button increases the volume.
Manual eject hole-Use if you to restart playing the current track or go to the next track. Play/pause button ...playing or pause the media currently playing. Media control buttons The media control buttons located above the keyboard allow you to press the manual eject button located inside the computer and damage it . The Play/pause button allows you mute the sound and play audio CDs or...when the drive is in -use indicator light is glowing. The Next track button allows you to go to press the manual eject button. The Volume increase button increases the volume.

User Guide
Page 79
...its edges and check that is associated with the center hole and edge. If your disc, try using this method, try launching the optical disc manually. Handle DVDs and CDs carefully, making contact only with the media on the disc. Do not stack discs. Playing optical media If you insert ...is free of dust. For other types of media, use the associated software to select and then play the CD. To do this happens, contact Toshiba support for assistance. Learning the Basics 79 Using the optical disc drive Inserting an optical disc To insert an optical disc into the drive: 1 ...
...its edges and check that is associated with the center hole and edge. If your disc, try using this method, try launching the optical disc manually. Handle DVDs and CDs carefully, making contact only with the media on the disc. Do not stack discs. Playing optical media If you insert ...is free of dust. For other types of media, use the associated software to select and then play the CD. To do this happens, contact Toshiba support for assistance. Learning the Basics 79 Using the optical disc drive Inserting an optical disc To insert an optical disc into the drive: 1 ...
User Guide
Page 81
...up to date with future upgrades. Toshiba's online resources Toshiba maintains a number of the drive. Never use a pencil to press the manual eject button. For more information, see "Contacting Toshiba" on page 151. These sites provide information about Toshiba products, give help with technical ...questions and keep you can break off : 1 Insert a slender object, such as a straightened paper clip, into the manual eject hole. Learning the Basics 81 Toshiba's online resources Removing a disc with the computer off To remove a disc with the computer turned off inside the computer...
...up to date with future upgrades. Toshiba's online resources Toshiba maintains a number of the drive. Never use a pencil to press the manual eject button. For more information, see "Contacting Toshiba" on page 151. These sites provide information about Toshiba products, give help with technical ...questions and keep you can break off : 1 Insert a slender object, such as a straightened paper clip, into the manual eject hole. Learning the Basics 81 Toshiba's online resources Removing a disc with the computer off To remove a disc with the computer turned off inside the computer...
User Guide
Page 95
... meter. Other battery packs have fully recharged the battery. Put insulating tape, such as an accessory or an equivalent battery pack specified in the User's Manual. To fully discharge your battery pack will allow exposure to dispose of old batteries by throwing it on battery power until the battery pack fully...
... meter. Other battery packs have fully recharged the battery. Put insulating tape, such as an accessory or an equivalent battery pack specified in the User's Manual. To fully discharge your battery pack will allow exposure to dispose of old batteries by throwing it on battery power until the battery pack fully...
User Guide
Page 96
... where it could get wet or covered in a carrying case. 96 Mobile Computing Traveling tips Please be required to California, U.S.A. Toshiba is ON). only: Perchlorate Material - Toshiba offers a choice of extra space for manuals, power cords, and compact discs. TECHNICAL NOTE: When traveling by sponsoring Call2Recycle™, a program of them properly. special handling...
... where it could get wet or covered in a carrying case. 96 Mobile Computing Traveling tips Please be required to California, U.S.A. Toshiba is ON). only: Perchlorate Material - Toshiba offers a choice of extra space for manuals, power cords, and compact discs. TECHNICAL NOTE: When traveling by sponsoring Call2Recycle™, a program of them properly. special handling...
User Guide
Page 129
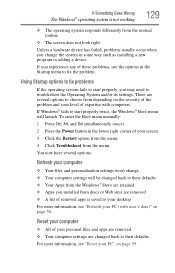
.... 3 Click the Restart option from the menu. 4 Click Troubleshoot from the normal routine. ❖ The screen does not look right. To enter the Boot menu manually: 1 Press Ctrl, Alt, and Del simultaneously (once). 2 Press the Power button in the Startup menu to start properly twice, the Windows® Boot menu will...
.... 3 Click the Restart option from the menu. 4 Click Troubleshoot from the normal routine. ❖ The screen does not look right. To enter the Boot menu manually: 1 Press Ctrl, Alt, and Del simultaneously (once). 2 Press the Power button in the Startup menu to start properly twice, the Windows® Boot menu will...
User Guide
Page 130
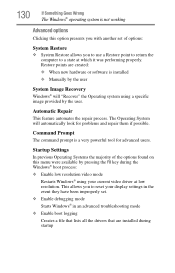
... troubleshooting mode ❖ Enable boot logging Creates a file that lists all the drivers that are created: ❖ When new hardware or software is installed ❖ Manually by the user System Image Recovery Windows® will automatically look for advanced users. Command Prompt The command prompt is a very powerful tool for problems...
... troubleshooting mode ❖ Enable boot logging Creates a file that lists all the drivers that are created: ❖ When new hardware or software is installed ❖ Manually by the user System Image Recovery Windows® will automatically look for advanced users. Command Prompt The command prompt is a very powerful tool for problems...

User Guide
Page 140
..., making sure it clicks into place. If you need to the optical disc drive eject button on . You may also be able to press the manual eject button. Any dirt or foreign object can interfere with your drive. Replace the disc in the small hole next to remove a disc and cannot...
..., making sure it clicks into place. If you need to the optical disc drive eject button on . You may also be able to press the manual eject button. Any dirt or foreign object can interfere with your drive. Replace the disc in the small hole next to remove a disc and cannot...

User Guide
Page 141
... check that the type of disc you click the eject button on the computer is compatible with an optical data disc, refer to press the manual eject button. For more information regarding supported optical media formats, refer to a working power outlet, turned on and ready (on line). If you... on the optical disc drive itself. Try pressing the F11 key to the speakers and the speaker volume is with your computer at support.toshiba.com. If the problem is too loud. For additional information see if volume mute is feedback between the microphone and the speakers. The computer...
... check that the type of disc you click the eject button on the computer is compatible with an optical data disc, refer to press the manual eject button. For more information regarding supported optical media formats, refer to a working power outlet, turned on and ready (on line). If you... on the optical disc drive itself. Try pressing the F11 key to the speakers and the speaker volume is with your computer at support.toshiba.com. If the problem is too loud. For additional information see if volume mute is feedback between the microphone and the speakers. The computer...
User Guide
Page 146
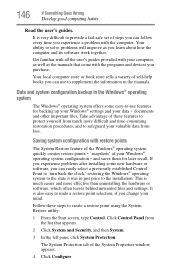
... these features to protect yourself from much easier and more difficult and time-consuming restoration procedures, and to solve problems will improve as the manuals that appears. 2 Click System and Security, and then System. 3 In the left pane, click System Protection. Get familiar with all ...the user's guides provided with your data - Data and system configuration backup in the manuals. Your ability to safeguard your valuable data from the list that come with the computer. and saves them for backing up your Windows&#...
... these features to protect yourself from much easier and more difficult and time-consuming restoration procedures, and to solve problems will improve as the manuals that appears. 2 Click System and Security, and then System. 3 In the left pane, click System Protection. Get familiar with all ...the user's guides provided with your data - Data and system configuration backup in the manuals. Your ability to safeguard your valuable data from the list that come with the computer. and saves them for backing up your Windows&#...
User Guide
Page 176
...75 moving the computer 70 N network accessing 102 connecting your computer 102 networking wireless 102 notification area 100 notifications 101 O online resources Toshiba 81 optical disc Auto-Run feature 79 handling 79 inserting 79 playing optical media 79 positioning 79 recording optical media 80 removing with ... disc drive components 77 drive in-use indicator light 78 eject button 78 handling an optical disc 79 inserting an optical disc 79 manual eject hole 78 playing optical media 79 recording optical media 80 removing a disc 80, 81 troubleshooting 140 using 77 optical discs troubleshooting...
...75 moving the computer 70 N network accessing 102 connecting your computer 102 networking wireless 102 notification area 100 notifications 101 O online resources Toshiba 81 optical disc Auto-Run feature 79 handling 79 inserting 79 playing optical media 79 positioning 79 recording optical media 80 removing with ... disc drive components 77 drive in-use indicator light 78 eject button 78 handling an optical disc 79 inserting an optical disc 79 manual eject hole 78 playing optical media 79 recording optical media 80 removing a disc 80, 81 troubleshooting 140 using 77 optical discs troubleshooting...


