User Guide
Page 19
... in Sleep mode 43 Adding optional external devices 44 Adding memory (optional 44 Installing a memory module 44 Removing a memory module 50 Checking total memory 51 Recovering the Internal Storage Drive 52 Creating recovery media 53 Restoring from recovery media 55 Refresh your PC (with user's data 56 Reset your PC 59 Installing drivers and applications 61 Using the touch pad 62 Adjusting touch pad settings 65 Disabling or enabling the touch pad 66 Connecting an external device 66 Using external display devices 66 Selecting video cables 67 Connecting an HDMI™-compatible...
... in Sleep mode 43 Adding optional external devices 44 Adding memory (optional 44 Installing a memory module 44 Removing a memory module 50 Checking total memory 51 Recovering the Internal Storage Drive 52 Creating recovery media 53 Restoring from recovery media 55 Refresh your PC (with user's data 56 Reset your PC 59 Installing drivers and applications 61 Using the touch pad 62 Adjusting touch pad settings 65 Disabling or enabling the touch pad 66 Connecting an external device 66 Using external display devices 66 Selecting video cables 67 Connecting an HDMI™-compatible...
User Guide
Page 22
... a user password 115 System Settings 116 Sleep and Charge 117 USB Sleep and Charge 117 Enabling/Disabling USB Sleep and Charge......119 Power supply mode settings 119 Function Key 120 PC Diagnostic Tool Utility 121 PC Health Monitor 122 Recovery Media Creator 123 Service Station 123 TOSHIBA Application Installer 124 Chapter 6: If Something Goes Wrong 125 Problems that are easy to fix 125 Problems when you turn on the computer............126 The Windows® operating system is not working 128 Using Startup options to fix problems 129 Internet problems...
... a user password 115 System Settings 116 Sleep and Charge 117 USB Sleep and Charge 117 Enabling/Disabling USB Sleep and Charge......119 Power supply mode settings 119 Function Key 120 PC Diagnostic Tool Utility 121 PC Health Monitor 122 Recovery Media Creator 123 Service Station 123 TOSHIBA Application Installer 124 Chapter 6: If Something Goes Wrong 125 Problems that are easy to fix 125 Problems when you turn on the computer............126 The Windows® operating system is not working 128 Using Startup options to fix problems 129 Internet problems...
User Guide
Page 23
... 145 Data and system configuration backup in the Windows® operating system 146 If you need further assistance 151 Contacting Toshiba 151 Other Toshiba Internet Web sites 151 Toshiba's worldwide offices 152 Appendix A: TOSHIBA Function Keys 153 Functions 153 Help file 154 Display brightness 154 Output (Display switch 155 Disabling or enabling the touch pad 156 Media buttons 156 Volume Mute 157 Disabling or enabling wireless devices............157 Keyboard Function keys 157 Zoom (Display resolution 157 Appendix B: Power Cord/Cable Connectors 158 Glossary 159...
... 145 Data and system configuration backup in the Windows® operating system 146 If you need further assistance 151 Contacting Toshiba 151 Other Toshiba Internet Web sites 151 Toshiba's worldwide offices 152 Appendix A: TOSHIBA Function Keys 153 Functions 153 Help file 154 Display brightness 154 Output (Display switch 155 Disabling or enabling the touch pad 156 Media buttons 156 Volume Mute 157 Disabling or enabling wireless devices............157 Keyboard Function keys 157 Zoom (Display resolution 157 Appendix B: Power Cord/Cable Connectors 158 Glossary 159...
User Guide
Page 26
...; Use the table of the information provided herein, product specifications, configurations, prices, system/component/options availability are designed for a product Series. You can: ❖ Read the entire guide from beginning to stay current with the various computer software or hardware options, visit Toshiba's Web site at support.toshiba.com. This guide This guide introduces the computer's features as well as some basic procedures needed to change...
...; Use the table of the information provided herein, product specifications, configurations, prices, system/component/options availability are designed for a product Series. You can: ❖ Read the entire guide from beginning to stay current with the various computer software or hardware options, visit Toshiba's Web site at support.toshiba.com. This guide This guide introduces the computer's features as well as some basic procedures needed to change...
User Guide
Page 44
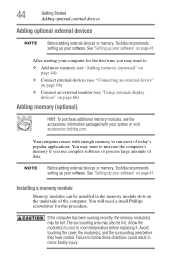
... "Adding memory (optional)" on page 44) ❖ Connect external devices (see "Connecting an external device" on page 66) ❖ Connect an external monitor (see the accessories information packaged with enough memory to increase the computer's memory if you use complex software or process large amounts of data. Avoid touching the cover, the module(s), and the surrounding area before replacing it. See "Setting up your computer for this procedure. Installing a memory module Memory modules can be hot...
... "Adding memory (optional)" on page 44) ❖ Connect external devices (see "Connecting an external device" on page 66) ❖ Connect an external monitor (see the accessories information packaged with enough memory to increase the computer's memory if you use complex software or process large amounts of data. Avoid touching the cover, the module(s), and the surrounding area before replacing it. See "Setting up your computer for this procedure. Installing a memory module Memory modules can be hot...
User Guide
Page 49
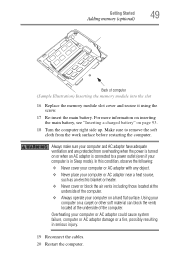
... slot 16 Replace the memory module slot cover and secure it using the screw. 17 Re-insert the main battery. Overheating your computer on a hard flat surface. Make sure to a power outlet (even if your computer and AC adaptor have adequate ventilation and are protected from the work surface before restarting the computer. Getting Started 49 Adding memory (optional) Back of the computer. ❖ Always operate...
... slot 16 Replace the memory module slot cover and secure it using the screw. 17 Re-insert the main battery. Overheating your computer on a hard flat surface. Make sure to a power outlet (even if your computer and AC adaptor have adequate ventilation and are protected from the work surface before restarting the computer. Getting Started 49 Adding memory (optional) Back of the computer. ❖ Always operate...
User Guide
Page 51
... login in screen. TECHNICAL NOTE: You must have adequate ventilation and are protected from the work . Make sure to work surface before restarting the computer. For more information on inserting the main battery, see "Inserting a charged battery" on or when an AC adaptor is displayed below the System heading. Getting Started 51 Adding memory (optional) 4 Replace the memory module slot cover and secure it using the screw...
... login in screen. TECHNICAL NOTE: You must have adequate ventilation and are protected from the work . Make sure to work surface before restarting the computer. For more information on inserting the main battery, see "Inserting a charged battery" on or when an AC adaptor is displayed below the System heading. Getting Started 51 Adding memory (optional) 4 Replace the memory module slot cover and secure it using the screw...
User Guide
Page 52
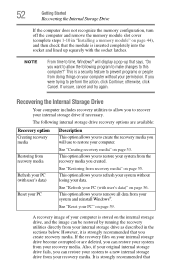
... again. Recovering the Internal Storage Drive Your computer includes recovery utilities to allow the following internal storage drive recovery options are deleted, you were trying to restore your recovery media. 52 Getting Started Recovering the Internal Storage Drive If the computer does not recognize the memory configuration, turn off the computer and remove the memory module slot cover (complete steps 1-10 in the sections below. NOTE From time to time, Windows® will use to perform...
... again. Recovering the Internal Storage Drive Your computer includes recovery utilities to allow the following internal storage drive recovery options are deleted, you were trying to restore your recovery media. 52 Getting Started Recovering the Internal Storage Drive If the computer does not recognize the memory configuration, turn off the computer and remove the memory module slot cover (complete steps 1-10 in the sections below. NOTE From time to time, Windows® will use to perform...
User Guide
Page 65
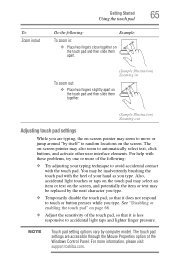
... Windows Control Panel. For help with the heel of the touch pad, so that it is less responsive to automatically select text, click buttons, and activate other user interface elements. Also, accidental light touches or taps on the touch pad may select an item or text on -screen pointer may be inadvertently brushing the touch pad with these problems, try one or more information, please visit support.toshiba...
... Windows Control Panel. For help with the heel of the touch pad, so that it is less responsive to automatically select text, click buttons, and activate other user interface elements. Also, accidental light touches or taps on the touch pad may select an item or text on -screen pointer may be inadvertently brushing the touch pad with these problems, try one or more information, please visit support.toshiba...
User Guide
Page 66
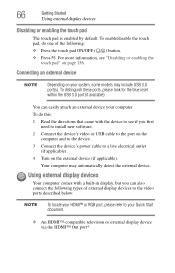
...). You can also connect the following : ❖ Press the touch pad ON/OFF ( ) button. ❖ Press F5. To enable/disable the touch pad, do this: 1 Read the directions that came with a built-in display, but you first need to install new software. 2 Connect the device's video or USB cable to the port on the computer and to the device. 3 Connect the device's power cable to your computer. 66 Getting Started Using external display devices Disabling or enabling the touch pad The touch pad is enabled by default.
...). You can also connect the following : ❖ Press the touch pad ON/OFF ( ) button. ❖ Press F5. To enable/disable the touch pad, do this: 1 Read the directions that came with a built-in display, but you first need to install new software. 2 Connect the device's video or USB cable to the port on the computer and to the device. 3 Connect the device's power cable to your computer. 66 Getting Started Using external display devices Disabling or enabling the touch pad The touch pad is enabled by default.
User Guide
Page 67
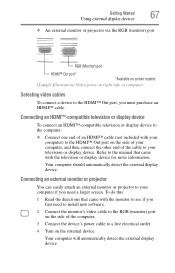
... television or display device for more information. Refer to the manual that came with the monitor to the HDMI™ Out port, you first need a larger screen. Your computer will automatically detect the external display device. Your computer should automatically detect the external display device. Getting Started 67 Using external display devices ❖ An external monitor or projector via the RGB (monitor) port RGB (Monitor) port HDMI™ Out port* *Available on certain models (Sample Illustration) Video ports on the external device.
... television or display device for more information. Refer to the manual that came with the monitor to the HDMI™ Out port, you first need a larger screen. Your computer will automatically detect the external display device. Your computer should automatically detect the external display device. Getting Started 67 Using external display devices ❖ An external monitor or projector via the RGB (monitor) port RGB (Monitor) port HDMI™ Out port* *Available on certain models (Sample Illustration) Video ports on the external device.
User Guide
Page 122
... of the computer and related devices and logs service-relevant information on the internal storage drive may be used to help diagnose problems should the computer require service by TOSHIBA or TOSHIBA's authorized service providers. The collected information includes device operation time and number of actuations or status changes (e.g.: number of power button and Fn key combination uses, and AC adaptor, battery, LCD, fan, HDD, sound volume, wireless communication switch, docking and USB information), date of your home...
... of the computer and related devices and logs service-relevant information on the internal storage drive may be used to help diagnose problems should the computer require service by TOSHIBA or TOSHIBA's authorized service providers. The collected information includes device operation time and number of actuations or status changes (e.g.: number of power button and Fn key combination uses, and AC adaptor, battery, LCD, fan, HDD, sound volume, wireless communication switch, docking and USB information), date of your home...
User Guide
Page 129
.... Unless a hardware device has failed, problems usually occur when you installed from the menu. If you may need to choose from the normal routine. ❖ The screen does not look right. To enter the Boot menu manually: 1 Press Ctrl, Alt, and Del simultaneously (once). 2 Press the Power button in some way such as installing a new program or adding a device. You now have several options to troubleshoot the Operating System...
.... Unless a hardware device has failed, problems usually occur when you installed from the menu. If you may need to choose from the normal routine. ❖ The screen does not look right. To enter the Boot menu manually: 1 Press Ctrl, Alt, and Del simultaneously (once). 2 Press the Power button in some way such as installing a new program or adding a device. You now have several options to troubleshoot the Operating System...
User Guide
Page 136
... screen, make sure the display priority is blank. Click Display and then Change display settings to activate the screen. If you are using an external monitor: ❖ Check that the monitor is turned on. ❖ Check that the monitor's power cord/cable is not set for each of the desktop with the secondary control button, then clicking Personalize. For more information, see the Windows® online Help. If you through the display options. Display...
... screen, make sure the display priority is blank. Click Display and then Change display settings to activate the screen. If you are using an external monitor: ❖ Check that the monitor is turned on. ❖ Check that the monitor's power cord/cable is not set for each of the desktop with the secondary control button, then clicking Personalize. For more information, see the Windows® online Help. If you through the display options. Display...
User Guide
Page 148
... be able to easily restore the Windows® operating system to External optical disc writers are a few tips to help ensure safe and easy installation of new hardware (printers, pointing devices, external hard drives, optical disc drive writers, scanners, etc.) and software (applications like Microsoft® Office and Adobe® Photoshop®, or utility software such as read from the list that appears. 2 Click Save backup copies of your files...
... be able to easily restore the Windows® operating system to External optical disc writers are a few tips to help ensure safe and easy installation of new hardware (printers, pointing devices, external hard drives, optical disc drive writers, scanners, etc.) and software (applications like Microsoft® Office and Adobe® Photoshop®, or utility software such as read from the list that appears. 2 Click Save backup copies of your files...
User Guide
Page 167
... quality audio and video signal via a single cable in which only every other services. HDMI-CEC (HDMI Consumer Electronics Control)-One A/V component can control another while using a pointing device such as a mouse. See also HDMI. interlaced-A method of pixels is running and have the operating system automatically recognize the change. Internet-The decentralized, world-wide network of using this function, if connected with HDMI cables. internal device-See device. L L1 (level one) cache-Memory cache...
... quality audio and video signal via a single cable in which only every other services. HDMI-CEC (HDMI Consumer Electronics Control)-One A/V component can control another while using a pointing device such as a mouse. See also HDMI. interlaced-A method of pixels is running and have the operating system automatically recognize the change. Internet-The decentralized, world-wide network of using this function, if connected with HDMI cables. internal device-See device. L L1 (level one) cache-Memory cache...
User Guide
Page 174
... power cord/cable 39 power source 38 cooling fan adequate ventilation 36 customize computer settings 69 D data/entire system backup troubleshooting 148 desktop creating new icon 99 exploring the 99 icons 99 recycle bin 100 standard features 98, 99 Desktop Assist 108 Media & Entertainment tab 109 Support & Recovery tab 111 Tools & Utilities tab 110 Device Manager fixing a problem 132 directing display output 68 disabling touch pad 66 display troubleshooting 137 display devices external 66 display output settings 68 display, external adjusting...
... power cord/cable 39 power source 38 cooling fan adequate ventilation 36 customize computer settings 69 D data/entire system backup troubleshooting 148 desktop creating new icon 99 exploring the 99 icons 99 recycle bin 100 standard features 98, 99 Desktop Assist 108 Media & Entertainment tab 109 Support & Recovery tab 111 Tools & Utilities tab 110 Device Manager fixing a problem 132 directing display output 68 disabling touch pad 66 display troubleshooting 137 display devices external 66 display output settings 68 display, external adjusting...
User Guide
Page 175
... troubleshooting 144 DVDs using 77 E eco power plan 91 eco Utility® 112 eject button optical disc drive 78 eject, optical disc drive 78 enabling touch pad 66 enabling/disabling touch pad 156 ENERGY STAR® 24 exploring desktop 99 Start screen 97 external display device HDMI™ Out port 66 RGB (monitor) port 67 external display, adjusting 69 F files backing up 73, 76 saving 76 Function Key 120 Function Keys disabling or enabling wireless devices 157 Function keys 156 display brightness 154 Help file 154 keyboard Function keys 157 media buttons 156 Output (Display switch) 155 volume...
... troubleshooting 144 DVDs using 77 E eco power plan 91 eco Utility® 112 eject button optical disc drive 78 eject, optical disc drive 78 enabling touch pad 66 enabling/disabling touch pad 156 ENERGY STAR® 24 exploring desktop 99 Start screen 97 external display device HDMI™ Out port 66 RGB (monitor) port 67 external display, adjusting 69 F files backing up 73, 76 saving 76 Function Key 120 Function Keys disabling or enabling wireless devices 157 Function keys 156 display brightness 154 Help file 154 keyboard Function keys 157 media buttons 156 Output (Display switch) 155 volume...
User Guide
Page 177
... 82 power down shut down 42 power light 86 power management 84 optimum performance 84 power plans selecting power plan options 89 power saving options 89 precautions safety 34 printer troubleshooting 141 problem solving contacting Toshiba 151 Startup options 129 projector connecting 67 R real-time clock (RTC) battery 83 recording sounds 103 recovery creating recovery media 53 installing drivers and applications 61 internal storage drive 52 refresh your PC 56 reset your PC 59 restoring from recovery media 55 Recovery Media Creator...
... 82 power down shut down 42 power light 86 power management 84 optimum performance 84 power plans selecting power plan options 89 power saving options 89 precautions safety 34 printer troubleshooting 141 problem solving contacting Toshiba 151 Startup options 129 projector connecting 67 R real-time clock (RTC) battery 83 recording sounds 103 recovery creating recovery media 53 installing drivers and applications 61 internal storage drive 52 refresh your PC 56 reset your PC 59 restoring from recovery media 55 Recovery Media Creator...
User Guide
Page 178
... data/entire system backup 148 Device Manager 132 display error message 137 display problems screen is blank 136 DVD player 144 eject button 140 error message, warning resume failure 127 Error-checking 138 external display problems 137 external keyboard 135 external monitor 136 good computing habits 145 hard disk drive is slow 139 high-pitched noise 141 installing hardware/software 148 keyboard 135 keyboard will not respond 126 memory problems 133 missing files/trouble accessing a drive 138 on-screen eject button 141 optical disc drive 140
... data/entire system backup 148 Device Manager 132 display error message 137 display problems screen is blank 136 DVD player 144 eject button 140 error message, warning resume failure 127 Error-checking 138 external display problems 137 external keyboard 135 external monitor 136 good computing habits 145 hard disk drive is slow 139 high-pitched noise 141 installing hardware/software 148 keyboard 135 keyboard will not respond 126 memory problems 133 missing files/trouble accessing a drive 138 on-screen eject button 141 optical disc drive 140


