User Manual
Page 48
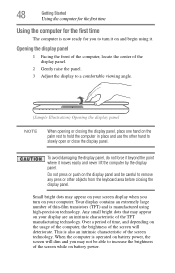
...other objects from the keyboard area before closing the display panel, place one hand on battery power. Do not press or push on the display panel and be able to increase the brightness of the screen will dim and you turn it on your computer. Your display contains an extremely large ...not be careful to remove any pens or other hand to slowly open or close the display panel. When the computer is operated on battery power, the screen will deteriorate. This is manufactured using it. Over a period of time, and depending on your display are an intrinsic characteristic of the...
...other objects from the keyboard area before closing the display panel, place one hand on battery power. Do not press or push on the display panel and be able to increase the brightness of the screen will dim and you turn it on your computer. Your display contains an extremely large ...not be careful to remove any pens or other hand to slowly open or close the display panel. When the computer is operated on battery power, the screen will deteriorate. This is manufactured using it. Over a period of time, and depending on your display are an intrinsic characteristic of the...
User Manual
Page 49
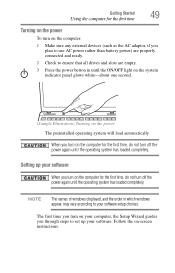
... power again until the operating system has loaded completely. Setting up your software. Getting Started 49 Using the computer for the first time Turning on the power To... turn on the computer: 1 Make sure any external devices (such as the AC adaptor, if you plan to use AC power rather than battery power)... are properly connected and ready. 2 Check to ensure that all drives and slots are empty. 3 Press the power button in ... to your software When you turn off the power again until the ON/OFF light on the system indicator panel glows white...
... power again until the operating system has loaded completely. Setting up your software. Getting Started 49 Using the computer for the first time Turning on the power To... turn on the computer: 1 Make sure any external devices (such as the AC adaptor, if you plan to use AC power rather than battery power)... are properly connected and ready. 2 Check to ensure that all drives and slots are empty. 3 Press the power button in ... to your software When you turn off the power again until the ON/OFF light on the system indicator panel glows white...
User Manual
Page 57
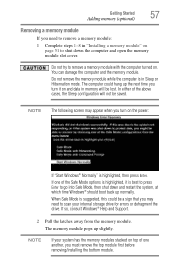
... module. If one another, you must remove the top module first before removing/installing the bottom module. The computer could be saved. NOTE The following screen may appear when you may need to remove a memory module: 1 Complete steps 1-8 in Sleep or Hibernation mode. The memory module pops up slightly. NOTE If... is suggested, this could hang up the next time you turn on . Do not try to remove a memory module with the computer turned on the power: If "Start Windows® Normally" is highlighted, then press Enter.
... module. If one another, you must remove the top module first before removing/installing the bottom module. The computer could be saved. NOTE The following screen may appear when you may need to remove a memory module: 1 Complete steps 1-8 in Sleep or Hibernation mode. The memory module pops up slightly. NOTE If... is suggested, this could hang up the next time you turn on . Do not try to remove a memory module with the computer turned on the power: If "Start Windows® Normally" is highlighted, then press Enter.
User Manual
Page 61
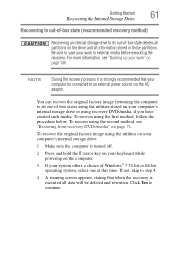
...on the computer. 3 If your computer be deleted and rewritten. You can recover the original factory image (returning the computer to an external power source via the AC adaptor. To recover the original factory image using the first method, follow the procedure below. NOTE During the recovery ... recommended that when the recovery is turned off. 2 Press and hold the 0 (zero) key on your keyboard while powering on page 106. If not, skip to step 4. 4 A warning screen appears, stating that your system offers a choice of Windows® 7 32-bit or 64-bit operating system, select ...
...on the computer. 3 If your computer be deleted and rewritten. You can recover the original factory image (returning the computer to an external power source via the AC adaptor. To recover the original factory image using the first method, follow the procedure below. NOTE During the recovery ... recommended that when the recovery is turned off. 2 Press and hold the 0 (zero) key on your keyboard while powering on page 106. If not, skip to step 4. 4 A warning screen appears, stating that your system offers a choice of Windows® 7 32-bit or 64-bit operating system, select ...
User Manual
Page 63
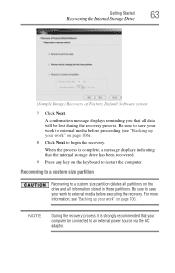
... 8 Click Next to external media before proceeding (see "Backing up your work " on the drive and all data will be connected to an external power source via the AC adaptor. For more information, see "Backing up your computer be lost during the recovery process. NOTE During the recovery process it... custom size partition deletes all partitions on page 106. Getting Started 63 Recovering the Internal Storage Drive (Sample Image) Recovery of Factory Default Software screen 7 Click Next. A confirmation message displays reminding you that your work to begin the recovery.
... 8 Click Next to external media before proceeding (see "Backing up your work " on the drive and all data will be connected to an external power source via the AC adaptor. For more information, see "Backing up your computer be lost during the recovery process. NOTE During the recovery process it... custom size partition deletes all partitions on page 106. Getting Started 63 Recovering the Internal Storage Drive (Sample Image) Recovery of Factory Default Software screen 7 Click Next. A confirmation message displays reminding you that your work to begin the recovery.
User Manual
Page 64
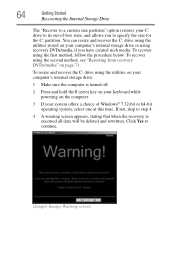
...be deleted and rewritten. You can resize and recover the C: drive using recovery DVDs/media, if you to continue. (Sample Image) Warning screen To recover using the second method, see "Restoring from recovery DVDs/media" on page 71. 64 Getting Started Recovering the Internal Storage Drive... method, follow the procedure below. If not, skip to step 4. 4 A warning screen appears, stating that when the recovery is turned off. 2 Press and hold the 0 (zero) key on your keyboard while powering on your computer's internal storage drive or using the utilities stored on the computer. 3...
...be deleted and rewritten. You can resize and recover the C: drive using recovery DVDs/media, if you to continue. (Sample Image) Warning screen To recover using the second method, see "Restoring from recovery DVDs/media" on page 71. 64 Getting Started Recovering the Internal Storage Drive... method, follow the procedure below. If not, skip to step 4. 4 A warning screen appears, stating that when the recovery is turned off. 2 Press and hold the 0 (zero) key on your keyboard while powering on your computer's internal storage drive or using the utilities stored on the computer. 3...

User Manual
Page 73
... and then overwrites the entire internal storage drive for security purposes. Read the Warning screen that displays and then click Yes to continue. ❖ To access the Recovery Wizard on the size of your computer. Select Toshiba Recovery Wizard, and then click Next. 2 Select Erase the hard disk and then... the internal storage drive, use one of erasing the drive. Be sure to create recovery DVDs/media and back up your computer, and then power on which type of the data on the internal storage drive without overwriting the drive. ❖ Delete all partitions and overwrite all data and...
... and then overwrites the entire internal storage drive for security purposes. Read the Warning screen that displays and then click Yes to continue. ❖ To access the Recovery Wizard on the size of your computer. Select Toshiba Recovery Wizard, and then click Next. 2 Select Erase the hard disk and then... the internal storage drive, use one of erasing the drive. Be sure to create recovery DVDs/media and back up your computer, and then power on which type of the data on the internal storage drive without overwriting the drive. ❖ Delete all partitions and overwrite all data and...
User Manual
Page 80
...; cable (not included with the monitor to a live electrical outlet. 4 Turn on the side of the cable to your computer if you first need a larger screen. To do this: 1 Read the directions that came with your computer) to the HDMI™ Out port on the side of your computer, and then... connect the other end of the computer. 3 Connect the device's power cable to see if you need to install new software. 2 Connect the monitor's video cable to the RGB (monitor) port on the external device. 80...
...; cable (not included with the monitor to a live electrical outlet. 4 Turn on the side of the cable to your computer if you first need a larger screen. To do this: 1 Read the directions that came with your computer) to the HDMI™ Out port on the side of your computer, and then... connect the other end of the computer. 3 Connect the device's power cable to see if you need to install new software. 2 Connect the monitor's video cable to the RGB (monitor) port on the external device. 80...
User Manual
Page 83
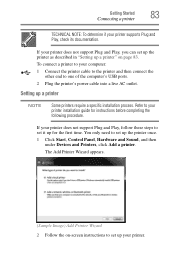
... a printer to your printer installation guide for the first time. The Add Printer Wizard appears. (Sample Image) Add Printer Wizard 2 Follow the on-screen instructions to set up the printer as described in "Setting up a printer" on page 83. If your printer does not support Plug and Play, you...: 1 Connect the printer cable to the printer and then connect the other end to one of the computer's USB ports. 2 Plug the printer's power cable into a live AC outlet. Getting Started 83 Connecting a printer TECHNICAL NOTE: To determine if your printer does not support Plug and Play, follow...
... a printer to your printer installation guide for the first time. The Add Printer Wizard appears. (Sample Image) Add Printer Wizard 2 Follow the on-screen instructions to set up the printer as described in "Setting up a printer" on page 83. If your printer does not support Plug and Play, you...: 1 Connect the printer cable to the printer and then connect the other end to one of the computer's USB ports. 2 Plug the printer's power cable into a live AC outlet. Getting Started 83 Connecting a printer TECHNICAL NOTE: To determine if your printer does not support Plug and Play, follow...
User Manual
Page 87
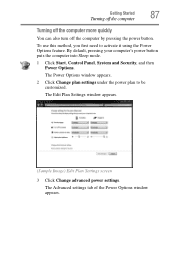
... Plan Settings screen 3 Click Change advanced power settings. To use this method, you first need to be customized. By default, pressing your computer's power button puts the computer into Sleep mode. 1 Click Start, Control Panel, System and Security, and then Power Options. The Power Options window ...appears. 2 Click Change plan settings under the power plan to activate it using the Power Options feature. The Advanced settings tab of the Power Options window appears. Getting Started 87 Turning off ...
... Plan Settings screen 3 Click Change advanced power settings. To use this method, you first need to be customized. By default, pressing your computer's power button puts the computer into Sleep mode. 1 Click Start, Control Panel, System and Security, and then Power Options. The Power Options window ...appears. 2 Click Change plan settings under the power plan to activate it using the Power Options feature. The Advanced settings tab of the Power Options window appears. Getting Started 87 Turning off ...
User Manual
Page 88
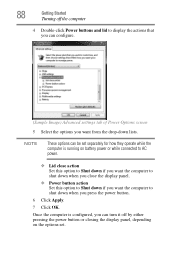
...you want the computer to shut down lists. 88 Getting Started Turning off by either pressing the power button or closing the display panel, depending on battery power or while connected to AC power. ❖ Lid close action Set this option to Shut down if you want the computer to ... the drop-down when you press the power button. 6 Click Apply. 7 Click OK. NOTE These options can turn it off the computer 4 Double-click Power buttons and lid to display the actions that you can configure. (Sample Image) Advanced settings tab of Power Options screen 5 Select the options you can be set...
...you want the computer to shut down lists. 88 Getting Started Turning off by either pressing the power button or closing the display panel, depending on battery power or while connected to AC power. ❖ Lid close action Set this option to Shut down if you want the computer to ... the drop-down when you press the power button. 6 Click Apply. 7 Click OK. NOTE These options can turn it off the computer 4 Double-click Power buttons and lid to display the actions that you can configure. (Sample Image) Advanced settings tab of Power Options screen 5 Select the options you can be set...
User Manual
Page 90
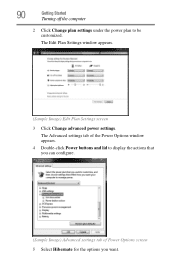
The Advanced settings tab of the Power Options window appears. 4 Double-click Power buttons and lid to be customized. 90 Getting Started Turning off the computer 2 Click Change plan settings under the power plan to display the actions that you can configure. (Sample Image) Advanced settings tab of Power Options screen 5 Select Hibernate for the options you want. The Edit Plan Settings window appears. (Sample Image) Edit Plan Settings screen 3 Click Change advanced power settings.
The Advanced settings tab of the Power Options window appears. 4 Double-click Power buttons and lid to be customized. 90 Getting Started Turning off the computer 2 Click Change plan settings under the power plan to display the actions that you can configure. (Sample Image) Advanced settings tab of Power Options screen 5 Select Hibernate for the options you want. The Edit Plan Settings window appears. (Sample Image) Edit Plan Settings screen 3 Click Change advanced power settings.

User Manual
Page 91
...OFF light glows white. Once the computer is running on battery power or while connected to AC power. ❖ Lid close the display panel. ❖ Power button action Set this option to Hibernate if you want the computer to the screen(s) you can place it again by opening the display panel. If... you put the computer in Hibernation mode by either pressing the power button or closing the display panel, you were using the Sleep command: 1 ...
...OFF light glows white. Once the computer is running on battery power or while connected to AC power. ❖ Lid close the display panel. ❖ Power button action Set this option to Hibernate if you want the computer to the screen(s) you can place it again by opening the display panel. If... you put the computer in Hibernation mode by either pressing the power button or closing the display panel, you were using the Sleep command: 1 ...
User Manual
Page 92
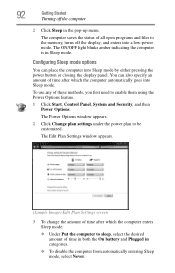
...Plan Settings window appears. (Sample Image) Edit Plan Settings screen 3 To change the amount of time after which the computer automatically goes into Sleep mode. You can place the computer into Sleep mode by either pressing the power button or closing the display panel. The computer saves the... and Plugged in categories. ❖ To disable the computer from automatically entering Sleep mode, select Never. The Power Options window appears. 2 Click Change plan settings under the power plan to the memory, turns off the computer 2 Click Sleep in Sleep mode. The ON/OFF light blinks...
...Plan Settings window appears. (Sample Image) Edit Plan Settings screen 3 To change the amount of time after which the computer automatically goes into Sleep mode. You can place the computer into Sleep mode by either pressing the power button or closing the display panel. The computer saves the... and Plugged in categories. ❖ To disable the computer from automatically entering Sleep mode, select Never. The Power Options window appears. 2 Click Change plan settings under the power plan to the memory, turns off the computer 2 Click Sleep in Sleep mode. The ON/OFF light blinks...

User Manual
Page 93
... lid to go into Sleep mode when you want . Getting Started 93 Turning off the computer 4 Click Change advanced power settings. The Advanced settings tab of Power Options screen 6 Select Sleep for the options you want the computer to display the actions that you can place it into Sleep... mode by either pressing the power button or closing the display panel, depending on battery power or while connected to AC power. ❖ Lid ...
... lid to go into Sleep mode when you want . Getting Started 93 Turning off the computer 4 Click Change advanced power settings. The Advanced settings tab of Power Options screen 6 Select Sleep for the options you want the computer to display the actions that you can place it into Sleep... mode by either pressing the power button or closing the display panel, depending on battery power or while connected to AC power. ❖ Lid ...
User Manual
Page 94
... on page 127. Never use harsh or caustic chemical products to your particular requirements. See "Utilities" on page 122. NOTE Please handle your power usage settings. If you place the computer in which you can customize your computer to keep your computer's battery, see... "Power Plans" on page 142. You may also wish to customize your computer carefully to the screen(s) you can start up the computer from Sleep mode, press the power button until the ON/OFF light glows white. The computer returns ...
... on page 127. Never use harsh or caustic chemical products to your particular requirements. See "Utilities" on page 122. NOTE Please handle your power usage settings. If you place the computer in which you can customize your computer to keep your computer's battery, see... "Power Plans" on page 142. You may also wish to customize your computer carefully to the screen(s) you can start up the computer from Sleep mode, press the power button until the ON/OFF light glows white. The computer returns ...

User Manual
Page 107
... viewing DVD and BD movies use the DVD or BD player software that were not available on previous video platforms. These features include wide-screen movies, multiple language tracks, digital surround sound, multiple camera angles, and interactive menus. Using the optical disc drive Optical storage is a ...popular medium for DVD-ROMs or BD-ROMs, depending on AC power. That is counted as two changes. Learning the Basics Using the optical disc drive 107 TECHNICAL NOTE: When restoring files, the backup program ...
... viewing DVD and BD movies use the DVD or BD player software that were not available on previous video platforms. These features include wide-screen movies, multiple language tracks, digital surround sound, multiple camera angles, and interactive menus. Using the optical disc drive Optical storage is a ...popular medium for DVD-ROMs or BD-ROMs, depending on AC power. That is counted as two changes. Learning the Basics Using the optical disc drive 107 TECHNICAL NOTE: When restoring files, the backup program ...

User Manual
Page 121
... appears. 4 Double-click Battery to display the battery options. (Sample Image) Advanced settings tab of Power Options screen 5 Configure the alarm settings to suit your battery: ❖ Enable Sleep or Hibernation, which saves power when you can conserve power and extend the operating time of factors, such as: ❖ How the computer is configured...
... appears. 4 Double-click Battery to display the battery options. (Sample Image) Advanced settings tab of Power Options screen 5 Configure the alarm settings to suit your battery: ❖ Enable Sleep or Hibernation, which saves power when you can conserve power and extend the operating time of factors, such as: ❖ How the computer is configured...
User Manual
Page 123
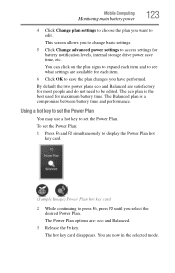
...time. The hot key card disappears. Mobile Computing Monitoring main battery power 123 4 Click Change plan settings to choose the plan you have performed. To set the Power Plan. This screen allows you select the desired Power Plan. The eco plan is a compromise between battery time and... performance. The Power Plan options are now in the selected mode. You are : eco and ...
...time. The hot key card disappears. Mobile Computing Monitoring main battery power 123 4 Click Change plan settings to choose the plan you have performed. To set the Power Plan. This screen allows you select the desired Power Plan. The eco plan is a compromise between battery time and... performance. The Power Plan options are now in the selected mode. You are : eco and ...
User Manual
Page 138
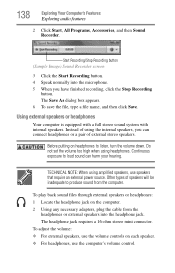
...adapters, plug the cable from the computer. Before putting on each speaker. ❖ For headphones, use speakers that require an external power source. Continuous exposure to listen, turn the volume down. Instead of speakers will be inadequate to produce sound from the headphones or... external speakers into the microphone. 5 When you can harm your hearing. Start Recording/Stop Recording button (Sample Image) Sound Recorder screen 3 Click the Start Recording button. 4 Speak normally into the headphone jack. TECHNICAL NOTE: When using headphones. Other types of using ...
...adapters, plug the cable from the computer. Before putting on each speaker. ❖ For headphones, use speakers that require an external power source. Continuous exposure to listen, turn the volume down. Instead of speakers will be inadequate to produce sound from the headphones or... external speakers into the microphone. 5 When you can harm your hearing. Start Recording/Stop Recording button (Sample Image) Sound Recorder screen 3 Click the Start Recording button. 4 Speak normally into the headphone jack. TECHNICAL NOTE: When using headphones. Other types of using ...


