
Users Manual Canada; English
Page 3
... of power condition 6-2 User's Manual iii Satellite L650/L655/L650D/L655D/Satellite Pro L650/L650D System Recovery 1-13 Chapter 2 The Grand Tour Front with the display closed 2-1 Left side 2-2 Right side 2-4 Back 2-5 Underside 2-6 Front with the display open 2-7 Indicators 2-9 Optical disc drives 2-11 AC adaptor 2-15 Chapter 3 Hardware, Utilities and Options Hardware 3-1 Special features 3-7 Utilities and Applications 3-9 Optional devices 3-15 Bridge media slot 3-16 Optional accessories 3-30 Chapter 4 Operating Basics Using the Touch Pad 4-1 Web Camera 4-2 Using the...
... of power condition 6-2 User's Manual iii Satellite L650/L655/L650D/L655D/Satellite Pro L650/L650D System Recovery 1-13 Chapter 2 The Grand Tour Front with the display closed 2-1 Left side 2-2 Right side 2-4 Back 2-5 Underside 2-6 Front with the display open 2-7 Indicators 2-9 Optical disc drives 2-11 AC adaptor 2-15 Chapter 3 Hardware, Utilities and Options Hardware 3-1 Special features 3-7 Utilities and Applications 3-9 Optional devices 3-15 Bridge media slot 3-16 Optional accessories 3-30 Chapter 4 Operating Basics Using the Touch Pad 4-1 Web Camera 4-2 Using the...
Users Manual Canada; English
Page 4
Satellite L650/L655/L650D/L655D/Satellite Pro L650/L650D Battery 6-3 Password Utility 6-10 Starting the computer by password 6-10 Power-up modes 6-11 Panel power on/off 6-11 System automatic Sleep/Hibernation 6-11 Chapter 7 HW Setup Accessing HW Setup 7-1 HW Setup window 7-1 Chapter 8 Troubleshooting Problem solving process 8-1 Hardware and system checklist 8-3 TOSHIBA support 8-19 Appendix A Specifications Physical Dimensions A-1 Environmental Requirements A-1 Appendix B Display Controller and Video mode Display controller B-1 Video mode B-1 Appendix C Wireless LAN Card...
Satellite L650/L655/L650D/L655D/Satellite Pro L650/L650D Battery 6-3 Password Utility 6-10 Starting the computer by password 6-10 Power-up modes 6-11 Panel power on/off 6-11 System automatic Sleep/Hibernation 6-11 Chapter 7 HW Setup Accessing HW Setup 7-1 HW Setup window 7-1 Chapter 8 Troubleshooting Problem solving process 8-1 Hardware and system checklist 8-3 TOSHIBA support 8-19 Appendix A Specifications Physical Dimensions A-1 Environmental Requirements A-1 Appendix B Display Controller and Video mode Display controller B-1 Video mode B-1 Appendix C Wireless LAN Card...
Users Manual Canada; English
Page 6
... and used by TOSHIBA under license. TOSHIBA assumes no liability for personal use or use of this manual cannot be reproduced only for damages incurred directly or indirectly from this manual. Windows, Microsoft and Windows logo are trademarks or registered trademarks of Microsoft Corporation. Labelflash is a trademark of YAMAHA CORPORATION. All rights reserved. TOSHIBA Satellite L650/L655/L650D/L655D/Satellite Pro L650/L650D Series User's Manual First...
... and used by TOSHIBA under license. TOSHIBA assumes no liability for personal use or use of this manual cannot be reproduced only for damages incurred directly or indirectly from this manual. Windows, Microsoft and Windows logo are trademarks or registered trademarks of Microsoft Corporation. Labelflash is a trademark of YAMAHA CORPORATION. All rights reserved. TOSHIBA Satellite L650/L655/L650D/L655D/Satellite Pro L650/L650D Series User's Manual First...
Users Manual Canada; English
Page 16
... would be used in a non-compliant manner. Satellite L650/L655/L650D/L655D/Satellite Pro L650/L650D Notes for Users in a non-compliant manner. To set the country/region permanently to Australia, enter the following command sequence: AT%TE=1 ATS133=1 AT&F AT&W AT%TE=0 ATZ Failure to set , enter the command ATI which could constitute a nuisance to the Australian telecoms network must...
... would be used in a non-compliant manner. Satellite L650/L655/L650D/L655D/Satellite Pro L650/L650D Notes for Users in a non-compliant manner. To set the country/region permanently to Australia, enter the following command sequence: AT%TE=1 ATS133=1 AT&F AT&W AT%TE=0 ATZ Failure to set , enter the command ATI which could constitute a nuisance to the Australian telecoms network must...
Users Manual Canada; English
Page 24
... over the Chapter 1, Getting Started and Chapter 3, Hardware, Utilities and Options chapters to set up your computer. Acronyms are enclosed in parentheses following formats to provide years of the Satellite L650/L655/L650D/L655D/Satellite Pro L650/L650D series computer. User's Manual xxii Then read the Special features section in the Glossary. Read Chapter 3, Hardware, Utilities and Options if connecting optional products or external devices. Abbreviations On first appearance, and...
... over the Chapter 1, Getting Started and Chapter 3, Hardware, Utilities and Options chapters to set up your computer. Acronyms are enclosed in parentheses following formats to provide years of the Satellite L650/L655/L650D/L655D/Satellite Pro L650/L650D series computer. User's Manual xxii Then read the Special features section in the Glossary. Read Chapter 3, Hardware, Utilities and Options if connecting optional products or external devices. Abbreviations On first appearance, and...
Users Manual Canada; English
Page 38
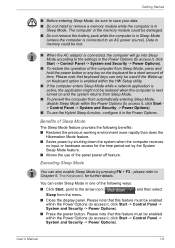
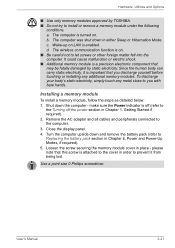
...; Click Start, point to access it , click Start -> Control Panel -> System and Security -> Power Options). ■ Press the power button. You can enter Sleep Mode in the Power Options. User's Manual 1-9 Please note that this feature must be enabled within the HW Setup utility. ■ If the computer enters Sleep Mode while a network application is active, the application might not be restored when the computer is next turned on the keyboard for a short amount of the panel power off...
...; Click Start, point to access it , click Start -> Control Panel -> System and Security -> Power Options). ■ Press the power button. You can enter Sleep Mode in the Power Options. User's Manual 1-9 Please note that this feature must be enabled within the HW Setup utility. ■ If the computer enters Sleep Mode while a network application is active, the application might not be restored when the computer is next turned on the keyboard for a short amount of the panel power off...
Users Manual Canada; English
Page 39
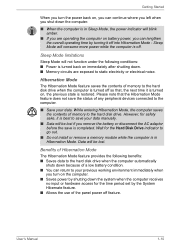
... you remove the battery or disconnect the AC adaptor before the save the status of memory to your data. Wait for the Hard Disk Drive indicator to go out. ■ Do not install or remove a memory module while the computer is turned off . User's Manual 1-10 Sleep Mode limitations Sleep Mode will blink amber. ■ If you are exposed to the hard disk drive when the computer is in Sleep Mode, the power indicator will not function...
... you remove the battery or disconnect the AC adaptor before the save the status of memory to your data. Wait for the Hard Disk Drive indicator to go out. ■ Do not install or remove a memory module while the computer is turned off . User's Manual 1-10 Sleep Mode limitations Sleep Mode will blink amber. ■ If you are exposed to the hard disk drive when the computer is in Sleep Mode, the power indicator will not function...
Users Manual Canada; English
Page 62
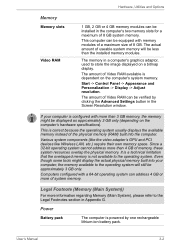
... powered by clicking the Advanced Settings button in the computer's two memory slots for a maximum of 8 GB system memory. The actual amount of Video RAM can be installed in the Screen Resolution window. Various system components (like the video adapter's GPU and PCI devices like Wireless LAN, etc.) require their own memory space. Hardware, Utilities and Options Memory Memory slots Video RAM 1 GB, 2 GB or 4 GB memory modules can be verified by one rechargeable lithium-ion battery pack. Start -> Control Panel...
... powered by clicking the Advanced Settings button in the computer's two memory slots for a maximum of 8 GB system memory. The actual amount of Video RAM can be installed in the Screen Resolution window. Various system components (like the video adapter's GPU and PCI devices like Wireless LAN, etc.) require their own memory space. Hardware, Utilities and Options Memory Memory slots Video RAM 1 GB, 2 GB or 4 GB memory modules can be verified by one rechargeable lithium-ion battery pack. Start -> Control Panel...
Users Manual Canada; English
Page 80
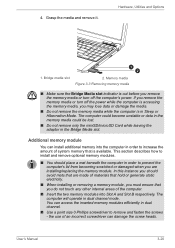
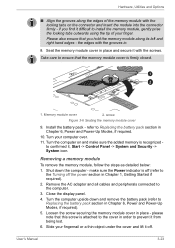
... section describes how to remove and fasten the screws - Additional memory module You can install additional memory into Slot A and Slot B respectively. If you do not touch any other internal areas of the computer. ■ Insert the two memory modules into the computer in order to increase the amount of an incorrect screwdriver can access the inserted memory modules efficiently in Sleep or Hibernation Mode. User's Manual 3-20 4. Hardware, Utilities and Options 1.
... section describes how to remove and fasten the screws - Additional memory module You can install additional memory into Slot A and Slot B respectively. If you do not touch any other internal areas of the computer. ■ Insert the two memory modules into the computer in order to increase the amount of an incorrect screwdriver can access the inserted memory modules efficiently in Sleep or Hibernation Mode. User's Manual 3-20 4. Hardware, Utilities and Options 1.
Users Manual Canada; English
Page 81
... enabled. Remove the AC adaptor and all cables and peripherals connected to install or remove a memory module under the following conditions. Turn the computer upside down the computer - Since the human body can carry static electricity, it from being lost. Hardware, Utilities and Options ■ Use only memory modules approved by static electricity. The wireless communication function is attached to the cover in order to you discharge yourself before touching...
... enabled. Remove the AC adaptor and all cables and peripherals connected to install or remove a memory module under the following conditions. Turn the computer upside down the computer - Since the human body can carry static electricity, it from being lost. Hardware, Utilities and Options ■ Use only memory modules approved by static electricity. The wireless communication function is attached to the cover in order to you discharge yourself before touching...
Users Manual Canada; English
Page 83
... display panel. 4. screw Figure 3-6 Seating the memory module cover 9. make sure the added memory is recognized to prevent it difficult to install the memory module, gently prise the locking tabs outwards using the tip of the memory module with the locking tabs on and make sure the Power indicator is off (refer to Replacing the battery pack section in place - User's Manual 3-23 refer to the computer. 3. Loosen the screw securing the memory module cover...
... display panel. 4. screw Figure 3-6 Seating the memory module cover 9. make sure the added memory is recognized to prevent it difficult to install the memory module, gently prise the locking tabs outwards using the tip of the memory module with the locking tabs on and make sure the Power indicator is off (refer to Replacing the battery pack section in place - User's Manual 3-23 refer to the computer. 3. Loosen the screw securing the memory module cover...
Users Manual Canada; English
Page 110
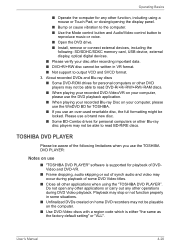
... discs. User's Manual 4-20 Please use a brand new disc. ■ Some BD-Combo drives for personal computers or other applications when using a mouse or Touch Pad, or closing/opening the display panel. ■ Bump or cause vibration to the computer. ■ Use the Mode control button and Audio/Video control button to reproduce music or voice. ■ Open the DVD drive. ■ Install, remove or connect external devices, including the following limitations when you use the TOSHIBA DVD PLAYER: Notes on use ■ "TOSHIBA DVD PLAYER" software...
... discs. User's Manual 4-20 Please use a brand new disc. ■ Some BD-Combo drives for personal computers or other applications when using a mouse or Touch Pad, or closing/opening the display panel. ■ Bump or cause vibration to the computer. ■ Use the Mode control button and Audio/Video control button to reproduce music or voice. ■ Open the DVD drive. ■ Install, remove or connect external devices, including the following limitations when you use the TOSHIBA DVD PLAYER: Notes on use ■ "TOSHIBA DVD PLAYER" software...
Users Manual Canada; English
Page 115
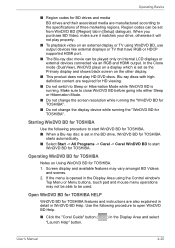
... your drive, otherwise it will not play HD DVD discs. Operating WinDVD BD for TOSHIBA Notes on an external display or TV using the Control window's Top Menu or Menu buttons, touch pad and mouse menu operations may vary amongst BD Videos and scenes. 2. Open WinDVD BD for TOSHIBA HELP WinDVD BD for HD viewing. ■ Do not switch to start WinDVD BD for TOSHIBA. 1. Region codes can be used. Use the following procedure to Sleep or Hibernation Mode...
... your drive, otherwise it will not play HD DVD discs. Operating WinDVD BD for TOSHIBA Notes on an external display or TV using the Control window's Top Menu or Menu buttons, touch pad and mouse menu operations may vary amongst BD Videos and scenes. 2. Open WinDVD BD for TOSHIBA HELP WinDVD BD for HD viewing. ■ Do not switch to start WinDVD BD for TOSHIBA. 1. Region codes can be used. Use the following procedure to Sleep or Hibernation Mode...
Users Manual Canada; English
Page 129
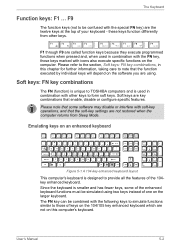
... TOSHIBA computers and is smaller and has fewer keys, some software may disable or interfere with the special FN key) are the twelve keys at the top of one on this chapter for further information, taking care to note that the soft-key settings are key combinations that enable, disable or configure specific features. these keys function differently from Sleep Mode. Since the keyboard is used in this computer's keyboard...
... TOSHIBA computers and is smaller and has fewer keys, some software may disable or interfere with the special FN key) are the twelve keys at the top of one on this chapter for further information, taking care to note that the soft-key settings are key combinations that enable, disable or configure specific features. these keys function differently from Sleep Mode. Since the keyboard is used in this computer's keyboard...
Users Manual Canada; English
Page 136
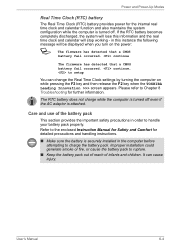
User's Manual 6-4 If the RTC battery becomes completely discharged, the system will lose this instance the following message will stop working - continue The firmware has detected that a CMOS battery fail occurred. It can change the Real Time Clock settings by turning the computer on the power: S The firmware has detected that a CMOS battery fail occurred. continue, to setup You can cause injury. Please refer to rupture...
User's Manual 6-4 If the RTC battery becomes completely discharged, the system will lose this instance the following message will stop working - continue The firmware has detected that a CMOS battery fail occurred. It can change the Real Time Clock settings by turning the computer on the power: S The firmware has detected that a CMOS battery fail occurred. continue, to setup You can cause injury. Please refer to rupture...
Users Manual Canada; English
Page 151
... will recognize the new device. ■ Make sure all optional accessories are configured properly in the computer's setup program and that all required driver software has been loaded (please refer to the documentation included with the computer, software or operating system. ■ Check that its installation and configuration). ■ Check all connectors for further information on its configuration is malfunctioning. keyboard, hard disk drive, display panel, touch pad, touch pad control buttons - Write down what...
... will recognize the new device. ■ Make sure all optional accessories are configured properly in the computer's setup program and that all required driver software has been loaded (please refer to the documentation included with the computer, software or operating system. ■ Check that its installation and configuration). ■ Check all connectors for further information on its configuration is malfunctioning. keyboard, hard disk drive, display panel, touch pad, touch pad control buttons - Write down what...

Users Manual Canada; English
Page 166
... interval within the Windows Control Panel. You place a call is going through a Private Branch Exchange (PBX), take care to ensure that the communication application's tone dial detection feature is disabled. Problem Procedure Communication software can 't hear a ring or pule dialling selection feature is set correctly. You can hear a dial tone but a Make sure that the cable connecting the external monitor to the...
... interval within the Windows Control Panel. You place a call is going through a Private Branch Exchange (PBX), take care to ensure that the communication application's tone dial detection feature is disabled. Problem Procedure Communication software can 't hear a ring or pule dialling selection feature is set correctly. You can hear a dial tone but a Make sure that the cable connecting the external monitor to the...
Users Manual Canada; English
Page 190
... on the specific computer model please refer to 86°F) or >25°C (77°F) at temperatures outside the range of system memory. User's Manual G-2 Contact Toshiba technical service and support, refer to take advantage of system memory. The amount of main system memory available for other factors. Computers configured with a 64bit CPU and therefore may automatically shutdown. Legal Footnotes ■ use your...
... on the specific computer model please refer to 86°F) or >25°C (77°F) at temperatures outside the range of system memory. User's Manual G-2 Contact Toshiba technical service and support, refer to take advantage of system memory. The amount of main system memory available for other factors. Computers configured with a 64bit CPU and therefore may automatically shutdown. Legal Footnotes ■ use your...
Users Manual Canada; English
Page 197
... start-up 8-3 TOSHIBA support 8-19 Touch Pad 8-12 USB device 8-14 USB mouse 8-13 Wireless LAN 8-18 eSATA device 8-15 Processor 3-1 R Recovery Media 1-15 problems 8-19 Recovery hard disk drive 1-14 Restarting the computer 1-11 S SD/SDHC/SDXC Card formatting 3-17 note 3-17 Security lock 3-29 Sleep Mode System automatic 3-7 setting 1-8 Soft keys enhanced keyboard 5-2 Sound system Stereo speakers 2-8 headphone jack 2-4 microphone jack 2-4 problems 8-15 T TOSHIBA Assist 3-11 TOSHIBA Bulletin Board 3-14 TOSHIBA ConfigFree 3-11 TOSHIBA DVD-RAM Utility 3-11 TOSHIBA Disc Creator 3-11, 4-16 TOSHIBA HDD...
... start-up 8-3 TOSHIBA support 8-19 Touch Pad 8-12 USB device 8-14 USB mouse 8-13 Wireless LAN 8-18 eSATA device 8-15 Processor 3-1 R Recovery Media 1-15 problems 8-19 Recovery hard disk drive 1-14 Restarting the computer 1-11 S SD/SDHC/SDXC Card formatting 3-17 note 3-17 Security lock 3-29 Sleep Mode System automatic 3-7 setting 1-8 Soft keys enhanced keyboard 5-2 Sound system Stereo speakers 2-8 headphone jack 2-4 microphone jack 2-4 problems 8-15 T TOSHIBA Assist 3-11 TOSHIBA Bulletin Board 3-14 TOSHIBA ConfigFree 3-11 TOSHIBA DVD-RAM Utility 3-11 TOSHIBA Disc Creator 3-11, 4-16 TOSHIBA HDD...
Detailed Specs for Satellite L655 PSK1EC-0DQ00Q English
Page 1
... Part Number/UPC code PSK1EC-0DQ00Q (Bilingual)/ 6-23506-02879-0 iToshiba of Canada Limited Information Systems Group shall not be filled with 2GB and 4GB modules Ports: Bridge Media Adaptor (SD Card, Mini SD Card, Micro SD Card, SDHC Card, Mult iMedia Card, Memory Stick Card, Memory Stick Pro Card), 2 USB 2.0, 1 USB 2.0/eSATA combo port, RJ45, external microphone port, headphone port, RGB, HDMI Keyboard Canadian Bilingual Keyboard 105 keys with 15 Function keys Color: Flat Half Glossy Black Pointing Device Touchpad Pointing device with Gesture Additional Software Toshiba...
... Part Number/UPC code PSK1EC-0DQ00Q (Bilingual)/ 6-23506-02879-0 iToshiba of Canada Limited Information Systems Group shall not be filled with 2GB and 4GB modules Ports: Bridge Media Adaptor (SD Card, Mini SD Card, Micro SD Card, SDHC Card, Mult iMedia Card, Memory Stick Card, Memory Stick Pro Card), 2 USB 2.0, 1 USB 2.0/eSATA combo port, RJ45, external microphone port, headphone port, RGB, HDMI Keyboard Canadian Bilingual Keyboard 105 keys with 15 Function keys Color: Flat Half Glossy Black Pointing Device Touchpad Pointing device with Gesture Additional Software Toshiba...


