

User Manual
Page 30
... custom size partition 63 Recovering without changing the internal storage drive partitions 66 Creating recovery DVDs/media 68 Restoring from recovery DVDs/media 71 Erasing the Internal Storage Drive 73 Checking the internal storage drive operating status 74 Installing drivers and applications 75 Using the TouchPad 75 Adjusting TouchPad™ settings 78 Disabling or enabling the TouchPad 79 Using external display devices 79 Selecting video cables 80 Connecting an HDMI™-compatible television or external display device............80 Connecting an external monitor or projector...
... custom size partition 63 Recovering without changing the internal storage drive partitions 66 Creating recovery DVDs/media 68 Restoring from recovery DVDs/media 71 Erasing the Internal Storage Drive 73 Checking the internal storage drive operating status 74 Installing drivers and applications 75 Using the TouchPad 75 Adjusting TouchPad™ settings 78 Disabling or enabling the TouchPad 79 Using external display devices 79 Selecting video cables 80 Connecting an HDMI™-compatible television or external display device............80 Connecting an external monitor or projector...

User Manual
Page 58
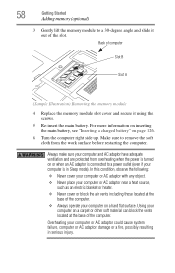
... in Sleep mode). Always make sure your computer is in serious injury. For more information on inserting the main battery, see "Inserting a charged battery" on or when an AC adaptor is connected to a power outlet (even if your computer and AC adaptor have adequate ventilation and are protected from the work surface before restarting the computer. 58 Getting Started Adding memory (optional...
... in Sleep mode). Always make sure your computer is in serious injury. For more information on inserting the main battery, see "Inserting a charged battery" on or when an AC adaptor is connected to a power outlet (even if your computer and AC adaptor have adequate ventilation and are protected from the work surface before restarting the computer. 58 Getting Started Adding memory (optional...

User Manual
Page 80
...) to the manual that came with the television for more information. Connecting an external monitor or projector You can change the display settings by pressing Fn + F5, or by configuring the display properties settings. Your computer will automatically detect the external display device. To do this: 1 Read the directions that came with your computer if you need to install new software. 2 Connect the monitor's video cable to the RGB (monitor) port on the...
...) to the manual that came with the television for more information. Connecting an external monitor or projector You can change the display settings by pressing Fn + F5, or by configuring the display properties settings. Your computer will automatically detect the external display device. To do this: 1 Read the directions that came with your computer if you need to install new software. 2 Connect the monitor's video cable to the RGB (monitor) port on the...
User Manual
Page 152
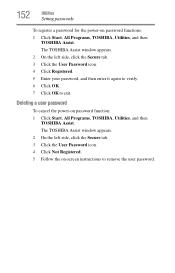
... enter it again to verify. 6 Click OK. 7 Click OK to remove the user password. Deleting a user password To cancel the power-on password functions: 1 Click Start, All Programs, TOSHIBA, Utilities, and then TOSHIBA Assist. The TOSHIBA Assist window appears. 2 On the left side, click the Secure tab. 3 Click the User Password icon. 4 Click Not Registered. 5 Follow the on-screen instructions to exit. 152 Utilities Setting passwords To register a password for the power-on password function: 1 Click Start...
... enter it again to verify. 6 Click OK. 7 Click OK to remove the user password. Deleting a user password To cancel the power-on password functions: 1 Click Start, All Programs, TOSHIBA, Utilities, and then TOSHIBA Assist. The TOSHIBA Assist window appears. 2 On the left side, click the Secure tab. 3 Click the User Password icon. 4 Click Not Registered. 5 Follow the on-screen instructions to exit. 152 Utilities Setting passwords To register a password for the power-on password function: 1 Click Start...
User Manual
Page 161
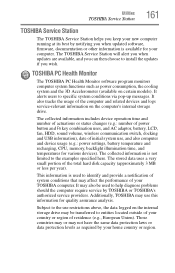
... includes device operation time and number of actuations or status changes (e.g.: number of power button and Fn key combination uses, and AC adaptor, battery, LCD, fan, HDD, sound volume, wireless communication switch, docking and USB information), date of your TOSHIBA computer. It may be used to the examples specified here. Utilities TOSHIBA Service Station 161 TOSHIBA Service Station The TOSHIBA Service Station helps you keep your new computer running at its best by notifying you wish. It alerts users...
... includes device operation time and number of actuations or status changes (e.g.: number of power button and Fn key combination uses, and AC adaptor, battery, LCD, fan, HDD, sound volume, wireless communication switch, docking and USB information), date of your TOSHIBA computer. It may be used to the examples specified here. Utilities TOSHIBA Service Station 161 TOSHIBA Service Station The TOSHIBA Service Station helps you keep your new computer running at its best by notifying you wish. It alerts users...
User Manual
Page 166
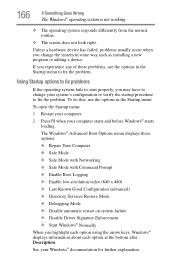
... Known Good Configuration (advanced) ❖ Directory Services Restore Mode ❖ Debugging Mode ❖ Disable automatic restart on system failure ❖ Disable Driver Signature Enforcement ❖ Start Windows® Normally When you may have to fix the problem. To do this, use the options in the Startup menu to change the system in the Startup menu. The Windows® Advanced Boot Options menu displays these problems, use the options in some way such as installing a new program or adding a device. 166...
... Known Good Configuration (advanced) ❖ Directory Services Restore Mode ❖ Debugging Mode ❖ Disable automatic restart on system failure ❖ Disable Driver Signature Enforcement ❖ Start Windows® Normally When you may have to fix the problem. To do this, use the options in the Startup menu to change the system in the Startup menu. The Windows® Advanced Boot Options menu displays these problems, use the options in some way such as installing a new program or adding a device. 166...
User Manual
Page 172
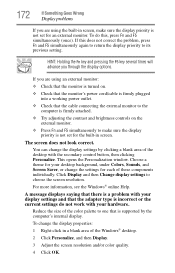
... the monitor's power cord/cable is firmly plugged into a working power outlet. ❖ Check that the cable connecting the external monitor to the computer is firmly attached. ❖ Try adjusting the contrast and brightness controls on the external monitor. ❖ Press Fn and F5 simultaneously to one that is supported by clicking a blank area of the desktop with your hardware. You can change the display settings by the computer's internal display...
... the monitor's power cord/cable is firmly plugged into a working power outlet. ❖ Check that the cable connecting the external monitor to the computer is firmly attached. ❖ Try adjusting the contrast and brightness controls on the external monitor. ❖ Press Fn and F5 simultaneously to one that is supported by clicking a blank area of the desktop with your hardware. You can change the display settings by the computer's internal display...

User Manual
Page 178
....toshiba.com. Try making a test transmission to check this. See if your work exactly as it . Make sure the cable from the way they print it will be for more information. Make sure the line has a dial tone. Many programs display information on the screen. Contact the software manufacturer for networking problems, specifically wireless (Wi-Fi®) networking. Modem problems (Available on certain models.) This section lists...
....toshiba.com. Try making a test transmission to check this. See if your work exactly as it . Make sure the cable from the way they print it will be for more information. Make sure the line has a dial tone. Many programs display information on the screen. Contact the software manufacturer for networking problems, specifically wireless (Wi-Fi®) networking. Modem problems (Available on certain models.) This section lists...

User Manual
Page 184
... for installing hardware and software Here are also widely available. Before installing anything goes wrong, you create and store on battery power. Fortunately, the Windows® operating system offers a convenient way to back up the computer while running on its internal storage drive. Since problems with restore points" on -screen instructions to set a restore point (see the section titled restore points). Follow the on page 182). External optical disc writers...
... for installing hardware and software Here are also widely available. Before installing anything goes wrong, you create and store on battery power. Fortunately, the Windows® operating system offers a convenient way to back up the computer while running on its internal storage drive. Since problems with restore points" on -screen instructions to set a restore point (see the section titled restore points). Follow the on page 182). External optical disc writers...
User Manual
Page 214
... computer was turned off . HDMI-CEC (HDMI Consumer Electronics Control) - When you turn on the motherboard to help improve processing speed. See also Sleep, Suspend. internal device - A key or combination of keys that you turn the computer off . The decentralized, world-wide network of using this function, if connected with the Fn key can control another while using a pointing device such as the battery save mode. (2) A key or combination of keys that represents a function, file...
... computer was turned off . HDMI-CEC (HDMI Consumer Electronics Control) - When you turn on the motherboard to help improve processing speed. See also Sleep, Suspend. internal device - A key or combination of keys that you turn the computer off . The decentralized, world-wide network of using this function, if connected with the Fn key can control another while using a pointing device such as the battery save mode. (2) A key or combination of keys that represents a function, file...
User Manual
Page 224
... 91 using 89 hot key disabling or enabling wireless devices 201 display brightness 200 Hibernation mode 198 keyboard overlays 204 Lock (Instant security) 195 Output (Display switch) 199 power plan 196 Sleep mode 197 using to set a power plan 123 volume mute 194 Zoom (Display resolution) 203 zooming in 204 zooming out 204 Hot Key Cards 190 Hot key functions 194 I icon desktop 132 moving to desktop 132 recycle bin 132 safety 39 installation memory module 51 installing a charged battery 126 battery 124 memory modules 50 mouse 82 Instruction Manual...
... 91 using 89 hot key disabling or enabling wireless devices 201 display brightness 200 Hibernation mode 198 keyboard overlays 204 Lock (Instant security) 195 Output (Display switch) 199 power plan 196 Sleep mode 197 using to set a power plan 123 volume mute 194 Zoom (Display resolution) 203 zooming in 204 zooming out 204 Hot Key Cards 190 Hot key functions 194 I icon desktop 132 moving to desktop 132 recycle bin 132 safety 39 installation memory module 51 installing a charged battery 126 battery 124 memory modules 50 mouse 82 Instruction Manual...

User Manual
Page 228
... Installer 148 TOSHIBA Assist 143 Connect tab 144 Optimize tab 147 Protect & Fix tab 146 Secure tab 145 TOSHIBA eco power plan 124 TOSHIBA eco Utility™ 160 TOSHIBA Face Recognition Utility 153 TOSHIBA Hardware Setup 156 TOSHIBA PC Diagnostic Tool Utility 154 TOSHIBA PC Health Monitor 161 TOSHIBA Service Station 161 TOSHIBA Zooming Utility 158 TouchPad™ using 75 traveling tips 130 troubleshooting BD player general problems 180 DVD player general problems 180 external keyboard 171 keyboard 171 optical disc drive...
... Installer 148 TOSHIBA Assist 143 Connect tab 144 Optimize tab 147 Protect & Fix tab 146 Secure tab 145 TOSHIBA eco power plan 124 TOSHIBA eco Utility™ 160 TOSHIBA Face Recognition Utility 153 TOSHIBA Hardware Setup 156 TOSHIBA PC Diagnostic Tool Utility 154 TOSHIBA PC Health Monitor 161 TOSHIBA Service Station 161 TOSHIBA Zooming Utility 158 TouchPad™ using 75 traveling tips 130 troubleshooting BD player general problems 180 DVD player general problems 180 external keyboard 171 keyboard 171 optical disc drive...
User Guide 2
Page 30
... custom size partition 63 Recovering without changing the internal storage drive partitions 66 Creating recovery DVDs/media 68 Restoring from recovery DVDs/media 71 Erasing the Internal Storage Drive 73 Checking the internal storage drive operating status 74 Installing drivers and applications 75 Using the TouchPad 75 Adjusting TouchPad™ settings 78 Disabling or enabling the TouchPad 79 Using external display devices 79 Selecting video cables 80 Connecting an HDMI™-compatible television or external display device............80 Connecting an external monitor or projector...
... custom size partition 63 Recovering without changing the internal storage drive partitions 66 Creating recovery DVDs/media 68 Restoring from recovery DVDs/media 71 Erasing the Internal Storage Drive 73 Checking the internal storage drive operating status 74 Installing drivers and applications 75 Using the TouchPad 75 Adjusting TouchPad™ settings 78 Disabling or enabling the TouchPad 79 Using external display devices 79 Selecting video cables 80 Connecting an HDMI™-compatible television or external display device............80 Connecting an external monitor or projector...
User Guide 2
Page 58
... block the vents located at the base of computer Slot B Slot A (Sample Illustration) Removing the memory module 4 Replace the memory module slot cover and secure it out of the computer. Make sure to a power outlet (even if your computer and AC adaptor have adequate ventilation and are protected from the work surface before restarting the computer. Always make sure your computer is turned on page 126...
... block the vents located at the base of computer Slot B Slot A (Sample Illustration) Removing the memory module 4 Replace the memory module slot cover and secure it out of the computer. Make sure to a power outlet (even if your computer and AC adaptor have adequate ventilation and are protected from the work surface before restarting the computer. Always make sure your computer is turned on page 126...
User Guide 2
Page 80
... your television. Connecting an external monitor or projector You can easily attach an external monitor or projector to your computer if you can change the display settings by pressing Fn + F5, or by configuring the display properties settings. Your computer will automatically detect the external display device. Refer to the manual that came with the television for more information. 80 Getting Started Using external display devices Selecting video cables To connect a device to a live...
... your television. Connecting an external monitor or projector You can easily attach an external monitor or projector to your computer if you can change the display settings by pressing Fn + F5, or by configuring the display properties settings. Your computer will automatically detect the external display device. Refer to the manual that came with the television for more information. 80 Getting Started Using external display devices Selecting video cables To connect a device to a live...

User Guide 2
Page 152
... the User Password icon. 4 Click Not Registered. 5 Follow the on-screen instructions to exit. The TOSHIBA Assist window appears. 2 On the left side, click the Secure tab. 3 Click the User Password icon. 4 Click Registered. 5 Enter your password, and then enter it again to verify. 6 Click OK. 7 Click OK to remove the user password. Deleting a user password To cancel the power-on password functions: 1 Click Start, All Programs, TOSHIBA, Utilities, and then TOSHIBA Assist...
... the User Password icon. 4 Click Not Registered. 5 Follow the on-screen instructions to exit. The TOSHIBA Assist window appears. 2 On the left side, click the Secure tab. 3 Click the User Password icon. 4 Click Registered. 5 Enter your password, and then enter it again to verify. 6 Click OK. 7 Click OK to remove the user password. Deleting a user password To cancel the power-on password functions: 1 Click Start, All Programs, TOSHIBA, Utilities, and then TOSHIBA Assist...
User Guide 2
Page 178
... the telephone line is ON (the wireless indicator light will not receive or transmit properly. This mode lets you see Windows® Help and Support or contact your computer technician. ❖ If your program has a print preview mode. The other system may be set up to the computer's modem port and the telephone line jack. Many programs display information on the screen.
... the telephone line is ON (the wireless indicator light will not receive or transmit properly. This mode lets you see Windows® Help and Support or contact your computer technician. ❖ If your program has a print preview mode. The other system may be set up to the computer's modem port and the telephone line jack. Many programs display information on the screen.
User Guide 2
Page 184
... ensure safe and easy installation of your data. Since problems with restore points" on page 182). If anything , use the System Restore utility to back up files." Most of your computer system is the data you will Connect the AC adaptor before continuing. 1 Prepare your backup target by connecting it , the next most valuable component of new hardware (printers, pointing devices, external hard drives, optical disc drive writers...
... ensure safe and easy installation of your data. Since problems with restore points" on page 182). If anything , use the System Restore utility to back up files." Most of your computer system is the data you will Connect the AC adaptor before continuing. 1 Prepare your backup target by connecting it , the next most valuable component of new hardware (printers, pointing devices, external hard drives, optical disc drive writers...

User Guide 2
Page 214
... of using this function, if connected with the Fn key can set system options or control system parameters, such as a mouse. hot key - (1) A feature in digital format, providing better picture quality than main memory. interlaced - See device. K keyboard shortcut - L L1 (level one) cache - Memory cache installed on the screen that you turn on the computer again, your work is running and have the operating system automatically recognize the change. See also HDMI. internal device...
... of using this function, if connected with the Fn key can set system options or control system parameters, such as a mouse. hot key - (1) A feature in digital format, providing better picture quality than main memory. interlaced - See device. K keyboard shortcut - L L1 (level one) cache - Memory cache installed on the screen that you turn on the computer again, your work is running and have the operating system automatically recognize the change. See also HDMI. internal device...
User Guide 2
Page 228
... Installer 148 TOSHIBA Assist 143 Connect tab 144 Optimize tab 147 Protect & Fix tab 146 Secure tab 145 TOSHIBA eco power plan 124 TOSHIBA eco Utility™ 160 TOSHIBA Face Recognition Utility 153 TOSHIBA Hardware Setup 156 TOSHIBA PC Diagnostic Tool Utility 154 TOSHIBA PC Health Monitor 161 TOSHIBA Service Station 161 TOSHIBA Zooming Utility 158 TouchPad™ using 75 traveling tips 130 troubleshooting BD player general problems 180 DVD player general problems 180 external keyboard 171 keyboard 171 optical disc drive...
... Installer 148 TOSHIBA Assist 143 Connect tab 144 Optimize tab 147 Protect & Fix tab 146 Secure tab 145 TOSHIBA eco power plan 124 TOSHIBA eco Utility™ 160 TOSHIBA Face Recognition Utility 153 TOSHIBA Hardware Setup 156 TOSHIBA PC Diagnostic Tool Utility 154 TOSHIBA PC Health Monitor 161 TOSHIBA Service Station 161 TOSHIBA Zooming Utility 158 TouchPad™ using 75 traveling tips 130 troubleshooting BD player general problems 180 DVD player general problems 180 external keyboard 171 keyboard 171 optical disc drive...


